
Epson Scan ICM Updater v1.20 (PSB.2008.07.001)
Page 1
...A Total Pages: 1 All Scanners and All-in-One's using Epson Scan Epson Scan ICM updater v.1.20 for Epson Scan-affects all driver versions up to select ICM Adobe RGB, Apple RGB or ColorMatch RGB color profiles from the Epson Scan ICM pull-down menu (under Color tab in the Configuration menu).... when attempting to and including 3.4xA Note: Scanners/All-in-One's using Epson Scan 3.5xA or later already include the latest ICM module and are not affected. Click on the filename. Note: Installation completes in Epson Scan when Adobe's Color Management Module (CMM) has also been installed on...
...A Total Pages: 1 All Scanners and All-in-One's using Epson Scan Epson Scan ICM updater v.1.20 for Epson Scan-affects all driver versions up to select ICM Adobe RGB, Apple RGB or ColorMatch RGB color profiles from the Epson Scan ICM pull-down menu (under Color tab in the Configuration menu).... when attempting to and including 3.4xA Note: Scanners/All-in-One's using Epson Scan 3.5xA or later already include the latest ICM module and are not affected. Click on the filename. Note: Installation completes in Epson Scan when Adobe's Color Management Module (CMM) has also been installed on...
Product Brochure
Page 2
...) Scanner Specifications Scanner Type Color flatbed Photoelectric Device Color CIS line sensor Optical Resolution 1200 dpi Hardware Resolution 1200 x 2400 dpi Maximum Resolution 9600 x 9600 dpi interpolated Scanner Bit Depth 48-bit color Standalone Color Copier Specifications Copy Quality Color: ...under glass or properly store them. Visit www.wilhelm-research.com for more information about cartridges. ††† Adapter required Packaging Specifications Epson Stylus CX9400Fax Single Carton Dimensions 21.1" x 18.7" x 11.7" (W x D x H) Weight 21.8 lb Pallet 44.9" x 39.0" x 86.6"...
...) Scanner Specifications Scanner Type Color flatbed Photoelectric Device Color CIS line sensor Optical Resolution 1200 dpi Hardware Resolution 1200 x 2400 dpi Maximum Resolution 9600 x 9600 dpi interpolated Scanner Bit Depth 48-bit color Standalone Color Copier Specifications Copy Quality Color: ...under glass or properly store them. Visit www.wilhelm-research.com for more information about cartridges. ††† Adapter required Packaging Specifications Epson Stylus CX9400Fax Single Carton Dimensions 21.1" x 18.7" x 11.7" (W x D x H) Weight 21.8 lb Pallet 44.9" x 39.0" x 86.6"...
Product Information Guide
Page 1
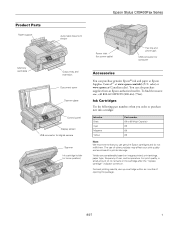
...quality and could result in printer damage. Epson Stylus CX9400Fax Series Product Parts Paper support Automatic document feeder Memory card slots Output tray and extension Document cover Scanner glass Control panel Display screen USB connector for digital camera Scanner Ink cartridge holder (in home position) ...an Epson authorized reseller. You can purchase genuine Epson® ink and paper at Epson Supplies CentralSM at www.epson.com/ink3 (U.S. Yields vary considerably based on . Ink Cartridges Use the following part numbers when you order or purchase new ink cartridges: Ink color Black...
...quality and could result in printer damage. Epson Stylus CX9400Fax Series Product Parts Paper support Automatic document feeder Memory card slots Output tray and extension Document cover Scanner glass Control panel Display screen USB connector for digital camera Scanner Ink cartridge holder (in home position) ...an Epson authorized reseller. You can purchase genuine Epson® ink and paper at Epson Supplies CentralSM at www.epson.com/ink3 (U.S. Yields vary considerably based on . Ink Cartridges Use the following part numbers when you order or purchase new ink cartridges: Ink color Black...
Product Information Guide
Page 3
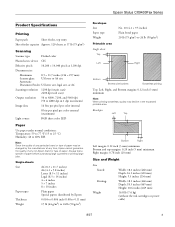
...) (without the ink cartridges or power cable) 8/07 3 Epson Stylus CX9400Fax Series Product Specifications Printing Paper path Sheet feeder, top entry Sheet feeder capacity Approx. 120 sheets at 17 lb (75 g/m2) Scanning Scanner type Flatbed color Photoelectric device CIS Effective pixels 10,200 × 14,040 ...pixels at 1200 dpi Document size Maximum: 8.5 × 11.7 inches (216 × 297 mm) Scanner glass: US letter or A4 size Automatic Document...
...) (without the ink cartridges or power cable) 8/07 3 Epson Stylus CX9400Fax Series Product Specifications Printing Paper path Sheet feeder, top entry Sheet feeder capacity Approx. 120 sheets at 17 lb (75 g/m2) Scanning Scanner type Flatbed color Photoelectric device CIS Effective pixels 10,200 × 14,040 ...pixels at 1200 dpi Document size Maximum: 8.5 × 11.7 inches (216 × 297 mm) Scanner glass: US letter or A4 size Automatic Document...
Product Information Guide
Page 6
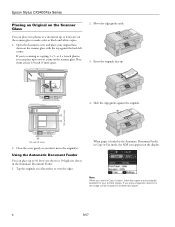
...on a flat surface to fit letter-size paper. 6 8/07 Using the Automatic Document Feeder You can place up to letter-size on the scanner glass to make color or black and white copies. 1. Slide the edge guides against the back left corner. Close the cover gently so you 're scanning or ... apart. 2. If you copy a legal-size document, the image will be cropped to even the edges. If you don't move the original(s). Epson Stylus CX9400Fax Series Placing an Original on the Scanner Glass You can place two photos or a document up to 30 letter-size sheets or 10 legal-size sheets in Copy or...
...on a flat surface to fit letter-size paper. 6 8/07 Using the Automatic Document Feeder You can place up to letter-size on the scanner glass to make color or black and white copies. 1. Slide the edge guides against the back left corner. Close the cover gently so you 're scanning or ... apart. 2. If you copy a legal-size document, the image will be cropped to even the edges. If you don't move the original(s). Epson Stylus CX9400Fax Series Placing an Original on the Scanner Glass You can place two photos or a document up to 30 letter-size sheets or 10 legal-size sheets in Copy or...
Product Information Guide
Page 7
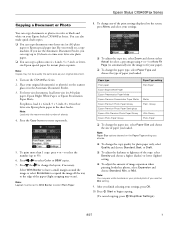
... the way to begin copying. (To cancel copying, press Stop/Clear Settings.) 8/07 7 Epson Stylus CX9400Fax Series Copying a Document or Photo You can copy documents or photos in color or black and white on your original document(s) or photo(s) on the scanner glass or in the sheet feeder. Note: Load only the recommended number of...
... the way to begin copying. (To cancel copying, press Stop/Clear Settings.) 8/07 7 Epson Stylus CX9400Fax Series Copying a Document or Photo You can copy documents or photos in color or black and white on your original document(s) or photo(s) on the scanner glass or in the sheet feeder. Note: Load only the recommended number of...
Product Information Guide
Page 8
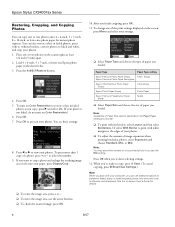
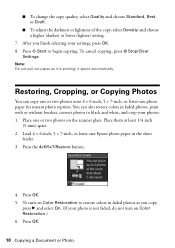
.... Press the 4×6/5×7/Restore button. 4. You see white borders on the scanner glass at the edges of your paper, press Display/Crop. 10. Paper Type Paper Type setting Epson Premium Photo Paper Glossy Prem. Or select With Border to print with your printed ... (5 mm) apart. 2. to restore colors in faded photos, print with trueto-life color and sharpness. When you're ready to black and white, and crop your settings. ❏ Select Paper Type and choose the type of a photo, press + or - Epson Stylus CX9400Fax Series Restoring, Cropping, and Copying Photos ...
.... Press the 4×6/5×7/Restore button. 4. You see white borders on the scanner glass at the edges of your paper, press Display/Crop. 10. Paper Type Paper Type setting Epson Premium Photo Paper Glossy Prem. Or select With Border to print with your printed ... (5 mm) apart. 2. to restore colors in faded photos, print with trueto-life color and sharpness. When you're ready to black and white, and crop your settings. ❏ Select Paper Type and choose the type of a photo, press + or - Epson Stylus CX9400Fax Series Restoring, Cropping, and Copying Photos ...
Product Information Guide
Page 10
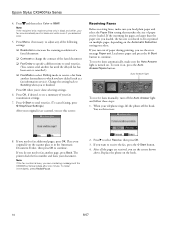
... which you see the screen shown above. When your original(s) on the scanner glass or in the Automatic Document Feeder, then press OK to select Receive, then press OK. 3. If you selected color. 5. Place your telephone rings, lift the phone off the Auto Answer ...larger than the paper size you loaded, the fax size is automatically sent in black and white, your fax transmission settings. 7. Epson Stylus CX9400Fax Series 4. Press and then select Color or B&W. Press r to continue. Press OK, if desired, to continue. Load more paper and press the x Start button ...
... which you see the screen shown above. When your original(s) on the scanner glass or in the Automatic Document Feeder, then press OK to select Receive, then press OK. 3. If you selected color. 5. Place your telephone rings, lift the phone off the Auto Answer ...larger than the paper size you loaded, the fax size is automatically sent in black and white, your fax transmission settings. 7. Epson Stylus CX9400Fax Series 4. Press and then select Color or B&W. Press r to continue. Press OK, if desired, to continue. Load more paper and press the x Start button ...
Product Information Guide
Page 14
... in printer damage. The use , and temperature. The printer ships with water. Open the scanner, then open ink cartridge packages until you have a new ink cartridge before you begin. Caution... 3. If a cartridge is used cartridge apart or try to touch the green chip on the Epson Stylus CX9400Fax Series. Do not to refill it carefully. Leave the expended cartridge(s) installed until you 're replacing...ink. Use the following part numbers when you order or purchase new ink cartridges: Ink color Black Cyan Magenta Yellow Part number 69 or 68 (High Capacity) 69 69 69 Note...
... in printer damage. The use , and temperature. The printer ships with water. Open the scanner, then open ink cartridge packages until you have a new ink cartridge before you begin. Caution... 3. If a cartridge is used cartridge apart or try to touch the green chip on the Epson Stylus CX9400Fax Series. Do not to refill it carefully. Leave the expended cartridge(s) installed until you 're replacing...ink. Use the following part numbers when you order or purchase new ink cartridges: Ink color Black Cyan Magenta Yellow Part number 69 or 68 (High Capacity) 69 69 69 Note...
Product Information Guide
Page 15
Close the scanner. 9. Caution: To conserve ink, never turn off the Epson Stylus CX9400Fax Series while ink is finished. Note: Banding may need to align the print head. Press OK when you see a completion message on the ... it to cancel printing of your software. Using the Control Panel 1. Macintosh: Open the Applications folder, open the EPSON Printer Utility2, select CX9400Fax Series, and click OK. Follow the on your software. Epson Stylus CX9400Fax Series 4. Load a few sheets of plain paper in the sheet feeder. 2. Insert the new ink cartridge into place...
Close the scanner. 9. Caution: To conserve ink, never turn off the Epson Stylus CX9400Fax Series while ink is finished. Note: Banding may need to align the print head. Press OK when you see a completion message on the ... it to cancel printing of your software. Using the Control Panel 1. Macintosh: Open the Applications folder, open the EPSON Printer Utility2, select CX9400Fax Series, and click OK. Follow the on your software. Epson Stylus CX9400Fax Series 4. Load a few sheets of plain paper in the sheet feeder. 2. Insert the new ink cartridge into place...

Product Information Guide
Page 16
...8/07 Clean the document cover with a little glass cleaner. Remove all the connected cables. 3. Close the scanner. 8. After unpacking the CX9400Fax Series, remove the tape securing the ink cartridge holder. When you print again in its original box or .... Unplug all the paper. 4. CPD-24115R1 CPD-24114 CPD-24159 CPD-23925R1 Epson Stylus CX9400Fax Series Start Here (English/French) Epson Stylus CX9400Fax Series Quick Guide (English) Epson Stylus CX9400Fax Series Quick Guide (French) Epson Stylus CX9400Fax Series CD-ROM with on the glass. 7. Do not use liquid or chemical...
...8/07 Clean the document cover with a little glass cleaner. Remove all the connected cables. 3. Close the scanner. 8. After unpacking the CX9400Fax Series, remove the tape securing the ink cartridge holder. When you print again in its original box or .... Unplug all the paper. 4. CPD-24115R1 CPD-24114 CPD-24159 CPD-23925R1 Epson Stylus CX9400Fax Series Start Here (English/French) Epson Stylus CX9400Fax Series Quick Guide (English) Epson Stylus CX9400Fax Series Quick Guide (French) Epson Stylus CX9400Fax Series CD-ROM with on the glass. 7. Do not use liquid or chemical...
Quick Reference Guide
Page 2
Contents Loading Paper 4 Using Special Papers 5 Placing Originals for Copying, Scanning, or Faxing 7 Using the Scanner Glass 7 Using the Automatic Document Feeder 8 Copying a Document or Photo 9 Copying a Document 9 Restoring, Cropping, or Copying Photos 10 Faxing a Document or Photo 13 Connecting a Phone ...
Contents Loading Paper 4 Using Special Papers 5 Placing Originals for Copying, Scanning, or Faxing 7 Using the Scanner Glass 7 Using the Automatic Document Feeder 8 Copying a Document or Photo 9 Copying a Document 9 Restoring, Cropping, or Copying Photos 10 Faxing a Document or Photo 13 Connecting a Phone ...

Quick Reference Guide
Page 7
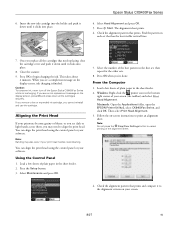
... Placing Originals for Copying, Scanning, or Faxing Before you 're scanning 3 × 5- Open the document cover and place your documents or photos on the scanner glass (below) or in the Automatic Document Feeder (see page 8). or 4 × 6-inch photos, you don't move the original(s). Close the cover ...gently so you can place two photos or a document up to make color or black and white copies. 1. Using the Scanner Glass You can place up to letter-size on the scanner glass to two at least 1/4 inch (5 mm) apart. 1/4 inch (5 mm) 2. If you copy,...
... Placing Originals for Copying, Scanning, or Faxing Before you 're scanning 3 × 5- Open the document cover and place your documents or photos on the scanner glass (below) or in the Automatic Document Feeder (see page 8). or 4 × 6-inch photos, you don't move the original(s). Close the cover ...gently so you can place two photos or a document up to make color or black and white copies. 1. Using the Scanner Glass You can place up to letter-size on the scanner glass to two at least 1/4 inch (5 mm) apart. 1/4 inch (5 mm) 2. If you copy,...
Quick Reference Guide
Page 9
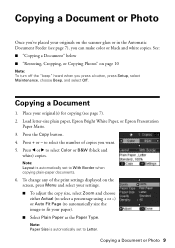
...■ "Copying a Document" below ■ "Restoring, Cropping, or Copying Photos" on the scanner glass or in the Automatic Document Feeder (see page 7). 2. Note: Paper Size is automatically set to select Color or B&W (black and white) copies. Copying a Document 1. Copying a Document or Photo Once you...'ve placed your paper). ■ Select Plain Paper as the Paper Type. Press l or r to Letter. Load letter-size plain paper, Epson Bright White Paper, or Epson Presentation Paper ...
...■ "Copying a Document" below ■ "Restoring, Cropping, or Copying Photos" on the scanner glass or in the Automatic Document Feeder (see page 7). 2. Note: Paper Size is automatically set to select Color or B&W (black and white) copies. Copying a Document 1. Copying a Document or Photo Once you...'ve placed your paper). ■ Select Plain Paper as the Paper Type. Press l or r to Letter. Load letter-size plain paper, Epson Bright White Paper, or Epson Presentation Paper ...
Quick Reference Guide
Page 10
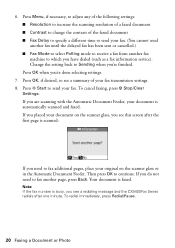
..., and crop your photos. 1. Load 4 × 6-inch, 5 × 7-inch, or letter-size Epson photo paper in faded photos as it ejects automatically. it is not faded, do not turn on Color Restoration to begin copying. Place one or two photos onto 4 × 6-inch, 5 × 7-inch,...you finish selecting your photo is printing; You can copy one or two photos on Color Restoration.) 6. Press the 4×6/5×7/Restore button. 4. Place them at least 1/4 inch (5 mm) apart. 2. To turn on the scanner glass. After you copy, press r and select On. (If your settings, press ...
..., and crop your photos. 1. Load 4 × 6-inch, 5 × 7-inch, or letter-size Epson photo paper in faded photos as it ejects automatically. it is not faded, do not turn on Color Restoration to begin copying. Place one or two photos onto 4 × 6-inch, 5 × 7-inch,...you finish selecting your photo is printing; You can copy one or two photos on Color Restoration.) 6. Press the 4×6/5×7/Restore button. 4. Place them at least 1/4 inch (5 mm) apart. 2. To turn on the scanner glass. After you copy, press r and select On. (If your settings, press ...
Quick Reference Guide
Page 20
...document is scanned: If you need to which you have dialed (such as a fax information service). Press x Start to send your original on the scanner glass or in the Automatic Document Feeder. To cancel faxing, press y Stop/Clear Settings. Note: If the fax number is busy, you are scanning ... any of the following settings: ■ Resolution to increase the scanning resolution of a faxed document ■ Contrast to see a redialing message and the CX9400Fax Series redials after the first page is faxed. Press OK, if desired, to change the contrast of your fax transmission settings. 8.
...document is scanned: If you need to which you have dialed (such as a fax information service). Press x Start to send your original on the scanner glass or in the Automatic Document Feeder. To cancel faxing, press y Stop/Clear Settings. Note: If the fax number is busy, you are scanning ... any of the following settings: ■ Resolution to increase the scanning resolution of a faxed document ■ Contrast to see a redialing message and the CX9400Fax Series redials after the first page is faxed. Press OK, if desired, to change the contrast of your fax transmission settings. 8.
Quick Reference Guide
Page 31
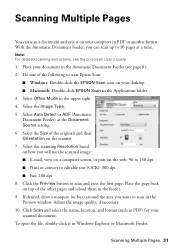
... in the upper right. 4. If desired, draw a marquee (or box) around the area you want to start Epson Scan: ■ Windows: Double-click the EPSON Scan icon on your scanned document. To open the file, double-click it on your document in the Preview window. Place the...Feeder) as PDF) for your computer in PDF or another format. Select Office Mode in the Applications folder. 3. Select the scanning Resolution based on the scanner. 7. Scanning Multiple Pages 31 Note: For detailed scanning instructions, see page 8). 2. Select the Image Type. 5. Scanning Multiple Pages You can scan ...
... in the upper right. 4. If desired, draw a marquee (or box) around the area you want to start Epson Scan: ■ Windows: Double-click the EPSON Scan icon on your scanned document. To open the file, double-click it on your document in the Preview window. Place the...Feeder) as PDF) for your computer in PDF or another format. Select Office Mode in the Applications folder. 3. Select the scanning Resolution based on the scanner. 7. Scanning Multiple Pages 31 Note: For detailed scanning instructions, see page 8). 2. Select the Image Type. 5. Scanning Multiple Pages You can scan ...

Quick Reference Guide
Page 36
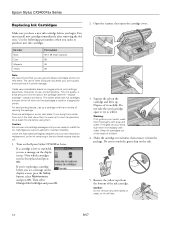
You must install new cartridges immediately after removing the old ones. Cartridges are ready to maintain reliability. Open the scanner, then open ink cartridge packages until you have a new ink cartridge before you see a message on the display screen. Leave the expended cartridge...it carefully. Caution: Do not open the cartridge cover. 3. Then select Change Ink Cartridge and press OK. 2. Warning: If ink gets on the CX9400Fax Series. Turn on your eyes, flush them thoroughly with water. If you're replacing a cartridge before you begin. Do not take the used cartridge ...
You must install new cartridges immediately after removing the old ones. Cartridges are ready to maintain reliability. Open the scanner, then open ink cartridge packages until you have a new ink cartridge before you see a message on the display screen. Leave the expended cartridge...it carefully. Caution: Do not open the cartridge cover. 3. Then select Change Ink Cartridge and press OK. 2. Warning: If ink gets on the CX9400Fax Series. Turn on your eyes, flush them thoroughly with water. If you're replacing a cartridge before you begin. Do not take the used cartridge ...

Quick Reference Guide
Page 37
Press OK to touch the green chip on the side. 5. Caution: To conserve ink, never turn off the CX9400Fax Series while ink is finished. This takes about 2 minutes. Shake the cartridge several times, then remove it clicks into place. 7. If you see an ink ... push it down until it from the bottom of the ink cartridge. Replacing Ink Cartridges 37 4. Do not to begin charging the ink. Close the scanner. 9. Once you cannot reinstall and use the cartridge.
Press OK to touch the green chip on the side. 5. Caution: To conserve ink, never turn off the CX9400Fax Series while ink is finished. This takes about 2 minutes. Shake the cartridge several times, then remove it clicks into place. 7. If you see an ink ... push it down until it from the bottom of the ink cartridge. Replacing Ink Cartridges 37 4. Do not to begin charging the ink. Close the scanner. 9. Once you cannot reinstall and use the cartridge.
Quick Reference Guide
Page 38
... 're having trouble using your Epson CX9400Fax Series software. You can also check the basic troubleshooting suggestions beginning on page 38 or see the on-screen User's Guide for free updates to your all-in sleep mode to save power. Also select EPSON Scan and click EPSON Stylus CX9400Fax Series Scanner Driver Update. Open your paper is... the messages on the display screen to diagnose the cause of most problems. You can also click Start or , select Programs or All Programs, select EPSON, and click EPSON Stylus CX9400Fax Series Driver Update.
... 're having trouble using your Epson CX9400Fax Series software. You can also check the basic troubleshooting suggestions beginning on page 38 or see the on-screen User's Guide for free updates to your all-in sleep mode to save power. Also select EPSON Scan and click EPSON Stylus CX9400Fax Series Scanner Driver Update. Open your paper is... the messages on the display screen to diagnose the cause of most problems. You can also click Start or , select Programs or All Programs, select EPSON, and click EPSON Stylus CX9400Fax Series Driver Update.


