Product Information Guide
Page 7
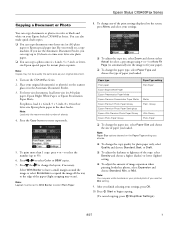
... 1 copy, press + or - Glossy Ultra Glossy Photo Paper ❏ To change the layout, if necessary. Turn on the Paper Type setting you would on your Epson Stylus CX9400Fax Series. to select the number (up to change the paper size, select Paper Size and choose the size of paper... a percentage using + or -) or Auto Fit Page (to automatically size the image to 99). 6. Epson Stylus CX9400Fax Series Copying a Document or Photo You can copy documents or photos in color or black and white on a copy machine. Note: Load only the recommended number of image expansion when ...
... 1 copy, press + or - Glossy Ultra Glossy Photo Paper ❏ To change the layout, if necessary. Turn on the Paper Type setting you would on your Epson Stylus CX9400Fax Series. to select the number (up to change the paper size, select Paper Size and choose the size of paper... a percentage using + or -) or Auto Fit Page (to automatically size the image to 99). 6. Epson Stylus CX9400Fax Series Copying a Document or Photo You can copy documents or photos in color or black and white on a copy machine. Note: Load only the recommended number of image expansion when ...
Product Information Guide
Page 8
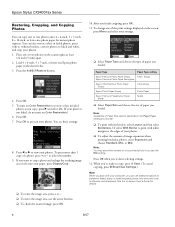
...of Paper Size options depends on -screen User's Guide for instant photo reprints. You can also restore colors in faded photos, print with your computer, you loaded. To turn on your photos. Press OK to view your printed photo if you choose. ❏ To print ...the size of a photo, press + or - Or select With Border to select the number. 9. Note: You may see these settings: 8. Epson Stylus CX9400Fax Series Restoring, Cropping, and Copying Photos You can use additional options to fit onto your photos. 1. Note: Availability of image expansion when printing borderless...
...of Paper Size options depends on -screen User's Guide for instant photo reprints. You can also restore colors in faded photos, print with your computer, you loaded. To turn on your photos. Press OK to view your printed photo if you choose. ❏ To print ...the size of a photo, press + or - Or select With Border to select the number. 9. Note: You may see these settings: 8. Epson Stylus CX9400Fax Series Restoring, Cropping, and Copying Photos You can use additional options to fit onto your photos. 1. Note: Availability of image expansion when printing borderless...
Product Information Guide
Page 10
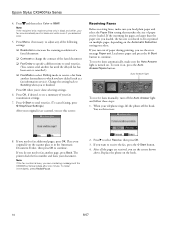
...and select the Paper Size setting that matches the size of paper during printing, you selected color. 5. You see a summary of the faxed document ❏ Fax Delay to specify a different time to send your fax is turned on the scanner glass or in black and white, your fax. (You cannot send ...or printed on multiple pages, depending on the hook. 10 8/07 Replace the phone on the Automatic Reduction setting you 've loaded. When your document. Epson Stylus CX9400Fax Series 4. If the incoming fax pages are received, you 're done selecting settings. 6. Press and then select...
...and select the Paper Size setting that matches the size of paper during printing, you selected color. 5. You see a summary of the faxed document ❏ Fax Delay to specify a different time to send your fax is turned on the scanner glass or in black and white, your fax. (You cannot send ...or printed on multiple pages, depending on the hook. 10 8/07 Replace the phone on the Automatic Reduction setting you 've loaded. When your document. Epson Stylus CX9400Fax Series 4. If the incoming fax pages are received, you 're done selecting settings. 6. Press and then select...
Product Information Guide
Page 11
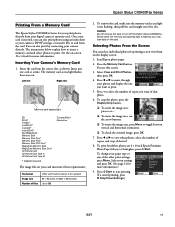
... through your digital camera's memory card. To print borderless photos on -screen User's Guide for more information.) 9. Epson Stylus CX9400Fax Series Printing From a Memory Card The Epson Stylus CX9400Fax Series lets you want to print. 5. Selecting Photos From the Screen You can select individual photos for more information....your settings and press OK. (See page 12 for printing as shown. Caution: Do not remove the card or turn off the Epson Stylus CX9400Fax Series while the memory card access light is not flashing, then pull the card straight out of files JPEG with...
... through your digital camera's memory card. To print borderless photos on -screen User's Guide for more information.) 9. Epson Stylus CX9400Fax Series Printing From a Memory Card The Epson Stylus CX9400Fax Series lets you want to print. 5. Selecting Photos From the Screen You can select individual photos for more information....your settings and press OK. (See page 12 for printing as shown. Caution: Do not remove the card or turn off the Epson Stylus CX9400Fax Series while the memory card access light is not flashing, then pull the card straight out of files JPEG with...
Product Information Guide
Page 13
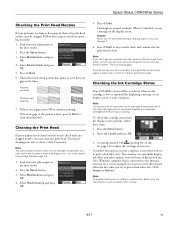
...can optionally display ink offers and other cartridges are clean Nozzles need cleaning 7. Follow these steps: 1. Nozzles are not expended. Caution: Never turn off the printer during a cleaning cycle or you try to print when ink is faint, press x Start to clean the print head. ... cartridge, if necessary. This window can clean the print head. Note: To disable checking for ink offers or updates from Epson, see page 14). 1. Epson Stylus CX9400Fax Series Checking the Print Head Nozzles If your printouts are no gaps, press OK to continue printing. Select Nozzle Check and press...
...can optionally display ink offers and other cartridges are clean Nozzles need cleaning 7. Follow these steps: 1. Nozzles are not expended. Caution: Never turn off the printer during a cleaning cycle or you try to print when ink is faint, press x Start to clean the print head. ... cartridge, if necessary. This window can clean the print head. Note: To disable checking for ink offers or updates from Epson, see page 14). 1. Epson Stylus CX9400Fax Series Checking the Print Head Nozzles If your printouts are no gaps, press OK to continue printing. Select Nozzle Check and press...
Product Information Guide
Page 14
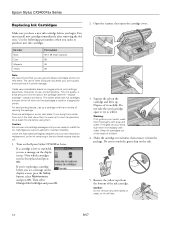
... "replace cartridge" indicator comes on the cartridge and lift it carefully. Use the following part numbers when you order or purchase new ink cartridges: Ink color Black Cyan Magenta Yellow Part number 69 or 68 (High Capacity) 69 69 69 Note: We recommend that you have a new ink cartridge before using... to be replaced and press OK. Note which cartridges need to touch the green chip on the display screen. Yields vary considerably based on the Epson Stylus CX9400Fax Series. Turn on images printed, print settings, paper type, frequency of use up .
... "replace cartridge" indicator comes on the cartridge and lift it carefully. Use the following part numbers when you order or purchase new ink cartridges: Ink color Black Cyan Magenta Yellow Part number 69 or 68 (High Capacity) 69 69 69 Note: We recommend that you have a new ink cartridge before using... to be replaced and press OK. Note which cartridges need to touch the green chip on the display screen. Yields vary considerably based on the Epson Stylus CX9400Fax Series. Turn on images printed, print settings, paper type, frequency of use up .
Product Information Guide
Page 15
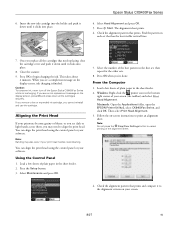
Once you replace all the cartridges securely. This takes about 2 minutes. Caution: To conserve ink, never turn off the Epson Stylus CX9400Fax Series while ink is finished. If you remove a low or expended ink cartridge, you 're done. You can align ...paper in the sheet feeder. 2. Close the scanner. 9. Select Maintenance and press OK. 7. Epson Stylus CX9400Fax Series 4. The alignment sheet prints. 6. Macintosh: Open the Applications folder, open the EPSON Printer Utility2, select CX9400Fax Series, and click OK. Check the alignment pattern that prints and compare it clicks into place....
Once you replace all the cartridges securely. This takes about 2 minutes. Caution: To conserve ink, never turn off the Epson Stylus CX9400Fax Series while ink is finished. If you remove a low or expended ink cartridge, you 're done. You can align ...paper in the sheet feeder. 2. Close the scanner. 9. Select Maintenance and press OK. 7. Epson Stylus CX9400Fax Series 4. The alignment sheet prints. 6. Macintosh: Open the Applications folder, open the EPSON Printer Utility2, select CX9400Fax Series, and click OK. Check the alignment pattern that prints and compare it clicks into place....

Product Information Guide
Page 16
... Here (English/French) Epson Stylus CX9400Fax Series Quick Guide (English) Epson Stylus CX9400Fax Series Quick Guide (French) Epson Stylus CX9400Fax Series CD-ROM with a soft, dry cloth. Clean the LCD screen with on-screen User's Guide (English/French) 16 8/07 Clean the scanner glass with a soft, lint-free cloth moistened with a little glass cleaner. Turn off the CX9400Fax Series. 2. Related Documentation...
... Here (English/French) Epson Stylus CX9400Fax Series Quick Guide (English) Epson Stylus CX9400Fax Series Quick Guide (French) Epson Stylus CX9400Fax Series CD-ROM with a soft, dry cloth. Clean the LCD screen with on-screen User's Guide (English/French) 16 8/07 Clean the scanner glass with a soft, lint-free cloth moistened with a little glass cleaner. Turn off the CX9400Fax Series. 2. Related Documentation...

Start Here
Page 1
Start Here Epson Stylus® CX9400Fax Series 1 Unpack (Included for Canada only) Caution: Do not open ink cartridge packages until you are vacuum packed to maintain reliability. If anything is missing, contact Epson as described on 1 Connect the power cable. Remove the tape. 2 Turn on the back in "Any questions?". Caution: Do not connect to install the ink. Cartridges are ready to your computer yet. 2 Press the On button.
Start Here Epson Stylus® CX9400Fax Series 1 Unpack (Included for Canada only) Caution: Do not open ink cartridge packages until you are vacuum packed to maintain reliability. If anything is missing, contact Epson as described on 1 Connect the power cable. Remove the tape. 2 Turn on the back in "Any questions?". Caution: Do not connect to install the ink. Cartridges are ready to your computer yet. 2 Press the On button.
Start Here Book (with wireless print server)
Page 12
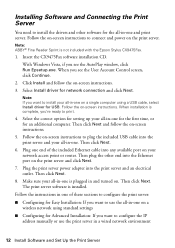
... outlet. Follow the instructions in a wired network environment 12 Install Software and Set Up the Print Server Select Install driver for the all -in and turned on a single computer using standard settings ■ Configuring for Advanced Installation: If you want to use the print server in one . Note: ABBY® Fine.... Plug the print server power adapter into any available port on -screen instructions. Then click Next. 8. The print server software is not included with the Epson Stylus CX9475Fax. 1.
... outlet. Follow the instructions in a wired network environment 12 Install Software and Set Up the Print Server Select Install driver for the all -in and turned on a single computer using standard settings ■ Configuring for Advanced Installation: If you want to use the print server in one . Note: ABBY® Fine.... Plug the print server power adapter into any available port on -screen instructions. Then click Next. 8. The print server software is not included with the Epson Stylus CX9475Fax. 1.


