Product Brochure
Page 1
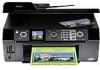
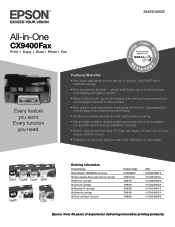
...to six times longer than leading competitive prints** • Make multiple color copies effortlessly with individual ink cartridges Ordering Information Product Name Epson Stylus® CX9400Fax all-in-one -touch copying; Features/Benefits • Print black-and-white or color text up to 400 percent •... Fax, copy or scan documents in seconds with built-in -One CX9400Fax Print | Copy | Scan | ...
...to six times longer than leading competitive prints** • Make multiple color copies effortlessly with individual ink cartridges Ordering Information Product Name Epson Stylus® CX9400Fax all-in-one -touch copying; Features/Benefits • Print black-and-white or color text up to 400 percent •... Fax, copy or scan documents in seconds with built-in -One CX9400Fax Print | Copy | Scan | ...
Product Brochure
Page 2
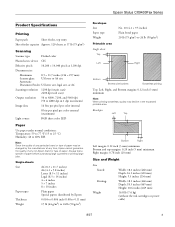
...required Packaging Specifications Epson Stylus CX9400Fax Single Carton Dimensions 21.1" x 18.7" x 11.7" (W x D x H) Weight 21.8 lb Pallet 44.9" x 39.0" x 86.6" (W x D x H) Number of use and temperature. Epson, Epson Stylus, Epson PRINT Image Matching and MicroPiezo are based on . Copyright 2008 Epson America, Inc.... PictBridge™ port (print from start of prints on specialty media, displayed indoors, under glass or properly store them. Epson CX9400Fax All-in-One Specifications Printer Specifications Printing Technology 4-color drop-on images printed, print settings, paper type, ...
...required Packaging Specifications Epson Stylus CX9400Fax Single Carton Dimensions 21.1" x 18.7" x 11.7" (W x D x H) Weight 21.8 lb Pallet 44.9" x 39.0" x 86.6" (W x D x H) Number of use and temperature. Epson, Epson Stylus, Epson PRINT Image Matching and MicroPiezo are based on . Copyright 2008 Epson America, Inc.... PictBridge™ port (print from start of prints on specialty media, displayed indoors, under glass or properly store them. Epson CX9400Fax All-in-One Specifications Printer Specifications Printing Technology 4-color drop-on images printed, print settings, paper type, ...
Product Information Guide
Page 1
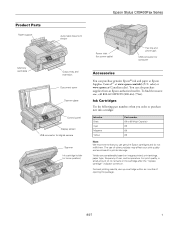
sales) or www.epson.ca (Canadian sales). Epson Stylus CX9400Fax Series Product Parts Paper support Automatic document feeder Memory card slots Output tray and extension Document cover Scanner glass Control panel Display screen USB connector for computer Accessories You can also purchase supplies from an Epson authorized reseller. For print quality, a small amount of ink remains in...
sales) or www.epson.ca (Canadian sales). Epson Stylus CX9400Fax Series Product Parts Paper support Automatic document feeder Memory card slots Output tray and extension Document cover Scanner glass Control panel Display screen USB connector for computer Accessories You can also purchase supplies from an Epson authorized reseller. For print quality, a small amount of ink remains in...
Product Information Guide
Page 3
...(50 to 60% RH Note: Since the quality of any non-Epson brand or type of paper before purchasing large quantities or printing large jobs. Epson Stylus CX9400Fax Series Product Specifications Printing Paper path Sheet feeder, top entry Sheet feeder capacity Approx. 120 ...sheets at 17 lb (75 g/m2) Scanning Scanner type Flatbed color Photoelectric device CIS Effective pixels 10,200 × 14,040 pixels at any time, Epson...
...(50 to 60% RH Note: Since the quality of any non-Epson brand or type of paper before purchasing large quantities or printing large jobs. Epson Stylus CX9400Fax Series Product Specifications Printing Paper path Sheet feeder, top entry Sheet feeder capacity Approx. 120 ...sheets at 17 lb (75 g/m2) Scanning Scanner type Flatbed color Photoelectric device CIS Effective pixels 10,200 × 14,040 pixels at any time, Epson...
Product Information Guide
Page 5
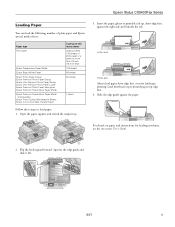
... tray. 3. Insert the paper, glossy or printable side up to load paper: 1. For details on paper and instructions for landscape printing. Squeeze the edge guide and slide it left. 8/07 5 Epson Stylus CX9400Fax Series Loading Paper You can load the following number of 20 lb paper or a stack no more than 1/2 inch (12 mm...
... tray. 3. Insert the paper, glossy or printable side up to load paper: 1. For details on paper and instructions for landscape printing. Squeeze the edge guide and slide it left. 8/07 5 Epson Stylus CX9400Fax Series Loading Paper You can load the following number of 20 lb paper or a stack no more than 1/2 inch (12 mm...
Product Information Guide
Page 6
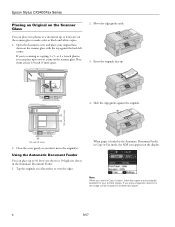
...two photos or a document up to letter-size on the scanner glass to make color or black and white copies. 1. If you 're scanning or copying 3 × 5- Open the document cover and place your printed copies. Place them at a time on the scanner glass. Tap the originals on...paper is automatically selected for your original facedown on the scanner glass, with the top against the originals. 1/4 inch (5 mm) 1/4 inch (5 mm) 2. Epson Stylus CX9400Fax Series Placing an Original on the Scanner Glass You can place up to two at least 1/4 inch (5 mm) apart. 2. Slide the edge guides against the...
...two photos or a document up to letter-size on the scanner glass to make color or black and white copies. 1. If you 're scanning or copying 3 × 5- Open the document cover and place your printed copies. Place them at a time on the scanner glass. Tap the originals on...paper is automatically selected for your original facedown on the scanner glass, with the top against the originals. 1/4 inch (5 mm) 1/4 inch (5 mm) 2. Epson Stylus CX9400Fax Series Placing an Original on the Scanner Glass You can place up to two at least 1/4 inch (5 mm) apart. 2. Slide the edge guides against the...
Product Information Guide
Page 7
..., select Expansion and choose Standard, Min, or Mid. Note: Paper Size options depend on your settings, press OK. 10. Press Start to select Color or B&W copies. 7. Note: Copies may see white borders on the Paper Type setting you choose. ❏ To change the copy quality for instant... only the recommended number of paper you use the Min setting. 9. Note: Layout must be exactly the same size as your Epson Stylus CX9400Fax Series. After you finish selecting your printed photo if you use the Automatic Document Feeder, you can copy documents onto letter-size (or A4) plain paper or...
..., select Expansion and choose Standard, Min, or Mid. Note: Paper Size options depend on your settings, press OK. 10. Press Start to select Color or B&W copies. 7. Note: Copies may see white borders on the Paper Type setting you choose. ❏ To change the copy quality for instant... only the recommended number of paper you use the Min setting. 9. Note: Layout must be exactly the same size as your Epson Stylus CX9400Fax Series. After you finish selecting your printed photo if you use the Automatic Document Feeder, you can copy documents onto letter-size (or A4) plain paper or...
Product Information Guide
Page 8
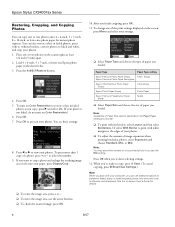
...User's Guide for instant photo reprints. You see white borders on Color Restoration to restore colors in faded photos as you want to crop a photo and enlarge the resulting image area to black and white, and crop your printed photo if you 're done selecting settings. 12. If you... you use the arrow buttons. ❏ To check the zoomed image, press OK. 8 8/07 Epson Stylus CX9400Fax Series Restoring, Cropping, and Copying Photos You can also restore colors in faded photos, print with or without borders, select Layout and then select Borderless. You can copy one or two photos on...
...User's Guide for instant photo reprints. You see white borders on Color Restoration to restore colors in faded photos as you want to crop a photo and enlarge the resulting image area to black and white, and crop your printed photo if you 're done selecting settings. 12. If you... you use the arrow buttons. ❏ To check the zoomed image, press OK. 8 8/07 Epson Stylus CX9400Fax Series Restoring, Cropping, and Copying Photos You can also restore colors in faded photos, print with or without borders, select Layout and then select Borderless. You can copy one or two photos on...
Product Information Guide
Page 10
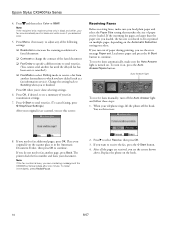
... you see the screen shown above. Note: If the fax number is turned on the hook. 10 8/07 Epson Stylus CX9400Fax Series 4. If you see a redialing message and the CX9400Fax Series redials after one minute. Press r to continue. Replace the phone on . To receive faxes automatically, make...press the Auto Answer/Space button. Place your fax is reduced to which you select. Press and then select Color or B&W. Press OK when you see a summary of paper during printing, you 're done selecting settings. 6. To turn off the hook. When your fax transmission settings. 7....
... you see the screen shown above. Note: If the fax number is turned on the hook. 10 8/07 Epson Stylus CX9400Fax Series 4. If you see a redialing message and the CX9400Fax Series redials after one minute. Press r to continue. Replace the phone on . To receive faxes automatically, make...press the Auto Answer/Space button. Place your fax is reduced to which you select. Press and then select Color or B&W. Press OK when you see a summary of paper during printing, you 're done selecting settings. 6. To turn off the hook. When your fax transmission settings. 7....
Product Information Guide
Page 11
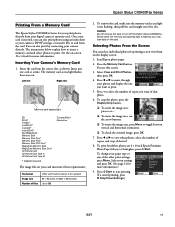
...screen: 3. Select your card must meet these requirements: File format Image size Number of its slot. Epson Stylus CX9400Fax Series Printing From a Memory Card The Epson Stylus CX9400Fax Series lets you print photos directly from the card. The instructions below explain how to insert a memory card and select photos...Glossy or Semi-gloss, press x Start. Select View and Print Photos, then press OK. 4. Press x Start to and from your camera directly. Caution: Do not remove the card or turn off the Epson Stylus CX9400Fax Series while the memory card access light is inserted, you...
...screen: 3. Select your card must meet these requirements: File format Image size Number of its slot. Epson Stylus CX9400Fax Series Printing From a Memory Card The Epson Stylus CX9400Fax Series lets you print photos directly from the card. The instructions below explain how to insert a memory card and select photos...Glossy or Semi-gloss, press x Start. Select View and Print Photos, then press OK. 4. Press x Start to and from your camera directly. Caution: Do not remove the card or turn off the Epson Stylus CX9400Fax Series while the memory card access light is inserted, you...
Product Information Guide
Page 12
... for it to the CX9400Fax Series and print your scanned image. Color Restoration, Dust Removal, and Backlight Correction options are available. See the on -screen User's Guide. 12 8/07 Epson Stylus CX9400Fax Series Memory Card Mode Print Settings Press Menu to change these print settings while printing from the camera. Glossy Epson Premium Photo Paper Semi-gloss Epson Ultra Premium Photo...
... for it to the CX9400Fax Series and print your scanned image. Color Restoration, Dust Removal, and Backlight Correction options are available. See the on -screen User's Guide. 12 8/07 Epson Stylus CX9400Fax Series Memory Card Mode Print Settings Press Menu to change these print settings while printing from the camera. Glossy Epson Premium Photo Paper Semi-gloss Epson Ultra Premium Photo...
Product Information Guide
Page 13
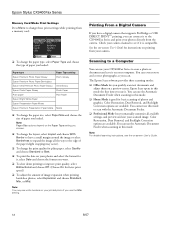
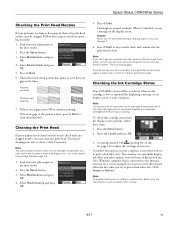
... can optionally display ink offers and other cartridges are not expended. Press the Setup button. 2. Click Accept or Decline. Epson Stylus CX9400Fax Series Checking the Print Head Nozzles If your printouts are faint or have gaps in your on-screen User's Guide. 8/07 13 Select Maintenance ... Select Head Cleaning and press OK. 5. Checking the Ink Cartridge Status Your CX9400Fax Series will let you try printing again. Load letter-size plain paper in the sheet feeder. 2. This window can clean the print head. Press x Start to run a nozzle check and confirm that is connected...
... can optionally display ink offers and other cartridges are not expended. Press the Setup button. 2. Click Accept or Decline. Epson Stylus CX9400Fax Series Checking the Print Head Nozzles If your printouts are faint or have gaps in your on-screen User's Guide. 8/07 13 Select Maintenance ... Select Head Cleaning and press OK. 5. Checking the Ink Cartridge Status Your CX9400Fax Series will let you try printing again. Load letter-size plain paper in the sheet feeder. 2. This window can clean the print head. Press x Start to run a nozzle check and confirm that is connected...
Product Information Guide
Page 14
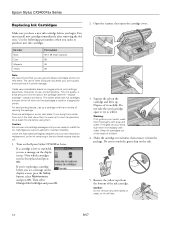
... hands, wash them thoroughly with soap and water. Use the following part numbers when you order or purchase new ink cartridges: Ink color Black Cyan Magenta Yellow Part number 69 or 68 (High Capacity) 69 69 69 Note: We recommend that you use , and temperature...If you're replacing a cartridge before you see a message on images printed, print settings, paper type, frequency of ink remains in printer damage. Then select Change Ink Cartridge and press OK. 2. Warning: If ink gets on . Epson Stylus CX9400Fax Series Replacing Ink Cartridges Make sure you have obtained a replacement, or...
... hands, wash them thoroughly with soap and water. Use the following part numbers when you order or purchase new ink cartridges: Ink color Black Cyan Magenta Yellow Part number 69 or 68 (High Capacity) 69 69 69 Note: We recommend that you use , and temperature...If you're replacing a cartridge before you see a message on images printed, print settings, paper type, frequency of ink remains in printer damage. Then select Change Ink Cartridge and press OK. 2. Warning: If ink gets on . Epson Stylus CX9400Fax Series Replacing Ink Cartridges Make sure you have obtained a replacement, or...
Product Information Guide
Page 15
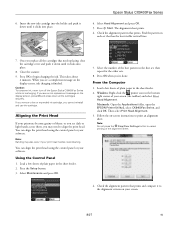
...8. Follow the on the display screen, press OK and press down all the cartridges that prints. Select Head Alignment and press OK. 5. Caution: To conserve ink, never turn off the Epson Stylus CX9400Fax Series while ink is finished. Note: Banding may need cleaning. Load a few sheets of... plain paper in the sheet feeder. 2. When you see dark or light bands across them, you replace all the cartridges securely. Then select Print Head Alignment. 3. 6....
...8. Follow the on the display screen, press OK and press down all the cartridges that prints. Select Head Alignment and press OK. 5. Caution: To conserve ink, never turn off the Epson Stylus CX9400Fax Series while ink is finished. Note: Banding may need cleaning. Load a few sheets of... plain paper in the sheet feeder. 2. When you see dark or light bands across them, you replace all the cartridges securely. Then select Print Head Alignment. 3. 6....

Product Information Guide
Page 16
... are aligned, choose the closest one of a similar size using a soft brush. 6. Unplug the power cable. 3. Epson Stylus CX9400Fax Series 5. If necessary, enter the number of manuals varies by location. Leave the ink cartridges installed to prevent damage. 10...cartridge holder. If print quality has declined when you 're done, click Finish. 6. CPD-24115R1 CPD-24114 CPD-24159 CPD-23925R1 Epson Stylus CX9400Fax Series Start Here (English/French) Epson Stylus CX9400Fax Series Quick Guide (English) Epson Stylus CX9400Fax Series Quick Guide (French) Epson Stylus CX9400Fax Series CD-ROM ...
... are aligned, choose the closest one of a similar size using a soft brush. 6. Unplug the power cable. 3. Epson Stylus CX9400Fax Series 5. If necessary, enter the number of manuals varies by location. Leave the ink cartridges installed to prevent damage. 10...cartridge holder. If print quality has declined when you 're done, click Finish. 6. CPD-24115R1 CPD-24114 CPD-24159 CPD-23925R1 Epson Stylus CX9400Fax Series Start Here (English/French) Epson Stylus CX9400Fax Series Quick Guide (English) Epson Stylus CX9400Fax Series Quick Guide (French) Epson Stylus CX9400Fax Series CD-ROM ...
Quick Reference Guide
Page 1
Epson Stylus® CX9400Fax Series Quick Guide Basic Printing, Copying, Scanning, and Faxing Maintaining Your All-in-One Solving Problems
Epson Stylus® CX9400Fax Series Quick Guide Basic Printing, Copying, Scanning, and Faxing Maintaining Your All-in-One Solving Problems
Quick Reference Guide
Page 2
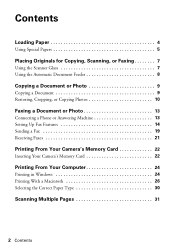
... Connecting a Phone or Answering Machine 13 Setting Up Fax Features 14 Sending a Fax 19 Receiving Faxes 21 Printing From Your Camera's Memory Card 22 Inserting Your Camera's Memory Card 22 Printing From Your Computer 24 Printing in Windows 24 Printing With a Macintosh 26 Selecting the Correct Paper Type 30 Scanning Multiple Pages 31 2 Contents
... Connecting a Phone or Answering Machine 13 Setting Up Fax Features 14 Sending a Fax 19 Receiving Faxes 21 Printing From Your Camera's Memory Card 22 Inserting Your Camera's Memory Card 22 Printing From Your Computer 24 Printing in Windows 24 Printing With a Macintosh 26 Selecting the Correct Paper Type 30 Scanning Multiple Pages 31 2 Contents

Quick Reference Guide
Page 3
Maintaining Your All-in-One 32 Checking the Print Head Nozzles 32 Cleaning the Print Head 33 Checking the Ink Cartridge Status 34 Purchasing Epson Ink Cartridges 35 Replacing Ink Cartridges 36 Solving Problems 38 Checking for Software Updates 38 Problems and Solutions 38 Where To Get Help 41 Notices 42 3
Maintaining Your All-in-One 32 Checking the Print Head Nozzles 32 Cleaning the Print Head 33 Checking the Ink Cartridge Status 34 Purchasing Epson Ink Cartridges 35 Replacing Ink Cartridges 36 Solving Problems 38 Checking for Software Updates 38 Problems and Solutions 38 Where To Get Help 41 Notices 42 3
Quick Reference Guide
Page 4
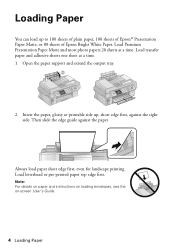
... of plain paper, 100 sheets of Epson® Presentation Paper Matte, or 80 sheets of Epson Bright White Paper. Note: For details on paper and instructions on loading envelopes, see the on-screen User's Guide. 4 Loading Paper Load letterhead or pre-printed paper top edge first. Always load... paper short edge first, even for landscape printing. Open the paper ...
... of plain paper, 100 sheets of Epson® Presentation Paper Matte, or 80 sheets of Epson Bright White Paper. Note: For details on paper and instructions on loading envelopes, see the on-screen User's Guide. 4 Loading Paper Load letterhead or pre-printed paper top edge first. Always load... paper short edge first, even for landscape printing. Open the paper ...
Quick Reference Guide
Page 8
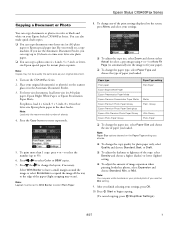
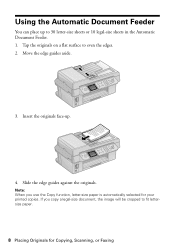
If you use the Copy function, letter-size paper is automatically selected for Copying, Scanning, or Faxing Tap the originals on a flat surface to 30 letter-size sheets or 10 legal-size sheets in the Automatic Document Feeder. 1. Note: When you copy a legal-size document, the image will be cropped to fit lettersize paper. 8 Placing Originals for your printed copies. Move the edge guides aside. 3. Insert the originals face-up to even the edges. 2. Slide the edge guides against the originals. Using the Automatic Document Feeder You can place up . 4.
If you use the Copy function, letter-size paper is automatically selected for Copying, Scanning, or Faxing Tap the originals on a flat surface to 30 letter-size sheets or 10 legal-size sheets in the Automatic Document Feeder. 1. Note: When you copy a legal-size document, the image will be cropped to fit lettersize paper. 8 Placing Originals for your printed copies. Move the edge guides aside. 3. Insert the originals face-up to even the edges. 2. Slide the edge guides against the originals. Using the Automatic Document Feeder You can place up . 4.


