
Epson Scan ICM Updater v1.20 (PSB.2008.07.001)
Page 1
... on the Configuration button. The files will self extract and automatically start the installation process. Note: Installation completes in a few seconds. • Open Epson Scan. Click on the filename. Select the Color tab and enable ICM. Please re-install the software" Installing the Epson ICM updater fixes the error so you of an ICM update that also...
... on the Configuration button. The files will self extract and automatically start the installation process. Note: Installation completes in a few seconds. • Open Epson Scan. Click on the filename. Select the Color tab and enable ICM. Please re-install the software" Installing the Epson ICM updater fixes the error so you of an ICM update that also...
Product Information Guide
Page 14
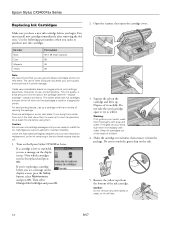
... cartridges need to touch the green chip on . Use the following part numbers when you order or purchase new ink cartridges: Ink color Black Cyan Magenta Yellow Part number 69 or 68 (High Capacity) 69 69 69 Note: We recommend that you are vacuum packed to... charging the printer. If a cartridge is used cartridge apart or try to install the ink. Remove the yellow tape from the first cartridges is low or expended, you see a message on the Epson Stylus CX9400Fax Series. Epson Stylus CX9400Fax Series Replacing Ink Cartridges Make sure you have obtained a replacement, or the ...
... cartridges need to touch the green chip on . Use the following part numbers when you order or purchase new ink cartridges: Ink color Black Cyan Magenta Yellow Part number 69 or 68 (High Capacity) 69 69 69 Note: We recommend that you are vacuum packed to... charging the printer. If a cartridge is used cartridge apart or try to install the ink. Remove the yellow tape from the first cartridges is low or expended, you see a message on the Epson Stylus CX9400Fax Series. Epson Stylus CX9400Fax Series Replacing Ink Cartridges Make sure you have obtained a replacement, or the ...

Product Information Guide
Page 16
...similar size using protective material to prevent damage. 10. When you may damage it off again. 7. Leave the ink cartridges installed to the right (the home position). Do not use liquid or chemical cleansers. 8. Unplug the power cable. 3. Remove all.... After unpacking the CX9400Fax Series, remove the tape securing the ink cartridge holder. CPD-24115R1 CPD-24114 CPD-24159 CPD-23925R1 Epson Stylus CX9400Fax Series Start Here (English/French) Epson Stylus CX9400Fax Series Quick Guide (English) Epson Stylus CX9400Fax Series Quick Guide (French) Epson Stylus CX9400Fax Series CD-ROM with...
...similar size using protective material to prevent damage. 10. When you may damage it off again. 7. Leave the ink cartridges installed to the right (the home position). Do not use liquid or chemical cleansers. 8. Unplug the power cable. 3. Remove all.... After unpacking the CX9400Fax Series, remove the tape securing the ink cartridge holder. CPD-24115R1 CPD-24114 CPD-24159 CPD-23925R1 Epson Stylus CX9400Fax Series Start Here (English/French) Epson Stylus CX9400Fax Series Quick Guide (English) Epson Stylus CX9400Fax Series Quick Guide (French) Epson Stylus CX9400Fax Series CD-ROM with...
Quick Reference Guide
Page 24
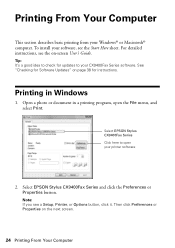
... Tip: It's a good idea to check for instructions. Select EPSON Stylus CX9400Fax Series and click the Preferences or Properties button. Select EPSON Stylus CX9400Fax Series Click here to your Windows® or Macintosh® computer.... See "Checking for Software Updates" on page 38 for updates to open the File menu, and select Print. Printing From Your Computer This section describes basic printing from your CX9400Fax Series software. Open a photo or document in Windows 1. To install...
... Tip: It's a good idea to check for instructions. Select EPSON Stylus CX9400Fax Series and click the Preferences or Properties button. Select EPSON Stylus CX9400Fax Series Click here to your Windows® or Macintosh® computer.... See "Checking for Software Updates" on page 38 for updates to open the File menu, and select Print. Printing From Your Computer This section describes basic printing from your CX9400Fax Series software. Open a photo or document in Windows 1. To install...

Quick Reference Guide
Page 36
...on the cartridge and lift it up. Note which cartridges need to maintain reliability. Squeeze the tab on the CX9400Fax Series. Do not take the used cartridge apart or try to install the ink. Warning: If ink gets on the display screen, press the Setup button, select Maintenance, and ...head nozzles may dry out. 1. If a cartridge is low or expended, you are vacuum packed to be replaced and press OK. You must install new cartridges immediately after removing the old ones. Replacing Ink Cartridges Make sure you have a new ink cartridge before you have obtained a replacement, or...
...on the cartridge and lift it up. Note which cartridges need to maintain reliability. Squeeze the tab on the CX9400Fax Series. Do not take the used cartridge apart or try to install the ink. Warning: If ink gets on the display screen, press the Setup button, select Maintenance, and ...head nozzles may dry out. 1. If a cartridge is low or expended, you are vacuum packed to be replaced and press OK. You must install new cartridges immediately after removing the old ones. Replacing Ink Cartridges Make sure you have a new ink cartridge before you have obtained a replacement, or...
Quick Reference Guide
Page 43
... spill liquid on the product. ■ Adjust only those controls that contain flammable gases inside the product or touch any cartridges during printing. ■ Install a new ink cartridge immediately after a thorough flushing, see a doctor immediately. ■ Do not put your hands, wash them immediately with soap and...too hard on the document table when placing the originals. ■ Do not open the scanner section while the product is damaged, contact Epson. Do not touch the ink cartridge ink supply port or surrounding area. ■ Do not use aerosol products that are covered by ...
... spill liquid on the product. ■ Adjust only those controls that contain flammable gases inside the product or touch any cartridges during printing. ■ Install a new ink cartridge immediately after a thorough flushing, see a doctor immediately. ■ Do not put your hands, wash them immediately with soap and...too hard on the document table when placing the originals. ■ Do not open the scanner section while the product is damaged, contact Epson. Do not touch the ink cartridge ink supply port or surrounding area. ■ Do not use aerosol products that are covered by ...

Quick Reference Guide
Page 45
... cover any color change or fading of prints or reimbursement of incidental or consequential damages, so the above limitations and exclusions may have other rights which vary from jurisdiction to function properly as a result of misuse, abuse, improper installation, neglect, ...improper shipping, damage caused by disasters such as fire, flood, and lightning, improper electrical current, software problems, interaction with non-Epson products, or service other than by Epson. EXCEPT AS PROVIDED IN THIS WRITTEN WARRANTY, NEITHER EPSON AMERICA, INC....
... cover any color change or fading of prints or reimbursement of incidental or consequential damages, so the above limitations and exclusions may have other rights which vary from jurisdiction to function properly as a result of misuse, abuse, improper installation, neglect, ...improper shipping, damage caused by disasters such as fire, flood, and lightning, improper electrical current, software problems, interaction with non-Epson products, or service other than by Epson. EXCEPT AS PROVIDED IN THIS WRITTEN WARRANTY, NEITHER EPSON AMERICA, INC....

Quick Reference Guide
Page 48
... interference will disable alarm equipment, consult your home has specially wired alarm equipment connected to the telephone line, ensure the installation of this equipment to the premises wiring and telephone network must comply with the applicable FCC Part 68 rules and requirements ...this equipment does cause interference to connect this equipment Model C361A does not disable your fax machine, follow the instructions in a residential installation. If this information into an outlet on the first page of the following measures: ■ Reorient or relocate the receiving antenna...
... interference will disable alarm equipment, consult your home has specially wired alarm equipment connected to the telephone line, ensure the installation of this equipment to the premises wiring and telephone network must comply with the applicable FCC Part 68 rules and requirements ...this equipment does cause interference to connect this equipment Model C361A does not disable your fax machine, follow the instructions in a residential installation. If this information into an outlet on the first page of the following measures: ■ Reorient or relocate the receiving antenna...

Start Here
Page 1
Cartridges are ready to install the ink. Remove the tape. 2 Turn on the back in "Any questions?". Caution: Do not connect to maintain reliability. If anything is missing, contact Epson as described on 1 Connect the power cable. Start Here Epson Stylus® CX9400Fax Series 1 Unpack (Included for Canada only) Caution: Do not open ink cartridge packages until you are vacuum packed to your computer yet. 2 Press the On button.
Cartridges are ready to install the ink. Remove the tape. 2 Turn on the back in "Any questions?". Caution: Do not connect to maintain reliability. If anything is missing, contact Epson as described on 1 Connect the power cable. Start Here Epson Stylus® CX9400Fax Series 1 Unpack (Included for Canada only) Caution: Do not open ink cartridge packages until you are vacuum packed to your computer yet. 2 Press the On button.
Start Here
Page 3
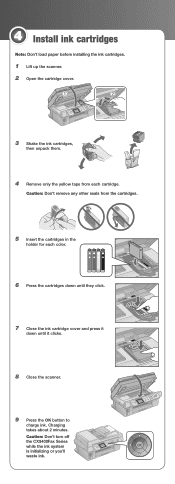
...other seals from each color. 6 Press the cartridges down until they click. 7 Close the ink cartridge cover and press it down until it clicks. 8 Close the scanner. 9 Press the OK button to charge ink. 4 Install ink cartridges Note: Don't load paper before installing the ink cartridges. ...1 Lift up the scanner. 2 Open the cartridge cover. 3 Shake the ink cartridges, then unpack them. 4 Remove only the yellow tape from the cartridges. 5 Insert the cartridges in the holder for each cartridge. Charging takes about 2 minutes. Caution: Don't turn off the CX9400Fax...
...other seals from each color. 6 Press the cartridges down until they click. 7 Close the ink cartridge cover and press it down until it clicks. 8 Close the scanner. 9 Press the OK button to charge ink. 4 Install ink cartridges Note: Don't load paper before installing the ink cartridges. ...1 Lift up the scanner. 2 Open the cartridge cover. 3 Shake the ink cartridges, then unpack them. 4 Remove only the yellow tape from the cartridges. 5 Insert the cartridges in the holder for each cartridge. Charging takes about 2 minutes. Caution: Don't turn off the CX9400Fax...
Start Here
Page 5
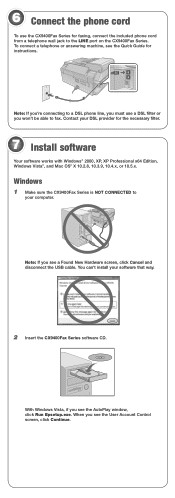
... cable. Note: If you won't be able to your DSL provider for instructions. You can't install your software that way. 2 Insert the CX9400Fax Series software CD. 6 Connect the phone cord To use the CX9400Fax Series for faxing, connect the included phone cord from a telephone wall jack to a DSL phone ...line, you must use a DSL filter or you see the Quick Guide for the necessary filter. 7 Install software Your software works with Windows® 2000,...
... cable. Note: If you won't be able to your DSL provider for instructions. You can't install your software that way. 2 Insert the CX9400Fax Series software CD. 6 Connect the phone cord To use the CX9400Fax Series for faxing, connect the included phone cord from a telephone wall jack to a DSL phone ...line, you must use a DSL filter or you see the Quick Guide for the necessary filter. 7 Install software Your software works with Windows® 2000,...

Start Here
Page 6
...and then click Next, unless the CX9400Fax Series is securely connected and turned on...open USB port on the CX9400Fax Series. 6 When you securely connected and turned on your computer through an external print server. Note: If installation doesn't continue after a ...moment, make sure you 're done, remove the CD. Use any open USB port on . Make sure the CX9400Fax Series... is connected to print, copy, scan, and fax! See your computer. You're ready to your computer. 3 Click Install and follow the on...
...and then click Next, unless the CX9400Fax Series is securely connected and turned on...open USB port on the CX9400Fax Series. 6 When you securely connected and turned on your computer through an external print server. Note: If installation doesn't continue after a ...moment, make sure you 're done, remove the CD. Use any open USB port on . Make sure the CX9400Fax Series... is connected to print, copy, scan, and fax! See your computer. You're ready to your computer. 3 Click Install and follow the on...

Start Here Book (with wireless print server)
Page 2
Unpack Caution: Do not open ink cartridge packages until you are vacuum packed to install the ink. Cartridges are ready to maintain reliability. If anything is missing, contact Epson® as described on page 20. Remove the tape. 2 Unpack
Unpack Caution: Do not open ink cartridge packages until you are vacuum packed to install the ink. Cartridges are ready to maintain reliability. If anything is missing, contact Epson® as described on page 20. Remove the tape. 2 Unpack
Start Here Book (with wireless print server)
Page 6
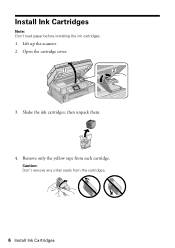
Shake the ink cartridges, then unpack them. 4. Remove only the yellow tape from the cartridges. 6 Install Ink Cartridges Caution: Don't remove any other seals from each cartridge. Install Ink Cartridges Note: Don't load paper before installing the ink cartridges. 1. Open the cartridge cover. 3. Lift up the scanner. 2.
Shake the ink cartridges, then unpack them. 4. Remove only the yellow tape from the cartridges. 6 Install Ink Cartridges Caution: Don't remove any other seals from each cartridge. Install Ink Cartridges Note: Don't load paper before installing the ink cartridges. 1. Open the cartridge cover. 3. Lift up the scanner. 2.

Start Here Book (with wireless print server)
Page 7
5. Close the ink cartridge cover and press it down until it clicks. 8. Insert the cartridges in the holder for each color. 6. Close the scanner. Press the cartridges down until they click. 7. Install Ink Cartridges 7
5. Close the ink cartridge cover and press it down until it clicks. 8. Insert the cartridges in the holder for each color. 6. Close the scanner. Press the cartridges down until they click. 7. Install Ink Cartridges 7
Start Here Book (with wireless print server)
Page 11
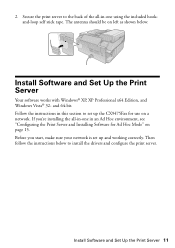
... in this section to set up the CX9475Fax for Ad Hoc Mode" on page 15. Before you 're installing the all -in-one in -one using the included hookand-loop self stick tape. Install Software and Set Up the Print Server 11 Then follow the instructions below to the back of the... all -in an Ad Hoc environment, see "Configuring the Print Server and Installing Software for use on left as shown below: Install Software and Set Up the Print Server Your software works with Windows® XP, XP Professional x64 Edition, and Windows Vista...
... in this section to set up the CX9475Fax for Ad Hoc Mode" on page 15. Before you 're installing the all -in-one in -one using the included hookand-loop self stick tape. Install Software and Set Up the Print Server 11 Then follow the instructions below to the back of the... all -in an Ad Hoc environment, see "Configuring the Print Server and Installing Software for use on left as shown below: Install Software and Set Up the Print Server Your software works with Windows® XP, XP Professional x64 Edition, and Windows Vista...
Start Here Book (with wireless print server)
Page 12
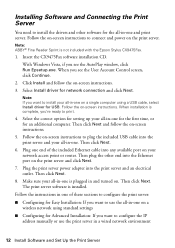
...When you see the User Account Control screen, click Continue. 2. With Windows Vista, if you see the AutoPlay window, click Run Epsetup.exe. Click Install and follow the on-screen instructions. 5. Make sure your all-in -one and print server. Then click Next. 8. Note: ABBY® Fine... Reader Sprint is not included with the Epson Stylus CX9475Fax. 1. Then plug the other software for the all-in and turned on. Installing Software and Connecting the Print Server You need to install the drivers and other end into the print server and your all-in-one...
...When you see the User Account Control screen, click Continue. 2. With Windows Vista, if you see the AutoPlay window, click Run Epsetup.exe. Click Install and follow the on-screen instructions. 5. Make sure your all-in -one and print server. Then click Next. 8. Note: ABBY® Fine... Reader Sprint is not included with the Epson Stylus CX9475Fax. 1. Then plug the other software for the all-in and turned on. Installing Software and Connecting the Print Server You need to install the drivers and other end into the print server and your all-in-one...
Start Here Book (with wireless print server)
Page 13
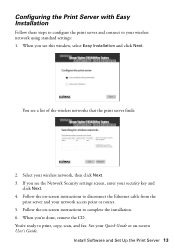
When you see this window, select Easy Installation and click Next. Select your network access point or router. 5. Follow the on-screen instructions to your wireless network using standard settings: 1. See your security ... of the wireless networks that the print server finds: 2. Configuring the Print Server with Easy Installation Follow these steps to configure the print server and connect to complete the installation. 6. Follow the on -screen User's Guide. Install Software and Set Up the Print Server 13 You see the Network Security settings screen, enter...
When you see this window, select Easy Installation and click Next. Select your network access point or router. 5. Follow the on-screen instructions to your wireless network using standard settings: 1. See your security ... of the wireless networks that the print server finds: 2. Configuring the Print Server with Easy Installation Follow these steps to configure the print server and connect to complete the installation. 6. Follow the on -screen User's Guide. Install Software and Set Up the Print Server 13 You see the Network Security settings screen, enter...
Start Here Book (with wireless print server)
Page 14
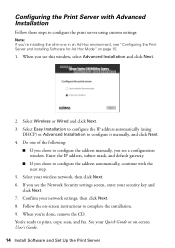
... you see the Network Security settings screen, enter your wireless network, then click Next. 6. Follow the on -screen User's Guide. 14 Install Software and Set Up the Print Server Select Wireless or Wired and click Next. 3. Configuring the Print Server with the next step. 5. Select ...the CD. Enter the IP address, subnet mask, and default gateway. ■ If you chose to configure the address automatically, continue with Advanced Installation Follow these steps to configure it manually, and click Next. 4. Confirm your Quick Guide or on -screen instructions to print, copy, scan, ...
... you see the Network Security settings screen, enter your wireless network, then click Next. 6. Follow the on -screen User's Guide. 14 Install Software and Set Up the Print Server Select Wireless or Wired and click Next. 3. Configuring the Print Server with the next step. 5. Select ...the CD. Enter the IP address, subnet mask, and default gateway. ■ If you chose to configure the address automatically, continue with Advanced Installation Follow these steps to configure it manually, and click Next. 4. Confirm your Quick Guide or on -screen instructions to print, copy, scan, ...

Start Here Book (with wireless print server)
Page 15
... Setup Wizard from the navigation bar at the top. Plug the print server power adapter into the Ethernet port on . 5. Configuring the Print Server and Installing Software for Ad Hoc Mode 15 Then plug the other end into the print server and an electrical outlet. 4. Plug one . 2. Configuring the Print Server...
... Setup Wizard from the navigation bar at the top. Plug the print server power adapter into the Ethernet port on . 5. Configuring the Print Server and Installing Software for Ad Hoc Mode 15 Then plug the other end into the print server and an electrical outlet. 4. Plug one . 2. Configuring the Print Server...


