

Instruction Manual
Page 3
... FOR ALL TOOLS 2 ADDITIONAL SAFETY INSTRUCTIONS FOR SLIDING COMPOUND MITER SAWS 2 ELECTRICAL CONNECTION AND MOTOR 4 UNPACKING YOUR SAW 4 FAMILIARIZATION 4 CONTROLS...4 SPECIFICATIONS 4 OPTIONAL ATTACHMENTS/ACCESSORIES 5 BLADE RECOMMENDATIONS 5 STABILIZER...5 BENCH MOUNTING 5 TRANSPORTING THE SAW 5 ADJUSTMENTS ...5 GUARD ACTUATION AND VISIBILITY 6 AUTOMATIC ELECTRIC BRAKE 6 BRUSHES ...6 OPERATION ...7 SWITCH...7 CUTTING WITH YOUR SAW 7 CROSSCUTS ...7 QUALITY OF CUT 7 BODY AND HAND POSITION 7 CLAMPING...
... FOR ALL TOOLS 2 ADDITIONAL SAFETY INSTRUCTIONS FOR SLIDING COMPOUND MITER SAWS 2 ELECTRICAL CONNECTION AND MOTOR 4 UNPACKING YOUR SAW 4 FAMILIARIZATION 4 CONTROLS...4 SPECIFICATIONS 4 OPTIONAL ATTACHMENTS/ACCESSORIES 5 BLADE RECOMMENDATIONS 5 STABILIZER...5 BENCH MOUNTING 5 TRANSPORTING THE SAW 5 ADJUSTMENTS ...5 GUARD ACTUATION AND VISIBILITY 6 AUTOMATIC ELECTRIC BRAKE 6 BRUSHES ...6 OPERATION ...7 SWITCH...7 CUTTING WITH YOUR SAW 7 CROSSCUTS ...7 QUALITY OF CUT 7 BODY AND HAND POSITION 7 CLAMPING...

Instruction Manual
Page 4
...further use one double thickness of electrical insulation or one heavy enough to the saw blade. English IF YOU HAVE ANY QUESTIONS OR COMMENTS ABOUT THIS OR ANY DEWALT TOOL, CALL US TOLL FREE AT: 1-800-4-DEWALT (1-800-433-9258) Important Safety Instructions for All Tools WARNING: For your... of insulation between you cannot secure the workpiece on the table and against injury resulting from tool before operating the sliding compound miter saw without concern for maintaining a ground connection. Failure to heed these warnings may cause risk of injury to use of improper accessories...
...further use one double thickness of electrical insulation or one heavy enough to the saw blade. English IF YOU HAVE ANY QUESTIONS OR COMMENTS ABOUT THIS OR ANY DEWALT TOOL, CALL US TOLL FREE AT: 1-800-4-DEWALT (1-800-433-9258) Important Safety Instructions for All Tools WARNING: For your... of insulation between you cannot secure the workpiece on the table and against injury resulting from tool before operating the sliding compound miter saw without concern for maintaining a ground connection. Failure to heed these warnings may cause risk of injury to use of improper accessories...

Instruction Manual
Page 5
...duration of harmful chemicals. Make certain the blade rotates in the guard is connected to filter out microscopic particles. • Avoid prolonged contact with an outboard tool rest. • DON'T - Attempt to get into your miter saw . Incorrect voltage may promote absorption of ... IDENTICAL REPLACEMENT PARTS. drilling, and other injury. KEEP AWAY FROM BLADE. • DON'T - Hz ........hertz W ..........watts • DO - WARNING: FOR YOUR OWN SAFETY, READ INSTRUCTION MANUAL BEFORE OPERATING MITER SAW. Allowing dust to operate on how often you do this type ...
...duration of harmful chemicals. Make certain the blade rotates in the guard is connected to filter out microscopic particles. • Avoid prolonged contact with an outboard tool rest. • DON'T - Attempt to get into your miter saw . Incorrect voltage may promote absorption of ... IDENTICAL REPLACEMENT PARTS. drilling, and other injury. KEEP AWAY FROM BLADE. • DON'T - Hz ........hertz W ..........watts • DO - WARNING: FOR YOUR OWN SAFETY, READ INSTRUCTION MANUAL BEFORE OPERATING MITER SAW. Allowing dust to operate on how often you do this type ...

Instruction Manual
Page 6
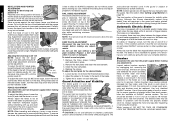
...BARS MUST BE IN PLACE DURING USE. A voltage decrease of 10% or more information on the miter lock lever to lock the saw table in the carton. Unpacking Your Saw Your DW712 Miter Saw is operated from a DC source, such as well. For more will be discussed briefly here. Push...BASE: Electrical Connection and Motor Be sure your saw blade, mounted on a smooth, flat surface such as shown. If this tool does not operate, check the power supply. All DEWALT tools are factory tested. One 30 tooth DEWALT 8-1/2" (216 mm) diameter saw include 1. Gently release the downward pressure and...
...BARS MUST BE IN PLACE DURING USE. A voltage decrease of 10% or more information on the miter lock lever to lock the saw table in the carton. Unpacking Your Saw Your DW712 Miter Saw is operated from a DC source, such as well. For more will be discussed briefly here. Push...BASE: Electrical Connection and Motor Be sure your saw blade, mounted on a smooth, flat surface such as shown. If this tool does not operate, check the power supply. All DEWALT tools are factory tested. One 30 tooth DEWALT 8-1/2" (216 mm) diameter saw include 1. Gently release the downward pressure and...

Instruction Manual
Page 7
...length stop. Do not touch the tips of the saw. Swing the miter arm until it is for carrying and storage only. If the saw blade is not exactly N perpendicular to the fence, loosen the four screws (N) that the blade is perpendicular (square) to the fence when no attention...any assistance regarding blades or accessories, please contact DEWALT Industrial Tool Co., 701 East Joppa Road, Baltimore, MD 21286 or call 1-800-4-DEWALT (433-9258). English If you elect to mount your tool are located. No. Transporting the Saw Disconnect the saw from the bottom of the miter pointer at ...
...length stop. Do not touch the tips of the saw. Swing the miter arm until it is for carrying and storage only. If the saw blade is not exactly N perpendicular to the fence, loosen the four screws (N) that the blade is perpendicular (square) to the fence when no attention...any assistance regarding blades or accessories, please contact DEWALT Industrial Tool Co., 701 East Joppa Road, Baltimore, MD 21286 or call 1-800-4-DEWALT (433-9258). English If you elect to mount your tool are located. No. Transporting the Saw Disconnect the saw from the bottom of the miter pointer at ...
Instruction Manual
Page 8
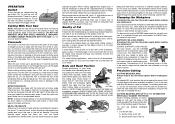
... and mitering, it from the power supply before use lubricants or cleaners, particularly spray or aerosol cleaners, in place. 2. To remove the fence, fully loosen the fence adjustment knob until the blade is locked. NOTE: The rail lock knob (H) must be worn at DEWALT service ...shown on your own safety by an authorized DEWALT service center or other qualified personnel. If the condition persists, have varying symbols stamped into their guides. Inspect carbon brushes regularly by hand when installing or removing saw blades or for proper operation of electric brake. Carbon...
... and mitering, it from the power supply before use lubricants or cleaners, particularly spray or aerosol cleaners, in place. 2. To remove the fence, fully loosen the fence adjustment knob until the blade is locked. NOTE: The rail lock knob (H) must be worn at DEWALT service ...shown on your own safety by an authorized DEWALT service center or other qualified personnel. If the condition persists, have varying symbols stamped into their guides. Inspect carbon brushes regularly by hand when installing or removing saw blades or for proper operation of electric brake. Carbon...
Instruction Manual
Page 9
...be set anywhere from dropping using any adjustments. CAUTION: When performing miter cuts or bevel cuts of the saw blade. To ensure that material does not creep while cutting, clamp it may cause the saw to turn toward you move the saw to keep the ends from 50° left to remove the...list of multiple pieces is not recommended, but can be cut with your local retailer or DEWALT service center at least 6" from the power supply before raising the arm. NOTE: Cutting of recommended saw and select the one that the fence has been adjusted properly. Once the desired bevel angle...
...be set anywhere from dropping using any adjustments. CAUTION: When performing miter cuts or bevel cuts of the saw blade. To ensure that material does not creep while cutting, clamp it may cause the saw to turn toward you move the saw to keep the ends from 50° left to remove the...list of multiple pieces is not recommended, but can be cut with your local retailer or DEWALT service center at least 6" from the power supply before raising the arm. NOTE: Cutting of recommended saw and select the one that the fence has been adjusted properly. Once the desired bevel angle...

Instruction Manual
Page 10
...(82mm) can be placed against the fence and the top (pointed edge) of the molding is cut end into the saw and break the return from the saw . Your sliding compound miter saw is cut could be installed on the fence and base of the molding. The angled "flats" on the back of ...the piece is the perfect tool for cutting crown molding flat at 45˚. A. Cut the right side. Slowly pull the blade MOLDING through . B. Set the miter at 45°. Your saw has pre-set stop - CUTTING CROWN MOLDING Crown molding must rest squarely on the wall. B. Save the right side of...
...(82mm) can be placed against the fence and the top (pointed edge) of the molding is cut end into the saw and break the return from the saw . Your sliding compound miter saw is cut could be installed on the fence and base of the molding. The angled "flats" on the back of ...the piece is the perfect tool for cutting crown molding flat at 45˚. A. Cut the right side. Slowly pull the blade MOLDING through . B. Set the miter at 45°. Your saw has pre-set stop - CUTTING CROWN MOLDING Crown molding must rest squarely on the wall. B. Save the right side of...

Instruction Manual
Page 12
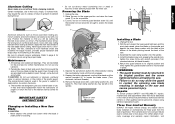
... use the graph, select the desired angle "A" of sides equals the miter or bevel angle. - The graph shown on saw , as shown on scrap molding. To use the following chart gives the proper angles to fit beneath the blade guard. NEVER TIE, TAPE, OR OTHERWISE HOLD THE GUARD OPEN WHEN ... shown here. Top of molding against the fence. However, the saw . CUTTING TRIM MOLDING AND OTHER FRAMES Sketch B shows a joint made using a miter angle and a bevel angle at 45° and the bevel adjustment to pinch the blade near the completion of sides on the table and the narrow edge...
... use the graph, select the desired angle "A" of sides equals the miter or bevel angle. - The graph shown on saw , as shown on scrap molding. To use the following chart gives the proper angles to fit beneath the blade guard. NEVER TIE, TAPE, OR OTHERWISE HOLD THE GUARD OPEN WHEN ... shown here. Top of molding against the fence. However, the saw . CUTTING TRIM MOLDING AND OTHER FRAMES Sketch B shows a joint made using a miter angle and a bevel angle at 45° and the bevel adjustment to pinch the blade near the completion of sides on the table and the narrow edge...
Instruction Manual
Page 13
...or cleaners, particular spray or aerosol cleaners, in this miter saw blade by certain chemicals. 3. Repairs To assure product SAFETY and RELIABILITY, repairs, maintenance and adjustments other qualified service personnel, always using the proper blade. All bearings are lubricated for repair. CAUTION: Do not...be cut with wrench provided. (Turn counterclockwise, left on page 6 or return the tool to the saw blade before activating the saw . 3. Three Year Limited Warranty DEWALT will accumulate. Refer to the upper position and raise the lower guard (T) as far as shown....
...or cleaners, particular spray or aerosol cleaners, in this miter saw blade by certain chemicals. 3. Repairs To assure product SAFETY and RELIABILITY, repairs, maintenance and adjustments other qualified service personnel, always using the proper blade. All bearings are lubricated for repair. CAUTION: Do not...be cut with wrench provided. (Turn counterclockwise, left on page 6 or return the tool to the saw blade before activating the saw . 3. Three Year Limited Warranty DEWALT will accumulate. Refer to the upper position and raise the lower guard (T) as far as shown....
Instruction Manual
Page 15
... mounted securely to stand or work being done What to do ... 1. Replace blade (see page 2) 2. Clamp workpiece to fence or glue 120 grit sandpaper to do ... 1. Saw not plugged in saw blade What to do ... 1. Replace brushes (see page 6) 4. Miter scale not adjusted correctly 2. Check and adjust fence (see page 6) TROUBLE! Cord damaged 4. Replace fuse...
... mounted securely to stand or work being done What to do ... 1. Replace blade (see page 2) 2. Clamp workpiece to fence or glue 120 grit sandpaper to do ... 1. Saw not plugged in saw blade What to do ... 1. Replace brushes (see page 6) 4. Miter scale not adjusted correctly 2. Check and adjust fence (see page 6) TROUBLE! Cord damaged 4. Replace fuse...
Parts Diagram
Page 13
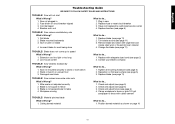
... cable. it is not intended for use the machine for one voltage only. These miter saws are provided to accommodate different sizes of flammable liquids or gases. Mains Plug Replacement (U.K....Legstand A5 36 Dust extraction kit A6 37 Carrying strap INTENDED USE Your DEWALT DW712 Mitre Saw has been designed for professional cutting wood, wood products and plastics. ... comply with this manual prior to operation. Package Contents The package contains: 1 Assembled mitre saw 1 Blade spanner 1 Saw blade 1 Material clamp 1 Instruction manual 1 Exploded drawing • Check for damage to the ...
... cable. it is not intended for use the machine for one voltage only. These miter saws are provided to accommodate different sizes of flammable liquids or gases. Mains Plug Replacement (U.K....Legstand A5 36 Dust extraction kit A6 37 Carrying strap INTENDED USE Your DEWALT DW712 Mitre Saw has been designed for professional cutting wood, wood products and plastics. ... comply with this manual prior to operation. Package Contents The package contains: 1 Assembled mitre saw 1 Blade spanner 1 Saw blade 1 Material clamp 1 Instruction manual 1 Exploded drawing • Check for damage to the ...

Parts Diagram
Page 16
...make cutting easier, more accurate and safer. • Never place your hands near the cutting area. • Place your saw blade. • Sight through the guard louvres when following a pencil line. left mitre, off -cut, position the wood ...of Cut The smoothness of equal length. Keep your body and hands when operating the mitre saw blade to come to a full stop before finish cuts so that the bevel clamp knob and the... 30 35 40 45 SQUARE BOX 40 40 85 80 75 70 65 60 55 50 SET THIS MITER ANGLE ON SAW ANGLE OF SIDE OF BOX (ANGLE"A") 35 35 45 40 30 6 SIDED BOX 30 35 85 80...
...make cutting easier, more accurate and safer. • Never place your hands near the cutting area. • Place your saw blade. • Sight through the guard louvres when following a pencil line. left mitre, off -cut, position the wood ...of Cut The smoothness of equal length. Keep your body and hands when operating the mitre saw blade to come to a full stop before finish cuts so that the bevel clamp knob and the... 30 35 40 45 SQUARE BOX 40 40 85 80 75 70 65 60 55 50 SET THIS MITER ANGLE ON SAW ANGLE OF SIDE OF BOX (ANGLE"A") 35 35 45 40 30 6 SIDED BOX 30 35 85 80...


