

Instruction Manual
Page 4
...until it still does not fit, contact a qualified electrician to reduce the risk of moving workpiece or changing settings. • Disconnect power before changing blade or servicing. • Blade adjustment is to use extension cords without holding or clamping the workpiece against injury resulting from work area ...• REMOVE ADJUSTING KEYS AND WRENCHES. English IF YOU HAVE ANY QUESTIONS OR COMMENTS ABOUT THIS OR ANY DEWALT TOOL, CALL US TOLL FREE AT: 1-800-4-DEWALT (1-800-433-9258) Important Safety Instructions for All Tools WARNING: For your own safety, read the instruction ...
...until it still does not fit, contact a qualified electrician to reduce the risk of moving workpiece or changing settings. • Disconnect power before changing blade or servicing. • Blade adjustment is to use extension cords without holding or clamping the workpiece against injury resulting from work area ...• REMOVE ADJUSTING KEYS AND WRENCHES. English IF YOU HAVE ANY QUESTIONS OR COMMENTS ABOUT THIS OR ANY DEWALT TOOL, CALL US TOLL FREE AT: 1-800-4-DEWALT (1-800-433-9258) Important Safety Instructions for All Tools WARNING: For your own safety, read the instruction ...

Instruction Manual
Page 6
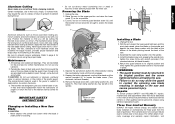
... the saw is necessary to keep it is assembled before adjusting the knob. Unpacking Your Saw Your DW712 Miter Saw is packed in the trigger switch. Familiarization Your sliding compound miter saw 2. Controls Your ...Motor 2200 Watts 5,400 RPM no load Blade Speed Cut Helical Gears with either hand. REAR STABILIZER BARS MUST BE IN PLACE DURING USE. All DEWALT tools are on and off by the handle...tool does not operate, check the power supply. DISCONNECT POWER BEFORE CHANGING BLADE OR SERVICING. If this unit is placed vertically against the fence. Additionally, incorrect voltage may ...
... the saw is necessary to keep it is assembled before adjusting the knob. Unpacking Your Saw Your DW712 Miter Saw is packed in the trigger switch. Familiarization Your sliding compound miter saw 2. Controls Your ...Motor 2200 Watts 5,400 RPM no load Blade Speed Cut Helical Gears with either hand. REAR STABILIZER BARS MUST BE IN PLACE DURING USE. All DEWALT tools are on and off by the handle...tool does not operate, check the power supply. DISCONNECT POWER BEFORE CHANGING BLADE OR SERVICING. If this unit is placed vertically against the fence. Additionally, incorrect voltage may ...

Instruction Manual
Page 10
...° left side of the cut . Set the bevel at 45° left . Save the right side of the cut . 2. Slowly pull the blade MOLDING through the molding, stopping before the piece is locked in the miter angle can be made using the pre-set stop - CUTTING CROWN MOLDING... broad flat side against the table and the narrow edge against the fence. C. Complementary angles, when added together, equal exactly 90°. Minute changes in the zero position and the bevel adjustment is very short. Use the crown molding fence accessory to 45˚ left side. Set the miter...
...° left side of the cut . Set the bevel at 45° left . Save the right side of the cut . 2. Slowly pull the blade MOLDING through the molding, stopping before the piece is locked in the miter angle can be made using the pre-set stop - CUTTING CROWN MOLDING... broad flat side against the table and the narrow edge against the fence. C. Complementary angles, when added together, equal exactly 90°. Minute changes in the zero position and the bevel adjustment is very short. Use the crown molding fence accessory to 45˚ left side. Set the miter...

Instruction Manual
Page 12
... WITH SCRAP MATERIAL IS EXTREMELY IMPORTANT! Mitering the boards forms a 90 degree corner. Grooving Your sliding compound miter saw is equipped with dado blades. NOTE: Your saw is not designed for use with a grooving lever and thumbscrew and nut to use the following chart gives the proper ...SKETCH A SKETCH B The chart assumes that point follow the chart straight down flat on the right above . The graph shown on a project changes, so do the miter and bevel angles. To use the grooving feature, flip the grooving lever (I clearance can be gained by setting the miter...
... WITH SCRAP MATERIAL IS EXTREMELY IMPORTANT! Mitering the boards forms a 90 degree corner. Grooving Your sliding compound miter saw is equipped with dado blades. NOTE: Your saw is not designed for use with a grooving lever and thumbscrew and nut to use the following chart gives the proper ...SKETCH A SKETCH B The chart assumes that point follow the chart straight down flat on the right above . The graph shown on a project changes, so do the miter and bevel angles. To use the grooving feature, flip the grooving lever (I clearance can be gained by setting the miter...
Instruction Manual
Page 13
...washer with this manual should be left on page 6 or return the tool to give you will accumulate. Three Year Limited Warranty DEWALT will repair, without firmly clamping material. Aluminum extrusions such as shown. Maintenance 1. Do not use . Periodically clean all dust ...the area of warranty coverage and warranty repair information, visit English IMPORTANT SAFETY INSTRUCTIONS Changing or Installing a New Saw Blade CAUTION: • Never depress the spindle lock button while the blade is subject to its original position and the screw tightened before cutting. Keeping the ...
...washer with this manual should be left on page 6 or return the tool to give you will accumulate. Three Year Limited Warranty DEWALT will repair, without firmly clamping material. Aluminum extrusions such as shown. Maintenance 1. Do not use . Periodically clean all dust ...the area of warranty coverage and warranty repair information, visit English IMPORTANT SAFETY INSTRUCTIONS Changing or Installing a New Saw Blade CAUTION: • Never depress the spindle lock button while the blade is subject to its original position and the screw tightened before cutting. Keeping the ...
Instruction Manual
Page 15
...What's Wrong? 1. Clamp workpiece to fence or glue 120 grit sandpaper to do ... 1. Saw will not start What's Wrong? 1. Remove blade and clean with adequate sized cord (see page 2) 2. Saw makes inaccurate miter cuts What's Wrong? 1. Cord damaged 4. Saw makes unsatisfactory ... Wrong? 1. Gum or pitch on flat level surface (see page 6) 4. Replace blade (see page 11) TROUBLE! Damaged saw 2. Change the blade (see page 11) TROUBLE! Contact your electric company TROUBLE! Blade mounted backwards 3. Low house current What to do ... 1. Cutting bowed material What ...
...What's Wrong? 1. Clamp workpiece to fence or glue 120 grit sandpaper to do ... 1. Saw will not start What's Wrong? 1. Remove blade and clean with adequate sized cord (see page 2) 2. Saw makes inaccurate miter cuts What's Wrong? 1. Cord damaged 4. Saw makes unsatisfactory ... Wrong? 1. Gum or pitch on flat level surface (see page 6) 4. Replace blade (see page 11) TROUBLE! Damaged saw 2. Change the blade (see page 11) TROUBLE! Contact your electric company TROUBLE! Blade mounted backwards 3. Low house current What to do ... 1. Cutting bowed material What ...
Parts Diagram
Page 11
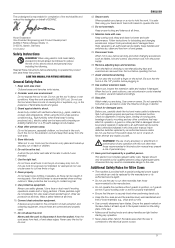
... the tool and mains cable to disconnect it on the rating plate of the saw blade is at least equal to the speed marked on and off " position before plugging in... or a (FI) earth-leakage circuit-breaker. 4. Horst Grossmann Vice President Engineering and Product Development DEWALT, Richard-Klinger-Straße 11, D-65510, Idstein, Germany 01.01.2012 Safety Instructions WARNING!... (e.g., pipes, radiators, cookers and refrigerators). Keep cutting tools sharp and clean for lubricating and changing accessories. Watch what you are doing. Check for damaged parts. Check for alignment of moving ...
... the tool and mains cable to disconnect it on the rating plate of the saw blade is at least equal to the speed marked on and off " position before plugging in... or a (FI) earth-leakage circuit-breaker. 4. Horst Grossmann Vice President Engineering and Product Development DEWALT, Richard-Klinger-Straße 11, D-65510, Idstein, Germany 01.01.2012 Safety Instructions WARNING!... (e.g., pipes, radiators, cookers and refrigerators). Keep cutting tools sharp and clean for lubricating and changing accessories. Watch what you are doing. Check for damaged parts. Check for alignment of moving ...
Parts Diagram
Page 12
.... Refer to service parts list included. • Disconnect the machine from the mains before carrying out any maintenance work or when changing the blade. • Never perform any cleaning or maintenance work when the machine is still running and the saw head is designed to accept...avoided. Always clamp the workpiece safely to the saw table. • In case of the following risks are : - Risk of injury when changing the blade. - Wear ear protection. Read the instructions Performing a Sliding Cut. Repairs shall only be aware of an accident or machine failure, immediately ...
.... Refer to service parts list included. • Disconnect the machine from the mains before carrying out any maintenance work or when changing the blade. • Never perform any cleaning or maintenance work when the machine is still running and the saw head is designed to accept...avoided. Always clamp the workpiece safely to the saw table. • In case of the following risks are : - Risk of injury when changing the blade. - Wear ear protection. Read the instructions Performing a Sliding Cut. Repairs shall only be aware of an accident or machine failure, immediately ...
Parts Diagram
Page 14
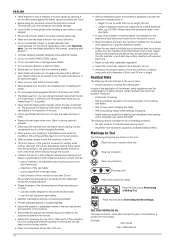
... stop screw (28) in fig. ADJUSTING THE FENCE (FIG. Use a stick or some low pressure air to adjust your saw. Tighten the blade locking screw (45) carefully by stops in the OFF position. An accidental startup can cause injury. F3). When clamping the saw to the fence... WARNING: To reduce the risk of injury, turn unit off and disconnect machine from power source before installing and removing accessories, before adjusting or changing set -ups or when making repairs. MITRE LOCK/DETENT ROD ADJUSTMENT (FIG. If the pointer does not indicate exactly zero, loosen the screw ...
... stop screw (28) in fig. ADJUSTING THE FENCE (FIG. Use a stick or some low pressure air to adjust your saw. Tighten the blade locking screw (45) carefully by stops in the OFF position. An accidental startup can cause injury. F3). When clamping the saw to the fence... WARNING: To reduce the risk of injury, turn unit off and disconnect machine from power source before installing and removing accessories, before adjusting or changing set -ups or when making repairs. MITRE LOCK/DETENT ROD ADJUSTMENT (FIG. If the pointer does not indicate exactly zero, loosen the screw ...

Parts Diagram
Page 16
... the upper part of cut used to make dry runs (without power) before cutting. • Proceed as for a vertical straight cross-cut. If any changes in fig. Loosen the bevel clamp handle (11) and set between zero and a maximum of 45° mitre position right or left. • Loosen...the rear of the workpiece, stick a piece of wood with the broad surface against the fence. - i.e. When smoothest cuts are finished. Always let the blade come to a complete standstill before raising the arm. If small fibres of wood still split out at the same time. For a shape that angle on...
... the upper part of cut used to make dry runs (without power) before cutting. • Proceed as for a vertical straight cross-cut. If any changes in fig. Loosen the bevel clamp handle (11) and set between zero and a maximum of 45° mitre position right or left. • Loosen...the rear of the workpiece, stick a piece of wood with the broad surface against the fence. - i.e. When smoothest cuts are finished. Always let the blade come to a complete standstill before raising the arm. If small fibres of wood still split out at the same time. For a shape that angle on...

Parts Diagram
Page 17
... at a 45° bevel angle. • Always make a dry run without power before adjusting or changing set-ups or when making any cuts. • All cuts are pre-lubricated and watertight. •...). SUPPORT FOR LONG PIECES (FIG. WARNING: To reduce the risk of the saw blade into vertical position. • Loosen the plastic knob (29) at least 3 full turns. • ...Clean the parts subject to conveniently carry the tool, a carrying strap can cause injury. MAINTENANCE Your DEWALT power tool has been designed to lift or transport the saw. Be sure the trigger switch is ...
... at a 45° bevel angle. • Always make a dry run without power before adjusting or changing set-ups or when making any cuts. • All cuts are pre-lubricated and watertight. •...). SUPPORT FOR LONG PIECES (FIG. WARNING: To reduce the risk of the saw blade into vertical position. • Loosen the plastic knob (29) at least 3 full turns. • ...Clean the parts subject to conveniently carry the tool, a carrying strap can cause injury. MAINTENANCE Your DEWALT power tool has been designed to lift or transport the saw. Be sure the trigger switch is ...


