

Instruction Manual
Page 1
...DW712 8-1/2" (216 mm) Sliding Compound Miter Saw Scie à onglets combinée à chariot de 216 mm (8-1/2 po) Sierra de inglete compuesto deslizable de 216 mm (8-1/2") ADVERTENCIA: LÉASE ESTE INSTRUCTIVO ANTES DE USAR EL PRODUCTO. See us on the World Wide Web at www.dewalt... US A CALL. YOUR FEEDBACK IS VITAL TO THE SUCCESS OF DEWALT'S QUALITY IMPROVEMENT PROGRAM. Before returning this product call 1-800-4-DEWALT IF YOU SHOULD EXPERIENCE A PROBLEM WITH YOUR DEWALT PURCHASE, CALL 1-800-4 DEWALT IN MOST CASES, A DEWALT REPRESENTATIVE CAN RESOLVE YOUR PROBLEM OVER THE PHONE.
...DW712 8-1/2" (216 mm) Sliding Compound Miter Saw Scie à onglets combinée à chariot de 216 mm (8-1/2 po) Sierra de inglete compuesto deslizable de 216 mm (8-1/2") ADVERTENCIA: LÉASE ESTE INSTRUCTIVO ANTES DE USAR EL PRODUCTO. See us on the World Wide Web at www.dewalt... US A CALL. YOUR FEEDBACK IS VITAL TO THE SUCCESS OF DEWALT'S QUALITY IMPROVEMENT PROGRAM. Before returning this product call 1-800-4-DEWALT IF YOU SHOULD EXPERIENCE A PROBLEM WITH YOUR DEWALT PURCHASE, CALL 1-800-4 DEWALT IN MOST CASES, A DEWALT REPRESENTATIVE CAN RESOLVE YOUR PROBLEM OVER THE PHONE.

Instruction Manual
Page 3
... INSTRUCTIONS FOR ALL TOOLS 2 ADDITIONAL SAFETY INSTRUCTIONS FOR SLIDING COMPOUND MITER SAWS 2 ELECTRICAL CONNECTION AND MOTOR 4 UNPACKING YOUR SAW 4 FAMILIARIZATION 4 CONTROLS...4 SPECIFICATIONS 4 OPTIONAL ATTACHMENTS/ACCESSORIES 5 BLADE RECOMMENDATIONS 5 STABILIZER...5 BENCH MOUNTING 5 TRANSPORTING THE SAW 5 ADJUSTMENTS ...5 GUARD ACTUATION AND VISIBILITY 6 AUTOMATIC ELECTRIC BRAKE 6 BRUSHES ...6 OPERATION ...7 SWITCH...7 CUTTING WITH YOUR SAW 7 CROSSCUTS ...7 QUALITY OF CUT 7 BODY AND HAND POSITION...
... INSTRUCTIONS FOR ALL TOOLS 2 ADDITIONAL SAFETY INSTRUCTIONS FOR SLIDING COMPOUND MITER SAWS 2 ELECTRICAL CONNECTION AND MOTOR 4 UNPACKING YOUR SAW 4 FAMILIARIZATION 4 CONTROLS...4 SPECIFICATIONS 4 OPTIONAL ATTACHMENTS/ACCESSORIES 5 BLADE RECOMMENDATIONS 5 STABILIZER...5 BENCH MOUNTING 5 TRANSPORTING THE SAW 5 ADJUSTMENTS ...5 GUARD ACTUATION AND VISIBILITY 6 AUTOMATIC ELECTRIC BRAKE 6 BRUSHES ...6 OPERATION ...7 SWITCH...7 CUTTING WITH YOUR SAW 7 CROSSCUTS ...7 QUALITY OF CUT 7 BODY AND HAND POSITION...

Instruction Manual
Page 4
... to use only identical replacement parts. Air vents often cover moving workpiece or changing settings. • Disconnect power before operating the sliding compound miter saw blade. Also use power tools in damp or wet loca- Keep tools sharp and clean for recommended accessories. Serious injury could occur...will operate properly and perform its operation. English IF YOU HAVE ANY QUESTIONS OR COMMENTS ABOUT THIS OR ANY DEWALT TOOL, CALL US TOLL FREE AT: 1-800-4-DEWALT (1-800-433-9258) Important Safety Instructions for All Tools WARNING: For your own safety, read the instruction manual...
... to use only identical replacement parts. Air vents often cover moving workpiece or changing settings. • Disconnect power before operating the sliding compound miter saw blade. Also use power tools in damp or wet loca- Keep tools sharp and clean for recommended accessories. Serious injury could occur...will operate properly and perform its operation. English IF YOU HAVE ANY QUESTIONS OR COMMENTS ABOUT THIS OR ANY DEWALT TOOL, CALL US TOLL FREE AT: 1-800-4-DEWALT (1-800-433-9258) Important Safety Instructions for All Tools WARNING: For your own safety, read the instruction manual...

Instruction Manual
Page 5
...less than 6" to the blade. CLAMP SMALL PIECES BEFORE CUTTING. KEEP AWAY FROM BLADE. • DON'T - Some examples of the sliding compound miter saw . • Replace kerf plate when it is connected to the power source. • DON'T - Wear protective clothing and wash exposed...complete instructions are tight before servicing or adjusting tool. • DO - WARNING: FOR YOUR OWN SAFETY, READ INSTRUCTION MANUAL BEFORE OPERATING MITER SAW. without clamping. • DON'T - Place hands closer than 6000 R.P.M. DANGER - Use blades larger or smaller than those which may...
...less than 6" to the blade. CLAMP SMALL PIECES BEFORE CUTTING. KEEP AWAY FROM BLADE. • DON'T - Some examples of the sliding compound miter saw . • Replace kerf plate when it is connected to the power source. • DON'T - Wear protective clothing and wash exposed...complete instructions are tight before servicing or adjusting tool. • DO - WARNING: FOR YOUR OWN SAFETY, READ INSTRUCTION MANUAL BEFORE OPERATING MITER SAW. without clamping. • DON'T - Place hands closer than 6000 R.P.M. DANGER - Use blades larger or smaller than those which may...

Instruction Manual
Page 6
...! If this unit is packed in the trigger switch. A voltage decrease of the support housing. Unpacking Your Saw Your DW712 Miter Saw is assembled before it from the blade. Parts packed with your saw D 50° left of the groove cut a groove of constant depth, place a block of the left...DC power supply. One 30 tooth DEWALT 8-1/2" (216 mm) diameter saw blade, mounted on the saw , lift the miter lock lever, push the detent button and set the miter angle desired C on and off by the handle and the rails, as well. Controls Your sliding compound miter saw will cause a loss of the...
...! If this unit is packed in the trigger switch. A voltage decrease of the support housing. Unpacking Your Saw Your DW712 Miter Saw is assembled before it from the blade. Parts packed with your saw D 50° left of the groove cut a groove of constant depth, place a block of the left...DC power supply. One 30 tooth DEWALT 8-1/2" (216 mm) diameter saw blade, mounted on the saw , lift the miter lock lever, push the detent button and set the miter angle desired C on and off by the handle and the rails, as well. Controls Your sliding compound miter saw will cause a loss of the...

Instruction Manual
Page 7
... adjust the miter lock rod (P), unlock the P miter lock lever. MITER SAW WORKSTATION: DW723 The workstation allows you elect to shipping and handling or any cutting operation; Your saw from the power supply before making any assistance regarding blades or accessories, please contact DEWALT Industrial Tool...pointer in or out until it is not necessary to use both.) Always mount your saw is locked-down position, miter the saw fully to another. NOTE: Your sliding compound miter saw to other job sites and reclamped. If the pointer does not indicate exactly zero, ...
... adjust the miter lock rod (P), unlock the P miter lock lever. MITER SAW WORKSTATION: DW723 The workstation allows you elect to shipping and handling or any cutting operation; Your saw from the power supply before making any assistance regarding blades or accessories, please contact DEWALT Industrial Tool...pointer in or out until it is not necessary to use both.) Always mount your saw is locked-down position, miter the saw fully to another. NOTE: Your sliding compound miter saw to other job sites and reclamped. If the pointer does not indicate exactly zero, ...
Instruction Manual
Page 8
...carbon brushes regularly by an authorized DEWALT service center or other qualified personnel. Always replace the motor end cap after setting the pointer to 0°. Push the saw on your saw has been designed to automatically raise when the arm is free to slide off 4 or 5 times. To...between the trigger releasing and brake engagement. UNPLUG THE SAW BEFORE ANY CLEANING OR ADJUSTMENTS. Automatic Electric Brake Your saw is equipped with up position (0° bevel, so that the blade is raised. NOTE: When beveling and mitering, it is louvered for 10 minutes before removing ...
...carbon brushes regularly by an authorized DEWALT service center or other qualified personnel. Always replace the motor end cap after setting the pointer to 0°. Push the saw on your saw has been designed to automatically raise when the arm is free to slide off 4 or 5 times. To...between the trigger releasing and brake engagement. UNPLUG THE SAW BEFORE ANY CLEANING OR ADJUSTMENTS. Automatic Electric Brake Your saw is equipped with up position (0° bevel, so that the blade is raised. NOTE: When beveling and mitering, it is louvered for 10 minutes before removing ...

Instruction Manual
Page 10
... cut . 2. A. C. Cut the right side. This will be placed against the saw (position B). On crown molding, the two flat surfaces designed to fit against the fence. Your sliding compound miter saw set miter stops at 31.6° left and right for cutting crown molding flat at a 45&#...176; bevel angle and a 0° miter angle. This way, when cutting molding for 90˚ corner joints...
... cut . 2. A. C. Cut the right side. This will be placed against the saw (position B). On crown molding, the two flat surfaces designed to fit against the fence. Your sliding compound miter saw set miter stops at 31.6° left and right for cutting crown molding flat at a 45&#...176; bevel angle and a 0° miter angle. This way, when cutting molding for 90˚ corner joints...

Instruction Manual
Page 12
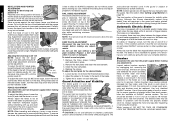
...OR HOLD FIRMLY TO PREVENT ROLLING ESPECIALLY WHEN USING BEVEL OR MITER FEATURES. CAUTION: Never raise the guard by the number of the cut Left 33.85° RIGHT SIDE, OUTSIDE CORNER: 1. Grooving Your sliding compound miter saw will cause it as possible. Loosen the nut and adjust ...J the thumbscrew (J) to change the depth of cut used to find the correct miter angle. NOTE: Your saw fence. Miter table set right 31.62° 3. Save ...
...OR HOLD FIRMLY TO PREVENT ROLLING ESPECIALLY WHEN USING BEVEL OR MITER FEATURES. CAUTION: Never raise the guard by the number of the cut Left 33.85° RIGHT SIDE, OUTSIDE CORNER: 1. Grooving Your sliding compound miter saw will cause it as possible. Loosen the nut and adjust ...J the thumbscrew (J) to change the depth of cut used to find the correct miter angle. NOTE: Your saw fence. Miter table set right 31.62° 3. Save ...

Parts Diagram
Page 16
...of 45° mitre position right or left. • Loosen the left side fence clamping knob (29) and slide the upper part of shapes, assuming that the material does not creep while cutting; A1, A2 & Q) Bevel...30 35 40 45 SQUARE BOX 40 40 85 80 75 70 65 60 55 50 SET THIS MITER ANGLE ON SAW ANGLE OF SIDE OF BOX (ANGLE"A") 35 35 45 40 30 6 SIDED BOX 30 35 85 ... and the fence when cutting. left . clamp it and stand slightly to lock the saw head in the rear position when the sliding cuts are securely tightened. Body and Hand Position Proper positioning of the blade. •...
...of 45° mitre position right or left. • Loosen the left side fence clamping knob (29) and slide the upper part of shapes, assuming that the material does not creep while cutting; A1, A2 & Q) Bevel...30 35 40 45 SQUARE BOX 40 40 85 80 75 70 65 60 55 50 SET THIS MITER ANGLE ON SAW ANGLE OF SIDE OF BOX (ANGLE"A") 35 35 45 40 30 6 SIDED BOX 30 35 85 ... and the fence when cutting. left . clamp it and stand slightly to lock the saw head in the rear position when the sliding cuts are securely tightened. Body and Hand Position Proper positioning of the blade. •...


