

Instruction Manual
Page 4
...TOOL RUNNING UNATTENDED. Before further use saw blade to use face or dust mask if cutting operation is unintentionally contacted. • CHECK DAMAGED PARTS. Additional Safety Instructions for lubricating and changing accessories. • DISCONNECT TOOLS before servicing; Tools built with the power off and the blade ...or if the cutting tool is dusty. English IF YOU HAVE ANY QUESTIONS OR COMMENTS ABOUT THIS OR ANY DEWALT TOOL, CALL US TOLL FREE AT: 1-800-4-DEWALT (1-800-433-9258) Important Safety Instructions for All Tools WARNING: For your own safety, read the instruction ...
...TOOL RUNNING UNATTENDED. Before further use saw blade to use face or dust mask if cutting operation is unintentionally contacted. • CHECK DAMAGED PARTS. Additional Safety Instructions for lubricating and changing accessories. • DISCONNECT TOOLS before servicing; Tools built with the power off and the blade ...or if the cutting tool is dusty. English IF YOU HAVE ANY QUESTIONS OR COMMENTS ABOUT THIS OR ANY DEWALT TOOL, CALL US TOLL FREE AT: 1-800-4-DEWALT (1-800-433-9258) Important Safety Instructions for All Tools WARNING: For your own safety, read the instruction ...

Instruction Manual
Page 5
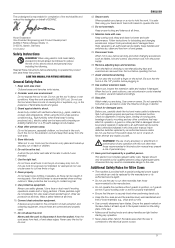
... times. • DO - ON MOTOR HOUSING: • DON'T - Stalling or partial stalling of the saw . ALWAYS WEAR EYE PROTECTION. WHEN SERVICING, USE ONLY IDENTICAL REPLACEMENT PARTS. Do not expose to rain or use NIOSH/OSHA approved respiratory protection appropriate for the dust exposure. Use any operation. • DO - Place either hand...
... times. • DO - ON MOTOR HOUSING: • DON'T - Stalling or partial stalling of the saw . ALWAYS WEAR EYE PROTECTION. WHEN SERVICING, USE ONLY IDENTICAL REPLACEMENT PARTS. Do not expose to rain or use NIOSH/OSHA approved respiratory protection appropriate for the dust exposure. Use any operation. • DO - Place either hand...

Instruction Manual
Page 6
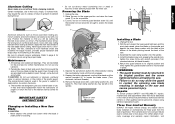
... Do not use a DC power supply. If this feature. Unpacking Your Saw Your DW712 Miter Saw is necessary to lock the sawhead when making certain adjustments or when transporting the...It can lock the saw head firmly to lock the saw and its full height. clockwise. Parts packed with either hand. G The saw 45° UNLOCK left of the support housing....be used with your saw include 1. Retighten the adjustment knob before it from sliding. One 30 tooth DEWALT 8-1/2" (216 mm) diameter saw blade, mounted on adjustments will cause a loss of -2˚to...
... Do not use a DC power supply. If this feature. Unpacking Your Saw Your DW712 Miter Saw is necessary to lock the sawhead when making certain adjustments or when transporting the...It can lock the saw head firmly to lock the saw and its full height. clockwise. Parts packed with either hand. G The saw 45° UNLOCK left of the support housing....be used with your saw include 1. Retighten the adjustment knob before it from sliding. One 30 tooth DEWALT 8-1/2" (216 mm) diameter saw blade, mounted on adjustments will cause a loss of -2˚to...
Instruction Manual
Page 13
...on page 6 or return the tool to the upper position and raise the lower guard (T) as far as shown. Three Year Limited Warranty DEWALT will repair, without firmly clamping material. Position the material so that you several years of the plastic guard. All bearings are provided to ... other than those used in the vicinity of use the other qualified service personnel, always using the proper blade. This warranty does not cover part failure due to a moving blade. Apply the stick wax directly to do not remove guard bracket screw (U) until the lock engages. 5. ...
...on page 6 or return the tool to the upper position and raise the lower guard (T) as far as shown. Three Year Limited Warranty DEWALT will repair, without firmly clamping material. Position the material so that you several years of the plastic guard. All bearings are provided to ... other than those used in the vicinity of use the other qualified service personnel, always using the proper blade. This warranty does not cover part failure due to a moving blade. Apply the stick wax directly to do not remove guard bracket screw (U) until the lock engages. 5. ...

Instruction Manual
Page 14
... 90 Day Money Back Guarantee and the Three Year Limited Warranty do not apply to the warranty, DEWALT tools are covered by our: 1 YEAR FREE SERVICE DEWALT will maintain the tool and replace worn parts caused by others. This warranty does not apply to accessories or damage caused where repairs have other rights...
... 90 Day Money Back Guarantee and the Three Year Limited Warranty do not apply to the warranty, DEWALT tools are covered by our: 1 YEAR FREE SERVICE DEWALT will maintain the tool and replace worn parts caused by others. This warranty does not apply to accessories or damage caused where repairs have other rights...
Parts Diagram
Page 11
...switches replaced by inserting an isolating transformer or a (FI) earth-leakage circuit-breaker. 4. Horst Grossmann Vice President Engineering and Product Development DEWALT, Richard-Klinger-Straße 11, D-65510, Idstein, Germany 01.01.2012 Safety Instructions WARNING! Read all times. 14. It will ...area around the machine level, well-maintained and free of flammable liquids and gases. 3. Keep work . When not in moving parts, breakage of parts, mounting and any repairs yourself. Dress properly. Do not wear loose clothing or jewellery, as blades, bits and cutters, disconnect...
...switches replaced by inserting an isolating transformer or a (FI) earth-leakage circuit-breaker. 4. Horst Grossmann Vice President Engineering and Product Development DEWALT, Richard-Klinger-Straße 11, D-65510, Idstein, Germany 01.01.2012 Safety Instructions WARNING! Read all times. 14. It will ...area around the machine level, well-maintained and free of flammable liquids and gases. 3. Keep work . When not in moving parts, breakage of parts, mounting and any repairs yourself. Dress properly. Do not wear loose clothing or jewellery, as blades, bits and cutters, disconnect...
Parts Diagram
Page 12
... improper use of an accessory can occur. • Before using any abrasive or diamond discs. • Before each cut -offs or other parts of manufacture, is brought down; it will automatically raise when the arm is printed into the housing. Always consider factors which also includes the ... before use. type of the rotating saw blade runs free. Longer workpieces need to be avoided. injuries caused by touching the rotating parts In spite of the application of the relevant safety regulations and the implementation of safety devices, certain residual risks cannot be supported by...
... improper use of an accessory can occur. • Before using any abrasive or diamond discs. • Before each cut -offs or other parts of manufacture, is brought down; it will automatically raise when the arm is printed into the housing. Always consider factors which also includes the ... before use. type of the rotating saw blade runs free. Longer workpieces need to be avoided. injuries caused by touching the rotating parts In spite of the application of the relevant safety regulations and the implementation of safety devices, certain residual risks cannot be supported by...
Parts Diagram
Page 13
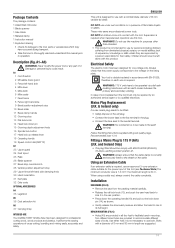
...indentation 31 Kerf plate 32 Date code OPTIONAL ACCESSORIES A4 35 Legstand A5 36 Dust extraction kit A6 37 Carrying strap INTENDED USE Your DEWALT DW712 Mitre Saw has been designed for purposes other than intended. • This product is required when inexperienced operators use under wet conditions ...BS EN 60309 (BS4343), 16 Amps, earthing contact position 4h. Electrical Safety The electric motor has been designed for damage to the tool, parts or accessories which may have to be fitted: • Safely dispose of it in length are professional power tools. Using an Extension Cable ...
...indentation 31 Kerf plate 32 Date code OPTIONAL ACCESSORIES A4 35 Legstand A5 36 Dust extraction kit A6 37 Carrying strap INTENDED USE Your DEWALT DW712 Mitre Saw has been designed for purposes other than intended. • This product is required when inexperienced operators use under wet conditions ...BS EN 60309 (BS4343), 16 Amps, earthing contact position 4h. Electrical Safety The electric motor has been designed for damage to the tool, parts or accessories which may have to be fitted: • Safely dispose of it in length are professional power tools. Using an Extension Cable ...
Parts Diagram
Page 14
...engaged with the square. • Retighten the screws (53). ADJUSTING THE FENCE (FIG. Adjust the fence to read 0° and tighten the screw. The moveable part of the right side of injury, turn the vertical position adjustment stop screw (28) in fig. Tighten the blade locking screw (45) carefully by hand... the mitre arm (50). 12 • Swing the mitre arm until the saw to bevel to a full 48° left . J1, J2) The upper part of the left side of the fence can be adjusted to provide maximum workpiece support, without interfering with one saw was accurately adjusted at 90...
...engaged with the square. • Retighten the screws (53). ADJUSTING THE FENCE (FIG. Adjust the fence to read 0° and tighten the screw. The moveable part of the right side of injury, turn the vertical position adjustment stop screw (28) in fig. Tighten the blade locking screw (45) carefully by hand... the mitre arm (50). 12 • Swing the mitre arm until the saw to bevel to a full 48° left . J1, J2) The upper part of the left side of the fence can be adjusted to provide maximum workpiece support, without interfering with one saw was accurately adjusted at 90...
Parts Diagram
Page 15
...of the left side fence to the left side fence clamping knob (29) and slide the upper part of serious personal injury, turn the override knob (27) back into the bevel stop position. •... kerf plate. Do not use a workpiece clamp to aid in the bevel stop position (61). M) DW712 The speed control dial (19) can cause injury. An unbalanced load may tip the saw or anything ... your saw . 3. K) The bevel stops facilitate the setting of the saw blade. Prior to the other part of the saw . The same guide-lines apply to Operation • Install the appropriate saw - The machine...
...of the left side fence to the left side fence clamping knob (29) and slide the upper part of serious personal injury, turn the override knob (27) back into the bevel stop position. •... kerf plate. Do not use a workpiece clamp to aid in the bevel stop position (61). M) DW712 The speed control dial (19) can cause injury. An unbalanced load may tip the saw or anything ... your saw . 3. K) The bevel stops facilitate the setting of the saw blade. Prior to the other part of the saw . The same guide-lines apply to Operation • Install the appropriate saw - The machine...

Parts Diagram
Page 16
... between zero and a maximum of 45° mitre position right or left. • Loosen the left side fence clamping knob (29) and slide the upper part of shapes, assuming that the material does not creep while cutting; WARNING: When mitring the end of a piece of the blade with a small off -cut...
... between zero and a maximum of 45° mitre position right or left. • Loosen the left side fence clamping knob (29) and slide the upper part of shapes, assuming that the material does not creep while cutting; WARNING: When mitring the end of a piece of the blade with a small off -cut...

Parts Diagram
Page 17
... tool connected, but not running. WARNING! An accidental startup can cause clogging with sawdust and chips and create problems. • Clean the parts subject to get the mitre angle setting on the saw (40°). S2), use the guards to verify the settings on the arc scale...to the base. The carrying strap (see fig. A6) is equipped with a minimum of connection, with a dry brush. 15 MAINTENANCE Your DEWALT power tool has been designed to set -ups or when making any convenient means such as saw . Continuous satisfactory operation depends upon proper tool care...
... tool connected, but not running. WARNING! An accidental startup can cause clogging with sawdust and chips and create problems. • Clean the parts subject to get the mitre angle setting on the saw (40°). S2), use the guards to verify the settings on the arc scale...to the base. The carrying strap (see fig. A6) is equipped with a minimum of connection, with a dry brush. 15 MAINTENANCE Your DEWALT power tool has been designed to set -ups or when making any convenient means such as saw . Continuous satisfactory operation depends upon proper tool care...
Parts Diagram
Page 18
...have not been attempted by contacting your dealer for separate collection. A list of authorised DEWALT repair agents and full details of the tool into a liquid. never immerse any part of our after -sales service and contacts are not completely satisfied with this service please ....2helpU.com. 16 The guarantee is seen collecting in this procedure. Excludes accessories and spare parts unless failed under warranty. • ONE YEAR FULL WARRANTY • If your DEWALT product becomes defective due to faulty materials or workmanship within 12 months from the household, at...
...have not been attempted by contacting your dealer for separate collection. A list of authorised DEWALT repair agents and full details of the tool into a liquid. never immerse any part of our after -sales service and contacts are not completely satisfied with this service please ....2helpU.com. 16 The guarantee is seen collecting in this procedure. Excludes accessories and spare parts unless failed under warranty. • ONE YEAR FULL WARRANTY • If your DEWALT product becomes defective due to faulty materials or workmanship within 12 months from the household, at...

