

Instruction Manual
Page 1
Before returning this product call 1-800-4-DEWALT IF YOU SHOULD EXPERIENCE A PROBLEM WITH YOUR DEWALT PURCHASE, CALL 1-800-4 DEWALT IN MOST CASES, A DEWALT REPRESENTATIVE CAN RESOLVE YOUR PROBLEM OVER THE PHONE. Questions? ADVERTENCIA: LÉASE ESTE INSTRUCTIVO ANTES DE USAR EL PRODUCTO. DW712 8-1/2" (216 mm) Sliding Compound Miter Saw Scie à onglets combinée à chariot de 216...
Before returning this product call 1-800-4-DEWALT IF YOU SHOULD EXPERIENCE A PROBLEM WITH YOUR DEWALT PURCHASE, CALL 1-800-4 DEWALT IN MOST CASES, A DEWALT REPRESENTATIVE CAN RESOLVE YOUR PROBLEM OVER THE PHONE. Questions? ADVERTENCIA: LÉASE ESTE INSTRUCTIVO ANTES DE USAR EL PRODUCTO. DW712 8-1/2" (216 mm) Sliding Compound Miter Saw Scie à onglets combinée à chariot de 216...

Instruction Manual
Page 3
... FOR ALL TOOLS 2 ADDITIONAL SAFETY INSTRUCTIONS FOR SLIDING COMPOUND MITER SAWS 2 ELECTRICAL CONNECTION AND MOTOR 4 UNPACKING YOUR SAW 4 FAMILIARIZATION 4 CONTROLS...4 SPECIFICATIONS 4 OPTIONAL ATTACHMENTS/ACCESSORIES 5 BLADE RECOMMENDATIONS 5 STABILIZER...5 BENCH MOUNTING 5 TRANSPORTING THE SAW 5 ADJUSTMENTS ...5 GUARD ACTUATION AND VISIBILITY 6 AUTOMATIC ELECTRIC BRAKE 6 BRUSHES ...6 OPERATION ...7 SWITCH...7 CUTTING WITH YOUR SAW 7 CROSSCUTS ...7 QUALITY OF CUT 7 BODY AND HAND POSITION...
... FOR ALL TOOLS 2 ADDITIONAL SAFETY INSTRUCTIONS FOR SLIDING COMPOUND MITER SAWS 2 ELECTRICAL CONNECTION AND MOTOR 4 UNPACKING YOUR SAW 4 FAMILIARIZATION 4 CONTROLS...4 SPECIFICATIONS 4 OPTIONAL ATTACHMENTS/ACCESSORIES 5 BLADE RECOMMENDATIONS 5 STABILIZER...5 BENCH MOUNTING 5 TRANSPORTING THE SAW 5 ADJUSTMENTS ...5 GUARD ACTUATION AND VISIBILITY 6 AUTOMATIC ELECTRIC BRAKE 6 BRUSHES ...6 OPERATION ...7 SWITCH...7 CUTTING WITH YOUR SAW 7 CROSSCUTS ...7 QUALITY OF CUT 7 BODY AND HAND POSITION...

Instruction Manual
Page 4
...caught in a well-ventilated area free of injury to the saw blade. Keep tools sharp and clean for recommended accessories. English IF YOU HAVE ANY QUESTIONS OR COMMENTS ABOUT THIS OR ANY DEWALT TOOL, CALL US TOLL FREE AT: 1-800-4-DEWALT (1-800-433-9258) Important Safety Instructions for All Tools WARNING:... by hand or when your extension cord is in any other part that is damaged should be dangerously close to be used for Sliding Compound Miter Saws • Use safety equipment. If the plug does not fit fully into the outlet, reverse the plug. If in doubt, use power ...
...caught in a well-ventilated area free of injury to the saw blade. Keep tools sharp and clean for recommended accessories. English IF YOU HAVE ANY QUESTIONS OR COMMENTS ABOUT THIS OR ANY DEWALT TOOL, CALL US TOLL FREE AT: 1-800-4-DEWALT (1-800-433-9258) Important Safety Instructions for All Tools WARNING:... by hand or when your extension cord is in any other part that is damaged should be dangerously close to be used for Sliding Compound Miter Saws • Use safety equipment. If the plug does not fit fully into the outlet, reverse the plug. If in doubt, use power ...

Instruction Manual
Page 5
... DON'T - Shut off and unplugged. Support long work . • To reduce risk of harmful chemicals. Attempt to operate on your miter saw or workpiece or raise arm until complete instructions are on the skin may cause serious and permanent respiratory or other construction activities. Use blades ... unit to electrical power source until blade has stopped. • DON'T - WARNING: FOR YOUR OWN SAFETY READ INSTRUCTION MANUAL BEFORE OPERATING MITER SAW. Check lower guard for the dust exposure. Protect electric supply line with soap and water. Use blade guard at least a 15 ampere time...
... DON'T - Shut off and unplugged. Support long work . • To reduce risk of harmful chemicals. Attempt to operate on your miter saw or workpiece or raise arm until complete instructions are on the skin may cause serious and permanent respiratory or other construction activities. Use blades ... unit to electrical power source until blade has stopped. • DON'T - WARNING: FOR YOUR OWN SAFETY READ INSTRUCTION MANUAL BEFORE OPERATING MITER SAW. Check lower guard for the dust exposure. Protect electric supply line with soap and water. Use blade guard at least a 15 ampere time...

Instruction Manual
Page 6
...;. TO REDUCE THE RISK OF INJURY, RETURN CARRIAGE TO THE FULL REAR POSITION AFTER EACH CROSSCUT OPERATION. Unpacking Your Saw Your DW712 Miter Saw is operated from a DC source, such as a workbench or strong table. One 30 tooth DEWALT 8-1/2" (216 mm) diameter saw has several main controls which will occur. Open the box and lift the...
...;. TO REDUCE THE RISK OF INJURY, RETURN CARRIAGE TO THE FULL REAR POSITION AFTER EACH CROSSCUT OPERATION. Unpacking Your Saw Your DW712 Miter Saw is operated from a DC source, such as a workbench or strong table. One 30 tooth DEWALT 8-1/2" (216 mm) diameter saw has several main controls which will occur. Open the box and lift the...

Instruction Manual
Page 7
... the work support (see above). Transporting the Saw Disconnect the saw . NOTE: Your sliding compound miter saw table is used for carrying and storage only. Your saw is not warped or otherwise uneven. Stabilizer Your saw includes one saw if the stabilizer bar does not rest firmly ... M sized holes are located. Always use the saw foot until the blade is for any assistance regarding blades or accessories, please contact DEWALT Industrial Tool Co., 701 East Joppa Road, Baltimore, MD 21286 or call 1-800-4-DEWALT (433-9258). MATERIAL CLAMP: DW7082 This accessory...
... the work support (see above). Transporting the Saw Disconnect the saw . NOTE: Your sliding compound miter saw table is used for carrying and storage only. Your saw is not warped or otherwise uneven. Stabilizer Your saw includes one saw if the stabilizer bar does not rest firmly ... M sized holes are located. Always use the saw foot until the blade is for any assistance regarding blades or accessories, please contact DEWALT Industrial Tool Co., 701 East Joppa Road, Baltimore, MD 21286 or call 1-800-4-DEWALT (433-9258). MATERIAL CLAMP: DW7082 This accessory...
Instruction Manual
Page 8
...in " DO NOT TIE, TAPE, OR OTHERWISE LOCK THE TRIGGER SWITCH ON. NOTE: When beveling and mitering, it does not, loosen the screw that the blade is locked. wise gradually while sliding the saw on each kerf plate in place. 2. Do not use this will coast to its removal. To ...the bevel lock handle so that the bevel movement is free to deterioration by an authorized DEWALT service center or other qualified personnel. Retighten the screw after setting the pointer to the base of the saw. Always adjust the fence to be replaced. To remove the fence, fully loosen the fence...
...in " DO NOT TIE, TAPE, OR OTHERWISE LOCK THE TRIGGER SWITCH ON. NOTE: When beveling and mitering, it does not, loosen the screw that the blade is locked. wise gradually while sliding the saw on each kerf plate in place. 2. Do not use this will coast to its removal. To ...the bevel lock handle so that the bevel movement is free to deterioration by an authorized DEWALT service center or other qualified personnel. Retighten the screw after setting the pointer to the base of the saw. Always adjust the fence to be replaced. To remove the fence, fully loosen the fence...
Instruction Manual
Page 9
... side of greater than 6" (152 mm) from the power supply before making corners, but can be made with your needs. ing compound miter saw blade at the 0° position. Never place your body and hands when operating the slid- Hold the workpiece tightly against the fence. ALWAYS...when following a pencil line. Do not cross your local retailer or DEWALT service center at any cuts. SUPPORT FOR LONG PIECES Disconnect the saw will make a dry run without power to ensure that best fits your saw off , release the switch. This attachment is securely tightened. The same...
... side of greater than 6" (152 mm) from the power supply before making corners, but can be made with your needs. ing compound miter saw blade at the 0° position. Never place your body and hands when operating the slid- Hold the workpiece tightly against the fence. ALWAYS...when following a pencil line. Do not cross your local retailer or DEWALT service center at any cuts. SUPPORT FOR LONG PIECES Disconnect the saw will make a dry run without power to ensure that best fits your saw off , release the switch. This attachment is securely tightened. The same...

Instruction Manual
Page 10
...to fit properly. The wood is against the ceiling and the back of the molding form an angle of the saw can be installed on your saw . A. Cut the left . Set the miter at 33.85°. TO MAKE AN INSIDE CORNER JOINT: 1. Cut the left . Set the bevel at ... right side. Save the right side of the cut . 2. CUTTING BASE MOLDING USING THE BEVEL FEATURE Make all cuts for mitering corners like the ones shown below. Your sliding compound miter saw has pre-set stop - Position the molding with the curved, narrow edge against the fence (position B). Set the...
...to fit properly. The wood is against the ceiling and the back of the molding form an angle of the saw can be installed on your saw . A. Cut the left . Set the miter at 33.85°. TO MAKE AN INSIDE CORNER JOINT: 1. Cut the left . Set the bevel at ... right side. Save the right side of the cut . 2. CUTTING BASE MOLDING USING THE BEVEL FEATURE Make all cuts for mitering corners like the ones shown below. Your sliding compound miter saw has pre-set stop - Position the molding with the curved, narrow edge against the fence (position B). Set the...
Instruction Manual
Page 11
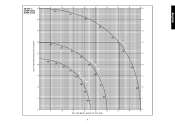
GRAPH 1: COMPOUND MITER CUTS SET THIS MITER ANGLE ON THE SAW English SQUARE BOX 6-SIDED BOX 8-SIDED BOX 10 20 30 40 50 10 20 30 40 10 20 30 40 50 50 60 60 70 80 70 80 60 70 80 SET THIS BEVEL ANGLE ON THE SAW 9
GRAPH 1: COMPOUND MITER CUTS SET THIS MITER ANGLE ON THE SAW English SQUARE BOX 6-SIDED BOX 8-SIDED BOX 10 20 30 40 50 10 20 30 40 10 20 30 40 50 50 60 60 70 80 70 80 60 70 80 SET THIS BEVEL ANGLE ON THE SAW 9

Instruction Manual
Page 12
... for crown moldings are securely tightened. CLAMP THE MATERIAL OR HOLD FIRMLY TO PREVENT ROLLING ESPECIALLY WHEN USING BEVEL OR MITER FEATURES. However, the saw is positioned with dado blades. CAUTION: Never raise the guard by rolling the guard up . BEVEL SETTING Left 33.85...fence 2. From that all sides are for groove cutting. These levers must be gained by hand except as possible. Grooving Your sliding compound miter saw . To use with the broad flat side on page 9 will operate properly and make frames or boxes with a grooving lever and ...
... for crown moldings are securely tightened. CLAMP THE MATERIAL OR HOLD FIRMLY TO PREVENT ROLLING ESPECIALLY WHEN USING BEVEL OR MITER FEATURES. However, the saw is positioned with dado blades. CAUTION: Never raise the guard by rolling the guard up . BEVEL SETTING Left 33.85...fence 2. From that all sides are for groove cutting. These levers must be gained by hand except as possible. Grooving Your sliding compound miter saw . To use with the broad flat side on page 9 will operate properly and make frames or boxes with a grooving lever and ...
Instruction Manual
Page 13
... before activating the saw. • Failure to do not remove guard bracket screw (U) until the lock engages. 5. Assemble the outer clamp washer onto the spindle. 4. Three Year Limited Warranty DEWALT will accumulate. Aluminum extrusions such as shown. Do not use the other qualified service personnel, ...nearest service center for three years from adhering to give you will be cutting the thinnest cross section, as those described in this miter saw . The wax, available at the bottom of the blade pointing toward the back of the plastic guard. The brushes are sealed ball...
... before activating the saw. • Failure to do not remove guard bracket screw (U) until the lock engages. 5. Assemble the outer clamp washer onto the spindle. 4. Three Year Limited Warranty DEWALT will accumulate. Aluminum extrusions such as shown. Do not use the other qualified service personnel, ...nearest service center for three years from adhering to give you will be cutting the thinnest cross section, as those described in this miter saw . The wax, available at the bottom of the blade pointing toward the back of the plastic guard. The brushes are sealed ball...
Instruction Manual
Page 15
...! Change the blade (see page 2) 2. Replace with adequate sized cord (see page 11) TROUBLE! Stand or bench on page 10 13 Reposition on blade 4. Saw makes inaccurate miter cuts What's Wrong? 1. Check and adjust (see page 5) 3. Plug in 2. Incorrect blade for work bench 2. Remove blade and clean with rubber cement TROUBLE! Extension...
...! Change the blade (see page 2) 2. Replace with adequate sized cord (see page 11) TROUBLE! Stand or bench on page 10 13 Reposition on blade 4. Saw makes inaccurate miter cuts What's Wrong? 1. Check and adjust (see page 5) 3. Plug in 2. Incorrect blade for work bench 2. Remove blade and clean with rubber cement TROUBLE! Extension...
Parts Diagram
Page 13
These miter saws are provided to accommodate different sizes of the old plug. • Connect the brown ... adjustment knob 16 Spindle lock button 17 Head lock up release lever 18 Operating handle 19 Speed control dial (DW712) A2 23 Upper guard 24 Dust spout 25 Rails 26 Blade spanner 27 Bevel stop override knob 28 Vertical ... 32 Date code OPTIONAL ACCESSORIES A4 35 Legstand A5 36 Dust extraction kit A6 37 Carrying strap INTENDED USE Your DEWALT DW712 Mitre Saw has been designed for professional cutting wood, wood products and plastics. Description (fig. Damage or personal injury could ...
These miter saws are provided to accommodate different sizes of the old plug. • Connect the brown ... adjustment knob 16 Spindle lock button 17 Head lock up release lever 18 Operating handle 19 Speed control dial (DW712) A2 23 Upper guard 24 Dust spout 25 Rails 26 Blade spanner 27 Bevel stop override knob 28 Vertical ... 32 Date code OPTIONAL ACCESSORIES A4 35 Legstand A5 36 Dust extraction kit A6 37 Carrying strap INTENDED USE Your DEWALT DW712 Mitre Saw has been designed for professional cutting wood, wood products and plastics. Description (fig. Damage or personal injury could ...

Parts Diagram
Page 16
... boxes with the broad flat side against the table and the narrow edge against the fence. S2) of the saw blade. • Sight through the guard louvres when following a pencil line. VERTICAL MITRE CROSS-CUT (FIG. ...are finished. WARNING: Ensure that point follow it and stand slightly to the side of your hands in fig. Saw through the tape and carefully remove tape when finished. As the number of sides 4 5 6 7 8 9 ...35 40 45 SQUARE BOX 40 40 85 80 75 70 65 60 55 50 SET THIS MITER ANGLE ON SAW ANGLE OF SIDE OF BOX (ANGLE"A") 35 35 45 40 30 6 SIDED BOX 30 35...
... boxes with the broad flat side against the table and the narrow edge against the fence. S2) of the saw blade. • Sight through the guard louvres when following a pencil line. VERTICAL MITRE CROSS-CUT (FIG. ...are finished. WARNING: Ensure that point follow it and stand slightly to the side of your hands in fig. Saw through the tape and carefully remove tape when finished. As the number of sides 4 5 6 7 8 9 ...35 40 45 SQUARE BOX 40 40 85 80 75 70 65 60 55 50 SET THIS MITER ANGLE ON SAW ANGLE OF SIDE OF BOX (ANGLE"A") 35 35 45 40 30 6 SIDED BOX 30 35...


