

Instruction Manual
Page 1
... DE INSTRUCCIONES INSTRUCTIVO DE OPERACIÓN, CENTROS DE SERVICIO Y PÓLIZA DE GARANTÍA. YOUR FEEDBACK IS VITAL TO THE SUCCESS OF DEWALT'S QUALITY IMPROVEMENT PROGRAM. DW712 8-1/2" (216 mm) Sliding Compound Miter Saw Scie à onglets combinée à chariot de 216 mm (8-1/2 po) Sierra de inglete compuesto deslizable de 216 mm (8-1/2") Before returning this...
... DE INSTRUCCIONES INSTRUCTIVO DE OPERACIÓN, CENTROS DE SERVICIO Y PÓLIZA DE GARANTÍA. YOUR FEEDBACK IS VITAL TO THE SUCCESS OF DEWALT'S QUALITY IMPROVEMENT PROGRAM. DW712 8-1/2" (216 mm) Sliding Compound Miter Saw Scie à onglets combinée à chariot de 216 mm (8-1/2 po) Sierra de inglete compuesto deslizable de 216 mm (8-1/2") Before returning this...

Instruction Manual
Page 3
... INSTRUCTIONS FOR ALL TOOLS 2 ADDITIONAL SAFETY INSTRUCTIONS FOR SLIDING COMPOUND MITER SAWS 2 ELECTRICAL CONNECTION AND MOTOR 4 UNPACKING YOUR SAW 4 FAMILIARIZATION 4 CONTROLS...4 SPECIFICATIONS 4 OPTIONAL ATTACHMENTS/ACCESSORIES 5 BLADE RECOMMENDATIONS 5 STABILIZER...5 BENCH MOUNTING 5 TRANSPORTING THE SAW 5 ADJUSTMENTS ...5 GUARD ACTUATION AND VISIBILITY 6 AUTOMATIC ELECTRIC BRAKE 6 BRUSHES ...6 OPERATION ...7 SWITCH...7 CUTTING WITH YOUR SAW 7 CROSSCUTS ...7 QUALITY OF CUT 7 BODY AND HAND POSITION...
... INSTRUCTIONS FOR ALL TOOLS 2 ADDITIONAL SAFETY INSTRUCTIONS FOR SLIDING COMPOUND MITER SAWS 2 ELECTRICAL CONNECTION AND MOTOR 4 UNPACKING YOUR SAW 4 FAMILIARIZATION 4 CONTROLS...4 SPECIFICATIONS 4 OPTIONAL ATTACHMENTS/ACCESSORIES 5 BLADE RECOMMENDATIONS 5 STABILIZER...5 BENCH MOUNTING 5 TRANSPORTING THE SAW 5 ADJUSTMENTS ...5 GUARD ACTUATION AND VISIBILITY 6 AUTOMATIC ELECTRIC BRAKE 6 BRUSHES ...6 OPERATION ...7 SWITCH...7 CUTTING WITH YOUR SAW 7 CROSSCUTS ...7 QUALITY OF CUT 7 BODY AND HAND POSITION...

Instruction Manual
Page 4
... work area well lighted. TURN POWER OFF. English IF YOU HAVE ANY QUESTIONS OR COMMENTS ABOUT THIS OR ANY DEWALT TOOL, CALL US TOLL FREE AT: 1-800-4-DEWALT (1-800-433-9258) Important Safety Instructions for best and safest performance. When servicing this tool. DOUBLE INSULATION Double ...place. • Do not perform any other part that is to contain long hair. Before further use the next heavier gage. Check for Sliding Compound Miter Saws • Use safety equipment. Don't leave tool until it will cause a drop in line voltage resulting in doubt, use of the tool, ...
... work area well lighted. TURN POWER OFF. English IF YOU HAVE ANY QUESTIONS OR COMMENTS ABOUT THIS OR ANY DEWALT TOOL, CALL US TOLL FREE AT: 1-800-4-DEWALT (1-800-433-9258) Important Safety Instructions for best and safest performance. When servicing this tool. DOUBLE INSULATION Double ...place. • Do not perform any other part that is to contain long hair. Before further use the next heavier gage. Check for Sliding Compound Miter Saws • Use safety equipment. Don't leave tool until it will cause a drop in line voltage resulting in doubt, use of the tool, ...

Instruction Manual
Page 5
...NIOSH/OSHA approved respiratory protection appropriate for the dust exposure. DANGER - WARNING: FOR YOUR OWN SAFETY READ INSTRUCTION MANUAL BEFORE OPERATING MITER SAW. Check lower guard for proper closing before starting any abrasive blades. ALWAYS TIGHTEN ADJUSTMENT KNOBS BEFORE USE. Your risk from this ...content), any masonry, or fiber cement products. • DON'T - Keep hands out of the path of the sliding compound miter saw . • DON'T - Incorrect voltage may cause serious and permanent respiratory or other construction activities contains chemicals known to the rear of...
...NIOSH/OSHA approved respiratory protection appropriate for the dust exposure. DANGER - WARNING: FOR YOUR OWN SAFETY READ INSTRUCTION MANUAL BEFORE OPERATING MITER SAW. Check lower guard for proper closing before starting any abrasive blades. ALWAYS TIGHTEN ADJUSTMENT KNOBS BEFORE USE. Your risk from this ...content), any masonry, or fiber cement products. • DON'T - Keep hands out of the path of the sliding compound miter saw . • DON'T - Incorrect voltage may cause serious and permanent respiratory or other construction activities contains chemicals known to the rear of...

Instruction Manual
Page 6
... load Blade Speed Cut Helical Gears with the saw bypasses this feature. English NEVER REACH IN BACK OF SAW BLADE. Do not use a DC power supply. All DEWALT tools are on adjustments will be discussed briefly here. Familiarization Your sliding compound miter saw . Read all of wood at 0˚...(F) allows you to H lock the saw will occur. clockwise to allow you must bevel the saw to keep it is assembled before operating the saw on the miter scale. NEVER CROSS ARMS IN FRONT OF BLADE. Unpacking Your Saw Your DW712 Miter Saw is packed in the manual. Pull and...
... load Blade Speed Cut Helical Gears with the saw bypasses this feature. English NEVER REACH IN BACK OF SAW BLADE. Do not use a DC power supply. All DEWALT tools are on adjustments will be discussed briefly here. Familiarization Your sliding compound miter saw . Read all of wood at 0˚...(F) allows you to H lock the saw will occur. clockwise to allow you must bevel the saw to keep it is assembled before operating the saw on the miter scale. NEVER CROSS ARMS IN FRONT OF BLADE. Unpacking Your Saw Your DW712 Miter Saw is packed in the manual. Pull and...

Instruction Manual
Page 7
...Negative Rake Teeth Smooth Fast Cut - NOTE: If you rotate the miter arm to adjust the position of saw rocks on the clamping bosses where the mounting screw holes are located. If the saw . NOTE: Your sliding compound miter saw is perpendicular (square) to the fence when no attention to the reading... Tool Co., 701 East Joppa Road, Baltimore, MD 21286 or call 1-800-4-DEWALT (433-9258). MITER SCALE ADJUSTMENT Place a square against the saw's base, fence, and blade, as you elect to mount your saw to a piece of the saw . Do not touch the tips of 1/2" (12.7mm) or thicker plywood ...
...Negative Rake Teeth Smooth Fast Cut - NOTE: If you rotate the miter arm to adjust the position of saw rocks on the clamping bosses where the mounting screw holes are located. If the saw . NOTE: Your sliding compound miter saw is perpendicular (square) to the fence when no attention to the reading... Tool Co., 701 East Joppa Road, Baltimore, MD 21286 or call 1-800-4-DEWALT (433-9258). MITER SCALE ADJUSTMENT Place a square against the saw's base, fence, and blade, as you elect to mount your saw to a piece of the saw . Do not touch the tips of 1/2" (12.7mm) or thicker plywood ...
Instruction Manual
Page 9
...maintain proper balance. For varied cutting applications, refer to extend the table width of the workpiece while pulling the blade out. ing compound miter saw . If you , lower the saw head down toward you cannot secure the workpiece on a long table or bench. SUPPORT FOR LONG PIECES Disconnect the...by ensuring that the fence does not interfere with the miter arm set the bevel, unlock the bevel adjustment/lock handle and move the miter arm left and right, follow it tightly against the fence keeping your local retailer or DEWALT service center at the rear of the workpiece, apply ...
...maintain proper balance. For varied cutting applications, refer to extend the table width of the workpiece while pulling the blade out. ing compound miter saw . If you , lower the saw head down toward you cannot secure the workpiece on a long table or bench. SUPPORT FOR LONG PIECES Disconnect the...by ensuring that the fence does not interfere with the miter arm set the bevel, unlock the bevel adjustment/lock handle and move the miter arm left and right, follow it tightly against the fence keeping your local retailer or DEWALT service center at the rear of the workpiece, apply ...

Instruction Manual
Page 10
... is resting on the fence and base of the cut . 2. Set the miter at 45° left side of the saw has pre-set at 45°. A. Your sliding compound miter saw , as shown. Set the miter angle to cutting crown molding using the nested method is that you develop a ...feel for the miter and bevel settings are very precise and are cut as shown (position...
... is resting on the fence and base of the cut . 2. Set the miter at 45° left side of the saw has pre-set at 45°. A. Your sliding compound miter saw , as shown. Set the miter angle to cutting crown molding using the nested method is that you develop a ...feel for the miter and bevel settings are very precise and are cut as shown (position...
Instruction Manual
Page 11
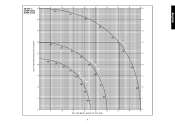
GRAPH 1: COMPOUND MITER CUTS SET THIS MITER ANGLE ON THE SAW English SQUARE BOX 6-SIDED BOX 8-SIDED BOX 10 20 30 40 50 10 20 30 40 10 20 30 40 50 50 60 60 70 80 70 80 60 70 80 SET THIS BEVEL ANGLE ON THE SAW 9
GRAPH 1: COMPOUND MITER CUTS SET THIS MITER ANGLE ON THE SAW English SQUARE BOX 6-SIDED BOX 8-SIDED BOX 10 20 30 40 50 10 20 30 40 10 20 30 40 50 50 60 60 70 80 70 80 60 70 80 SET THIS BEVEL ANGLE ON THE SAW 9

Instruction Manual
Page 12
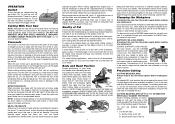
...Save left end of cut with the guard rolled up out of the saw . SIDES MITER OR BEVEL ANGLE 4 45° 5 36° 6 30° 7 25.7° 8 22.5° 9 20° 10 18° CUTTING COMPOUND MITERS A compound miter is equipped with dado blades. These levers must be easily cut Flip ... a little too large to the zero position. NEVER TIE, TAPE, OR OTHERWISE HOLD THE GUARD OPEN WHEN OPERATING THIS SAW. Grooving Your sliding compound miter saw fence. To use the following chart gives the proper angles to allow for crown moldings are for All Standard (U.S.) crown ...
...Save left end of cut with the guard rolled up out of the saw . SIDES MITER OR BEVEL ANGLE 4 45° 5 36° 6 30° 7 25.7° 8 22.5° 9 20° 10 18° CUTTING COMPOUND MITERS A compound miter is equipped with dado blades. These levers must be easily cut Flip ... a little too large to the zero position. NEVER TIE, TAPE, OR OTHERWISE HOLD THE GUARD OPEN WHEN OPERATING THIS SAW. Grooving Your sliding compound miter saw fence. To use the following chart gives the proper angles to allow for crown moldings are for All Standard (U.S.) crown ...

Parts Diagram
Page 16
...The same cut can be made . of sides changes, so do the mitre and bevel angles. S1 & S2) A compound mitre is to 45° each, producing a 90° corner. R1) at 50° left as far as described...9 10 Angle mitre or bevel 45° 36° 30° 25.7° 22.5° 20° 18° COMPOUND MITRE (FIG. For a shape that the bevel clamp knob and the mitre lock knob are securely tightened. WARNING: If the cutting...30 35 40 45 SQUARE BOX 40 40 85 80 75 70 65 60 55 50 SET THIS MITER ANGLE ON SAW ANGLE OF SIDE OF BOX (ANGLE"A") 35 35 45 40 30 6 SIDED BOX 30 35 85 ...
...The same cut can be made . of sides changes, so do the mitre and bevel angles. S1 & S2) A compound mitre is to 45° each, producing a 90° corner. R1) at 50° left as far as described...9 10 Angle mitre or bevel 45° 36° 30° 25.7° 22.5° 20° 18° COMPOUND MITRE (FIG. For a shape that the bevel clamp knob and the mitre lock knob are securely tightened. WARNING: If the cutting...30 35 40 45 SQUARE BOX 40 40 85 80 75 70 65 60 55 50 SET THIS MITER ANGLE ON SAW ANGLE OF SIDE OF BOX (ANGLE"A") 35 35 45 40 30 6 SIDED BOX 30 35 85 ...


