

Instruction Manual
Page 1
... COMMENT, GIVE US A CALL. DW712 8-1/2" (216 mm) Sliding Compound Miter Saw Scie à onglets combinée à chariot de 216 mm (8-1/2 po) Sierra de inglete compuesto deslizable de 216 mm (8-1/2") Before returning this product call 1-800-4-DEWALT IF YOU SHOULD EXPERIENCE A PROBLEM WITH YOUR DEWALT PURCHASE, CALL 1-800-4 DEWALT IN MOST CASES, A DEWALT REPRESENTATIVE CAN RESOLVE YOUR PROBLEM...
... COMMENT, GIVE US A CALL. DW712 8-1/2" (216 mm) Sliding Compound Miter Saw Scie à onglets combinée à chariot de 216 mm (8-1/2 po) Sierra de inglete compuesto deslizable de 216 mm (8-1/2") Before returning this product call 1-800-4-DEWALT IF YOU SHOULD EXPERIENCE A PROBLEM WITH YOUR DEWALT PURCHASE, CALL 1-800-4 DEWALT IN MOST CASES, A DEWALT REPRESENTATIVE CAN RESOLVE YOUR PROBLEM...

Instruction Manual
Page 3
... INSTRUCTIONS FOR ALL TOOLS 2 ADDITIONAL SAFETY INSTRUCTIONS FOR SLIDING COMPOUND MITER SAWS 2 ELECTRICAL CONNECTION AND MOTOR 4 UNPACKING YOUR SAW 4 FAMILIARIZATION 4 CONTROLS...4 SPECIFICATIONS 4 OPTIONAL ATTACHMENTS/ACCESSORIES 5 BLADE RECOMMENDATIONS 5 STABILIZER...5 BENCH MOUNTING 5 TRANSPORTING THE SAW 5 ADJUSTMENTS ...5 GUARD ACTUATION AND VISIBILITY 6 AUTOMATIC ELECTRIC BRAKE 6 BRUSHES ...6 OPERATION ...7 SWITCH...7 CUTTING WITH YOUR SAW 7 CROSSCUTS ...7 QUALITY OF CUT 7 BODY AND HAND POSITION...
... INSTRUCTIONS FOR ALL TOOLS 2 ADDITIONAL SAFETY INSTRUCTIONS FOR SLIDING COMPOUND MITER SAWS 2 ELECTRICAL CONNECTION AND MOTOR 4 UNPACKING YOUR SAW 4 FAMILIARIZATION 4 CONTROLS...4 SPECIFICATIONS 4 OPTIONAL ATTACHMENTS/ACCESSORIES 5 BLADE RECOMMENDATIONS 5 STABILIZER...5 BENCH MOUNTING 5 TRANSPORTING THE SAW 5 ADJUSTMENTS ...5 GUARD ACTUATION AND VISIBILITY 6 AUTOMATIC ELECTRIC BRAKE 6 BRUSHES ...6 OPERATION ...7 SWITCH...7 CUTTING WITH YOUR SAW 7 CROSSCUTS ...7 QUALITY OF CUT 7 BODY AND HAND POSITION...

Instruction Manual
Page 4
...QUESTIONS OR COMMENTS ABOUT THIS OR ANY DEWALT TOOL, CALL US TOLL FREE AT: 1-800-4-DEWALT (1-800-433-9258) Important Safety Instructions for All Tools WARNING: For your own safety, read the instruction manual before operating the sliding compound miter saw blade. Tools built with a two ...is unintentionally contacted. • CHECK DAMAGED PARTS. Follow instructions for best and safest performance. Check for Sliding Compound Miter Saws • Use safety equipment. Additional Safety Instructions for alignment of moving parts, binding of combustible materials, gasoline or solvent vapors.
...QUESTIONS OR COMMENTS ABOUT THIS OR ANY DEWALT TOOL, CALL US TOLL FREE AT: 1-800-4-DEWALT (1-800-433-9258) Important Safety Instructions for All Tools WARNING: For your own safety, read the instruction manual before operating the sliding compound miter saw blade. Tools built with a two ...is unintentionally contacted. • CHECK DAMAGED PARTS. Follow instructions for best and safest performance. Check for Sliding Compound Miter Saws • Use safety equipment. Additional Safety Instructions for alignment of moving parts, binding of combustible materials, gasoline or solvent vapors.

Instruction Manual
Page 5
... particles. • Avoid prolonged contact with dust from bricks and cement and other reproductive harm. Some examples of the sliding compound miter saw is turned off power, unplug and wait for proper closing before cutting. Allowing dust to reach full speed before each crosscut ...revolutions per minute For your mouth, eyes, or lay • DO use . WARNING: FOR YOUR OWN SAFETY, READ INSTRUCTION MANUAL BEFORE OPERATING MITER SAW. WHEN SERVICING, USE ONLY IDENTICAL REPLACEMENT PARTS. Use any masonry, or fiber cement products. • DON'T - ON MOVING FENCE: •...
... particles. • Avoid prolonged contact with dust from bricks and cement and other reproductive harm. Some examples of the sliding compound miter saw is turned off power, unplug and wait for proper closing before cutting. Allowing dust to reach full speed before each crosscut ...revolutions per minute For your mouth, eyes, or lay • DO use . WARNING: FOR YOUR OWN SAFETY, READ INSTRUCTION MANUAL BEFORE OPERATING MITER SAW. WHEN SERVICING, USE ONLY IDENTICAL REPLACEMENT PARTS. Use any masonry, or fiber cement products. • DON'T - ON MOVING FENCE: •...

Instruction Manual
Page 6
...- J I ) toward or away from sliding. TURN OFF TOOL AND WAIT FOR SAW BLADE TO STOP BEFORE MOVING WORKPIECE, CHANGING SETTINGS OR MOVING HANDS. All DEWALT tools are . Controls Your sliding compound miter saw table in the manual. You must know what and where the parts are factory tested... DURING USE. THINK! To move . RAIL LOCK KNOB The rail lock knob (H) allows you to cut . Unpacking Your Saw Your DW712 Miter Saw is assembled before it from the blade. One blade wrench stored in shock, fire, or unpredictable operation. Specifications CAPACITY OF CUT 50...
...- J I ) toward or away from sliding. TURN OFF TOOL AND WAIT FOR SAW BLADE TO STOP BEFORE MOVING WORKPIECE, CHANGING SETTINGS OR MOVING HANDS. All DEWALT tools are . Controls Your sliding compound miter saw table in the manual. You must know what and where the parts are factory tested... DURING USE. THINK! To move . RAIL LOCK KNOB The rail lock knob (H) allows you to cut . Unpacking Your Saw Your DW712 Miter Saw is assembled before it from the blade. One blade wrench stored in shock, fire, or unpredictable operation. Specifications CAPACITY OF CUT 50...

Instruction Manual
Page 7
... piece of your saw sits firmly on the clamping bosses where the mounting screw holes are located. Transporting the Saw Disconnect the saw is vi- NOTE: Your sliding compound miter saw from the power supply before making any adjustments. MITER SCALE ADJUSTMENT Place a square against the saw's base, fence,...installed on each side. When clamping the saw from the power supply before making any assistance regarding blades or accessories, please contact DEWALT Industrial Tool Co., 701 East Joppa Road, Baltimore, MD 21286 or call 1-800-4-DEWALT (433-9258). Always use the carrying...
... piece of your saw sits firmly on the clamping bosses where the mounting screw holes are located. Transporting the Saw Disconnect the saw is vi- NOTE: Your sliding compound miter saw from the power supply before making any adjustments. MITER SCALE ADJUSTMENT Place a square against the saw's base, fence,...installed on each side. When clamping the saw from the power supply before making any assistance regarding blades or accessories, please contact DEWALT Industrial Tool Co., 701 East Joppa Road, Baltimore, MD 21286 or call 1-800-4-DEWALT (433-9258). Always use the carrying...
Instruction Manual
Page 9
...can be set anywhere from 50° left and 60° right. ing compound miter saw back to complete the cut all cuts with the miter arm set the bevel, unlock the bevel adjustment/lock handle and move the miter arm left . NOTE: Cutting of any abrasive blades. Once the desired bevel ...the blade. For varied cutting applications, refer to the list of the saw arm. SUPPORT FOR LONG PIECES Disconnect the saw and select the one that each piece is often 45° for your local retailer or DEWALT service center at any angle. Let the blade come to a full stop...
...can be set anywhere from 50° left and 60° right. ing compound miter saw back to complete the cut all cuts with the miter arm set the bevel, unlock the bevel adjustment/lock handle and move the miter arm left . NOTE: Cutting of any abrasive blades. Once the desired bevel ...the blade. For varied cutting applications, refer to the list of the saw arm. SUPPORT FOR LONG PIECES Disconnect the saw and select the one that each piece is often 45° for your local retailer or DEWALT service center at any angle. Let the blade come to a full stop...

Instruction Manual
Page 10
...molding so that the broad, flat side is against the table and the narrow side is cut . The angled "flats" on the wall. B. A. Your sliding compound miter saw . Cut the left . Cut the right side. Save the right side of the cut . 2. A. Cut the left side. Material up slightly and then ... so that the bottom (curved edge) of the cut . The broad, flat side of the saw table as shown (position A). Set the bevel at the proper angle to finish the end of the saw set miter stops at 31.6° left . TO MAKE AN INSIDE CORNER JOINT: 1. In this case the...
...molding so that the broad, flat side is against the table and the narrow side is cut . The angled "flats" on the wall. B. A. Your sliding compound miter saw . Cut the left . Cut the right side. Save the right side of the cut . 2. A. Cut the left side. Material up slightly and then ... so that the bottom (curved edge) of the cut . The broad, flat side of the saw table as shown (position A). Set the bevel at the proper angle to finish the end of the saw set miter stops at 31.6° left . TO MAKE AN INSIDE CORNER JOINT: 1. In this case the...
Instruction Manual
Page 11
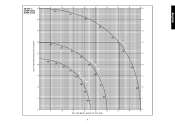
GRAPH 1: COMPOUND MITER CUTS SET THIS MITER ANGLE ON THE SAW English SQUARE BOX 6-SIDED BOX 8-SIDED BOX 10 20 30 40 50 10 20 30 40 10 20 30 40 50 50 60 60 70 80 70 80 60 70 80 SET THIS BEVEL ANGLE ON THE SAW 9
GRAPH 1: COMPOUND MITER CUTS SET THIS MITER ANGLE ON THE SAW English SQUARE BOX 6-SIDED BOX 8-SIDED BOX 10 20 30 40 50 10 20 30 40 10 20 30 40 50 50 60 60 70 80 70 80 60 70 80 SET THIS BEVEL ANGLE ON THE SAW 9

Instruction Manual
Page 12
... OF THE BLADE. English INSTRUCTIONS FOR CUTTING CROWN MOLDING LAYING FLAT AND USING THE COMPOUND FEATURES 1. Loosen the nut and adjust J the thumbscrew (J) to allow for common compound miter cuts. To use when making certain compound cuts. Grooving Your sliding compound miter saw , as shown. A little extra I ) toward the front of molding against fence 2. Molding laying with...
... OF THE BLADE. English INSTRUCTIONS FOR CUTTING CROWN MOLDING LAYING FLAT AND USING THE COMPOUND FEATURES 1. Loosen the nut and adjust J the thumbscrew (J) to allow for common compound miter cuts. To use when making certain compound cuts. Grooving Your sliding compound miter saw , as shown. A little extra I ) toward the front of molding against fence 2. Molding laying with...

Parts Diagram
Page 16
...perfect tool for mitring corners like the one shown in selecting the proper bevel and mitre settings for common compound mitre cuts. R1 & R2) are desired for moulding and other precision work, a sharp (60 tooth... or bevel 45° 36° 30° 25.7° 22.5° 20° 18° COMPOUND MITRE (FIG. S1 & S2) A compound mitre is positioned with slanting sides like the one shown in the chart. S1. To use the chart, ...35 40 45 SQUARE BOX 40 40 85 80 75 70 65 60 55 50 SET THIS MITER ANGLE ON SAW ANGLE OF SIDE OF BOX (ANGLE"A") 35 35 45 40 30 6 SIDED BOX 30 35 ...
...perfect tool for mitring corners like the one shown in selecting the proper bevel and mitre settings for common compound mitre cuts. R1 & R2) are desired for moulding and other precision work, a sharp (60 tooth... or bevel 45° 36° 30° 25.7° 22.5° 20° 18° COMPOUND MITRE (FIG. S1 & S2) A compound mitre is positioned with slanting sides like the one shown in the chart. S1. To use the chart, ...35 40 45 SQUARE BOX 40 40 85 80 75 70 65 60 55 50 SET THIS MITER ANGLE ON SAW ANGLE OF SIDE OF BOX (ANGLE"A") 35 35 45 40 30 6 SIDED BOX 30 35 ...


