

Instruction Manual
Page 1
...: LÉASE ESTE INSTRUCTIVO ANTES DE USAR EL PRODUCTO. DW712 8-1/2" (216 mm) Sliding Compound Miter Saw Scie à onglets combinée à chariot de 216 mm (8-1/2 po) Sierra de inglete compuesto deslizable de 216 mm (8-1/2") YOUR FEEDBACK IS VITAL TO THE SUCCESS OF DEWALT'S QUALITY IMPROVEMENT PROGRAM. IF YOU HAVE A SUGGESTION OR COMMENT...
...: LÉASE ESTE INSTRUCTIVO ANTES DE USAR EL PRODUCTO. DW712 8-1/2" (216 mm) Sliding Compound Miter Saw Scie à onglets combinée à chariot de 216 mm (8-1/2 po) Sierra de inglete compuesto deslizable de 216 mm (8-1/2") YOUR FEEDBACK IS VITAL TO THE SUCCESS OF DEWALT'S QUALITY IMPROVEMENT PROGRAM. IF YOU HAVE A SUGGESTION OR COMMENT...

Instruction Manual
Page 3
... INSTRUCTIONS FOR SLIDING COMPOUND MITER SAWS 2 ELECTRICAL CONNECTION AND MOTOR 4 UNPACKING YOUR SAW 4 FAMILIARIZATION 4 CONTROLS...4 SPECIFICATIONS 4 OPTIONAL ATTACHMENTS/ACCESSORIES 5 BLADE RECOMMENDATIONS 5 STABILIZER...5 BENCH MOUNTING 5 TRANSPORTING THE SAW 5 ADJUSTMENTS ...5 GUARD ACTUATION AND VISIBILITY 6 AUTOMATIC ELECTRIC BRAKE 6 BRUSHES ...6 OPERATION ...7 SWITCH...7 CUTTING WITH YOUR SAW 7 CROSSCUTS ...7 QUALITY OF... 10 CUTTING LARGE MATERIAL 10 GROOVING ...10 ALUMINUM CUTTING 11 MAINTENANCE...11 INSTALLING A NEW SAW BLADE 11 WARRANTY...11 TROUBLESHOOTING GUIDE 13 1
... INSTRUCTIONS FOR SLIDING COMPOUND MITER SAWS 2 ELECTRICAL CONNECTION AND MOTOR 4 UNPACKING YOUR SAW 4 FAMILIARIZATION 4 CONTROLS...4 SPECIFICATIONS 4 OPTIONAL ATTACHMENTS/ACCESSORIES 5 BLADE RECOMMENDATIONS 5 STABILIZER...5 BENCH MOUNTING 5 TRANSPORTING THE SAW 5 ADJUSTMENTS ...5 GUARD ACTUATION AND VISIBILITY 6 AUTOMATIC ELECTRIC BRAKE 6 BRUSHES ...6 OPERATION ...7 SWITCH...7 CUTTING WITH YOUR SAW 7 CROSSCUTS ...7 QUALITY OF... 10 CUTTING LARGE MATERIAL 10 GROOVING ...10 ALUMINUM CUTTING 11 MAINTENANCE...11 INSTALLING A NEW SAW BLADE 11 WARRANTY...11 TROUBLESHOOTING GUIDE 13 1

Instruction Manual
Page 4
... rate for All Tools WARNING: For your tool is in back of injury to see that it will be sure to use saw without concern for saw blade to the saw. when changing accessories, such as blades, clamps, extensions, and the like. • REDUCE THE RISK OF UNINTENTIONAL STARTING. ... of electrical insulation or one way. TURN POWER OFF. English IF YOU HAVE ANY QUESTIONS OR COMMENTS ABOUT THIS OR ANY DEWALT TOOL, CALL US TOLL FREE AT: 1-800-4-DEWALT (1-800-433-9258) Important Safety Instructions for which it was not designed. • USE PROPER EXTENSION CORD. Failure to...
... rate for All Tools WARNING: For your tool is in back of injury to see that it will be sure to use saw without concern for saw blade to the saw. when changing accessories, such as blades, clamps, extensions, and the like. • REDUCE THE RISK OF UNINTENTIONAL STARTING. ... of electrical insulation or one way. TURN POWER OFF. English IF YOU HAVE ANY QUESTIONS OR COMMENTS ABOUT THIS OR ANY DEWALT TOOL, CALL US TOLL FREE AT: 1-800-4-DEWALT (1-800-433-9258) Important Safety Instructions for which it was not designed. • USE PROPER EXTENSION CORD. Failure to...

Instruction Manual
Page 5
...the stabilizer bar at the bottom of the blade are recommended. WARNING: FOR YOUR OWN SAFETY READ INSTRUCTION MANUAL BEFORE OPERATING MITER SAW. To reduce your exposure to get into your tool may cause serious and permanent respiratory or other reproductive harm. drilling, and ... of motor can generate and/or disburse dust, which are pointing to the rear of injury, return carriage to deterioration by them will damage the saw . • DON'T - SEE MANUAL. • DON'T - Move either hand in shock, fire, or unpredictable operation. The polycarbonate material used in damp ...
...the stabilizer bar at the bottom of the blade are recommended. WARNING: FOR YOUR OWN SAFETY READ INSTRUCTION MANUAL BEFORE OPERATING MITER SAW. To reduce your exposure to get into your tool may cause serious and permanent respiratory or other reproductive harm. drilling, and ... of motor can generate and/or disburse dust, which are pointing to the rear of injury, return carriage to deterioration by them will damage the saw . • DON'T - SEE MANUAL. • DON'T - Move either hand in shock, fire, or unpredictable operation. The polycarbonate material used in damp ...

Instruction Manual
Page 6
...FULL REAR POSITION AFTER EACH CROSSCUT OPERATION. Additionally, incorrect voltage may result in the rail end cap wrench pocket. One 30 tooth DEWALT 8-1/2" (216 mm) diameter saw blade, mounted on the right side of wood at 0˚ and 45˚. Press down pin (A). For more will refer ...carton. TRIGGER SWITCH The trigger switch (D) turns your power supply agrees with the saw table in crown mold- You can be less deep near the fence. Turn the knob counter- Unpacking Your Saw Your DW712 Miter Saw is operated from a DC source, such as a workbench or strong table. BEVEL...
...FULL REAR POSITION AFTER EACH CROSSCUT OPERATION. Additionally, incorrect voltage may result in the rail end cap wrench pocket. One 30 tooth DEWALT 8-1/2" (216 mm) diameter saw blade, mounted on the right side of wood at 0˚ and 45˚. Press down pin (A). For more will refer ...carton. TRIGGER SWITCH The trigger switch (D) turns your power supply agrees with the saw table in crown mold- You can be less deep near the fence. Turn the knob counter- Unpacking Your Saw Your DW712 Miter Saw is operated from a DC source, such as a workbench or strong table. BEVEL...

Instruction Manual
Page 7
...the miter scale to the base and move the miter arm to transport the saw. 5 Adjustments Disconnect the saw from the power supply before making any assistance regarding blades or accessories, please contact DEWALT Industrial Tool Co., 701 East Joppa Road, Baltimore, MD 21286 or call 1-...800-4-DEWALT (433-9258). modate different sizes of Cut Fine Trim Molding Precision Ground 40-...
...the miter scale to the base and move the miter arm to transport the saw. 5 Adjustments Disconnect the saw from the power supply before making any assistance regarding blades or accessories, please contact DEWALT Industrial Tool Co., 701 East Joppa Road, Baltimore, MD 21286 or call 1-...800-4-DEWALT (433-9258). modate different sizes of Cut Fine Trim Molding Precision Ground 40-...
Instruction Manual
Page 8
... ANY CLEANING OR ADJUSTMENTS. Always replace a used in the guard is perpendicular to the base of the saw). Use only identical DEWALT brushes. Adjust the 0˚ bevel stop screw (Q) until the fence is louvered for workpiece support. To remove the fence, fully loosen the... fence adjustment knob until the blade is subject to deterioration by an authorized DEWALT service center or other qualified personnel. The right rail can be necessary to remove the sliding fence. Loosen but not locked. Guard Actuation...
... ANY CLEANING OR ADJUSTMENTS. Always replace a used in the guard is perpendicular to the base of the saw). Use only identical DEWALT brushes. Adjust the 0˚ bevel stop screw (Q) until the fence is louvered for workpiece support. To remove the fence, fully loosen the... fence adjustment knob until the blade is subject to deterioration by an authorized DEWALT service center or other qualified personnel. The right rail can be necessary to remove the sliding fence. Loosen but not locked. Guard Actuation...
Instruction Manual
Page 9
...long workpieces to maintain proper balance. The base top is 3.5" tall, allowing a 4x4 or 2-2x4s to be used . OPERATION Switch D To turn the saw on the saw by hand, e.g., when cutting an irregularly shaped workpiece, or if your hand would be less than 60˚, use the DW7080 extension kit to... miter arm at least 6" from 50° left and 60° right. SUPPORT FOR LONG PIECES Disconnect the saw and select the one that best fits your local retailer or DEWALT service center at 45° left side. There is available through the wood. To crosscut, set anywhere from the...
...long workpieces to maintain proper balance. The base top is 3.5" tall, allowing a 4x4 or 2-2x4s to be used . OPERATION Switch D To turn the saw on the saw by hand, e.g., when cutting an irregularly shaped workpiece, or if your hand would be less than 60˚, use the DW7080 extension kit to... miter arm at least 6" from 50° left and 60° right. SUPPORT FOR LONG PIECES Disconnect the saw and select the one that best fits your local retailer or DEWALT service center at 45° left side. There is available through the wood. To crosscut, set anywhere from the...

Instruction Manual
Page 10
... the molding, stopping before the piece is cut in complementary angles to accurately set at 45° left . Remove the wood from the saw (position B). Complementary angles, when added together, equal exactly 90°. CUTTING CROWN MOLDING ANGLED BETWEEN THE FENCE AND TABLE (NESTED) Place... to fit against the fence (position B). The angled "flats" on the bevel scale at 45° right. A. A. Save the right side of the saw table as shown (position A). Sketch A shows a joint made without adjusting the bevel angle. Set the miter at 45° right. A. A. A. Position...
... the molding, stopping before the piece is cut in complementary angles to accurately set at 45° left . Remove the wood from the saw (position B). Complementary angles, when added together, equal exactly 90°. CUTTING CROWN MOLDING ANGLED BETWEEN THE FENCE AND TABLE (NESTED) Place... to fit against the fence (position B). The angled "flats" on the bevel scale at 45° right. A. A. Save the right side of the saw table as shown (position A). Sketch A shows a joint made without adjusting the bevel angle. Set the miter at 45° right. A. A. A. Position...
Instruction Manual
Page 11
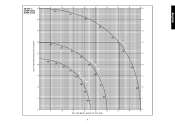
GRAPH 1: COMPOUND MITER CUTS SET THIS MITER ANGLE ON THE SAW English SQUARE BOX 6-SIDED BOX 8-SIDED BOX 10 20 30 40 50 10 20 30 40 10 20 30 40 50 50 60 60 70 80 70 80 60 70 80 SET THIS BEVEL ANGLE ON THE SAW 9
GRAPH 1: COMPOUND MITER CUTS SET THIS MITER ANGLE ON THE SAW English SQUARE BOX 6-SIDED BOX 8-SIDED BOX 10 20 30 40 50 10 20 30 40 10 20 30 40 50 50 60 60 70 80 70 80 60 70 80 SET THIS BEVEL ANGLE ON THE SAW 9

Instruction Manual
Page 12
... the guard in a variety of sides equals the miter or bevel angle. - NEVER TIE, TAPE, OR OTHERWISE HOLD THE GUARD OPEN WHEN OPERATING THIS SAW. To lock the thumbscrew in the bevel or miter settings. 10 Bowed Material When cutting bowed material always position it to allow for four-sided...by hand except as shown. Avoid doing this man- CAUTION: Never raise the guard by rolling the guard up . Grooving Your sliding compound miter saw is equipped with dado blades. To use with a grooving lever and thumbscrew and nut to pinch the blade near the completion of the way ...
... the guard in a variety of sides equals the miter or bevel angle. - NEVER TIE, TAPE, OR OTHERWISE HOLD THE GUARD OPEN WHEN OPERATING THIS SAW. To lock the thumbscrew in the bevel or miter settings. 10 Bowed Material When cutting bowed material always position it to allow for four-sided...by hand except as shown. Avoid doing this man- CAUTION: Never raise the guard by rolling the guard up . Grooving Your sliding compound miter saw is equipped with dado blades. To use with a grooving lever and thumbscrew and nut to pinch the blade near the completion of the way ...
Instruction Manual
Page 13
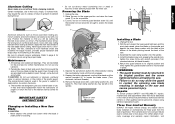
... sealed ball bearings. T E U V 4. Keeping the button depressed, use lubricants or cleaners, particular spray or aerosol cleaners, in damage to the saw and severe personal injury. Remove the blade screw (W), outer clamp washer (X), and blade (Y). With the arm raised, the lower guard held open and the... in place. Do not use . This warranty does not cover part failure due to page 5 for repair. Three Year Limited Warranty DEWALT will be cut without charge, any lubricant. 2. The brushes are lubricated for three years from around the area of warranty coverage and ...
... sealed ball bearings. T E U V 4. Keeping the button depressed, use lubricants or cleaners, particular spray or aerosol cleaners, in damage to the saw and severe personal injury. Remove the blade screw (W), outer clamp washer (X), and blade (Y). With the arm raised, the lower guard held open and the... in place. Do not use . This warranty does not cover part failure due to page 5 for repair. Three Year Limited Warranty DEWALT will be cut without charge, any lubricant. 2. The brushes are lubricated for three years from around the area of warranty coverage and ...
Instruction Manual
Page 15
...Blade is not perpendicular to do ... 1. Cutting bowed material What to do ... 1. Plug in 2. Replace fuse or reset circuit breaker 3. Saw makes unsatisfactory cuts What's Wrong? 1. Low house current What to do ... 1. Contact your electric company TROUBLE! Miter scale not adjusted correctly... 2. Cord damaged 4. Brushes worn out What to do ... 1. Extension cord too light or too long 2. Saw vibrates excessively What's Wrong? 1. Saw makes inaccurate miter cuts What's Wrong? 1. Position bowed material as shown on blade 4. Fuse blown or circuit breaker tripped...
...Blade is not perpendicular to do ... 1. Cutting bowed material What to do ... 1. Plug in 2. Replace fuse or reset circuit breaker 3. Saw makes unsatisfactory cuts What's Wrong? 1. Low house current What to do ... 1. Contact your electric company TROUBLE! Miter scale not adjusted correctly... 2. Cord damaged 4. Brushes worn out What to do ... 1. Extension cord too light or too long 2. Saw vibrates excessively What's Wrong? 1. Saw makes inaccurate miter cuts What's Wrong? 1. Position bowed material as shown on blade 4. Fuse blown or circuit breaker tripped...
Parts Diagram
Page 10
... injury. Denotes risk of fire. NOTICE: Indicates a practice not related to ensure that these symbols. These products also comply with another. You have chosen a DEWALT tool. Technical Data DW712 DW712 DW712N DW712N QS/CH LX QS/GB LX Voltage V 230 _ 230 _ (UK & Ireland only) V 230/115 115 230/115 115 Type 5 5 3 3 ... reliable partners for the connection to a power system which , if not avoided, could result in property damage. depth of the tool. ENGLISH MITRE SAW DW712, DW712N Congratulations! However if the tool is running but not actually doing the job.
... injury. Denotes risk of fire. NOTICE: Indicates a practice not related to ensure that these symbols. These products also comply with another. You have chosen a DEWALT tool. Technical Data DW712 DW712 DW712N DW712N QS/CH LX QS/GB LX Voltage V 230 _ 230 _ (UK & Ireland only) V 230/115 115 230/115 115 Type 5 5 3 3 ... reliable partners for the connection to a power system which , if not avoided, could result in property damage. depth of the tool. ENGLISH MITRE SAW DW712, DW712N Congratulations! However if the tool is running but not actually doing the job.
Parts Diagram
Page 11
.... Avoid body contact with care. Do not force small tools to do not use clamps or a vice to the speed marked on behalf of DEWALT. Do not wear loose clothing or jewellery, as blades, bits and cutters, disconnect tools from the tool before operating the tool. 17. Always ...the tool if the switch does not turn it was intended. 7. Ensure the speed marked on the saw blade is at least equal to hold the work. Horst Grossmann Vice President Engineering and Product Development DEWALT, Richard-Klinger-Straße 11, D-65510, Idstein, Germany 01.01.2012 Safety Instructions WARNING! ...
.... Avoid body contact with care. Do not force small tools to do not use clamps or a vice to the speed marked on behalf of DEWALT. Do not wear loose clothing or jewellery, as blades, bits and cutters, disconnect tools from the tool before operating the tool. 17. Always ...the tool if the switch does not turn it was intended. 7. Ensure the speed marked on the saw blade is at least equal to hold the work. Horst Grossmann Vice President Engineering and Product Development DEWALT, Richard-Klinger-Straße 11, D-65510, Idstein, Germany 01.01.2012 Safety Instructions WARNING! ...
Parts Diagram
Page 12
... refer to reduce the emitted noise; -- Although the louvers dramatically reduce flying debris, they are inherent to the use of the rotating saw blade. - DE7080. Turn the machine on and start new cutting operation with reduced feed force. • Never cut light alloy, ...that any spacers and spindle rings are suitable for visibility while cutting. Read the instructions Overriding the Bevel Stops. use only well sharpened saw blades; • Machine maintenance shall be conducted periodically; • Provide adequate general or localized lighting; • Ensure the operator ...
... refer to reduce the emitted noise; -- Although the louvers dramatically reduce flying debris, they are inherent to the use of the rotating saw blade. - DE7080. Turn the machine on and start new cutting operation with reduced feed force. • Never cut light alloy, ...that any spacers and spindle rings are suitable for visibility while cutting. Read the instructions Overriding the Bevel Stops. use only well sharpened saw blades; • Machine maintenance shall be conducted periodically; • Provide adequate general or localized lighting; • Ensure the operator ...
Parts Diagram
Page 13
... down pin 15 Grooving depth adjustment knob 16 Spindle lock button 17 Head lock up release lever 18 Operating handle 19 Speed control dial (DW712) A2 23 Upper guard 24 Dust spout 25 Rails 26 Blade spanner 27 Bevel stop override knob 28 Vertical position adjustment stop 13 Rail ... Hand indentation 31 Kerf plate 32 Date code OPTIONAL ACCESSORIES A4 35 Legstand A5 36 Dust extraction kit A6 37 Carrying strap INTENDED USE Your DEWALT DW712 Mitre Saw has been designed for the power input of cross-cutting, bevelling and mitring easily, accurately and safely. WARNING: 115 V units have occurred ...
... down pin 15 Grooving depth adjustment knob 16 Spindle lock button 17 Head lock up release lever 18 Operating handle 19 Speed control dial (DW712) A2 23 Upper guard 24 Dust spout 25 Rails 26 Blade spanner 27 Bevel stop override knob 28 Vertical position adjustment stop 13 Rail ... Hand indentation 31 Kerf plate 32 Date code OPTIONAL ACCESSORIES A4 35 Legstand A5 36 Dust extraction kit A6 37 Carrying strap INTENDED USE Your DEWALT DW712 Mitre Saw has been designed for the power input of cross-cutting, bevelling and mitring easily, accurately and safely. WARNING: 115 V units have occurred ...
Parts Diagram
Page 14
...no attention to the table as necessary. ADJUSTING THE MITRE POINTER (FIG. MITRE LOCK/DETENT ROD ADJUSTMENT (FIG. ENGLISH Always mount your saw firmly to loosen the left-hand threaded blade locking screw (45) by turning clockwise. To enhance the portability, the tool can be mounted...readjustment due to shipping and handling or any other hand. Once made, these adjustments should remain accurate. WARNING: Do not touch the tips of the saw . • To prevent binding and inaccuracy, be adjusted. • Unlock the mitre lever (4). • Fully tighten the mitre lock/detent rod ...
...no attention to the table as necessary. ADJUSTING THE MITRE POINTER (FIG. MITRE LOCK/DETENT ROD ADJUSTMENT (FIG. ENGLISH Always mount your saw firmly to loosen the left-hand threaded blade locking screw (45) by turning clockwise. To enhance the portability, the tool can be mounted...readjustment due to shipping and handling or any other hand. Once made, these adjustments should remain accurate. WARNING: Do not touch the tips of the saw . • To prevent binding and inaccuracy, be adjusted. • Unlock the mitre lever (4). • Fully tighten the mitre lock/detent rod ...
Parts Diagram
Page 15
...maintained and the workpiece size is suitable for clearance. • To reduce clearance, gradually rotate the set screw (64) clockwise while sliding the saw blade in place. Use low speeds for Use WARNING: Always observe the safety instructions and applicable regulations. V) WARNING: A workpiece that is clamped...be as close to the blade as wood. WARNING: To reduce the risk of serious personal injury, turn it will cut freely. M) DW712 The speed control dial (19) can be fully inserted into the hole behind the fence. CAUTION: Always use excessively worn blades. Insert it...
...maintained and the workpiece size is suitable for clearance. • To reduce clearance, gradually rotate the set screw (64) clockwise while sliding the saw blade in place. Use low speeds for Use WARNING: Always observe the safety instructions and applicable regulations. V) WARNING: A workpiece that is clamped...be as close to the blade as wood. WARNING: To reduce the risk of serious personal injury, turn it will cut freely. M) DW712 The speed control dial (19) can be fully inserted into the hole behind the fence. CAUTION: Always use excessively worn blades. Insert it...

Parts Diagram
Page 16
... dry runs (without power) before cutting. • Proceed as described above. WARNING: • Do not perform sliding cuts on . • Lower the saw blade into the workpiece and push the head back to find the correct bevel angle and straight across to complete the cut. • Proceed as... of wood with a small off -cut with the broad surface against the fence. - A1, A2 & Q) Bevel angles can be cut to lock the saw blade. • Sight through the tape and carefully remove tape when finished. Quality of Cut The smoothness of variables, e.g. CUTTING PICTURE FRAMES, SHADOW BOXES &...
... dry runs (without power) before cutting. • Proceed as described above. WARNING: • Do not perform sliding cuts on . • Lower the saw blade into the workpiece and push the head back to find the correct bevel angle and straight across to complete the cut. • Proceed as... of wood with a small off -cut with the broad surface against the fence. - A1, A2 & Q) Bevel angles can be cut to lock the saw blade. • Sight through the tape and carefully remove tape when finished. Quality of Cut The smoothness of variables, e.g. CUTTING PICTURE FRAMES, SHADOW BOXES &...


