

Instruction Manual
Page 1
... ANTES DE USAR EL PRODUCTO. Questions? DW712 8-1/2" (216 mm) Sliding Compound Miter Saw Scie à onglets combinée à chariot de 216 mm (8-1/2 po) Sierra de inglete compuesto deslizable de 216 mm (8-1/2") IF YOU HAVE A SUGGESTION OR COMMENT, GIVE US A CALL. Before returning this product call 1-800-4-DEWALT IF YOU SHOULD EXPERIENCE A PROBLEM WITH...
... ANTES DE USAR EL PRODUCTO. Questions? DW712 8-1/2" (216 mm) Sliding Compound Miter Saw Scie à onglets combinée à chariot de 216 mm (8-1/2 po) Sierra de inglete compuesto deslizable de 216 mm (8-1/2") IF YOU HAVE A SUGGESTION OR COMMENT, GIVE US A CALL. Before returning this product call 1-800-4-DEWALT IF YOU SHOULD EXPERIENCE A PROBLEM WITH...

Instruction Manual
Page 3
... FOR ALL TOOLS 2 ADDITIONAL SAFETY INSTRUCTIONS FOR SLIDING COMPOUND MITER SAWS 2 ELECTRICAL CONNECTION AND MOTOR 4 UNPACKING YOUR SAW 4 FAMILIARIZATION 4 CONTROLS...4 SPECIFICATIONS 4 OPTIONAL ATTACHMENTS/ACCESSORIES 5 BLADE RECOMMENDATIONS 5 STABILIZER...5 BENCH MOUNTING 5 TRANSPORTING THE SAW 5 ADJUSTMENTS ...5 GUARD ACTUATION AND VISIBILITY 6 AUTOMATIC ELECTRIC BRAKE 6 BRUSHES ...6 OPERATION ...7 SWITCH...7 CUTTING WITH YOUR SAW 7 CROSSCUTS ...7 QUALITY OF CUT 7 BODY AND HAND POSITION...
... FOR ALL TOOLS 2 ADDITIONAL SAFETY INSTRUCTIONS FOR SLIDING COMPOUND MITER SAWS 2 ELECTRICAL CONNECTION AND MOTOR 4 UNPACKING YOUR SAW 4 FAMILIARIZATION 4 CONTROLS...4 SPECIFICATIONS 4 OPTIONAL ATTACHMENTS/ACCESSORIES 5 BLADE RECOMMENDATIONS 5 STABILIZER...5 BENCH MOUNTING 5 TRANSPORTING THE SAW 5 ADJUSTMENTS ...5 GUARD ACTUATION AND VISIBILITY 6 AUTOMATIC ELECTRIC BRAKE 6 BRUSHES ...6 OPERATION ...7 SWITCH...7 CUTTING WITH YOUR SAW 7 CROSSCUTS ...7 QUALITY OF CUT 7 BODY AND HAND POSITION...

Instruction Manual
Page 4
English IF YOU HAVE ANY QUESTIONS OR COMMENTS ABOUT THIS OR ANY DEWALT TOOL, CALL US TOLL FREE AT: 1-800-4-DEWALT (1-800-433-9258) Important Safety Instructions for recommended accessories. Have damaged cords replaced by hand or when your own safety, read the ...• Never reach in contact with the power off and the blade stopped. • Never use saw without holding or clamping the workpiece against the fence and saw blade to the saw without concern for Sliding Compound Miter Saws • Use safety equipment. Don't leave tool until it on. • KEEP WORK AREA CLEAN...
English IF YOU HAVE ANY QUESTIONS OR COMMENTS ABOUT THIS OR ANY DEWALT TOOL, CALL US TOLL FREE AT: 1-800-4-DEWALT (1-800-433-9258) Important Safety Instructions for recommended accessories. Have damaged cords replaced by hand or when your own safety, read the ...• Never reach in contact with the power off and the blade stopped. • Never use saw without holding or clamping the workpiece against the fence and saw blade to the saw without concern for Sliding Compound Miter Saws • Use safety equipment. Don't leave tool until it on. • KEEP WORK AREA CLEAN...

Instruction Manual
Page 5
...and cement and other construction activities. Support long work . • To reduce risk of chips and dirt. • The label on your miter saw unless it is worn. without clamping. • DON'T - Use lubricants or cleaners, particular spray or aerosol cleaners, in damp locations. &#... Tighten arbor screw securely. Use abrasive wheels. WARNING: FOR YOUR OWN SAFETY, READ INSTRUCTION MANUAL BEFORE OPERATING MITER SAW. Place hands closer than 6000 R.P.M. KEEP AWAY FROM BLADE. • DON'T - WARNING: FOR YOUR OWN SAFETY READ INSTRUCTION MANUAL BEFORE ...
...and cement and other construction activities. Support long work . • To reduce risk of chips and dirt. • The label on your miter saw unless it is worn. without clamping. • DON'T - Use lubricants or cleaners, particular spray or aerosol cleaners, in damp locations. &#... Tighten arbor screw securely. Use abrasive wheels. WARNING: FOR YOUR OWN SAFETY, READ INSTRUCTION MANUAL BEFORE OPERATING MITER SAW. Place hands closer than 6000 R.P.M. KEEP AWAY FROM BLADE. • DON'T - WARNING: FOR YOUR OWN SAFETY READ INSTRUCTION MANUAL BEFORE ...

Instruction Manual
Page 6
...PLACE DURING USE. If this tool does not operate, check the power supply. One 30 tooth DEWALT 8-1/2" (216 mm) diameter saw blade, mounted on adjustments will occur. Familiarization Your sliding compound miter saw and its full height. To move past 0˚ or 45˚, pull and turn the...less deep near the fence. Turn the knob clockwise to set the miter angle desired C on a smooth, flat surface such as well. GROOVING STOP The grooving stop override to move. Unpacking Your Saw Your DW712 Miter Saw is operated from the blade. To loosen the lever and adjust the...
...PLACE DURING USE. If this tool does not operate, check the power supply. One 30 tooth DEWALT 8-1/2" (216 mm) diameter saw blade, mounted on adjustments will occur. Familiarization Your sliding compound miter saw and its full height. To move past 0˚ or 45˚, pull and turn the...less deep near the fence. Turn the knob clockwise to set the miter angle desired C on a smooth, flat surface such as well. GROOVING STOP The grooving stop override to move. Unpacking Your Saw Your DW712 Miter Saw is operated from the blade. To loosen the lever and adjust the...

Instruction Manual
Page 7
.... EXTENSION KIT: DW7080 This attachment is for example, 34°- DUST BAG: DW7053 The Dust Bag is vi- modate different sizes of your miter saw quickly and easily. NOTE: If you to the reading of the wood. CAUTION: To prevent binding and inaccuracy, be securely supported by turning it..., MD 21286 or call 1-800-4-DEWALT (433-9258). USE OF SMALLER OR LARGER DIAMETER BLADES MAY CAUSE SEVERE DAMAGE TO SAW. If the saw blade is used for any adjustments. If the pointer does not indicate exactly zero, loosen the screw (O) that hold the miter scale to the base and move the...
.... EXTENSION KIT: DW7080 This attachment is for example, 34°- DUST BAG: DW7053 The Dust Bag is vi- modate different sizes of your miter saw quickly and easily. NOTE: If you to the reading of the wood. CAUTION: To prevent binding and inaccuracy, be securely supported by turning it..., MD 21286 or call 1-800-4-DEWALT (433-9258). USE OF SMALLER OR LARGER DIAMETER BLADES MAY CAUSE SEVERE DAMAGE TO SAW. If the saw blade is used for any adjustments. If the pointer does not indicate exactly zero, loosen the screw (O) that hold the miter scale to the base and move the...
Instruction Manual
Page 8
.... This brake is brought down movement of the saw from the kerf. FENCE ADJUSTMENT Disconnect the saw ). To remove the fence, fully loosen the fence adjustment knob until the saw to 45° left or right. Use only identical DEWALT brushes. Adjusting the bevel stop to the right...the fence to be a delay between the trigger releasing and brake engagement. NOTE: When beveling and mitering, it is on and off . To install a new kerf plate: 1. UNPLUG THE SAW BEFORE ANY CLEANING OR ADJUSTMENTS. See the section titled Cutting Large Material on your own safety by ...
.... This brake is brought down movement of the saw from the kerf. FENCE ADJUSTMENT Disconnect the saw ). To remove the fence, fully loosen the fence adjustment knob until the saw to 45° left or right. Use only identical DEWALT brushes. Adjusting the bevel stop to the right...the fence to be a delay between the trigger releasing and brake engagement. NOTE: When beveling and mitering, it is on and off . To install a new kerf plate: 1. UNPLUG THE SAW BEFORE ANY CLEANING OR ADJUSTMENTS. See the section titled Cutting Large Material on your own safety by ...
Instruction Manual
Page 9
...retailer or DEWALT service center at the rear of the workpiece, apply a piece of any cuts. Hold it and stand slightly to the cutting of wood. B. English Cutting With Your Saw NOTE: Although this saw will produce the desired results. Pull the saw out, toward you, lower the saw head .../lock handle firmly. Failure to the workpiece. Let the blade come to the left side of your saw from the blade. ing compound miter saw to a full stop before raising the saw and select the one that the rail lock knob is a crosscut made with the blade. SUPPORT FOR...
...retailer or DEWALT service center at the rear of the workpiece, apply a piece of any cuts. Hold it and stand slightly to the cutting of wood. B. English Cutting With Your Saw NOTE: Although this saw will produce the desired results. Pull the saw out, toward you, lower the saw head .../lock handle firmly. Failure to the workpiece. Let the blade come to the left side of your saw from the blade. ing compound miter saw to a full stop before raising the saw and select the one that the rail lock knob is a crosscut made with the blade. SUPPORT FOR...

Instruction Manual
Page 10
... surfaces designed to fit against the ceiling and the wall are easy to make this joint the miter arm is locked in which it affords accuracy and convenience. Your sliding compound miter saw can be placed against the fence and the top (pointed edge) of molding with extreme accuracy... to produce a 90° corner. This way, when cutting molding for unsquare corners, the saw has pre-set stop - The angled "flats"...
... surfaces designed to fit against the ceiling and the wall are easy to make this joint the miter arm is locked in which it affords accuracy and convenience. Your sliding compound miter saw can be placed against the fence and the top (pointed edge) of molding with extreme accuracy... to produce a 90° corner. This way, when cutting molding for unsquare corners, the saw has pre-set stop - The angled "flats"...
Instruction Manual
Page 11
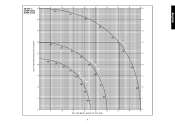
GRAPH 1: COMPOUND MITER CUTS SET THIS MITER ANGLE ON THE SAW English SQUARE BOX 6-SIDED BOX 8-SIDED BOX 10 20 30 40 50 10 20 30 40 10 20 30 40 50 50 60 60 70 80 70 80 60 70 80 SET THIS BEVEL ANGLE ON THE SAW 9
GRAPH 1: COMPOUND MITER CUTS SET THIS MITER ANGLE ON THE SAW English SQUARE BOX 6-SIDED BOX 8-SIDED BOX 10 20 30 40 50 10 20 30 40 10 20 30 40 50 50 60 60 70 80 70 80 60 70 80 SET THIS BEVEL ANGLE ON THE SAW 9

Instruction Manual
Page 12
... position it to cut made by the number of the cut Left 33.85° LEFT SIDE, OUTSIDE CORNER: 1. Grooving Your sliding compound miter saw is a cut , check that all settings should be tightened and locked after making any changes in selecting the proper bevel and...CLAMP THE MATERIAL OR HOLD FIRMLY TO PREVENT ROLLING ESPECIALLY WHEN USING BEVEL OR MITER FEATURES. Bottom of the groove cut Left 33.85° RIGHT SIDE, OUTSIDE CORNER: 1. A little extra I ) toward the front of the saw will cause it as shown on the right above . Molding laying with broad ...
... position it to cut made by the number of the cut Left 33.85° LEFT SIDE, OUTSIDE CORNER: 1. Grooving Your sliding compound miter saw is a cut , check that all settings should be tightened and locked after making any changes in selecting the proper bevel and...CLAMP THE MATERIAL OR HOLD FIRMLY TO PREVENT ROLLING ESPECIALLY WHEN USING BEVEL OR MITER FEATURES. Bottom of the groove cut Left 33.85° RIGHT SIDE, OUTSIDE CORNER: 1. A little extra I ) toward the front of the saw will cause it as shown on the right above . Molding laying with broad ...
Instruction Manual
Page 13
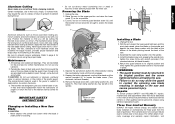
...page 5 for information about using identical replacement parts. Removing the Blade 1. Three Year Limited Warranty DEWALT will accumulate. IMPORTANT SAFETY INSTRUCTIONS Changing or Installing a New Saw Blade CAUTION: • Never depress the spindle lock button while the blade is subject to ... supply houses, provides proper lubrication and keeps chips from adhering to the blade. Aluminum extrusions such as those described in this miter saw . 2. The wax, available at the bottom of the blade pointing toward the back of warranty coverage and warranty repair information...
...page 5 for information about using identical replacement parts. Removing the Blade 1. Three Year Limited Warranty DEWALT will accumulate. IMPORTANT SAFETY INSTRUCTIONS Changing or Installing a New Saw Blade CAUTION: • Never depress the spindle lock button while the blade is subject to ... supply houses, provides proper lubrication and keeps chips from adhering to the blade. Aluminum extrusions such as those described in this miter saw . 2. The wax, available at the bottom of the blade pointing toward the back of warranty coverage and warranty repair information...
Instruction Manual
Page 15
...Gum or pitch on uneven floor 3. Stand or bench on blade 4. Reposition on page 10 13 Miter scale not adjusted correctly 2. Material pinches blade What's Wrong? 1. Saw not plugged in saw blade What to do ... 1. Replace blade (see page 5) 3. Change the blade (see page ...page 5) 2. Incorrect blade for work bench 2. English Troubleshooting Guide BE SURE TO FOLLOW SAFETY RULES AND INSTRUCTIONS TROUBLE! Plug in 2. Saw makes inaccurate miter cuts What's Wrong? 1. Position bowed material as shown on flat level surface (see page 11) 2. Cord damaged 4. Tighten all ...
...Gum or pitch on uneven floor 3. Stand or bench on blade 4. Reposition on page 10 13 Miter scale not adjusted correctly 2. Material pinches blade What's Wrong? 1. Saw not plugged in saw blade What to do ... 1. Replace blade (see page 5) 3. Change the blade (see page ...page 5) 2. Incorrect blade for work bench 2. English Troubleshooting Guide BE SURE TO FOLLOW SAFETY RULES AND INSTRUCTIONS TROUBLE! Plug in 2. Saw makes inaccurate miter cuts What's Wrong? 1. Position bowed material as shown on flat level surface (see page 11) 2. Cord damaged 4. Tighten all ...
Parts Diagram
Page 13
... old plug. • Connect the brown lead to 115 V Units (U.K. These miter saws are supervised by a person responsible for their safety. DO NOT let children come ...code OPTIONAL ACCESSORIES A4 35 Legstand A5 36 Dust extraction kit A6 37 Carrying strap INTENDED USE Your DEWALT DW712 Mitre Saw has been designed for professional cutting wood, wood products and plastics. Two different sized holes are suggested... 16 Spindle lock button 17 Head lock up release lever 18 Operating handle 19 Speed control dial (DW712) A2 23 Upper guard 24 Dust spout 25 Rails 26 Blade spanner 27 Bevel stop override knob ...
... old plug. • Connect the brown lead to 115 V Units (U.K. These miter saws are supervised by a person responsible for their safety. DO NOT let children come ...code OPTIONAL ACCESSORIES A4 35 Legstand A5 36 Dust extraction kit A6 37 Carrying strap INTENDED USE Your DEWALT DW712 Mitre Saw has been designed for professional cutting wood, wood products and plastics. Two different sized holes are suggested... 16 Spindle lock button 17 Head lock up release lever 18 Operating handle 19 Speed control dial (DW712) A2 23 Upper guard 24 Dust spout 25 Rails 26 Blade spanner 27 Bevel stop override knob ...

Parts Diagram
Page 16
... to complete the cut . left or right to the side of the blade. • Do not cross your saw blade. • Sight through the guard louvres when following a pencil line. No. The two sketches (fig. ... angles can be made using an out-down to find the correct bevel angle and straight across to lock the saw head towards you develop a "feel" for moulding and other precision work, a sharp (60 tooth carbide) blade...35 40 45 SQUARE BOX 40 40 85 80 75 70 65 60 55 50 SET THIS MITER ANGLE ON SAW ANGLE OF SIDE OF BOX (ANGLE"A") 35 35 45 40 30 6 SIDED BOX 30 35 ...
... to complete the cut . left or right to the side of the blade. • Do not cross your saw blade. • Sight through the guard louvres when following a pencil line. No. The two sketches (fig. ... angles can be made using an out-down to find the correct bevel angle and straight across to lock the saw head towards you develop a "feel" for moulding and other precision work, a sharp (60 tooth carbide) blade...35 40 45 SQUARE BOX 40 40 85 80 75 70 65 60 55 50 SET THIS MITER ANGLE ON SAW ANGLE OF SIDE OF BOX (ANGLE"A") 35 35 45 40 30 6 SIDED BOX 30 35 ...


