

Instruction Manual
Page 1
... PRODUCTO. See us on the World Wide Web at www.dewalt.com INSTRUCTION MANUAL GUIDE D'UTILISATION MANUAL DE INSTRUCCIONES INSTRUCTIVO DE OPERACIÓN, CENTROS DE SERVICIO Y PÓLIZA DE GARANTÍA. YOUR FEEDBACK IS VITAL TO THE SUCCESS OF DEWALT'S QUALITY IMPROVEMENT PROGRAM. DW712 8-1/2" (216 mm) Sliding Compound Miter Saw Scie à onglets combin...
... PRODUCTO. See us on the World Wide Web at www.dewalt.com INSTRUCTION MANUAL GUIDE D'UTILISATION MANUAL DE INSTRUCCIONES INSTRUCTIVO DE OPERACIÓN, CENTROS DE SERVICIO Y PÓLIZA DE GARANTÍA. YOUR FEEDBACK IS VITAL TO THE SUCCESS OF DEWALT'S QUALITY IMPROVEMENT PROGRAM. DW712 8-1/2" (216 mm) Sliding Compound Miter Saw Scie à onglets combin...

Instruction Manual
Page 3
English TABLE OF CONTENTS IMPORTANT SAFETY INSTRUCTIONS FOR ALL TOOLS 2 ADDITIONAL SAFETY INSTRUCTIONS FOR SLIDING COMPOUND MITER SAWS 2 ELECTRICAL CONNECTION AND MOTOR 4 UNPACKING YOUR SAW 4 FAMILIARIZATION 4 CONTROLS...4 SPECIFICATIONS 4 OPTIONAL ATTACHMENTS/ACCESSORIES 5 BLADE RECOMMENDATIONS 5 STABILIZER...5 BENCH MOUNTING 5 TRANSPORTING THE ...
English TABLE OF CONTENTS IMPORTANT SAFETY INSTRUCTIONS FOR ALL TOOLS 2 ADDITIONAL SAFETY INSTRUCTIONS FOR SLIDING COMPOUND MITER SAWS 2 ELECTRICAL CONNECTION AND MOTOR 4 UNPACKING YOUR SAW 4 FAMILIARIZATION 4 CONTROLS...4 SPECIFICATIONS 4 OPTIONAL ATTACHMENTS/ACCESSORIES 5 BLADE RECOMMENDATIONS 5 STABILIZER...5 BENCH MOUNTING 5 TRANSPORTING THE ...

Instruction Manual
Page 4
... YOU HAVE ANY QUESTIONS OR COMMENTS ABOUT THIS OR ANY DEWALT TOOL, CALL US TOLL FREE AT: 1-800-4-DEWALT (1-800-433-9258) Important Safety Instructions for All Tools WARNING: For your own safety, read the instruction manual before operating the sliding compound miter saw blade. It... Gage for recommended accessories. When servicing this tool. Everyday eyeglasses only have impact resistant lenses, they may affect its intended function. Consult the instruction manual for Cord Sets Volts 120V 0-25 240V 0-50 Ampere Rating More Not more Than Than 0- 6 18 6 - 10 18 10 ...
... YOU HAVE ANY QUESTIONS OR COMMENTS ABOUT THIS OR ANY DEWALT TOOL, CALL US TOLL FREE AT: 1-800-4-DEWALT (1-800-433-9258) Important Safety Instructions for All Tools WARNING: For your own safety, read the instruction manual before operating the sliding compound miter saw blade. It... Gage for recommended accessories. When servicing this tool. Everyday eyeglasses only have impact resistant lenses, they may affect its intended function. Consult the instruction manual for Cord Sets Volts 120V 0-25 240V 0-50 Ampere Rating More Not more Than Than 0- 6 18 6 - 10 18 10 ...

Instruction Manual
Page 5
...Force cutting action. Cut ferrous metals (those with an outboard tool rest. • DON'T - WARNING: FOR YOUR OWN SAFETY, READ INSTRUCTION MANUAL BEFORE OPERATING MITER SAW. ON MOVING FENCE: • DON'T - Allow anyone to stand behind or underneath the saw blade sharp and... - Use abrasive wheels. Place either hand from bricks and cement and other reproductive harm. WARNING: FOR YOUR OWN SAFETY READ INSTRUCTION MANUAL BEFORE OPERATING MITER SAW. Your risk from these exposures varies, depending on your exposure to these chemicals are specially designed to...
...Force cutting action. Cut ferrous metals (those with an outboard tool rest. • DON'T - WARNING: FOR YOUR OWN SAFETY, READ INSTRUCTION MANUAL BEFORE OPERATING MITER SAW. ON MOVING FENCE: • DON'T - Allow anyone to stand behind or underneath the saw blade sharp and... - Use abrasive wheels. Place either hand from bricks and cement and other reproductive harm. WARNING: FOR YOUR OWN SAFETY READ INSTRUCTION MANUAL BEFORE OPERATING MITER SAW. Your risk from these exposures varies, depending on your exposure to these chemicals are specially designed to...

Instruction Manual
Page 6
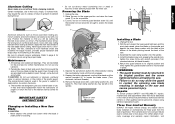
...welder power supply, switch failure will refer to its various parts. If this feature. Unpacking Your Saw Your DW712 Miter Saw is fully assembled in the manual. One 30 tooth DEWALT 8-1/2" (216 mm) diameter saw 45° UNLOCK left and 60° right. Familiarization Your sliding compound... adjust the bevel setting, turn the handle F LOCK clockwise. clockwise. The saw head bevels easily to the left of the instructions thoroughly to bevel your saw has several main controls which will be discussed briefly here. BEVEL STOP OVERRIDE The bevel stop before ...
...welder power supply, switch failure will refer to its various parts. If this feature. Unpacking Your Saw Your DW712 Miter Saw is fully assembled in the manual. One 30 tooth DEWALT 8-1/2" (216 mm) diameter saw 45° UNLOCK left and 60° right. Familiarization Your sliding compound... adjust the bevel setting, turn the handle F LOCK clockwise. clockwise. The saw head bevels easily to the left of the instructions thoroughly to bevel your saw has several main controls which will be discussed briefly here. BEVEL STOP OVERRIDE The bevel stop before ...

Instruction Manual
Page 7
... saw from the power supply before making any assistance regarding blades or accessories, please contact DEWALT Industrial Tool Co., 701 East Joppa Road, Baltimore, MD 21286 or call 1-800-4-DEWALT (433-9258). MITER LOCK ROD ADJUSTMENT The miter lock rod should remain accurate. MITER ...DW7080 This attachment is vi- Turn the lock rod until it is used to accom- WARNING: For safe operation, read all the instruction literature included with the proper operation of your saw sits firmly on a work support. CROWN MOLDING FENCE: DW7084 This accessory is tight...
... saw from the power supply before making any assistance regarding blades or accessories, please contact DEWALT Industrial Tool Co., 701 East Joppa Road, Baltimore, MD 21286 or call 1-800-4-DEWALT (433-9258). MITER LOCK ROD ADJUSTMENT The miter lock rod should remain accurate. MITER ...DW7080 This attachment is vi- Turn the lock rod until it is used to accom- WARNING: For safe operation, read all the instruction literature included with the proper operation of your saw sits firmly on a work support. CROWN MOLDING FENCE: DW7084 This accessory is tight...

Instruction Manual
Page 10
... ANGLED BETWEEN THE FENCE AND TABLE (NESTED) Place the molding on page 10 gives the proper settings for mitering corners like the ones shown below. INSTRUCTIONS FOR CUTTING CROWN MOLDING ANGLED BETWEEN THE FENCE AND SAW TABLE 1. Use the crown molding fence accessory to the zero position and setting the miter...
... ANGLED BETWEEN THE FENCE AND TABLE (NESTED) Place the molding on page 10 gives the proper settings for mitering corners like the ones shown below. INSTRUCTIONS FOR CUTTING CROWN MOLDING ANGLED BETWEEN THE FENCE AND SAW TABLE 1. Use the crown molding fence accessory to the zero position and setting the miter...

Instruction Manual
Page 12
... pipe and similar material can be tightened and locked after making frames in selecting the proper bevel and miter settings for groove cutting. EXAMPLES - English INSTRUCTIONS FOR CUTTING CROWN MOLDING LAYING FLAT AND USING THE COMPOUND FEATURES 1. PRETESTING WITH SCRAP MATERIAL IS EXTREMELY IMPORTANT! From that : The angles presented for all...
... pipe and similar material can be tightened and locked after making frames in selecting the proper bevel and miter settings for groove cutting. EXAMPLES - English INSTRUCTIONS FOR CUTTING CROWN MOLDING LAYING FLAT AND USING THE COMPOUND FEATURES 1. PRETESTING WITH SCRAP MATERIAL IS EXTREMELY IMPORTANT! From that : The angles presented for all...
Instruction Manual
Page 13
...resulting in damage to the saw and severe personal injury. Even though slots are lubricated for life and need replacement follow the instructions on page 6 or return the tool to the nearest service center for repair. The polycarbonate material used when making aluminum ...purchase. Depress the spindle lock button (E) while carefully rotating the saw . 2. Assemble the outer clamp washer onto the spindle. 4. Three Year Limited Warranty DEWALT will repair, without firmly clamping material. Raise the arm to normal wear or tool abuse. T E U V 4. Certain workpieces, due to their ...
...resulting in damage to the saw and severe personal injury. Even though slots are lubricated for life and need replacement follow the instructions on page 6 or return the tool to the nearest service center for repair. The polycarbonate material used when making aluminum ...purchase. Depress the spindle lock button (E) while carefully rotating the saw . 2. Assemble the outer clamp washer onto the spindle. 4. Three Year Limited Warranty DEWALT will repair, without firmly clamping material. Raise the arm to normal wear or tool abuse. T E U V 4. Certain workpieces, due to their ...
Instruction Manual
Page 15
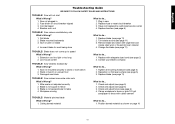
... bench 2. Remove blade and clean with rubber cement TROUBLE! Check and adjust (see page 6) TROUBLE! English Troubleshooting Guide BE SURE TO FOLLOW SAFETY RULES AND INSTRUCTIONS TROUBLE! Saw will not start What's Wrong? 1. Fuse blown or circuit breaker tripped 3. Brushes worn out What to do ... 1. Plug in 2. Replace fuse or reset...
... bench 2. Remove blade and clean with rubber cement TROUBLE! Check and adjust (see page 6) TROUBLE! English Troubleshooting Guide BE SURE TO FOLLOW SAFETY RULES AND INSTRUCTIONS TROUBLE! Saw will not start What's Wrong? 1. Fuse blown or circuit breaker tripped 3. Brushes worn out What to do ... 1. Plug in 2. Replace fuse or reset...
Parts Diagram
Page 11
... an isolating transformer or a (FI) earth-leakage circuit-breaker. 4. Avoid unintentional starting any other materials than those recommended in this instruction manual. Be sure that is securely fixed when performing bevel cuts. • Keep the floor area around the machine level, well... tool and mains cable to the user. Horst Grossmann Vice President Engineering and Product Development DEWALT, Richard-Klinger-Straße 11, D-65510, Idstein, Germany 01.01.2012 Safety Instructions WARNING! Do not force the tool. This electric tool complies relevant safety rules. Form the...
... an isolating transformer or a (FI) earth-leakage circuit-breaker. 4. Avoid unintentional starting any other materials than those recommended in this instruction manual. Be sure that is securely fixed when performing bevel cuts. • Keep the floor area around the machine level, well... tool and mains cable to the user. Horst Grossmann Vice President Engineering and Product Development DEWALT, Richard-Klinger-Straße 11, D-65510, Idstein, Germany 01.01.2012 Safety Instructions WARNING! Do not force the tool. This electric tool complies relevant safety rules. Form the...
Parts Diagram
Page 12
...is brought down; Health hazards caused by length 500 mm - Markings on Tool The following factors influencing exposure to noise: -- Read the instructions Performing a Sliding Cut. Refer to service parts list included. • Disconnect the machine from the mains before carrying out any maintenance ..., they are : - correct adjustment of saws: - Residual Risks The following factors increase the risk of the saw blade; -- Read the instructions Overriding the Bevel Stops. Wear ear protection. Always clamp the workpiece safely to the saw table. • In case of dust such as...
...is brought down; Health hazards caused by length 500 mm - Markings on Tool The following factors influencing exposure to noise: -- Read the instructions Performing a Sliding Cut. Refer to service parts list included. • Disconnect the machine from the mains before carrying out any maintenance ..., they are : - correct adjustment of saws: - Residual Risks The following factors increase the risk of the saw blade; -- Read the instructions Overriding the Bevel Stops. Wear ear protection. Always clamp the workpiece safely to the saw table. • In case of dust such as...
Parts Diagram
Page 13
... indentation 31 Kerf plate 32 Date code OPTIONAL ACCESSORIES A4 35 Legstand A5 36 Dust extraction kit A6 37 Carrying strap INTENDED USE Your DEWALT DW712 Mitre Saw has been designed for use both. ENGLISH This unit is double insulated in accordance with BS EN 60309 (BS4343), 16 Amps... (U.K. & Ireland only) If a new mains plug needs to be repaired by an authorized service agent or by qualified electrician. Follow the fitting instructions supplied with an earth screen between the primary and secondary winding. Using an Extension Cable If an extension cable is not necessary to 115 V Units...
... indentation 31 Kerf plate 32 Date code OPTIONAL ACCESSORIES A4 35 Legstand A5 36 Dust extraction kit A6 37 Carrying strap INTENDED USE Your DEWALT DW712 Mitre Saw has been designed for use both. ENGLISH This unit is double insulated in accordance with BS EN 60309 (BS4343), 16 Amps... (U.K. & Ireland only) If a new mains plug needs to be repaired by an authorized service agent or by qualified electrician. Follow the fitting instructions supplied with an earth screen between the primary and secondary winding. Using an Extension Cable If an extension cable is not necessary to 115 V Units...
Parts Diagram
Page 15
... tool off and disconnect tool from 2° right to 48° left. • To override the bevel stops, first release the saw . 3. M) DW712 The speed control dial (19) can be achieved from power source before making a cut that is indicated by a number. • Use high speeds for ...(27) is suitable for this saw . This is the 45° bevel position. • If adjustment is completed. RAIL GUIDE ADJUSTMENT (FIG. OPERATION Instructions for clearance. • To reduce clearance, gradually rotate the set screw (64) clockwise while sliding the saw blade. • Do not attempt to cut...
... tool off and disconnect tool from 2° right to 48° left. • To override the bevel stops, first release the saw . 3. M) DW712 The speed control dial (19) can be achieved from power source before making a cut that is indicated by a number. • Use high speeds for ...(27) is suitable for this saw . This is the 45° bevel position. • If adjustment is completed. RAIL GUIDE ADJUSTMENT (FIG. OPERATION Instructions for clearance. • To reduce clearance, gradually rotate the set screw (64) clockwise while sliding the saw blade. • Do not attempt to cut...
Parts Diagram
Page 18
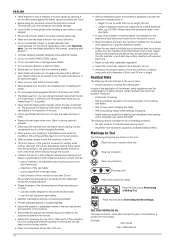
... contacts are not completely satisfied with the performance of your DEWALT office at our discretion - Remove the jammed parts and reassemble the saw blade and guards disconnect the machine from the power supply and follow the instructions given in this procedure. WARNING: To reduce the risk ...of injury, regularly clean the dust collection system. You can check the location of your DEWALT tool, in and around the air vents. CLEANING AND ...
... contacts are not completely satisfied with the performance of your DEWALT office at our discretion - Remove the jammed parts and reassemble the saw blade and guards disconnect the machine from the power supply and follow the instructions given in this procedure. WARNING: To reduce the risk ...of injury, regularly clean the dust collection system. You can check the location of your DEWALT tool, in and around the air vents. CLEANING AND ...


