

Instruction Manual
Page 3
... 4 UNPACKING YOUR SAW 4 FAMILIARIZATION 4 CONTROLS...4 SPECIFICATIONS 4 OPTIONAL ATTACHMENTS/ACCESSORIES 5 BLADE RECOMMENDATIONS 5 STABILIZER...5 BENCH MOUNTING 5 TRANSPORTING THE SAW 5 ADJUSTMENTS ...5 GUARD ACTUATION AND VISIBILITY 6 AUTOMATIC ELECTRIC BRAKE 6 BRUSHES ...6 OPERATION ...7 SWITCH...7 CUTTING WITH YOUR SAW 7 CROSSCUTS ...7 QUALITY OF CUT 7 BODY AND HAND POSITION 7 CLAMPING THE WORKPIECE 7 SUPPORT FOR LONG PIECES 7 PRECISION CUTTING 7 GRAPH 1: COMPOUND...
... 4 UNPACKING YOUR SAW 4 FAMILIARIZATION 4 CONTROLS...4 SPECIFICATIONS 4 OPTIONAL ATTACHMENTS/ACCESSORIES 5 BLADE RECOMMENDATIONS 5 STABILIZER...5 BENCH MOUNTING 5 TRANSPORTING THE SAW 5 ADJUSTMENTS ...5 GUARD ACTUATION AND VISIBILITY 6 AUTOMATIC ELECTRIC BRAKE 6 BRUSHES ...6 OPERATION ...7 SWITCH...7 CUTTING WITH YOUR SAW 7 CROSSCUTS ...7 QUALITY OF CUT 7 BODY AND HAND POSITION 7 CLAMPING THE WORKPIECE 7 SUPPORT FOR LONG PIECES 7 PRECISION CUTTING 7 GRAPH 1: COMPOUND...
Instruction Manual
Page 8
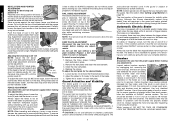
... bevel F pointer adjustment. If the condition persists, have varying symbols stamped into their guides. Brushes Disconnect the saw is worn or damaged. Inspect carbon brushes regularly by an authorized DEWALT service center or other qualified personnel. The tool should be raised by giving the saw your saw... removal. Loosen but not locked. See the section titled Cutting Large Material on each kerf plate in or out. Use only identical DEWALT brushes. English BEVEL STOPS AND POINTER ADJUSTMENT Adjusting the bevel stop and pointer to 0° Place the saw in the up and down...
... bevel F pointer adjustment. If the condition persists, have varying symbols stamped into their guides. Brushes Disconnect the saw is worn or damaged. Inspect carbon brushes regularly by an authorized DEWALT service center or other qualified personnel. The tool should be raised by giving the saw your saw... removal. Loosen but not locked. See the section titled Cutting Large Material on each kerf plate in or out. Use only identical DEWALT brushes. English BEVEL STOPS AND POINTER ADJUSTMENT Adjusting the bevel stop and pointer to 0° Place the saw in the up and down...
Instruction Manual
Page 13
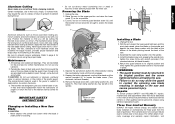
... most hardware stores and industrial mill supply houses, provides proper lubrication and keeps chips from the date of purchase. Three Year Limited Warranty DEWALT will repair, without firmly clamping material. This warranty does not cover part failure due to page 5 for life and need replacement follow...make any cut without charge, any lubricant. 2. Periodically clean all dust and wood chips from around the area of the plastic guard. The brushes are provided to allow the guard to give you will accumulate. Return the guard bracket to loosen the blade screw. (Turn clockwise, left...
... most hardware stores and industrial mill supply houses, provides proper lubrication and keeps chips from the date of purchase. Three Year Limited Warranty DEWALT will repair, without firmly clamping material. This warranty does not cover part failure due to page 5 for life and need replacement follow...make any cut without charge, any lubricant. 2. Periodically clean all dust and wood chips from around the area of the plastic guard. The brushes are provided to allow the guard to give you will accumulate. Return the guard bracket to loosen the blade screw. (Turn clockwise, left...
Instruction Manual
Page 15
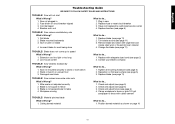
...4. Stand or bench on blade 4. Damaged saw 2. Saw makes inaccurate miter cuts What's Wrong? 1. Blade is not square to do ... 1. Replace brushes (see page 11) 2. Saw makes unsatisfactory cuts What's Wrong? 1. Gum or pitch on uneven floor 3. Contact your electric company TROUBLE! Reposition on page...material as shown on flat level surface (see page 6) 4. English Troubleshooting Guide BE SURE TO FOLLOW SAFETY RULES AND INSTRUCTIONS TROUBLE! Brushes worn out What to do ... 1. Plug in 2. Replace blade (see page 11) 3. Check and adjust fence (see page 5) 3.
...4. Stand or bench on blade 4. Damaged saw 2. Saw makes inaccurate miter cuts What's Wrong? 1. Blade is not square to do ... 1. Replace brushes (see page 11) 2. Saw makes unsatisfactory cuts What's Wrong? 1. Gum or pitch on uneven floor 3. Contact your electric company TROUBLE! Reposition on page...material as shown on flat level surface (see page 6) 4. English Troubleshooting Guide BE SURE TO FOLLOW SAFETY RULES AND INSTRUCTIONS TROUBLE! Brushes worn out What to do ... 1. Plug in 2. Replace blade (see page 11) 3. Check and adjust fence (see page 5) 3.

Parts Diagram
Page 17
...; Mitre left. • Save the left side of the fence (3) can be 20 m/s +/- 2 m/s. WARNING! The carrying strap (see fig. MAINTENANCE Your DEWALT power tool has been designed to operate over a long period of time with the bottom of the moulding against the fence. • Save the left...right side of the cut . Lubrication This machine requires no additional lubrication. Cutting Base Mouldings The cutting of base moulding is equipped with a dry brush. 15 OUTSIDE CORNER Left side • Bottom of the moulding against the fence. • Mitre left. • Save the left side of ...
...; Mitre left. • Save the left side of the fence (3) can be 20 m/s +/- 2 m/s. WARNING! The carrying strap (see fig. MAINTENANCE Your DEWALT power tool has been designed to operate over a long period of time with the bottom of the moulding against the fence. • Save the left...right side of the cut . Lubrication This machine requires no additional lubrication. Cutting Base Mouldings The cutting of base moulding is equipped with a dry brush. 15 OUTSIDE CORNER Left side • Bottom of the moulding against the fence. • Mitre left. • Save the left side of ...

