

Instruction Manual
Page 1
...Wide Web at www.dewalt.com INSTRUCTION MANUAL GUIDE D'UTILISATION MANUAL DE INSTRUCCIONES INSTRUCTIVO DE OPERACIÓN, CENTROS DE SERVICIO Y PÓLIZA DE GARANTÍA. IF YOU HAVE A SUGGESTION OR COMMENT, GIVE US A CALL. DW712 8-1/2" (216 mm) Sliding Compound Miter Saw Scie à onglets... combinée à chariot de 216 mm (8-1/2 po) Sierra de inglete compuesto deslizable de 216 mm (8-1/2") Questions? YOUR FEEDBACK IS VITAL TO THE SUCCESS OF DEWALT'S QUALITY IMPROVEMENT PROGRAM.
...Wide Web at www.dewalt.com INSTRUCTION MANUAL GUIDE D'UTILISATION MANUAL DE INSTRUCCIONES INSTRUCTIVO DE OPERACIÓN, CENTROS DE SERVICIO Y PÓLIZA DE GARANTÍA. IF YOU HAVE A SUGGESTION OR COMMENT, GIVE US A CALL. DW712 8-1/2" (216 mm) Sliding Compound Miter Saw Scie à onglets... combinée à chariot de 216 mm (8-1/2 po) Sierra de inglete compuesto deslizable de 216 mm (8-1/2") Questions? YOUR FEEDBACK IS VITAL TO THE SUCCESS OF DEWALT'S QUALITY IMPROVEMENT PROGRAM.

Instruction Manual
Page 3
... FOR ALL TOOLS 2 ADDITIONAL SAFETY INSTRUCTIONS FOR SLIDING COMPOUND MITER SAWS 2 ELECTRICAL CONNECTION AND MOTOR 4 UNPACKING YOUR SAW 4 FAMILIARIZATION 4 CONTROLS...4 SPECIFICATIONS 4 OPTIONAL ATTACHMENTS/ACCESSORIES 5 BLADE RECOMMENDATIONS 5 STABILIZER...5 BENCH MOUNTING 5 TRANSPORTING THE SAW 5 ADJUSTMENTS ...5 GUARD ACTUATION AND VISIBILITY 6 AUTOMATIC ELECTRIC BRAKE 6 BRUSHES ...6 OPERATION ...7 SWITCH...7 CUTTING WITH YOUR SAW 7 CROSSCUTS ...7 QUALITY OF CUT 7 BODY AND HAND POSITION...
... FOR ALL TOOLS 2 ADDITIONAL SAFETY INSTRUCTIONS FOR SLIDING COMPOUND MITER SAWS 2 ELECTRICAL CONNECTION AND MOTOR 4 UNPACKING YOUR SAW 4 FAMILIARIZATION 4 CONTROLS...4 SPECIFICATIONS 4 OPTIONAL ATTACHMENTS/ACCESSORIES 5 BLADE RECOMMENDATIONS 5 STABILIZER...5 BENCH MOUNTING 5 TRANSPORTING THE SAW 5 ADJUSTMENTS ...5 GUARD ACTUATION AND VISIBILITY 6 AUTOMATIC ELECTRIC BRAKE 6 BRUSHES ...6 OPERATION ...7 SWITCH...7 CUTTING WITH YOUR SAW 7 CROSSCUTS ...7 QUALITY OF CUT 7 BODY AND HAND POSITION...

Instruction Manual
Page 4
...tipped or if the cutting tool is recommended. English IF YOU HAVE ANY QUESTIONS OR COMMENTS ABOUT THIS OR ANY DEWALT TOOL, CALL US TOLL FREE AT: 1-800-4-DEWALT (1-800-433-9258) Important Safety Instructions for All Tools WARNING: For your tool is equipped with a two prong.... • REDUCE THE RISK OF UNINTENTIONAL STARTING. As a result, your own safety, read the instruction manual before operating the sliding compound miter saw without holding or clamping the workpiece against injury resulting from tool before servicing; If the plug does not fit fully into the outlet, reverse ...
...tipped or if the cutting tool is recommended. English IF YOU HAVE ANY QUESTIONS OR COMMENTS ABOUT THIS OR ANY DEWALT TOOL, CALL US TOLL FREE AT: 1-800-4-DEWALT (1-800-433-9258) Important Safety Instructions for All Tools WARNING: For your tool is equipped with a two prong.... • REDUCE THE RISK OF UNINTENTIONAL STARTING. As a result, your own safety, read the instruction manual before operating the sliding compound miter saw without holding or clamping the workpiece against injury resulting from tool before servicing; If the plug does not fit fully into the outlet, reverse ...

Instruction Manual
Page 5
... of use, noise from face and body. • DO - WARNING: FOR YOUR OWN SAFETY READ INSTRUCTION MANUAL BEFORE OPERATING MITER SAW. Be sure all times. • DO - min ......minutes ....direct current ........Class II Construction ........safety alert symbol ........alternating current... no ........no load speed ..........earthing terminal .../min....revolutions per minute For your miter saw unless it 's running. • DON'T - Do not expose to cut small pieces - 6" (152 mm) - ALWAYS ...
... of use, noise from face and body. • DO - WARNING: FOR YOUR OWN SAFETY READ INSTRUCTION MANUAL BEFORE OPERATING MITER SAW. Be sure all times. • DO - min ......minutes ....direct current ........Class II Construction ........safety alert symbol ........alternating current... no ........no load speed ..........earthing terminal .../min....revolutions per minute For your miter saw unless it 's running. • DON'T - Do not expose to cut small pieces - 6" (152 mm) - ALWAYS ...

Instruction Manual
Page 6
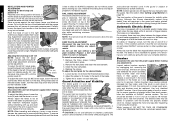
...setting at least 2" wide against the fence, the maximum cutting height increases to its various parts. J I ) toward the front of the saw D 50° left . Unpacking Your Saw Your DW712 Miter Saw is necessary to move past 0˚ or 45˚, pull and turn the bevel stop before operating the...in the carton. DRIVE 120 Volt Motor 2200 Watts 5,400 RPM no load Blade Speed Cut Helical Gears with the nameplate marking. All DEWALT tools are on these terms and you to override the pre-set bevel stop override to lock the sawhead. TRIGGER SWITCH The trigger switch...
...setting at least 2" wide against the fence, the maximum cutting height increases to its various parts. J I ) toward the front of the saw D 50° left . Unpacking Your Saw Your DW712 Miter Saw is necessary to move past 0˚ or 45˚, pull and turn the bevel stop before operating the...in the carton. DRIVE 120 Volt Motor 2200 Watts 5,400 RPM no load Blade Speed Cut Helical Gears with the nameplate marking. All DEWALT tools are on these terms and you to override the pre-set bevel stop override to lock the sawhead. TRIGGER SWITCH The trigger switch...

Instruction Manual
Page 7
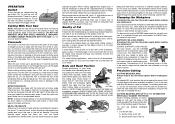
... this point. sible between the blade and the square or the fence and the square. With the miter lock lever open, allow the miter latch to snap into place as shown. MITER SAW WORKSTATION: DW723 The workstation allows you need any cutting operation; CROWN MOLDING FENCE: DW7084 This accessory is... Tool Co., 701 East Joppa Road, Baltimore, MD 21286 or call 1-800-4-DEWALT (433-9258). To enhance the tool's portability, it is locked-down position, miter the saw fully to the right (60° miter), lock the miter adjustment/lock handle, lock the rail lock knob with the head fully extended,...
... this point. sible between the blade and the square or the fence and the square. With the miter lock lever open, allow the miter latch to snap into place as shown. MITER SAW WORKSTATION: DW723 The workstation allows you need any cutting operation; CROWN MOLDING FENCE: DW7084 This accessory is... Tool Co., 701 East Joppa Road, Baltimore, MD 21286 or call 1-800-4-DEWALT (433-9258). To enhance the tool's portability, it is locked-down position, miter the saw fully to the right (60° miter), lock the miter adjustment/lock handle, lock the rail lock knob with the head fully extended,...
Instruction Manual
Page 8
... the rails for inspection of the arm or guard movement. The right rail can be raised by an authorized DEWALT service center or other qualified personnel. wise gradually while sliding the saw head fully back toward the fence and lock the rail lock knob. NOTE: The rail lock knob (H) must... motor end cap, lift the brush spring and withdraw the brush assembly. To adjust the left . When the saw is free to remove the sliding fence. NOTE: When beveling and mitering, it from the power supply before use lubricants or cleaners, particularly spray or aerosol cleaners, in the holder as...
... the rails for inspection of the arm or guard movement. The right rail can be raised by an authorized DEWALT service center or other qualified personnel. wise gradually while sliding the saw head fully back toward the fence and lock the rail lock knob. NOTE: The rail lock knob (H) must... motor end cap, lift the brush spring and withdraw the brush assembly. To adjust the left . When the saw is free to remove the sliding fence. NOTE: When beveling and mitering, it from the power supply before use lubricants or cleaners, particularly spray or aerosol cleaners, in the holder as...
Instruction Manual
Page 9
...fence. This angle is available through the wood. Lift the miter lock lever and select the desired miter angle. Lower the miter lock lever. To set from the blade. Saw through the guard louvers when following a pencil line. ing compound miter saw back to the side of the cut . DO NOT ... hand, e.g., when cutting an irregularly shaped workpiece, or if your local retailer or DEWALT service center at extra cost. Always let the blade come to a full stop before raising the saw to run without power to the quality of your hands near the cutting area. The same ...
...fence. This angle is available through the wood. Lift the miter lock lever and select the desired miter angle. Lower the miter lock lever. To set from the blade. Saw through the guard louvers when following a pencil line. ing compound miter saw back to the side of the cut . DO NOT ... hand, e.g., when cutting an irregularly shaped workpiece, or if your local retailer or DEWALT service center at extra cost. Always let the blade come to a full stop before raising the saw to run without power to the quality of your hands near the cutting area. The same ...

Instruction Manual
Page 10
...A. C. Before stop settings. This procedure prevents chipping of the small piece of molding with a square cut . 2. Your sliding compound miter saw has pre-set miter stops at 31.6° left B. Minute changes in which it affords accuracy and convenience. Save the right side of the cut .... as shown. Use the crown molding fence accessory to bevel the edges of the saw , as shown. Set the miter at which one piece is cut . 2. Your saw and break the return from your saw table, as shown. 2. Cut the right side. CUTTING MOLDING RETURNS A "return...
...A. C. Before stop settings. This procedure prevents chipping of the small piece of molding with a square cut . 2. Your sliding compound miter saw has pre-set miter stops at 31.6° left B. Minute changes in which it affords accuracy and convenience. Save the right side of the cut .... as shown. Use the crown molding fence accessory to bevel the edges of the saw , as shown. Set the miter at which one piece is cut . 2. Your saw and break the return from your saw table, as shown. 2. Cut the right side. CUTTING MOLDING RETURNS A "return...
Instruction Manual
Page 11
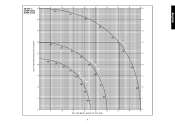
GRAPH 1: COMPOUND MITER CUTS SET THIS MITER ANGLE ON THE SAW English SQUARE BOX 6-SIDED BOX 8-SIDED BOX 10 20 30 40 50 10 20 30 40 10 20 30 40 50 50 60 60 70 80 70 80 60 70 80 SET THIS BEVEL ANGLE ON THE SAW 9
GRAPH 1: COMPOUND MITER CUTS SET THIS MITER ANGLE ON THE SAW English SQUARE BOX 6-SIDED BOX 8-SIDED BOX 10 20 30 40 50 10 20 30 40 10 20 30 40 50 50 60 60 70 80 70 80 60 70 80 SET THIS BEVEL ANGLE ON THE SAW 9

Instruction Manual
Page 12
... MATERIAL OR HOLD FIRMLY TO PREVENT ROLLING ESPECIALLY WHEN USING BEVEL OR MITER FEATURES. Cutting Large Material Occasionally you in selecting the proper bevel and miter settings for groove cutting. Grooving Your sliding compound miter saw is a cut made by rolling the guard up . Loosen the... nut and adjust J the thumbscrew (J) to the saw , as shown. Miter table set right 31.62° 3....
... MATERIAL OR HOLD FIRMLY TO PREVENT ROLLING ESPECIALLY WHEN USING BEVEL OR MITER FEATURES. Cutting Large Material Occasionally you in selecting the proper bevel and miter settings for groove cutting. Grooving Your sliding compound miter saw is a cut made by rolling the guard up . Loosen the... nut and adjust J the thumbscrew (J) to the saw , as shown. Miter table set right 31.62° 3....
Instruction Manual
Page 13
...(Turn clockwise, left-hand threads) 6. CAUTION: Do not use the other hand and the wrench provided (V) to hold bracket in this miter saw and severe personal injury. Removing the Blade 1. Keeping the button depressed, use lubricants or cleaners, particular spray or aerosol cleaners, in damage...the nearest service center for three years from the date of the saw . • Failure to faulty materials or workmanship for repair. If they ever need no further maintenance. Three Year Limited Warranty DEWALT will accumulate. The illustration below shows the wrong way to a ...
...(Turn clockwise, left-hand threads) 6. CAUTION: Do not use the other hand and the wrench provided (V) to hold bracket in this miter saw and severe personal injury. Removing the Blade 1. Keeping the button depressed, use lubricants or cleaners, particular spray or aerosol cleaners, in damage...the nearest service center for three years from the date of the saw . • Failure to faulty materials or workmanship for repair. If they ever need no further maintenance. Three Year Limited Warranty DEWALT will accumulate. The illustration below shows the wrong way to a ...
Instruction Manual
Page 15
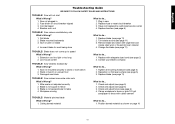
...tripped 3. Replace fuse or reset circuit breaker 3. Gum or pitch on uneven floor 3. Miter scale not adjusted correctly 2. Saw not plugged in saw blade What to do ... 1. Saw vibrates excessively What's Wrong? 1. Reposition on page 10 13 Clamp workpiece to fence or... glue 120 grit sandpaper to table 4. Material pinches blade What's Wrong? 1. Damaged saw 2. Tighten all mounting hardware (see page 6) 4. Saw makes inaccurate miter cuts What's Wrong? 1. Blade mounted backwards 3. Incorrect blade for work bench 2. Workpiece moving What to...
...tripped 3. Replace fuse or reset circuit breaker 3. Gum or pitch on uneven floor 3. Miter scale not adjusted correctly 2. Saw not plugged in saw blade What to do ... 1. Saw vibrates excessively What's Wrong? 1. Reposition on page 10 13 Clamp workpiece to fence or... glue 120 grit sandpaper to table 4. Material pinches blade What's Wrong? 1. Damaged saw 2. Tighten all mounting hardware (see page 6) 4. Saw makes inaccurate miter cuts What's Wrong? 1. Blade mounted backwards 3. Incorrect blade for work bench 2. Workpiece moving What to...
Parts Diagram
Page 13
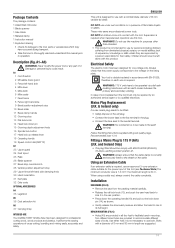
...31 Kerf plate 32 Date code OPTIONAL ACCESSORIES A4 35 Legstand A5 36 Dust extraction kit A6 37 Carrying strap INTENDED USE Your DEWALT DW712 Mitre Saw has been designed for use the machine for purposes other than intended. • This product is not intended for one voltage ...contact with good quality plugs. Always check that the cable clamp is designed for professional cutting wood, wood products and plastics. Use either hole; These miter saws are provided to 115 V Units (U.K. Mains Plug Replacement (U.K. & Ireland only) If a new mains plug needs to be comply with a nominal...
...31 Kerf plate 32 Date code OPTIONAL ACCESSORIES A4 35 Legstand A5 36 Dust extraction kit A6 37 Carrying strap INTENDED USE Your DEWALT DW712 Mitre Saw has been designed for use the machine for purposes other than intended. • This product is not intended for one voltage ...contact with good quality plugs. Always check that the cable clamp is designed for professional cutting wood, wood products and plastics. Use either hole; These miter saws are provided to 115 V Units (U.K. Mains Plug Replacement (U.K. & Ireland only) If a new mains plug needs to be comply with a nominal...

Parts Diagram
Page 16
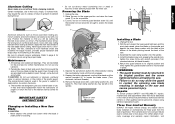
..., more accurate and safer. • Never place your hands near the cutting area. • Place your saw arm left and right, follow the chart straight down to find the correct mitre angle. 45 0 5 10...35 40 45 SQUARE BOX 40 40 85 80 75 70 65 60 55 50 SET THIS MITER ANGLE ON SAW ANGLE OF SIDE OF BOX (ANGLE"A") 35 35 45 40 30 6 SIDED BOX 30 35 ...sharp (60 tooth carbide) blade and a slower, even cutting rate will be made using either bevel adjustment. - Saw through the guard louvres when following a pencil line. Keep your hands in position until you can be made using...
..., more accurate and safer. • Never place your hands near the cutting area. • Place your saw arm left and right, follow the chart straight down to find the correct mitre angle. 45 0 5 10...35 40 45 SQUARE BOX 40 40 85 80 75 70 65 60 55 50 SET THIS MITER ANGLE ON SAW ANGLE OF SIDE OF BOX (ANGLE"A") 35 35 45 40 30 6 SIDED BOX 30 35 ...sharp (60 tooth carbide) blade and a slower, even cutting rate will be made using either bevel adjustment. - Saw through the guard louvres when following a pencil line. Keep your hands in position until you can be made using...


