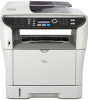

User Guide
Page 40
... tape. Important ❒ Removed tape is inhaled, gargle with large amounts of children. • If toner or used toner is dirty. Getting Started Unpacking To protect it from direct sunlight. ❒ Do not touch the print cartridge's photo conductor unit. 30 BSP024S Dispose of water and move into your hands. ❒ Do not...
... tape. Important ❒ Removed tape is inhaled, gargle with large amounts of children. • If toner or used toner is dirty. Getting Started Unpacking To protect it from direct sunlight. ❒ Do not touch the print cartridge's photo conductor unit. 30 BSP024S Dispose of water and move into your hands. ❒ Do not...
User Guide
Page 210
... ({User Tools} key setting) Quick Dial Entry Speed Dial Entry ❖ Machine Settings ({User Tools} key setting) Speaker Volume Paper Settings I/O Timeout Auto Continue Toner Saver Mode Cartridge&Parts 7 Scanner Carriage Low Humidity Mode Scan Warm-up Time User Registration ❖ Network Settings ({User Tools} key setting) Ethernet IP Configuration ❖ Reports...
... ({User Tools} key setting) Quick Dial Entry Speed Dial Entry ❖ Machine Settings ({User Tools} key setting) Speaker Volume Paper Settings I/O Timeout Auto Continue Toner Saver Mode Cartridge&Parts 7 Scanner Carriage Low Humidity Mode Scan Warm-up Time User Registration ❖ Network Settings ({User Tools} key setting) Ethernet IP Configuration ❖ Reports...
User Guide
Page 232
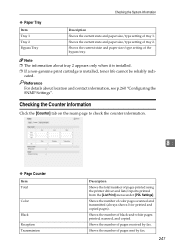
...) (Needs re(Needs re(Needs re(Needs re- Default: [Off] • On 7 • Off ❖ Cartridge&Parts Displays information about consumables. • Print Cartridge Displays the remaining amount of toner. • Black Life (New), , , , , placing) • Fuser Unit • Fuser Unit Life Displays the... , , , , placing) • Paper Feed Roller • Paper Feed Roller Unit Life Displays the remaining life of toner. Configuring the Machine Using the Control Panel • Restrict User Specifies how many seconds a user stays authenticated after paper is output...
...) (Needs re(Needs re(Needs re(Needs re- Default: [Off] • On 7 • Off ❖ Cartridge&Parts Displays information about consumables. • Print Cartridge Displays the remaining amount of toner. • Black Life (New), , , , , placing) • Fuser Unit • Fuser Unit Life Displays the... , , , , placing) • Paper Feed Roller • Paper Feed Roller Unit Life Displays the remaining life of toner. Configuring the Machine Using the Control Panel • Restrict User Specifies how many seconds a user stays authenticated after paper is output...
User Guide
Page 239
... and type settings. • Tray 1 Shows paper size and type settings. • Tray 2 Shows paper size and type settings. ❖ Cartridge & Parts Information Shows the information about supply levels. • Black Toner • Fuser Unit • Transfer Roller • Paper Feed Roller 7 229 Reports Print ❖ Speed Dial List Prints a list of...
... and type settings. • Tray 1 Shows paper size and type settings. • Tray 2 Shows paper size and type settings. ❖ Cartridge & Parts Information Shows the information about supply levels. • Black Toner • Fuser Unit • Transfer Roller • Paper Feed Roller 7 229 Reports Print ❖ Speed Dial List Prints a list of...
User Guide
Page 256
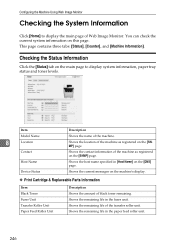
... on the [DNS] page. Shows the remaining life in [Host Name] on the machine's display. ❖ Print Cartridge & Replaceable Parts Information Item Black Toner Fuser Unit Transfer Roller Unit Paper Feed Roller Unit Description Shows the amount of Web Image Monitor. Shows the remaining life of...Counter], and [Machine Information]. Shows the contact information of the machine as registered on the main page to display the main page of black toner remaining. Shows the host name specified in the fuser unit. Checking the Status Information Click the [Status] tab on the [SNMP] page....
... on the [DNS] page. Shows the remaining life in [Host Name] on the machine's display. ❖ Print Cartridge & Replaceable Parts Information Item Black Toner Fuser Unit Transfer Roller Unit Paper Feed Roller Unit Description Shows the amount of Web Image Monitor. Shows the remaining life of...Counter], and [Machine Information]. Shows the contact information of the machine as registered on the main page to display the main page of black toner remaining. Shows the host name specified in the fuser unit. Checking the Status Information Click the [Status] tab on the [SNMP] page....
User Guide
Page 257
... contact information, see p.260 "Configuring the SNMP Settings". Reference For details about tray 2 appears only when it is installed. ❒ If a non-genuine print cartridge is installed, toner life cannot be reliably indi- Shows the current state and paper size/type setting of black-and-white pages printed, scanned, and copied. Shows...
... contact information, see p.260 "Configuring the SNMP Settings". Reference For details about tray 2 appears only when it is installed. ❒ If a non-genuine print cartridge is installed, toner life cannot be reliably indi- Shows the current state and paper size/type setting of black-and-white pages printed, scanned, and copied. Shows...
User Guide
Page 269
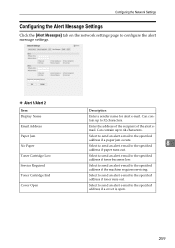
... to send an alert e-mail to configure the alert message settings. ❖ Alert 1/Alert 2 Item Display Name Email Address Paper Jam No Paper Toner Cartridge Low Service Required Toner Cartridge End Cover Open Description Enter a sender name for alert e-mail. Can contain up to the specified 8 address if paper runs out. Select to send...
... to send an alert e-mail to configure the alert message settings. ❖ Alert 1/Alert 2 Item Display Name Email Address Paper Jam No Paper Toner Cartridge Low Service Required Toner Cartridge End Cover Open Description Enter a sender name for alert e-mail. Can contain up to the specified 8 address if paper runs out. Select to send...
User Guide
Page 284
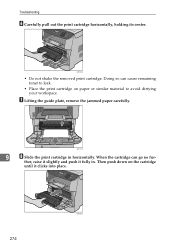
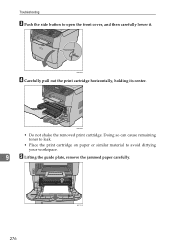
When the cartridge can cause remaining toner to leak. • Place the print cartridge on the cartridge until it fully in horizontally. ther, raise it slightly and push it clicks into place. 274 BSP039S Then push down on paper or similar material to avoid dirtying your workspace. Doing so can go no fur- G Lifting the guide plate, remove the jammed paper carefully. BSP036S • Do not shake the removed print cartridge. BSP121S 9 H Slide the print cartridge in . Troubleshooting F Carefully pull out the print cartridge horizontally, holding its center.
When the cartridge can cause remaining toner to leak. • Place the print cartridge on the cartridge until it fully in horizontally. ther, raise it slightly and push it clicks into place. 274 BSP039S Then push down on paper or similar material to avoid dirtying your workspace. Doing so can go no fur- G Lifting the guide plate, remove the jammed paper carefully. BSP036S • Do not shake the removed print cartridge. BSP121S 9 H Slide the print cartridge in . Troubleshooting F Carefully pull out the print cartridge horizontally, holding its center.
User Guide
Page 286
BSP032S D Carefully pull out the print cartridge horizontally, holding its center. BSP036S • Do not shake the removed print cartridge. Doing so can cause remaining toner to leak. • Place the print cartridge on paper or similar material to open the front cover, and then carefully lower it. Troubleshooting C Push the side button to avoid dirtying your workspace. 9 E Lifting the guide plate, remove the jammed paper carefully. 276 BSP121S
BSP032S D Carefully pull out the print cartridge horizontally, holding its center. BSP036S • Do not shake the removed print cartridge. Doing so can cause remaining toner to leak. • Place the print cartridge on paper or similar material to open the front cover, and then carefully lower it. Troubleshooting C Push the side button to avoid dirtying your workspace. 9 E Lifting the guide plate, remove the jammed paper carefully. 276 BSP121S
User Guide
Page 291
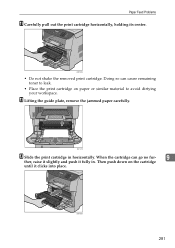
When the cartridge can cause remaining toner to leak. • Place the print cartridge on the cartridge until it fully in horizontally. BSP121S M Slide the print cartridge in . Then push down on paper or similar material to avoid dirtying your workspace. BSP039S 281 Paper Feed Problems K Carefully pull out the print cartridge horizontally, holding its center. BSP036S • Do not shake the removed print cartridge. Doing so can go no fur- 9 ther, raise it slightly and push it clicks into place. L Lifting the guide plate, remove the jammed paper carefully.
When the cartridge can cause remaining toner to leak. • Place the print cartridge on the cartridge until it fully in horizontally. BSP121S M Slide the print cartridge in . Then push down on paper or similar material to avoid dirtying your workspace. BSP039S 281 Paper Feed Problems K Carefully pull out the print cartridge horizontally, holding its center. BSP036S • Do not shake the removed print cartridge. Doing so can go no fur- 9 ther, raise it slightly and push it clicks into place. L Lifting the guide plate, remove the jammed paper carefully.
User Guide
Page 299
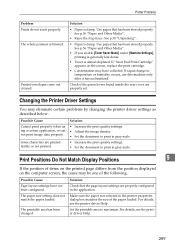
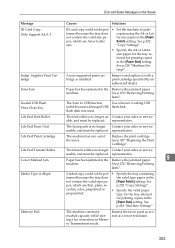
... • Paper is almost depleted. See p.56 "Paper and Other Media". • If you enable [Toner Saver Mode] under [Machine Settings], printing is generally less dense. • Toner is damp. Possible Cause Solution Cannot print properly when us- • Increase the print quality settings. Some characters... Display Positions 9 If the position of items on the printed page differs from the position displayed on the screen, replace the print cartridge. • Condensation may have not been configured. Use paper that has been stored properly. See p.56 "Paper and Other Media"....
... • Paper is almost depleted. See p.56 "Paper and Other Media". • If you enable [Toner Saver Mode] under [Machine Settings], printing is generally less dense. • Toner is damp. Possible Cause Solution Cannot print properly when us- • Increase the print quality settings. Some characters... Display Positions 9 If the position of items on the printed page differs from the position displayed on the screen, replace the print cartridge. • Condensation may have not been configured. Use paper that has been stored properly. See p.56 "Paper and Other Media"....
User Guide
Page 312
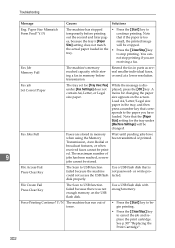
... is too es, because the tray's [Paper small, the printed image Size] setting does not match will be cropped. The maximum number of toner. • Press the {Start} key to begin printing. • Press the {Clear/Stop} key to USB function failed because there was...to the paper you are stored in parts as several smaller individual faxes, or send at a lower resolution. See p.307 "Replacing the Print Cartridge". 302 Troubleshooting Message Causes Solutions Eng. Paper Size Mismatch Form Feed? Y/N The machine has stopped • Press the {Start} key to USB...
... is too es, because the tray's [Paper small, the printed image Size] setting does not match will be cropped. The maximum number of toner. • Press the {Start} key to begin printing. • Press the {Clear/Stop} key to USB function failed because there was...to the paper you are stored in parts as several smaller individual faxes, or send at a lower resolution. See p.307 "Replacing the Print Cartridge". 302 Troubleshooting Message Causes Solutions Eng. Paper Size Mismatch Form Feed? Y/N The machine has stopped • Press the {Start} key to USB...
User Guide
Page 313
... Flash Press Clear Key The Scan to print formed because the tray does copies using the A4 or Let- Life End Print Cartridge The machine has run out of the toner. Memory Full The machine's memory Resend the fax in the Remove the jammed paper. representative. See p.272 "Removing Printing Jams". See...
... Flash Press Clear Key The Scan to print formed because the tray does copies using the A4 or Let- Life End Print Cartridge The machine has run out of the toner. Memory Full The machine's memory Resend the fax in the Remove the jammed paper. representative. See p.272 "Removing Printing Jams". See...
User Guide
Page 317
..., number of pages printed at all times. Early replacement of used toner containers in accordance with local regulations. • Do not store toner, used toner or toner containers. Dispose of the print cartridge might ig- Consult a doctor if necessary. • If toner or used toner is inhaled, gargle with plenty of water and move into your eyes...
..., number of pages printed at all times. Early replacement of used toner containers in accordance with local regulations. • Do not store toner, used toner or toner containers. Dispose of the print cartridge might ig- Consult a doctor if necessary. • If toner or used toner is inhaled, gargle with plenty of water and move into your eyes...
User Guide
Page 318
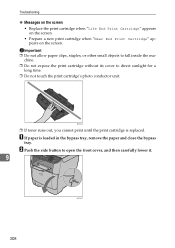
...clips, staples, or other small objects to direct sunlight for a long time. ❒ Do not touch the print cartridge's photo conductor unit. chine. ❒ Do not expose the print cartridge without its cover to fall inside the ma- B Push the side button to open the front cover, and then ...carefully lower it. 9 BSP032S 308 A If paper is replaced. BSP024S ❒ If toner runs out, you cannot print until the print cartridge is loaded in the bypass tray, remove the paper and close the bypass tray. Troubleshooting ❖ Messages on the screen &#...
...clips, staples, or other small objects to direct sunlight for a long time. ❒ Do not touch the print cartridge's photo conductor unit. chine. ❒ Do not expose the print cartridge without its cover to fall inside the ma- B Push the side button to open the front cover, and then ...carefully lower it. 9 BSP032S 308 A If paper is replaced. BSP024S ❒ If toner runs out, you cannot print until the print cartridge is loaded in the bypass tray, remove the paper and close the bypass tray. Troubleshooting ❖ Messages on the screen &#...
User Guide
Page 319
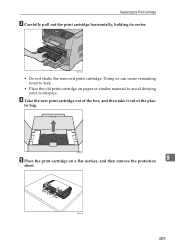
tic bag. BSP195S E Place the print cartridge on paper or similar material to avoid dirtying your workspace. D Take the new print cartridge out of the box, and then take it out of the plas- Replacing the Print Cartridge C Carefully pull out the print cartridge horizontally, holding its center. BSP037S 309 BSP036S • Do not shake the removed print cartridge. Doing so can cause remaining toner to leak. • Place the old print cartridge on a flat surface, and then remove the protection 9 sheet.
tic bag. BSP195S E Place the print cartridge on paper or similar material to avoid dirtying your workspace. D Take the new print cartridge out of the box, and then take it out of the plas- Replacing the Print Cartridge C Carefully pull out the print cartridge horizontally, holding its center. BSP037S 309 BSP036S • Do not shake the removed print cartridge. Doing so can cause remaining toner to leak. • Place the old print cartridge on a flat surface, and then remove the protection 9 sheet.
User Guide
Page 320
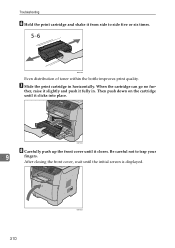
Troubleshooting F Hold the print cartridge and shake it from side to trap your 9 fingers. Be careful not to side five or six times. After closing the front cover, wait until it clicks into place. When the cartridge can go no fur- ther, raise it slightly and push it closes. BSP038S Even distribution of toner within the bottle improves print quality. Then push down on the cartridge until the initial screen is displayed. 310 BSP253S G Slide the print cartridge in . BSP039S H Carefully push up the front cover until it fully in horizontally.
Troubleshooting F Hold the print cartridge and shake it from side to trap your 9 fingers. Be careful not to side five or six times. After closing the front cover, wait until it clicks into place. When the cartridge can go no fur- ther, raise it slightly and push it closes. BSP038S Even distribution of toner within the bottle improves print quality. Then push down on the cartridge until the initial screen is displayed. 310 BSP253S G Slide the print cartridge in . BSP039S H Carefully push up the front cover until it fully in horizontally.
User Guide
Page 327
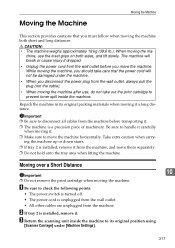
... machine up or down stairs. ❒ If tray 2 is installed, remove it. Moving over a Short Distance 10 Important ❒ Do not remove the print cartridge when moving the ma- B If tray 2 is installed, remove it . ❒ Make sure to check the following points: • The power switch is ...turned off. • The power cord is a precision piece of machinery. While moving the machine, you should take out the print cartridge to prevent toner spill inside the machine to disconnect all cables from the machine before you move them separately. ❒ Do not hold onto the tray area...
... machine up or down stairs. ❒ If tray 2 is installed, remove it. Moving over a Short Distance 10 Important ❒ Do not remove the print cartridge when moving the ma- B If tray 2 is installed, remove it . ❒ Make sure to check the following points: • The power switch is ...turned off. • The power cord is a precision piece of machinery. While moving the machine, you should take out the print cartridge to prevent toner spill inside the machine to disconnect all cables from the machine before you move them separately. ❒ Do not hold onto the tray area...
User Guide
Page 328
...8226; All other cables are unplugged from spilling, move the machine carefully. Empty all the paper trays, but do not remove the print cartridge. Reference 318 For details about [Scanner Carriage], see p.218 "Machine Settings". C Return the scanning unit inside the machine if the machine ...your sales or service representative. BSP025S E If you have removed tray 2, reinstall it. To prevent toner from the machine. • All paper trays are empty. Note ❒ Toner might spill inside the machine to hold the machine level while carrying it. Reference For details about...
...8226; All other cables are unplugged from spilling, move the machine carefully. Empty all the paper trays, but do not remove the print cartridge. Reference 318 For details about [Scanner Carriage], see p.218 "Machine Settings". C Return the scanning unit inside the machine if the machine ...your sales or service representative. BSP025S E If you have removed tray 2, reinstall it. To prevent toner from the machine. • All paper trays are empty. Note ❒ Toner might spill inside the machine to hold the machine level while carrying it. Reference For details about...
User Guide
Page 331
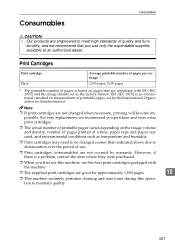
...by the International Organization for approximately 1,500 pages. 10 ❒ This machine routinely performs cleaning and uses toner during this machine, use the four print cartridges packaged with ISO/IEC 19752 and the image density set by warranty. For easy replacement, we recommend ...that are compliant with the machine. ❒ The supplied print cartridges are good for Standardization. Consumables Consumables R CAUTION: • Our products are engineered to meet high standards of quality and functionality...
...by the International Organization for approximately 1,500 pages. 10 ❒ This machine routinely performs cleaning and uses toner during this machine, use the four print cartridges packaged with ISO/IEC 19752 and the image density set by warranty. For easy replacement, we recommend ...that are compliant with the machine. ❒ The supplied print cartridges are good for Standardization. Consumables Consumables R CAUTION: • Our products are engineered to meet high standards of quality and functionality...


