User Guide
Page 12
...-VTM Microsoft® Windows Server® 2008 Enterprise without Hyper-VTM Microsoft® Windows Server® 2008 Datacenter without Hyper-VTM Note ❒ PostScript 3 in part, modified, quoted, or reprinted without permission. 2 Guide to the Machine • The product names of Windows Server 2003 are as follows: Microsoft® Windows Server...
...-VTM Microsoft® Windows Server® 2008 Enterprise without Hyper-VTM Microsoft® Windows Server® 2008 Datacenter without Hyper-VTM Note ❒ PostScript 3 in part, modified, quoted, or reprinted without permission. 2 Guide to the Machine • The product names of Windows Server 2003 are as follows: Microsoft® Windows Server...
User Guide
Page 16
... using a computer running . Follow the instructions below to install it. Guide to the Machine Using Manuals Be sure to read this section before any other part of this is completed. B Insert the "Manuals" CD-ROM into the CD-ROM drive.
... using a computer running . Follow the instructions below to install it. Guide to the Machine Using Manuals Be sure to read this section before any other part of this is completed. B Insert the "Manuals" CD-ROM into the CD-ROM drive.
User Guide
Page 31
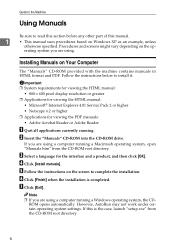
... ADF Originals scanned with the ADF are output here. 4. Front Cover Open this cover to Components This section lists the names and functions of the parts of plain paper. 10. This tray can be stacked here. 11.
... ADF Originals scanned with the ADF are output here. 4. Front Cover Open this cover to Components This section lists the names and functions of the parts of plain paper. 10. This tray can be stacked here. 11.
User Guide
Page 34
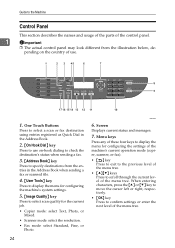
... of the menu tree. Screen Displays current status and messages. 7. Guide to the Machine Control Panel This section describes the names and usage of the parts of the control panel. 1 Important ❒ The actual control panel may look different from the illustration below, depending on the country of use on-hook...
... of the menu tree. Screen Displays current status and messages. 7. Guide to the Machine Control Panel This section describes the names and usage of the parts of the control panel. 1 Important ❒ The actual control panel may look different from the illustration below, depending on the country of use on-hook...
User Guide
Page 71
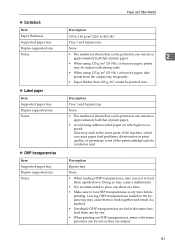
... curls. • When using 135 g/m2 (35.9 lb.) or heavier paper, take care not to load them upside down. Glue may stick to the inner parts of the machine, which glue is approximately half that of plain paper. 2 • When using 135 g/m2 (35.9 lb.) or heavier paper, prints may cause...
... curls. • When using 135 g/m2 (35.9 lb.) or heavier paper, take care not to load them upside down. Glue may stick to the inner parts of the machine, which glue is approximately half that of plain paper. 2 • When using 135 g/m2 (35.9 lb.) or heavier paper, prints may cause...
User Guide
Page 89
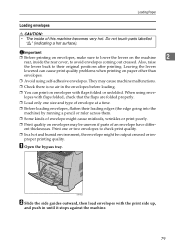
... quality on paper other than envelopes. ❒ Avoid using envelopes with flaps folded or unfolded. When using self-adhesive envelopes. Do not touch parts labelled "v" (indicating a hot surface). They may cause machine malfunctions. ❒ Check there is no air in until it stops against the...and push in the envelopes before loading. ❒ You can cause print quality problems when printing on envelopes may be uneven if parts of envelope might be output creased or improper printing quality. Loading Paper Loading envelopes R CAUTION: • The inside the rear...
... quality on paper other than envelopes. ❒ Avoid using envelopes with flaps folded or unfolded. When using self-adhesive envelopes. Do not touch parts labelled "v" (indicating a hot surface). They may cause machine malfunctions. ❒ Check there is no air in until it stops against the...and push in the envelopes before loading. ❒ You can cause print quality problems when printing on envelopes may be uneven if parts of envelope might be output creased or improper printing quality. Loading Paper Loading envelopes R CAUTION: • The inside the rear...
User Guide
Page 94
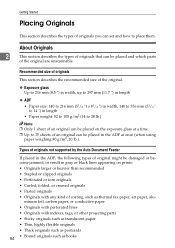
...Perforated or torn originals • Curled, folded, or creased originals • Pasted originals • Originals with indexes, tags, or other projecting parts • Sticky originals such as translucent paper • Thin, highly flexible originals • Thick originals such as postcards 84 • Bound ...80 g/m2, 20 lb.). Getting Started Placing Originals This section describes the types of originals you can be placed and which parts of the original are unscannable. Recommended size of originals This section describes the recommended size of the original. ❖ Exposure ...
...Perforated or torn originals • Curled, folded, or creased originals • Pasted originals • Originals with indexes, tags, or other projecting parts • Sticky originals such as translucent paper • Thin, highly flexible originals • Thick originals such as postcards 84 • Bound ...80 g/m2, 20 lb.). Getting Started Placing Originals This section describes the types of originals you can be placed and which parts of the original are unscannable. Recommended size of originals This section describes the recommended size of the original. ❖ Exposure ...
User Guide
Page 193
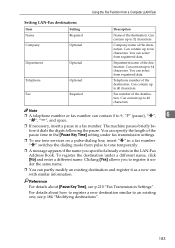
... Fax Optional Required Description Name of the destination. Can contain up to register it under a different name, click [No] and enter a different name. You can partly modify an existing destination and register it dials the digits following the pause. "p" switches the dialing mode from registered data. The machine pauses briefly before...
... Fax Optional Required Description Name of the destination. Can contain up to register it under a different name, click [No] and enter a different name. You can partly modify an existing destination and register it dials the digits following the pause. "p" switches the dialing mode from registered data. The machine pauses briefly before...
User Guide
Page 210
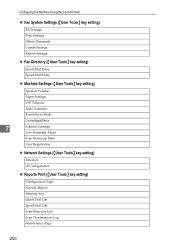
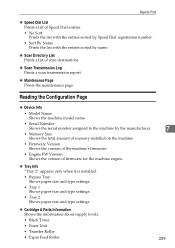
... setting) Quick Dial Entry Speed Dial Entry ❖ Machine Settings ({User Tools} key setting) Speaker Volume Paper Settings I/O Timeout Auto Continue Toner Saver Mode Cartridge&Parts 7 Scanner Carriage Low Humidity Mode Scan Warm-up Time User Registration ❖ Network Settings ({User Tools} key setting) Ethernet IP Configuration ❖ Reports Print ({User...
... setting) Quick Dial Entry Speed Dial Entry ❖ Machine Settings ({User Tools} key setting) Speaker Volume Paper Settings I/O Timeout Auto Continue Toner Saver Mode Cartridge&Parts 7 Scanner Carriage Low Humidity Mode Scan Warm-up Time User Registration ❖ Network Settings ({User Tools} key setting) Ethernet IP Configuration ❖ Reports Print ({User...
User Guide
Page 225
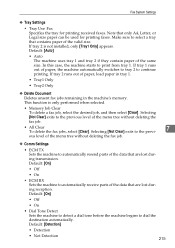
... a fax job, select the desired job, and then select [Clear]. Default: [On] • Off • On • ECM RX Sets the machine to automatically receive parts of the data that contains paper of the data that only A4, Letter, or Legal size paper can be used for printing received faxes. Make... sure to automatically resend parts of the valid size. If tray 1 runs out of paper, the machine automatically switches to tray 2 to the previous level of the menu tree ...
... a fax job, select the desired job, and then select [Clear]. Default: [On] • Off • On • ECM RX Sets the machine to automatically receive parts of the data that contains paper of the data that only A4, Letter, or Legal size paper can be used for printing received faxes. Make... sure to automatically resend parts of the valid size. If tray 1 runs out of paper, the machine automatically switches to tray 2 to the previous level of the menu tree ...
User Guide
Page 232
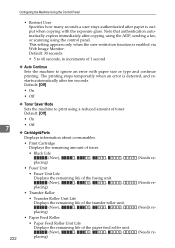
... temporarily when an error is detected, and restarts automatically after paper is enabled via Web Image Monitor. Default: [Off] • On 7 • Off ❖ Cartridge&Parts Displays information about consumables. • Print Cartridge Displays the remaining amount of toner. • Black Life (New), , , , , placing) • Fuser Unit • Fuser Unit Life...
... temporarily when an error is detected, and restarts automatically after paper is enabled via Web Image Monitor. Default: [Off] • On 7 • Off ❖ Cartridge&Parts Displays information about consumables. • Print Cartridge Displays the remaining amount of toner. • Black Life (New), , , , , placing) • Fuser Unit • Fuser Unit Life...
User Guide
Page 239
... Tray Shows paper size and type settings. • Tray 1 Shows paper size and type settings. • Tray 2 Shows paper size and type settings. ❖ Cartridge & Parts Information Shows the information about supply levels. • Black Toner • Fuser Unit • Transfer Roller • Paper Feed Roller 7 229
... Tray Shows paper size and type settings. • Tray 1 Shows paper size and type settings. • Tray 2 Shows paper size and type settings. ❖ Cartridge & Parts Information Shows the information about supply levels. • Black Toner • Fuser Unit • Transfer Roller • Paper Feed Roller 7 229
User Guide
Page 256
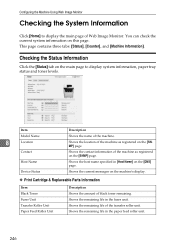
... roller unit. 246 Shows the remaining life of the machine. You can check the current system information on the machine's display. ❖ Print Cartridge & Replaceable Parts Information Item Black Toner Fuser Unit Transfer Roller Unit Paper Feed Roller Unit Description Shows the amount of Web Image Monitor. Configuring the Machine Using...
... roller unit. 246 Shows the remaining life of the machine. You can check the current system information on the machine's display. ❖ Print Cartridge & Replaceable Parts Information Item Black Toner Fuser Unit Transfer Roller Unit Paper Feed Roller Unit Description Shows the amount of Web Image Monitor. Configuring the Machine Using...
User Guide
Page 266
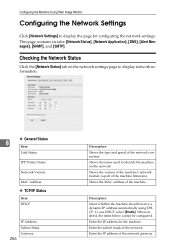
... below cannot be configured. Enter the IP address of the network connection. To use DHCP, select [Enable]. Shows the version of the machine's network module (a part of the machine firmware).
... below cannot be configured. Enter the IP address of the network connection. To use DHCP, select [Enable]. Shows the version of the machine's network module (a part of the machine firmware).
User Guide
Page 283
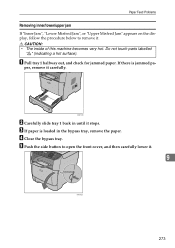
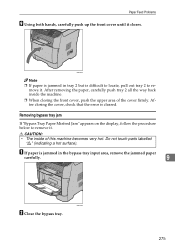
... stops. BSP118S B Carefully slide tray 1 back in the bypass tray, remove the paper. E Push the side button to remove it . 9 BSP032S 273 Do not touch parts labelled "v" (indicating a hot surface). If there is loaded in until it carefully. A Pull tray 1 halfway out, and check for jammed paper. Paper Feed Problems Removing...
... stops. BSP118S B Carefully slide tray 1 back in the bypass tray, remove the paper. E Push the side button to remove it . 9 BSP032S 273 Do not touch parts labelled "v" (indicating a hot surface). If there is loaded in until it carefully. A Pull tray 1 halfway out, and check for jammed paper. Paper Feed Problems Removing...
User Guide
Page 285
... inside of the cover firmly. After closing the front cover, push the upper area of this machine becomes very hot. move it. Do not touch parts labelled "v" (indicating a hot surface).
... inside of the cover firmly. After closing the front cover, push the upper area of this machine becomes very hot. move it. Do not touch parts labelled "v" (indicating a hot surface).
User Guide
Page 288
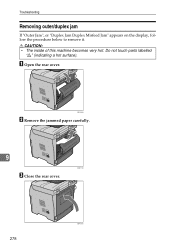
A Open the rear cover. BSP238S B Remove the jammed paper carefully. 9 BSP119S C Close the rear cover. 278 BSP251S Do not touch parts labelled "v" (indicating a hot surface). R CAUTION: • The inside of this machine becomes very hot. Troubleshooting Removing outer/duplex jam If "Outer Jam", or "Duplex Jam Duplex Misfeed Jam" appears on the display, follow the procedure below to remove it.
A Open the rear cover. BSP238S B Remove the jammed paper carefully. 9 BSP119S C Close the rear cover. 278 BSP251S Do not touch parts labelled "v" (indicating a hot surface). R CAUTION: • The inside of this machine becomes very hot. Troubleshooting Removing outer/duplex jam If "Outer Jam", or "Duplex Jam Duplex Misfeed Jam" appears on the display, follow the procedure below to remove it.
User Guide
Page 295
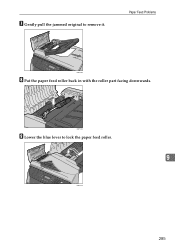
Paper Feed Problems BSP129S H Put the paper feed roller back in with the roller part facing downwards. BSP130S I Lower the blue lever to remove it. G Gently pull the jammed original to lock the paper feed roller. 9 BSP131S 285
Paper Feed Problems BSP129S H Put the paper feed roller back in with the roller part facing downwards. BSP130S I Lower the blue lever to remove it. G Gently pull the jammed original to lock the paper feed roller. 9 BSP131S 285
User Guide
Page 307
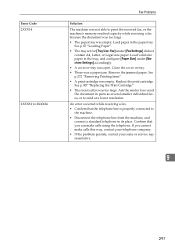
.... • If the problem persists, contact your sales or service representative. 9 297 Replace the print cartridge. Ask the sender to re-send the document in parts as several smaller individual faxes, or to the machine. • Disconnect the telephone line from the machine, and connect a standard telephone in the paper tray...
.... • If the problem persists, contact your sales or service representative. 9 297 Replace the print cartridge. Ask the sender to re-send the document in parts as several smaller individual faxes, or to the machine. • Disconnect the telephone line from the machine, and connect a standard telephone in the paper tray...
User Guide
Page 309
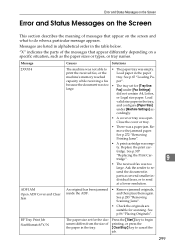
...too large. tridge. Ask the sender to send at a lower resolution. See p.86 "Placing Originals". print the received fax, or the Load paper in parts as the paper sizes or types, or tray names. Replace the print car- See p.307 "Replacing the Print Cartridge". 9 • The received fax... cover or tray was too • The tray set for the document differs from the size of the paper in the tray. "X" indicates the parts of the messages that appear on a specific situation, such as several smaller individual faxes, or to resend the document in the paper machine's memory ...
...too large. tridge. Ask the sender to send at a lower resolution. See p.86 "Placing Originals". print the received fax, or the Load paper in parts as the paper sizes or types, or tray names. Replace the print car- See p.307 "Replacing the Print Cartridge". 9 • The received fax... cover or tray was too • The tray set for the document differs from the size of the paper in the tray. "X" indicates the parts of the messages that appear on a specific situation, such as several smaller individual faxes, or to resend the document in the paper machine's memory ...


