User Guide
Page 1
User Guide 1 Guide to read "Safety Information" before using the machine. For safe and correct use this manual carefully before you use , be sure to the Machine 2 Getting Started 3 Using the Printer Function 4 Using the Copier Function 5 Using the Scanner Function 6 Using the Fax Function 7 Configuring the Machine Using the Control Panel 8 Configuring the Machine Using Web Image Monitor 9 Troubleshooting 10 Maintenance 11 Appendix Read this machine and keep it handy for future reference.
User Guide 1 Guide to read "Safety Information" before using the machine. For safe and correct use this manual carefully before you use , be sure to the Machine 2 Getting Started 3 Using the Printer Function 4 Using the Copier Function 5 Using the Scanner Function 6 Using the Fax Function 7 Configuring the Machine Using the Control Panel 8 Configuring the Machine Using Web Image Monitor 9 Troubleshooting 10 Maintenance 11 Appendix Read this machine and keep it handy for future reference.
User Guide
Page 5
...Locked Print file 106 Printing a Locked Print file 107 Deleting a Locked Print file 108 Checking which Locked Print File Jobs Have Been Canceled 109 Manual Duplex...112 Using Various Print Functions 113 Print Quality Functions 113 Print Output Functions 113 4. Entering Characters 88 Value Input Mode ...88 Fax Number... Input Mode 88 Text Input Mode ...90 Restricting Machine Functions According to User 91 Enabling the User Restriction Settings 91 Modifying user entries 93 Deleting user entries 94 When a Message Requesting...
...Locked Print file 106 Printing a Locked Print file 107 Deleting a Locked Print file 108 Checking which Locked Print File Jobs Have Been Canceled 109 Manual Duplex...112 Using Various Print Functions 113 Print Quality Functions 113 Print Output Functions 113 4. Entering Characters 88 Value Input Mode ...88 Fax Number... Input Mode 88 Text Input Mode ...90 Restricting Machine Functions According to User 91 Enabling the User Restriction Settings 91 Modifying user entries 93 Deleting user entries 94 When a Message Requesting...
User Guide
Page 13
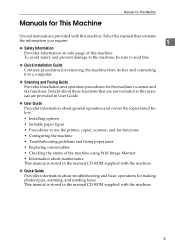
...of the machine using Web Image Monitor • Information about maintenance This manual is stored in the manual CD-ROM supplied with this machine. This manual is stored in the manual CD-ROM supplied with the machine. ❖ Quick Guide Provides information about...; Troubleshooting problems and fixing paper jams • Replacing consumables • Checking the status of this manual are provided with the machine. 3 Select the manual that are not included in User Guide. ❖ User Guide Provides information about troubleshooting and basic operations for This Machine Several...
...of the machine using Web Image Monitor • Information about maintenance This manual is stored in the manual CD-ROM supplied with this machine. This manual is stored in the manual CD-ROM supplied with the machine. ❖ Quick Guide Provides information about...; Troubleshooting problems and fixing paper jams • Replacing consumables • Checking the status of this manual are provided with the machine. 3 Select the manual that are not included in User Guide. ❖ User Guide Provides information about troubleshooting and basic operations for This Machine Several...
User Guide
Page 15
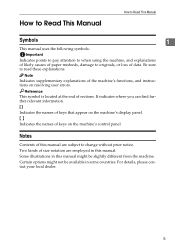
... keys that appear on the machine's display panel. { } Indicates the names of this manual are employed in some countries. How to Read This Manual How to Read This Manual Symbols 1 This manual uses the following symbols: Indicates points to pay attention to when using the machine, and ...explanations of likely causes of paper misfeeds, damage to originals, or loss of sections. Notes Contents of keys on resolving user errors....
... keys that appear on the machine's display panel. { } Indicates the names of this manual are employed in some countries. How to Read This Manual How to Read This Manual Symbols 1 This manual uses the following symbols: Indicates points to pay attention to when using the machine, and ...explanations of likely causes of paper misfeeds, damage to originals, or loss of sections. Notes Contents of keys on resolving user errors....

User Guide
Page 56
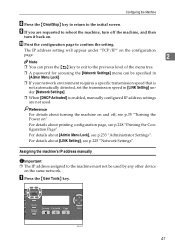
... Machine This section describes configuring the settings required to use the machine on whether IP address information is assigned automatically by the network (DHCP), or manually. The new setting is displayed with an "p" symbol, indicating that the setting has been changed. ber keys, and then press the {OK} key. A Press the...
... Machine This section describes configuring the settings required to use the machine on whether IP address information is assigned automatically by the network (DHCP), or manually. The new setting is displayed with an "p" symbol, indicating that the setting has been changed. ber keys, and then press the {OK} key. A Press the...
User Guide
Page 57
... about [LINK Setting], see p.233 "Administrator Settings". For details about [Admin Menu Lock], see p.225 "Network Settings". A Press the {User Tools} key. BSP051S 47 Configuring the Machine H Press the {Clear/Stop} key to return to confirm the setting. The IP address setting will... appear under [Network Settings]. ❒ When [DHCP Activated] is enabled, manually configured IP address settings are requested to the previous level of the menu tree. ❒ A password for accessing the [Network Settings] menu...
... about [LINK Setting], see p.233 "Administrator Settings". For details about [Admin Menu Lock], see p.225 "Network Settings". A Press the {User Tools} key. BSP051S 47 Configuring the Machine H Press the {Clear/Stop} key to return to confirm the setting. The IP address setting will... appear under [Network Settings]. ❒ When [DHCP Activated] is enabled, manually configured IP address settings are requested to the previous level of the menu tree. ❒ A password for accessing the [Network Settings] menu...

User Guide
Page 111
..., click [Print...]. A On the [File] menu, click [Print...]. 3 The [Print] dialog box appears. For details, see the manuals provided with Windows XP. The settings configured here are valid for the WordPad application provided with the application. ❒ Any settings you have ... settings for a specific application. Note ❒ The procedure to configure settings for the current application only. ❒ General users can configure printer settings for a specific application, open the [Printing Preferences] dialog box may vary depending on the application. Accessing...
..., click [Print...]. A On the [File] menu, click [Print...]. 3 The [Print] dialog box appears. For details, see the manuals provided with Windows XP. The settings configured here are valid for the WordPad application provided with the application. ❒ Any settings you have ... settings for a specific application. Note ❒ The procedure to configure settings for the current application only. ❒ General users can configure printer settings for a specific application, open the [Printing Preferences] dialog box may vary depending on the application. Accessing...
User Guide
Page 203
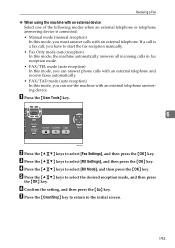
...], and then press the {OK} key. A Press the {User Tools} key. 6 BSP051S B Press the {U}{T} keys to the initial screen. 193 If a call , you have to select [RX Settings], and then press the {OK} key. C Press the {U}{T} keys to start the fax reception manually. • Fax Only mode (auto reception) In this mode...
...], and then press the {OK} key. A Press the {User Tools} key. 6 BSP051S B Press the {U}{T} keys to the initial screen. 193 If a call , you have to select [RX Settings], and then press the {OK} key. C Press the {U}{T} keys to start the fax reception manually. • Fax Only mode (auto reception) In this mode...
User Guide
Page 348
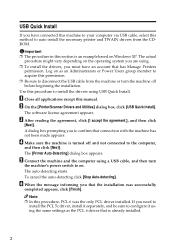
... Quick Install. Use this procedure to configure it separately, and be sure to install the drivers using the same settings as an Administrators or Power Users group member to acquire this permission. ❒ Be sure to disconnect the USB cable from the CDROM. E Connect the machine and the computer using . ❒... or turn the machine off and not connected to confirm that the installation was the only PCL driver installed. Log on . Note ❒ In this manual.
... Quick Install. Use this procedure to configure it separately, and be sure to install the drivers using the same settings as an Administrators or Power Users group member to acquire this permission. ❒ Be sure to disconnect the USB cable from the CDROM. E Connect the machine and the computer using . ❒... or turn the machine off and not connected to confirm that the installation was the only PCL driver installed. Log on . Note ❒ In this manual.

User Guide
Page 349
... Printer Driver] dialog box, select the machine name, configure the necessary settings, and then click [Continue]. For details about assigning the machine's IP address, see User Guide. C After reading the agreement, click [I accept the agreement.], and then click [Next]. To detect the machine automatically, select [Detect printer(s) automatically]. The ...Install to install the printer and TWAIN drivers from the CD-ROM when connecting the machine to acquire this permission. ❒ Before beginning this manual. The actual procedure might vary depending on as an Administrators or Power...
... Printer Driver] dialog box, select the machine name, configure the necessary settings, and then click [Continue]. For details about assigning the machine's IP address, see User Guide. C After reading the agreement, click [I accept the agreement.], and then click [Next]. To detect the machine automatically, select [Detect printer(s) automatically]. The ...Install to install the printer and TWAIN drivers from the CD-ROM when connecting the machine to acquire this permission. ❒ Before beginning this manual. The actual procedure might vary depending on as an Administrators or Power...
User Guide
Page 350
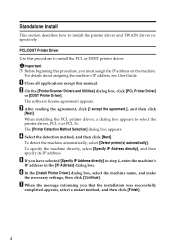
... appears. When installing the PCL printer driver, a dialog box appears to install the printer driver and TWAIN driver respectively. PCL/DDST Printer Driver Use this manual. A Close all applications except this procedure to install the PCL or DDST printer driver. For details about assigning the machine's IP address, see...
... appears. When installing the PCL printer driver, a dialog box appears to install the printer driver and TWAIN driver respectively. PCL/DDST Printer Driver Use this manual. A Close all applications except this procedure to install the PCL or DDST printer driver. For details about assigning the machine's IP address, see...
User Guide
Page 351
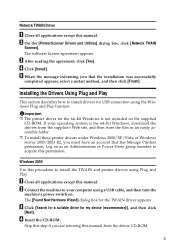
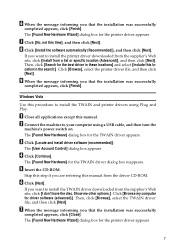
... the Drivers Using Plug and Play This section describes how to your operating system is not included on as an Administrators or Power Users group member to install the TWAIN and printer drivers using Plug and Play. B Connect the machine to install drivers for the 64...your computer using the Windows Plug and Play function. D Click [Install]. Log on the supplied CD-ROM. Windows 2000 Use this procedure to acquire this manual. A Close all applications except this permission. D Insert the CD-ROM. B On the [Printer/Scanner Drivers and Utilities] dialog box, click [Network ...
... the Drivers Using Plug and Play This section describes how to your operating system is not included on as an Administrators or Power Users group member to install the TWAIN and printer drivers using Plug and Play. B Connect the machine to install drivers for the 64...your computer using the Windows Plug and Play function. D Click [Install]. Log on the supplied CD-ROM. Windows 2000 Use this procedure to acquire this manual. A Close all applications except this permission. D Insert the CD-ROM. B On the [Printer/Scanner Drivers and Utilities] dialog box, click [Network ...
User Guide
Page 353
The [Found New Hardware] dialog box for the printer driver appears. 7 The [User Account Control] dialog box appears. Skip this step if you are referring this manual from a list or specific location (Advanced)], and then click [Next]. The [Found New Hardware Wizard] dialog box for the TWAIN driver appears. H Click [Install the ... the message informing you that the installation was successfully completed appears, click [Close]. Windows Vista Use this location in the search:]. G Click [No, not this manual. F Click [Next].
The [Found New Hardware] dialog box for the printer driver appears. 7 The [User Account Control] dialog box appears. Skip this step if you are referring this manual from a list or specific location (Advanced)], and then click [Next]. The [Found New Hardware Wizard] dialog box for the TWAIN driver appears. H Click [Install the ... the message informing you that the installation was successfully completed appears, click [Close]. Windows Vista Use this location in the search:]. G Click [No, not this manual. F Click [Next].


