User Guide
Page 4
... the machine's IP address manually 47 Configuring Telephone Network Settings 50 Selecting the telephone line type 50 Selecting the telephone network connection type 51 Setting the outside line access number 52 Sharing the Printer on a Network 53 Installing the Optional Paper Feed Unit 54 Installing the Paper Feed Unit TK1080 (Tray 2 54 Paper and Other Media 56 Supported Paper for Each Tray 56 Specifications of Paper Types 58 Unsupported Types of Paper 62 Paper Storage Precautions 63 Printable Area ...63 Loading Paper ...65 Loading Paper in Tray 1 65 Loading Legal size paper 69...
... the machine's IP address manually 47 Configuring Telephone Network Settings 50 Selecting the telephone line type 50 Selecting the telephone network connection type 51 Setting the outside line access number 52 Sharing the Printer on a Network 53 Installing the Optional Paper Feed Unit 54 Installing the Paper Feed Unit TK1080 (Tray 2 54 Paper and Other Media 56 Supported Paper for Each Tray 56 Specifications of Paper Types 58 Unsupported Types of Paper 62 Paper Storage Precautions 63 Printable Area ...63 Loading Paper ...65 Loading Paper in Tray 1 65 Loading Legal size paper 69...
User Guide
Page 5
....4...99 Mac OS X 10.5...99 Accessing the Printer Properties 100 Accessing the Printer Properties from the [Printers and Faxes] Window 100 Accessing the Printer Properties from an Application 101 Windows ...101 Mac OS X ...101 Basic Operation in Copier Mode 116 Canceling a Copy 118 Making Enlarged or Reduced Copies 119 Combining Multiple Pages 121 Copying Two or Four Pages onto One Sheet 121 Copying Both Sides of an ID Card onto One Side of Paper 124 Making 2-sided Copies 126 Making 2-sided Copies Automatically (Type 2 model 126 Making 2-sided Copies Manually (Type 1 model 128...
....4...99 Mac OS X 10.5...99 Accessing the Printer Properties 100 Accessing the Printer Properties from the [Printers and Faxes] Window 100 Accessing the Printer Properties from an Application 101 Windows ...101 Mac OS X ...101 Basic Operation in Copier Mode 116 Canceling a Copy 118 Making Enlarged or Reduced Copies 119 Combining Multiple Pages 121 Copying Two or Four Pages onto One Sheet 121 Copying Both Sides of an ID Card onto One Side of Paper 124 Making 2-sided Copies 126 Making 2-sided Copies Automatically (Type 2 model 126 Making 2-sided Copies Manually (Type 1 model 128...
User Guide
Page 8
...Tray for Printing Faxes 252 Specifying the Tray Priority for the Printer Function 253 Configuring Toner Saver Mode 253 Registering Destinations 254 Restricting Machine Functions According to User 255 Configuring the Network Settings 256 Checking the Network Status 256 Configuring the Network Application Settings 257 Configuring the DNS Settings 258 Configuring the Alert Message Settings 259 Configuring the SNMP Settings 260 Configuring the SMTP Settings 261 Printing Reports 263 Configuring the Administrator Settings 264 Configuring the Password 264 Restoring the Default Settings...
...Tray for Printing Faxes 252 Specifying the Tray Priority for the Printer Function 253 Configuring Toner Saver Mode 253 Registering Destinations 254 Restricting Machine Functions According to User 255 Configuring the Network Settings 256 Checking the Network Status 256 Configuring the Network Application Settings 257 Configuring the DNS Settings 258 Configuring the Alert Message Settings 259 Configuring the SNMP Settings 260 Configuring the SMTP Settings 261 Printing Reports 263 Configuring the Administrator Settings 264 Configuring the Password 264 Restoring the Default Settings...
User Guide
Page 13
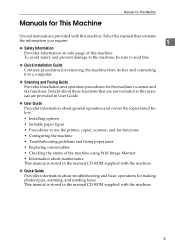
... 1 ❖ Safety Information Provides information on safe usage of the machine using Web Image Monitor • Information about general operation and covers the topics listed below. • Installing options • Suitable paper types • Procedures to use the printer, copier, scanner, and fax functions • Configuring the machine • Troubleshooting problems and fixing paper jams • Replacing consumables • Checking the status of this . ❖ Quick Installation Guide Contains procedures for removing the machine from its box and connecting it to read this...
... 1 ❖ Safety Information Provides information on safe usage of the machine using Web Image Monitor • Information about general operation and covers the topics listed below. • Installing options • Suitable paper types • Procedures to use the printer, copier, scanner, and fax functions • Configuring the machine • Troubleshooting problems and fixing paper jams • Replacing consumables • Checking the status of this . ❖ Quick Installation Guide Contains procedures for removing the machine from its box and connecting it to read this...
User Guide
Page 19
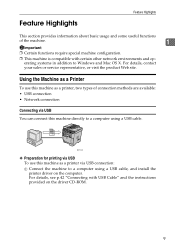
... operating systems in addition to a computer using a USB cable. Feature Highlights Feature Highlights This section provides information about basic usage and some useful functions of connection methods are available: • USB connection • Network connection Connecting via USB connection: A Connect the machine to Windows and Mac OS X. For details, contact your sales or service representative, or visit the product Web site. Using the Machine as a Printer To use this machine directly to a computer using a USB cable, and install the printer driver...
... operating systems in addition to a computer using a USB cable. Feature Highlights Feature Highlights This section provides information about basic usage and some useful functions of connection methods are available: • USB connection • Network connection Connecting via USB connection: A Connect the machine to Windows and Mac OS X. For details, contact your sales or service representative, or visit the product Web site. Using the Machine as a Printer To use this machine directly to a computer using a USB cable, and install the printer driver...
User Guide
Page 20
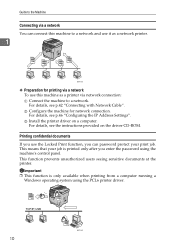
... users seeing sensitive documents at the printer. Printing confidential documents If you use the Locked Print function, you enter the password using the PCL6 printer driver. 10 BSP004S Guide to the Machine Connecting via network connection: A Connect the machine to a network and use it as a printer via a network You can password protect your job is only available when printing from a computer running a Windows operating system using the machine's control panel. This means that your print job. For details, see p.46 "Configuring the IP Address Settings". B Configure...
... users seeing sensitive documents at the printer. Printing confidential documents If you use the Locked Print function, you enter the password using the PCL6 printer driver. 10 BSP004S Guide to the Machine Connecting via network connection: A Connect the machine to a network and use it as a printer via a network You can password protect your job is only available when printing from a computer running a Windows operating system using the machine's control panel. This means that your print job. For details, see p.46 "Configuring the IP Address Settings". B Configure...
User Guide
Page 25
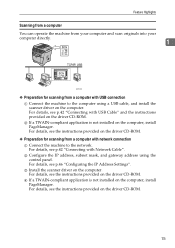
... for scanning from a computer with Network Cable". For details, see p.42 "Connecting with USB Cable" and the instructions provided on the driver CD-ROM. For details, see p.46 "Configuring the IP Address Settings". B Configure the IP address, subnet mask, and gateway address using a USB cable, and install the scanner driver on the computer. D If a TWAIN-compliant application is not installed on the driver CD-ROM. 15 For details, see p.42 "Connecting with USB connection A Connect the machine...
... for scanning from a computer with Network Cable". For details, see p.42 "Connecting with USB Cable" and the instructions provided on the driver CD-ROM. For details, see p.46 "Configuring the IP Address Settings". B Configure the IP address, subnet mask, and gateway address using a USB cable, and install the scanner driver on the computer. D If a TWAIN-compliant application is not installed on the driver CD-ROM. 15 For details, see p.42 "Connecting with USB connection A Connect the machine...
User Guide
Page 34
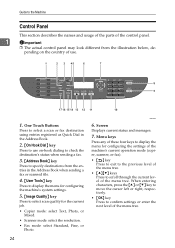
... right, respectively. • {OK} key Press to confirm settings or enter the next level of the menu tree. One Touch Buttons Press to select a scan or fax destination using entries registered as Quick Dial in the Address Book when sending a fax or scanned file. 4. {User Tools} key Press to display the menu for configuring the machine's system settings. 5. {Image Quality} key Press to select scan quality for configuring the settings of the machine's current operation mode (copier, scanner, or fax). • { } key Press to exit to...
... right, respectively. • {OK} key Press to confirm settings or enter the next level of the menu tree. One Touch Buttons Press to select a scan or fax destination using entries registered as Quick Dial in the Address Book when sending a fax or scanned file. 4. {User Tools} key Press to display the menu for configuring the machine's system settings. 5. {Image Quality} key Press to select scan quality for configuring the settings of the machine's current operation mode (copier, scanner, or fax). • { } key Press to exit to...
User Guide
Page 57
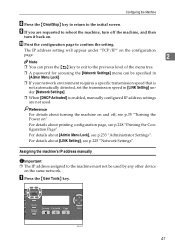
The IP address setting will appear under [Network Settings]. ❒ When [DHCP Activated] is enabled, manually configured IP address settings are requested to confirm the setting. For details about printing configuration page, see p.225 "Network Settings". BSP051S 47 Configuring the Machine H Press the {Clear/Stop} key to return to the machine must not be specified in [Admin Menu Lock]. ❒ If your network environment requires a specific transmission speed that is not automatically detected, set the transmission speed in [LINK Setting] under...
The IP address setting will appear under [Network Settings]. ❒ When [DHCP Activated] is enabled, manually configured IP address settings are requested to confirm the setting. For details about printing configuration page, see p.225 "Network Settings". BSP051S 47 Configuring the Machine H Press the {Clear/Stop} key to return to the machine must not be specified in [Admin Menu Lock]. ❒ If your network environment requires a specific transmission speed that is not automatically detected, set the transmission speed in [LINK Setting] under...
User Guide
Page 107
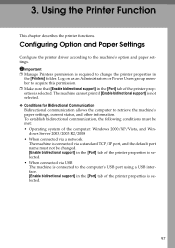
.... ❒ Make sure that [Enable bidirectional support] in the [Port] tab of the computer: Windows 2000/XP/Vista, and Win- To establish bidirectional communication, the following conditions must not be met: • Operating system of the printer properties is selected. The machine cannot print if [Enable bidirectional support] is required to the machine's option and paper settings. Configuring Option and Paper Settings Configure the printer driver according to change the printer properties in the [Printers] folder.
.... ❒ Make sure that [Enable bidirectional support] in the [Port] tab of the computer: Windows 2000/XP/Vista, and Win- To establish bidirectional communication, the following conditions must not be met: • Operating system of the printer properties is selected. The machine cannot print if [Enable bidirectional support] is required to the machine's option and paper settings. Configuring Option and Paper Settings Configure the printer driver according to change the printer properties in the [Printers] folder.
User Guide
Page 138
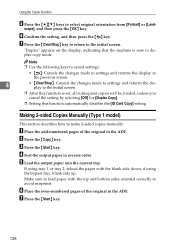
... output paper in duplex copy mode. If using the bypass tray, blank side up. G Press the {Start} key. 128 Making 2-sided Copies Manually (Type 1 model) This section describes how to select original orientation from [Portrait] or [Land- if using tray 1 or tray 2, reload the paper with the top and bottom sides oriented correctly to the initial screen. F Confirm the setting, and then press the { } key. Using the Copier Function E Press the {U}{T} keys to make 2-sided copies manually. Note ❒ Use the following keys to cancel settings: • { }: Cancels the changes...
... output paper in duplex copy mode. If using the bypass tray, blank side up. G Press the {Start} key. 128 Making 2-sided Copies Manually (Type 1 model) This section describes how to select original orientation from [Portrait] or [Land- if using tray 1 or tray 2, reload the paper with the top and bottom sides oriented correctly to the initial screen. F Confirm the setting, and then press the { } key. Using the Copier Function E Press the {U}{T} keys to make 2-sided copies manually. Note ❒ Use the following keys to cancel settings: • { }: Cancels the changes...
User Guide
Page 201
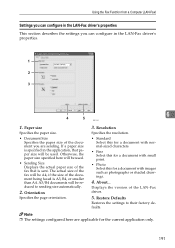
... paper size of the document you can configure in the LAN-Fax driver's properties This section describes the settings you are applicable for a document with images such as photographs or shaded drawings. 4. Note ❒ The settings configured here are sending. If a paper size is specified in the LAN-Fax driver's properties. 6 BSP116S 1. A3/B4 documents will be used . About... Otherwise, the paper size specified here will be reduced to their factory defaults. Displays...
... paper size of the document you can configure in the LAN-Fax driver's properties This section describes the settings you are applicable for a document with images such as photographs or shaded drawings. 4. Note ❒ The settings configured here are sending. If a paper size is specified in the LAN-Fax driver's properties. 6 BSP116S 1. A3/B4 documents will be used . About... Otherwise, the paper size specified here will be reduced to their factory defaults. Displays...
User Guide
Page 240
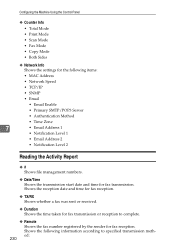
... the time taken for fax transmission or reception to specified transmission method: 230 Configuring the Machine Using the Control Panel ❖ Counter Info • Total Mode • Print Mode • Scan Mode • Fax Mode • Copy Mode • Both Sides ❖ Network Info Shows the settings for the following information according to complete. ❖ Remote Shows the fax number registered by the sender for fax reception. Shows the following items: • MAC Address • Network Speed...
... the time taken for fax transmission or reception to specified transmission method: 230 Configuring the Machine Using the Control Panel ❖ Counter Info • Total Mode • Print Mode • Scan Mode • Fax Mode • Copy Mode • Both Sides ❖ Network Info Shows the settings for the following information according to complete. ❖ Remote Shows the fax number registered by the sender for fax reception. Shows the following items: • MAC Address • Network Speed...
User Guide
Page 308
... out too light on the exposure glass, make sure that do not produce an error code. Place the original in the paper tray. The background of the right size. Adjust the image density. See p.218 "Machine Settings". A fax you must receive the fax manually. Dial fails when trying to send faxes. See the solutions provided for errors 1XXX22 to 1XXX23 in the above table. 298 Replace the print cartridge. Cannot print received faxes. • The paper tray is...
... out too light on the exposure glass, make sure that do not produce an error code. Place the original in the paper tray. The background of the right size. Adjust the image density. See p.218 "Machine Settings". A fax you must receive the fax manually. Dial fails when trying to send faxes. See the solutions provided for errors 1XXX22 to 1XXX23 in the above table. 298 Replace the print cartridge. Cannot print received faxes. • The paper tray is...
User Guide
Page 311
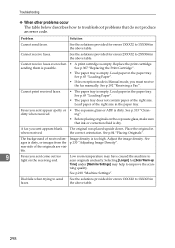
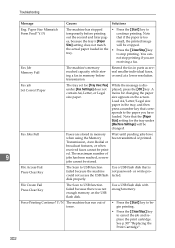
... the line is open. Dial Fail The fax could not be sent through e-mail. • Configure [Resolution] under scanner settings to reached capacity while origi- See p.207 "Scanner Settings". • Configure [Limitation Of Size Of Mail] under scanner settings to reduce the scanning resolution. Cover Open A cover is not busy. • You may need to perform sort copy- Error and Status Messages on the Screen Message Causes Solutions Copy Cancel Sort Press Stop Key The machine's memory Press the {Clear/Stop} key to...
... the line is open. Dial Fail The fax could not be sent through e-mail. • Configure [Resolution] under scanner settings to reached capacity while origi- See p.207 "Scanner Settings". • Configure [Limitation Of Size Of Mail] under scanner settings to reduce the scanning resolution. Cover Open A cover is not busy. • You may need to perform sort copy- Error and Status Messages on the Screen Message Causes Solutions Copy Cancel Sort Press Stop Key The machine's memory Press the {Clear/Stop} key to...
User Guide
Page 312
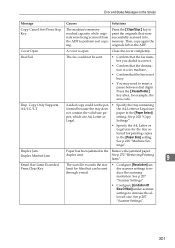
... [Fax Settings] does not contain A4, Letter, or Legal size paper. not stop printing. Fax job Set Correct Paper The tray set for changing the paper size appears on the USB flash disk. or write-protected. Y/N The machine has run out of jobs has been reached, so new jobs cannot be changed. See p.307 "Replacing the Print Cartridge". 302 Y/N The machine has stopped • Press the {Start} key to cancel the job and replace the print cartridge. Load A4/Letter/Legal size paper in the tray, and then press a number key...
... [Fax Settings] does not contain A4, Letter, or Legal size paper. not stop printing. Fax job Set Correct Paper The tray set for changing the paper size appears on the USB flash disk. or write-protected. Y/N The machine has run out of jobs has been reached, so new jobs cannot be changed. See p.307 "Replacing the Print Cartridge". 302 Y/N The machine has stopped • Press the {Start} key to cancel the job and replace the print cartridge. Load A4/Letter/Legal size paper in the tray, and then press a number key...
User Guide
Page 351
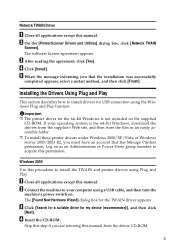
... computer using a USB cable, and then turn the machine's power switch on as an Administrators or Power Users group member to acquire this procedure to install the TWAIN and printer drivers using the Windows Plug and Play function. Log on . The [Found New Hardware Wizard] dialog box for USB connection using Plug and Play. D Insert the CD-ROM. Skip this step if you are referring this manual from the supplier's Web site...
... computer using a USB cable, and then turn the machine's power switch on as an Administrators or Power Users group member to acquire this procedure to install the TWAIN and printer drivers using the Windows Plug and Play function. Log on . The [Found New Hardware Wizard] dialog box for USB connection using Plug and Play. D Insert the CD-ROM. Skip this step if you are referring this manual from the supplier's Web site...
User Guide
Page 352
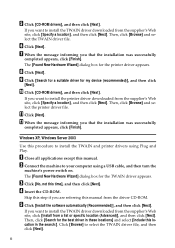
... [Next]. Windows XP, Windows Server 2003 Use this manual from the supplier's Web site, click [Specify a location], and then click [Next]. The [Found New Hardware Wizard] dialog box for the printer driver appears. F Click [Next]. D Insert the CD-ROM. If you want to install the TWAIN driver downloaded from the driver CD-ROM. If you want to install the TWAIN and printer drivers using a USB cable, and then turn the machine's power switch on...
... [Next]. Windows XP, Windows Server 2003 Use this manual from the supplier's Web site, click [Specify a location], and then click [Next]. The [Found New Hardware Wizard] dialog box for the printer driver appears. F Click [Next]. D Insert the CD-ROM. If you want to install the TWAIN driver downloaded from the driver CD-ROM. If you want to install the TWAIN and printer drivers using a USB cable, and then turn the machine's power switch on...
User Guide
Page 353
... [Next]. Windows Vista Use this manual from the driver CD-ROM. The [Found New Hardware] dialog box for the printer driver appears. The [User Account Control] dialog box appears. E Insert the CD-ROM. Show me other options.]. The [Found New Hardware Wizard] dialog box for the TWAIN driver appears. B Connect the machine to install the TWAIN and printer drivers using a USB cable, and then turn the machine's power switch on. C Click [Locate and install driver software (recommended)]. Skip...
... [Next]. Windows Vista Use this manual from the driver CD-ROM. The [Found New Hardware] dialog box for the printer driver appears. The [User Account Control] dialog box appears. E Insert the CD-ROM. Show me other options.]. The [Found New Hardware Wizard] dialog box for the TWAIN driver appears. B Connect the machine to install the TWAIN and printer drivers using a USB cable, and then turn the machine's power switch on. C Click [Locate and install driver software (recommended)]. Skip...
User Guide
Page 354
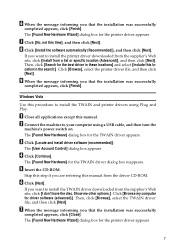
... printer driver downloaded from the supplier's Web site, click [I When the message informing you want to the computer via a USB cable. If [IP Printer] is powered and con- Show me other options.]. When Using the Machine under Mac OS X The procedures in this procedure to a computer that the installation was successfully completed appears, click [Close]. Setting up the machine when using a USB connection Use this manual. C Follow the instructions on as an Administrator...
... printer driver downloaded from the supplier's Web site, click [I When the message informing you want to the computer via a USB cable. If [IP Printer] is powered and con- Show me other options.]. When Using the Machine under Mac OS X The procedures in this procedure to a computer that the installation was successfully completed appears, click [Close]. Setting up the machine when using a USB connection Use this manual. C Follow the instructions on as an Administrator...


