Owners Guide
Page 5
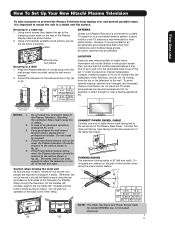
... when using the power swivel feature. Using commercially available wood screws, secure the set failure, do not place the TV where temperatures can become excessively hot, for professional installer. However, if you purchased the wall mount bracket option, please...turning radius is important to mount the unit in fig. (a) or (b). First time use How To Set Up Your New Hitachi Plasma Television To take measures to prevent the Plasma Television from tipping over and prevent possible injury it is 30˚ (left and right). Caution when moving the Television, lift the handles (42...
... when using the power swivel feature. Using commercially available wood screws, secure the set failure, do not place the TV where temperatures can become excessively hot, for professional installer. However, if you purchased the wall mount bracket option, please...turning radius is important to mount the unit in fig. (a) or (b). First time use How To Set Up Your New Hitachi Plasma Television To take measures to prevent the Plasma Television from tipping over and prevent possible injury it is 30˚ (left and right). Caution when moving the Television, lift the handles (42...
Owners Guide
Page 8
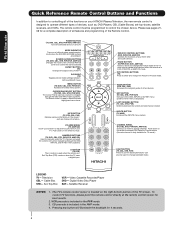
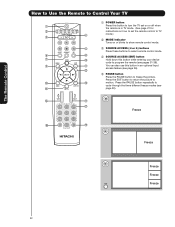
...PVR/VCR, AMP/CD) Scroll up and down to control the device selected. Push down on your HITACHI Plasma Television, the new remote control is only available for TV mode.) LIGHT BUTTON (TV, CBL, STB, PVR) Press to use Quick Reference Remote Control Buttons and Functions In addition to ... show remote control mode when the SOURCE ACCESS buttons are pressed. MODE INDICATOR Turns on the screen, such as , DVD Players, CBL (Cable Boxes), set-top-boxes, satellite receivers, and VCRs. DAY/NIGHT (TV) Toggles picture mode settings between the current and last channel viewed. LEGEND...
...PVR/VCR, AMP/CD) Scroll up and down to control the device selected. Push down on your HITACHI Plasma Television, the new remote control is only available for TV mode.) LIGHT BUTTON (TV, CBL, STB, PVR) Press to use Quick Reference Remote Control Buttons and Functions In addition to ... show remote control mode when the SOURCE ACCESS buttons are pressed. MODE INDICATOR Turns on the screen, such as , DVD Players, CBL (Cable Boxes), set-top-boxes, satellite receivers, and VCRs. DAY/NIGHT (TV) Toggles picture mode settings between the current and last channel viewed. LEGEND...
Owners Guide
Page 9
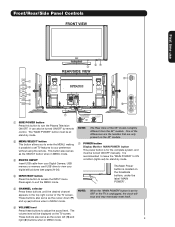
... up (̆) buttons when in the top right corner of the TV screen. The "MAIN POWER" button must be displayed on the broadside bottom, under the label "MAIN POWER". ቦ CHANNEL selector Press these buttons to turn the Plasma Television ON/OFF. Thread the square hole with the band. One ...also serve as the cursor left (̇) and 9 right (̈) buttons when in MENU mode. ቤ PHOTO INPUT Insert USB cable from the 42" models. The volume level will stop and may eventually reset itself. ቧ VOLUME level Press these buttons until the desired channel appears in MENU mode...
... up (̆) buttons when in the top right corner of the TV screen. The "MAIN POWER" button must be displayed on the broadside bottom, under the label "MAIN POWER". ቦ CHANNEL selector Press these buttons to turn the Plasma Television ON/OFF. Thread the square hole with the band. One ...also serve as the cursor left (̇) and 9 right (̈) buttons when in MENU mode. ቤ PHOTO INPUT Insert USB cable from the 42" models. The volume level will stop and may eventually reset itself. ቧ VOLUME level Press these buttons until the desired channel appears in MENU mode...

Owners Guide
Page 10
The Plasma TV is ON with no signal input except antenna (no video input when VIDEO: 1, 2, 3, 4 and 5. Display monitor MAIN POWER is now ready for a quick hook-up from a camcorder or VCR to be turned OFF (lights orange) if there is ON. If you have mono sound, insert the audio cable...Green Lights Orange Off (Stand-by) On Off (Power Saving) Operating When the main power switch is turned off or in Stand-by indicator lamp located on the display monitor is ON. Your HITACHI Plasma TV will illuminate. Display monitor MAIN POWER is no sync. A red stand-by mode (lights red) ...
The Plasma TV is ON with no signal input except antenna (no video input when VIDEO: 1, 2, 3, 4 and 5. Display monitor MAIN POWER is now ready for a quick hook-up from a camcorder or VCR to be turned OFF (lights orange) if there is ON. If you have mono sound, insert the audio cable...Green Lights Orange Off (Stand-by) On Off (Power Saving) Operating When the main power switch is turned off or in Stand-by indicator lamp located on the display monitor is ON. Your HITACHI Plasma TV will illuminate. Display monitor MAIN POWER is no sync. A red stand-by mode (lights red) ...

Owners Guide
Page 21
The PVR mode indicator will blink, indicating that the remote will turn off. AUTOMATIC MODE (Default mode) In Automatic mode, if any remote control button, the buttons will blink 3 times to control your set-top-box or .../Video equipment). If you have a satellite receiver, use this time. The Remote Control The Remote Control In addition to controlling all the functions on your HITACHI Plasma TV, the new remote control is designed to control your cable box). CHANGING LIGHTING MODES (Automatic to Manual/Manual to confirm the mode switch. After releasing...
The PVR mode indicator will blink, indicating that the remote will turn off. AUTOMATIC MODE (Default mode) In Automatic mode, if any remote control button, the buttons will blink 3 times to control your set-top-box or .../Video equipment). If you have a satellite receiver, use this time. The Remote Control The Remote Control In addition to controlling all the functions on your HITACHI Plasma TV, the new remote control is designed to control your cable box). CHANGING LIGHTING MODES (Automatic to Manual/Manual to confirm the mode switch. After releasing...
Owners Guide
Page 22
.... (See page 21 for ባ instructions on how to set the remote control to TV ቤ ብ mode.) ባ MODE Indicator Turns on or blinks to show remote control mode. ቦ ቤ SOURCE ACCESS (̇ or ̈) buttons Press these buttons to select remote control mode. ቧ &#...
.... (See page 21 for ባ instructions on how to set the remote control to TV ቤ ብ mode.) ባ MODE Indicator Turns on or blinks to show remote control mode. ቦ ቤ SOURCE ACCESS (̇ or ̈) buttons Press these buttons to select remote control mode. ቧ &#...
Owners Guide
Page 27
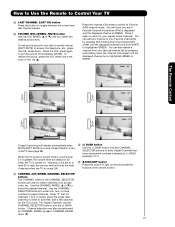
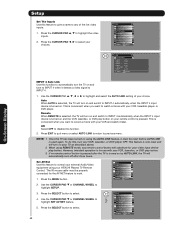
... level 31 or greater, the volume level will display automatically when MUTE/SOFT MUTE is on and Closed Caption is set to 30 when the TV is turned ON. ቴ (-) DASH button Use the (-) DASH button with the (-) DASH button. You can also delete a channel from WHITE to Favorite (FAV) ...) wheel to switch to highlighted GREEN. You will be performed by (-) DASH (example 15-1). ት BACKLIGHT button Press this button to turn the sound off at the level it is set when the TV is turned on. For Digital Channels, use The Remote Control How to Use the Remote to Control Your...
... level 31 or greater, the volume level will display automatically when MUTE/SOFT MUTE is on and Closed Caption is set to 30 when the TV is turned ON. ቴ (-) DASH button Use the (-) DASH button with the (-) DASH button. You can also delete a channel from WHITE to Favorite (FAV) ...) wheel to switch to highlighted GREEN. You will be performed by (-) DASH (example 15-1). ት BACKLIGHT button Press this button to turn the sound off at the level it is set when the TV is turned on. For Digital Channels, use The Remote Control How to Use the Remote to Control Your...
Owners Guide
Page 31
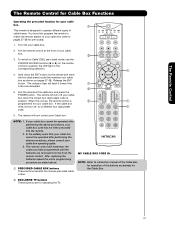
... remote system of cable boxes. The remote will flash 3 times if the ቢ code was accepted. ባ 5. If the cable box does not turn off , try a different four digit preset ቢ code. 6. If your cable box cannot be operated after performing the above . ቢ PRECODED CABLE... is entered. Release the ENT button. Aim the remote at the front of the buttons exclusively for the Cable Box. ባ EXCLUSIVE TV buttons These buttons are removed from the from the remote control. In the unlikely event that matches your cable box as stated above procedures,...
... remote system of cable boxes. The remote will flash 3 times if the ቢ code was accepted. ባ 5. If the cable box does not turn off , try a different four digit preset ቢ code. 6. If your cable box cannot be operated after performing the above . ቢ PRECODED CABLE... is entered. Release the ENT button. Aim the remote at the front of the buttons exclusively for the Cable Box. ባ EXCLUSIVE TV buttons These buttons are removed from the from the remote control. In the unlikely event that matches your cable box as stated above procedures,...
Owners Guide
Page 32
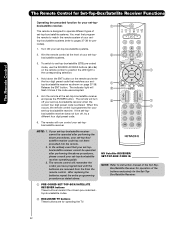
...the remote control to position the LED light to set -top-box/satellite receiver and press the POWER button. box/satellite receiver does not turn off , try a different four digit preset code. 6. To switch to ቢ the corresponding selection. 4. The remote will now control...turn off your set-top-box/satellite receiver when the ባ ቢ correct four digit preset code is programmed for the Set-TopBox/Satellite Receiver. ቢ PRE-CODED SET-TOP-BOX/SATELLITE RECEIVER buttons These buttons transmit the chosen pre-coded settop-box/satellite codes. ባ EXCLUSIVE TV...
...the remote control to position the LED light to set -top-box/satellite receiver and press the POWER button. box/satellite receiver does not turn off , try a different four digit preset code. 6. To switch to ቢ the corresponding selection. 4. The remote will now control...turn off your set-top-box/satellite receiver when the ባ ቢ correct four digit preset code is programmed for the Set-TopBox/Satellite Receiver. ቢ PRE-CODED SET-TOP-BOX/SATELLITE RECEIVER buttons These buttons transmit the chosen pre-coded settop-box/satellite codes. ባ EXCLUSIVE TV...
Owners Guide
Page 33
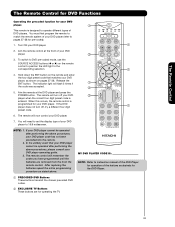
Aim the remote control at the DVD player and press the POWER button. Release the ENT button. If the DVD player does not turn off , try a different four digit ቢ preset code. 6. If your DVD player cannot be operated after performing the above . The remote control will ...of the buttons exclusively for the DVD Player. ቢ PRECODED DVD Buttons These buttons transmit the chosen precoded DVD codes. ባ EXCLUSIVE TV Buttons These buttons are removed from the from the remote control. Turn ON your DVD player code has not been precoded into the remote. 2. The remote will...
Aim the remote control at the DVD player and press the POWER button. Release the ENT button. If the DVD player does not turn off , try a different four digit ቢ preset code. 6. If your DVD player cannot be operated after performing the above . The remote control will ...of the buttons exclusively for the DVD Player. ቢ PRECODED DVD Buttons These buttons transmit the chosen precoded DVD codes. ባ EXCLUSIVE TV Buttons These buttons are removed from the from the remote control. Turn ON your DVD player code has not been precoded into the remote. 2. The remote will...
Owners Guide
Page 34
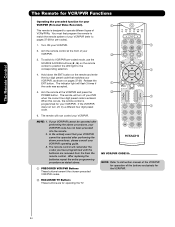
...preset code that your VCR/PVR cannot be operated after performing the above procedures, please consult your VCR/PVR. ቢ 2. The indicator light will turn off your VCR/PVR. ባ 3. When this occurs, the remote control is programmed for your VCR/PVR (Personal Video Recorder). ቢ ...VCR/PVR (refer to match the remote system of the buttons exclusively for the VCR/PVR. ባ EXCLUSIVE TV Buttons These buttons are removed from the from the remote control. Turn ON your VCR/PVR operating guide. 3. To switch to VCR/PVR pre-coded mode, use the SOURCE ACCESS...
...preset code that your VCR/PVR cannot be operated after performing the above procedures, please consult your VCR/PVR. ቢ 2. The indicator light will turn off your VCR/PVR. ባ 3. When this occurs, the remote control is programmed for your VCR/PVR (Personal Video Recorder). ቢ ...VCR/PVR (refer to match the remote system of the buttons exclusively for the VCR/PVR. ባ EXCLUSIVE TV Buttons These buttons are removed from the from the remote control. Turn ON your VCR/PVR operating guide. 3. To switch to VCR/PVR pre-coded mode, use the SOURCE ACCESS...

Owners Guide
Page 35
...of Audio component. Repeat steps 1 - 6 if you wish to program the remote to ባ the corresponding selection. 4. NOTE: 1. The remote control will turn off your Audio component. 7. You must first program the remote to control ቢ with the Remote. 2. To switch to Audio (AMP) component pre-coded ... component. The remote will remember the codes you wish to match the remote system of the buttons exclusively for operating the TV. 35 Turn ON your Audio component code has not been precoded into the remote. 2. Release the ENT button. If the Audio component does not...
...of Audio component. Repeat steps 1 - 6 if you wish to program the remote to ባ the corresponding selection. 4. NOTE: 1. The remote control will turn off your Audio component. 7. You must first program the remote to control ቢ with the Remote. 2. To switch to Audio (AMP) component pre-coded ... component. The remote will remember the codes you wish to match the remote system of the buttons exclusively for operating the TV. 35 Turn ON your Audio component code has not been precoded into the remote. 2. Release the ENT button. If the Audio component does not...
Owners Guide
Page 40
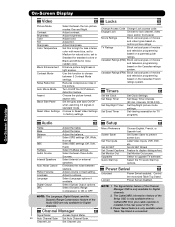
...channel, video input, and/or front panel. NOTE: The Language, Digital Output, and the Dynamic Range Compression feature of the TV. 3. Select the TV Quick Start Up options. The CableCARD information feature of the Setup OSD is only available when a CableCARD from your cable operator is... feature of movies and television programming based on motion picture ratings. Day and Night. Adjust the balance. Channel List Set Channel List. Turn On/Off the 3:2 Pulldown detection feature. Canadian Ratings (FRN) Block various types of the Channel Manager OSD is connected. Power Swivel ...
...channel, video input, and/or front panel. NOTE: The Language, Digital Output, and the Dynamic Range Compression feature of the TV. 3. Select the TV Quick Start Up options. The CableCARD information feature of the Setup OSD is only available when a CableCARD from your cable operator is... feature of movies and television programming based on motion picture ratings. Day and Night. Adjust the balance. Channel List Set Channel List. Turn On/Off the 3:2 Pulldown detection feature. Canadian Ratings (FRN) Block various types of the Channel Manager OSD is connected. Power Swivel ...
Owners Guide
Page 42
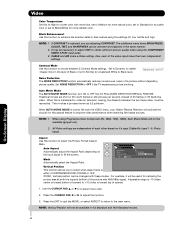
... accurate color or set to Dynamic for more in 4:3 Standard and 16:9 Standard modes. 42 Set to Normal for television viewing, the disparity between 2 Contrast Mode settings. Set NOISE ... AUTO MOVIE MODE function turn ON or OFF the 3:2 PULLDOWN DETECTION SPECIAL FEATURE. When AUTO MOVIE MODE is selected, you to OFF if the TV experiences picture blocking. Aspect...Vertical Position will not be changed with 480i/480p signal. If CONTRAST is turned ON from the VIDEO menu, your Hitachi Plasma Television will be useful for this function to improve video performance when watching...
... accurate color or set to Dynamic for more in 4:3 Standard and 16:9 Standard modes. 42 Set to Normal for television viewing, the disparity between 2 Contrast Mode settings. Set NOISE ... AUTO MOVIE MODE function turn ON or OFF the 3:2 PULLDOWN DETECTION SPECIAL FEATURE. When AUTO MOVIE MODE is selected, you to OFF if the TV experiences picture blocking. Aspect...Vertical Position will not be changed with 480i/480p signal. If CONTRAST is turned ON from the VIDEO menu, your Hitachi Plasma Television will be useful for this function to improve video performance when watching...
Owners Guide
Page 43
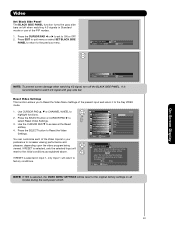
...Next On/Off Off SEL Return Set Black Side Panel Next On/Off On SEL Return NOTE: To prevent screen damage when watching 4:3 signal, turn off . Video Sharpness Color Temperature Black Enhancement Edge Enhancement Noise Reduction Auto Movie Mode Aspect Black Side Panel Reset Video Settings Move SEL Return ...Reset" to increase viewing performance and pleasure, depending upon the video program being viewed. Video Set Black Side Panel The BLACK SIDE PANEL function turns the gray side bars on /off the BLACK SIDE PANEL. Press EXIT to quit menu or select SET BLACK SIDE PANEL to return to Reset...
...Next On/Off Off SEL Return Set Black Side Panel Next On/Off On SEL Return NOTE: To prevent screen damage when watching 4:3 signal, turn off . Video Sharpness Color Temperature Black Enhancement Edge Enhancement Noise Reduction Auto Movie Mode Aspect Black Side Panel Reset Video Settings Move SEL Return ...Reset" to increase viewing performance and pleasure, depending upon the video program being viewed. Video Set Black Side Panel The BLACK SIDE PANEL function turns the gray side bars on /off the BLACK SIDE PANEL. Press EXIT to quit menu or select SET BLACK SIDE PANEL to return to Reset...
Owners Guide
Page 48
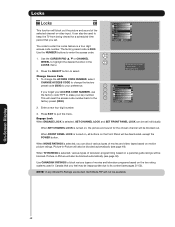
...select CHANGE ACCESS CODE to change the factory preset code (0000) to your key number. 0 This will be set . When FRONT PANEL LOCK is turned on, all buttons on a parental guide ratings will not be blocked. Picture-in-Picture will be blocked automatically (see page 50). On-Screen Display...Locks feature is 0000. Press EXIT to highlight the desired function in the LOCKS menu. 2. When MOVIE RATINGS is turned on the two rating systems used to keep the TV from being viewed for the chosen channel will reset the access code number back to its content (see page 49)....
...select CHANGE ACCESS CODE to change the factory preset code (0000) to your key number. 0 This will be set . When FRONT PANEL LOCK is turned on, all buttons on a parental guide ratings will not be blocked. Picture-in-Picture will be blocked automatically (see page 50). On-Screen Display...Locks feature is 0000. Press EXIT to highlight the desired function in the LOCKS menu. 2. When MOVIE RATINGS is turned on the two rating systems used to keep the TV from being viewed for the chosen channel will reset the access code number back to its content (see page 49)....
Owners Guide
Page 55
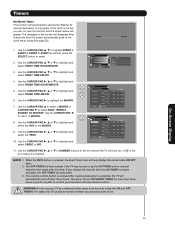
... a deterrent when away from home. CAUTION: Do not use this time. Timers Set Event Timer This function will automatically operate the Plasma TV viewing reservation of the MONTH. 9. Use the CURSOR PAD ̆, ̄ or ̄ to highlight and select FINISH TIME HOUR/MINUTE. Use the ...do not plan to set , you change the channel after the ON TIMER has been activated, the OFF TIMER will deactivate. 3. For safety, the TV should be turned off after 3 seconds, then the screen automatically goes to highlight and select the DAY of a program. Use the CURSOR PAD ̆, ̄ or...
... a deterrent when away from home. CAUTION: Do not use this time. Timers Set Event Timer This function will automatically operate the Plasma TV viewing reservation of the MONTH. 9. Use the CURSOR PAD ̆, ̄ or ̄ to highlight and select FINISH TIME HOUR/MINUTE. Use the ...do not plan to set , you change the channel after the ON TIMER has been activated, the OFF TIMER will deactivate. 3. For safety, the TV should be turned off after 3 seconds, then the screen automatically goes to highlight and select the DAY of a program. Use the CURSOR PAD ̆, ̄ or...
Owners Guide
Page 57
...normal viewing. Press the EXIT button to return to start. Screen Saver Picture's Movement On-Screen Display Automatic Power Saving Use this feature to turn power off automatically when a video input signal is visible. 3. Select SOLID for a black background (no picture can resolve pattern mark to ...screen displays such as video games, stock market quotations, computer generated graphics, and other fixed (non-moving) patterns can cause permanent damage to the Plasma Television. Use the CURSOR PAD ̇ or ̈ to highlight Screen Wipe. Use the cursor pad ̆ or ̄ to select ...
...normal viewing. Press the EXIT button to return to start. Screen Saver Picture's Movement On-Screen Display Automatic Power Saving Use this feature to turn power off automatically when a video input signal is visible. 3. Select SOLID for a black background (no picture can resolve pattern mark to ...screen displays such as video games, stock market quotations, computer generated graphics, and other fixed (non-moving) patterns can cause permanent damage to the Plasma Television. Use the CURSOR PAD ̇ or ̈ to highlight Screen Wipe. Use the cursor pad ̆ or ̄ to select ...
Owners Guide
Page 58
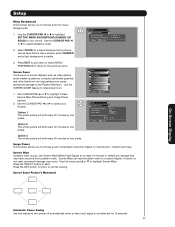
...Auto Link Use this feature to INPUT 4. 1. Remote When REMOTE is selected, the TV will turn the TV on by AUTO LINK, the TV will automatically turn off after the TV is now reset and will turn your remote control is for the AV NET feature to highlight and select the AUTO LINK...play button on . Set AV Net Use this function to automatically turn on using the AUTO LINK feature, it detects a video signal to control your external Audio/Video equipment using REMOTE mode, any of your HITACHI Plasma TV Remote Control. Video Audio Channel Manager Locks Timers Setup Power Swivel ...
...Auto Link Use this feature to INPUT 4. 1. Remote When REMOTE is selected, the TV will turn the TV on by AUTO LINK, the TV will automatically turn off after the TV is now reset and will turn your remote control is for the AV NET feature to highlight and select the AUTO LINK...play button on . Set AV Net Use this function to automatically turn on using the AUTO LINK feature, it detects a video signal to control your external Audio/Video equipment using REMOTE mode, any of your HITACHI Plasma TV Remote Control. Video Audio Channel Manager Locks Timers Setup Power Swivel ...

Owners Guide
Page 59
... the correct preset IR code ). 10. Use the CURSOR PAD ̆ or ̄ to the Learning mode. Before starting this TV, please select a TV Input. Brand Name Hitachi (1/54) Learning Mode Move Change Brand Name Back Next 7. These On-screen buttons are placed in front of the devices IR sensor....to this wizard, please make sure that connects to use an A/V Receiver. AV Net Setup Wizard Welcome to setup other devices). 4. If the A/V Receiver turns ON, then you connect the video or audio output of your A/V Receiver. 6. Use the CURSOR PAD ̇ or ̈ to the next SETUP ...
... the correct preset IR code ). 10. Use the CURSOR PAD ̆ or ̄ to the Learning mode. Before starting this TV, please select a TV Input. Brand Name Hitachi (1/54) Learning Mode Move Change Brand Name Back Next 7. These On-screen buttons are placed in front of the devices IR sensor....to this wizard, please make sure that connects to use an A/V Receiver. AV Net Setup Wizard Welcome to setup other devices). 4. If the A/V Receiver turns ON, then you connect the video or audio output of your A/V Receiver. 6. Use the CURSOR PAD ̇ or ̈ to the next SETUP ...


