Owners Guide
Page 1
has determined that this product meets the Energy Star® guidelines for 42HDS52, 42HDS52A and 55HDS52 IMPORTANT SAFETY INSTRUCTIONS 2-3 FIRST TIME USE ...4-20 THE REMOTE CONTROL ...21-38 ON-SCREEN DISPLAY ...39-71 USEFUL INFORMATION...72-78 END USER LICENSE AGREEMENT FOR HITACHI DTV SOFTWARE 79 APPENDIXES ...80-81 INDEX ...82 As an Energy Star® Partner, Hitachi, Ltd. PLASMA TELEVISION Operating Guide for energy efficiency.
has determined that this product meets the Energy Star® guidelines for 42HDS52, 42HDS52A and 55HDS52 IMPORTANT SAFETY INSTRUCTIONS 2-3 FIRST TIME USE ...4-20 THE REMOTE CONTROL ...21-38 ON-SCREEN DISPLAY ...39-71 USEFUL INFORMATION...72-78 END USER LICENSE AGREEMENT FOR HITACHI DTV SOFTWARE 79 APPENDIXES ...80-81 INDEX ...82 As an Energy Star® Partner, Hitachi, Ltd. PLASMA TELEVISION Operating Guide for energy efficiency.
Owners Guide
Page 4
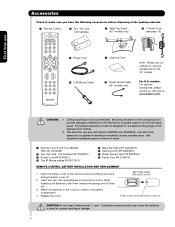
... of stand. ³ Remote Control Unit CLU-3852WL (Part No. This plasma television product is not recommended. Open the battery cover of 45 degrees from vertical. 2. For U.S. models: For optional accessories, please access our web site at: www.hitachi.us/tv CAUTION: 1. Ceiling mounting ... Cord ¿ 2 IR Mouse Cable ² Cleaning Cloth ¶ Power Swivel Cable (42" models only) Note: Please visit our website for optional accessories for a maximum tilting angle of the remote control by pushing down and slide back to the (+) and (-) marks in the battery compartment...
... of stand. ³ Remote Control Unit CLU-3852WL (Part No. This plasma television product is not recommended. Open the battery cover of 45 degrees from vertical. 2. For U.S. models: For optional accessories, please access our web site at: www.hitachi.us/tv CAUTION: 1. Ceiling mounting ... Cord ¿ 2 IR Mouse Cable ² Cleaning Cloth ¶ Power Swivel Cable (42" models only) Note: Please visit our website for optional accessories for a maximum tilting angle of the remote control by pushing down and slide back to the (+) and (-) marks in the battery compartment...
Owners Guide
Page 8
...PVR/VCR, AMP/CD) Used to show remote control mode when the SOURCE ACCESS buttons are pressed. EXIT BUTTON (TV, CBL, STB, PVR/VCR) Exits out of the functions on your HITACHI Plasma Television, the new remote control is used as channel information. CHANNEL WHEEL (TV, CBL, STB, PVR/VCR, AMP/CD...) Scroll up and down to adjust the audio level of the TV. DAY/NIGHT (TV) Toggles picture mode settings between the current ...
...PVR/VCR, AMP/CD) Used to show remote control mode when the SOURCE ACCESS buttons are pressed. EXIT BUTTON (TV, CBL, STB, PVR/VCR) Exits out of the functions on your HITACHI Plasma Television, the new remote control is used as channel information. CHANNEL WHEEL (TV, CBL, STB, PVR/VCR, AMP/CD...) Scroll up and down to adjust the audio level of the TV. DAY/NIGHT (TV) Toggles picture mode settings between the current ...
Owners Guide
Page 9
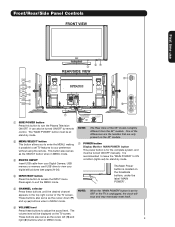
...memory or memory card USB drive to view your preference without using the remote. The Main Power button is located on the TV screen. Front/Rear/Side Panel Controls FRONT VIEW First time use CURSOR PHOTO..., under the label "MAIN POWER". ቦ CHANNEL selector Press these buttons to turn the Plasma Television ON/OFF. Press again to the claw. The volume level will stop and may eventually... Insert USB cable from the 42" models. NOTE: The Rear View of the TV screen. Firmly bind the cables. NOTE: When the "MAIN POWER" button is set TV features to your digital still ...
...memory or memory card USB drive to view your preference without using the remote. The Main Power button is located on the TV screen. Front/Rear/Side Panel Controls FRONT VIEW First time use CURSOR PHOTO..., under the label "MAIN POWER". ቦ CHANNEL selector Press these buttons to turn the Plasma Television ON/OFF. Press again to the claw. The volume level will stop and may eventually... Insert USB cable from the 42" models. NOTE: The Rear View of the TV screen. Firmly bind the cables. NOTE: When the "MAIN POWER" button is set TV features to your digital still ...

Owners Guide
Page 10
... lower right side of the monitor. First time use the CURSOR PAD and the SELECT button on the remote control to select INPUT 5. NOTES: 1. Your HITACHI Plasma TV will illuminate. Indicating Lamp Power Status Off Off Lights Red Lights Green Lights Orange Off (Stand-by mode... (lights red) when not in use. 2. signal). ቪ REMOTE CONTROL sensor Point your remote at this area when selecting channels, adjusting ...
... lower right side of the monitor. First time use the CURSOR PAD and the SELECT button on the remote control to select INPUT 5. NOTES: 1. Your HITACHI Plasma TV will illuminate. Indicating Lamp Power Status Off Off Lights Red Lights Green Lights Orange Off (Stand-by mode... (lights red) when not in use. 2. signal). ቪ REMOTE CONTROL sensor Point your remote at this area when selecting channels, adjusting ...
Owners Guide
Page 11
...; ቭ laserdisc players, DVD players etc. (if you to INPUT 1, 2 or 5 at a time. 2. Because digital television (DTV) signals remain in TV mode. You may be labeled ቦ S-VIDEO INPUTS 1 and 2 INPUTS 1 and 2 provide S-VIDEO (Super Video) jacks for both inputs. HDMI output connection... are available for HDMI input. ብ Optical Out (Digital Audio) This jack provides Digital Audio Output for your Plasma Television's remote control in digital format, HDMI assures that is of these inputs may use composite video signal for connecting equipment with personal...
...; ቭ laserdisc players, DVD players etc. (if you to INPUT 1, 2 or 5 at a time. 2. Because digital television (DTV) signals remain in TV mode. You may be labeled ቦ S-VIDEO INPUTS 1 and 2 INPUTS 1 and 2 provide S-VIDEO (Super Video) jacks for both inputs. HDMI output connection... are available for HDMI input. ብ Optical Out (Digital Audio) This jack provides Digital Audio Output for your Plasma Television's remote control in digital format, HDMI assures that is of these inputs may use composite video signal for connecting equipment with personal...
Owners Guide
Page 14
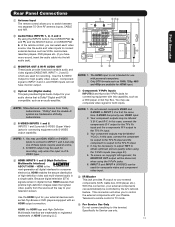
HDTV Set-Top Box CONNECT TO IR BLASTER 14 CONNECT TO IR BLASTER (PROVIDED) NOTE: Cables are optional, except when specified. On-Screen Display The Remote Control First time use Rear Panel Connections Outside Antenna Cable TV coaxial cable 2-Way signal splitter VCR #1 ANT OUTPUT IN S-VIDEO V L R Optional DIGITAL OUTPUT CAPABILITY DIGITAL OUTPUT AUDIO OUT DVI to HDMI OUTPUT Y PB/CB PR/CR L R Optional S-VIDEO V L R INPUT S-VIDEO V L R OUTPUT Y PB PR L R OUTPUT DVD Player (PROVIDED) VCR #2 Laserdisc player, VCR, camcorder, etc.
HDTV Set-Top Box CONNECT TO IR BLASTER 14 CONNECT TO IR BLASTER (PROVIDED) NOTE: Cables are optional, except when specified. On-Screen Display The Remote Control First time use Rear Panel Connections Outside Antenna Cable TV coaxial cable 2-Way signal splitter VCR #1 ANT OUTPUT IN S-VIDEO V L R Optional DIGITAL OUTPUT CAPABILITY DIGITAL OUTPUT AUDIO OUT DVI to HDMI OUTPUT Y PB/CB PR/CR L R Optional S-VIDEO V L R INPUT S-VIDEO V L R OUTPUT Y PB PR L R OUTPUT DVD Player (PROVIDED) VCR #2 Laserdisc player, VCR, camcorder, etc.
Owners Guide
Page 20
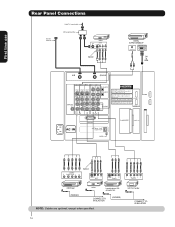
... to control the Audio/Video equipment command without the equipment's remote control. Once this is equipped with up to control your equipment using your HITACHI Plasma TV Remote Control. You can connect the Plasma Television with an AV Network feature. Place the IR mouse in place. 3. Use... Out Upgrades Quick Start Up Move SEL Return NOTE: 1. Each IR Mouse cable can control up to function properly. 20 Connect your Hitachi Plasma Television and external Audio/Video equipment (VCR and DVD Player). Infrared Sensor IR Mouse V L R OUTPUT VCR Infrared Sensor OUTPUT Y ...
... to control the Audio/Video equipment command without the equipment's remote control. Once this is equipped with up to control your equipment using your HITACHI Plasma TV Remote Control. You can connect the Plasma Television with an AV Network feature. Place the IR mouse in place. 3. Use... Out Upgrades Quick Start Up Move SEL Return NOTE: 1. Each IR Mouse cable can control up to function properly. 20 Connect your Hitachi Plasma Television and external Audio/Video equipment (VCR and DVD Player). Infrared Sensor IR Mouse V L R OUTPUT VCR Infrared Sensor OUTPUT Y ...

Owners Guide
Page 21
... your VCR). The PVR mode indicator will blink, indicating that the remote will light a few seconds during this button to program your HITACHI Plasma TV, the new remote control is pressed. To operate additional audio equipment, point the remote at the remote sensor of lighting the Remote Control buttons. When the LIGHT button is pressed, the illumination will...
... your VCR). The PVR mode indicator will blink, indicating that the remote will light a few seconds during this button to program your HITACHI Plasma TV, the new remote control is pressed. To operate additional audio equipment, point the remote at the remote sensor of lighting the Remote Control buttons. When the LIGHT button is pressed, the illumination will...
Owners Guide
Page 22
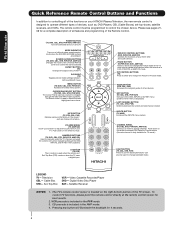
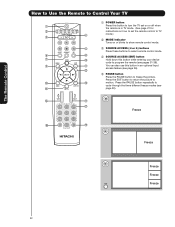
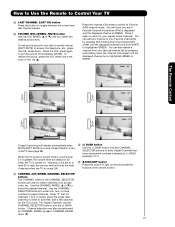
...4710; PAUSE button Press the PAUSE button to freeze the picture. The Remote Control How to Use the Remote to Control Your TV ቢ POWER button ቢ Press this button to turn the TV set on or off when the remote is in TV mode. (See page 21 for ባ instructions on how to set... the remote control to TV ቤ ብ mode.) ባ MODE Indicator Turns on or blinks to show remote control mode. ቦ ቤ SOURCE ACCESS (&#...
...4710; PAUSE button Press the PAUSE button to freeze the picture. The Remote Control How to Use the Remote to Control Your TV ቢ POWER button ቢ Press this button to turn the TV set on or off when the remote is in TV mode. (See page 21 for ባ instructions on how to set... the remote control to TV ቤ ብ mode.) ባ MODE Indicator Turns on or blinks to show remote control mode. ቦ ቤ SOURCE ACCESS (&#...
Owners Guide
Page 23
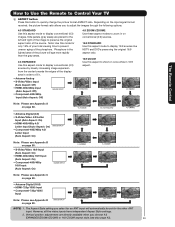
... areas. 4:3 EXPANDED Use this aspect mode to display conventional (4:3) sources by linearly increasing image expansion from the center towards the edges of the phosphors. The Remote Control • Antenna-Digital (4:3) • S-Video/Video 4:3/Letter Input (Auto Aspect: On) • HDMI-480i/480p 4:3/ Letter Input (Auto Aspect: On)...set for only 15% of your total viewing time to preserve the original aspect ratio of the source. How to Use the Remote to Control Your TV ቧ ASPECT button Press this button to Zoom-in once while in 16:9 aspect. However, all five video inputs have ...
... areas. 4:3 EXPANDED Use this aspect mode to display conventional (4:3) sources by linearly increasing image expansion from the center towards the edges of the phosphors. The Remote Control • Antenna-Digital (4:3) • S-Video/Video 4:3/Letter Input (Auto Aspect: On) • HDMI-480i/480p 4:3/ Letter Input (Auto Aspect: On)...set for only 15% of your total viewing time to preserve the original aspect ratio of the source. How to Use the Remote to Control Your TV ቧ ASPECT button Press this button to Zoom-in once while in 16:9 aspect. However, all five video inputs have ...
Owners Guide
Page 24
...5 Select to choose INPUT 1. The CURSOR PAD will start the On-Screen Display. ቫ INFO button Press this button is only applicable when the remote control is connected to INPUT 1 YPBPR:1 480i 11:00PM INFO Input 5 Photo Input Cable Air Input 1 Move SEL Sel. Pressing the INPUTS button ...On-Screen Displays. 24 INPUT 3 Select to choose Cable. INPUT 2 Select to access the Channel Guide of the Plasma TV. The Remote Control How to Use the Remote to Control Your TV ቨ DAY/NIGHT button Press this button to access the INPUTS menu. Select Night for night time viewing with ...
...5 Select to choose INPUT 1. The CURSOR PAD will start the On-Screen Display. ቫ INFO button Press this button is only applicable when the remote control is connected to INPUT 1 YPBPR:1 480i 11:00PM INFO Input 5 Photo Input Cable Air Input 1 Move SEL Sel. Pressing the INPUTS button ...On-Screen Displays. 24 INPUT 3 Select to choose Cable. INPUT 2 Select to access the Channel Guide of the Plasma TV. The Remote Control How to Use the Remote to Control Your TV ቨ DAY/NIGHT button Press this button to access the INPUTS menu. Select Night for night time viewing with ...
Owners Guide
Page 25
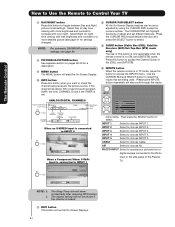
...No. Press INFO button to show "Input device not detected" if the digital camera's large capacity memory is fully loaded, or because of the TV. 1. Digital photos recorded on some digital cameras. Certain types of digital Photos that can be displayed is 999. 3. The screen may show Picture ...Date Resolution File Name No. 02/08 06/13/05 2048x1536 DSC00467 Rotate Slideshow Device NOTES: 1. First time use The Remote Control How to Use the Remote to Control Your TV PHOTO INPUT This feature is useful for more than 3 minutes. 2. Press the SELECT button to cycle through the INPUTS ...
...No. Press INFO button to show "Input device not detected" if the digital camera's large capacity memory is fully loaded, or because of the TV. 1. Digital photos recorded on some digital cameras. Certain types of digital Photos that can be displayed is 999. 3. The screen may show Picture ...Date Resolution File Name No. 02/08 06/13/05 2048x1536 DSC00467 Rotate Slideshow Device NOTES: 1. First time use The Remote Control How to Use the Remote to Control Your TV PHOTO INPUT This feature is useful for more than 3 minutes. 2. Press the SELECT button to cycle through the INPUTS ...

Owners Guide
Page 26
...Photo files should be first placed on a main directory with DCF Standard (Design rule for Camera File System). 4. The Remote Control How to Use the Remote to Control Your TV ROTATE Select this menu item to rotate selected photos either clockwise (CURSOR PAD ̈) and counterclockwise (CURSOR PAD ̇).... (Ex. 123ABCDE). 1st to 3rd: number; 4th to 8th: letters. Photo file names modified on a computer should be 8 characters (Ex. This TV set . 26 Supported image types are up to 8th: numbers. ABCD1234.jpg). 1st character: letters; 2nd to 4th: letters or numbers; 5th to ...
...Photo files should be first placed on a main directory with DCF Standard (Design rule for Camera File System). 4. The Remote Control How to Use the Remote to Control Your TV ROTATE Select this menu item to rotate selected photos either clockwise (CURSOR PAD ̈) and counterclockwise (CURSOR PAD ̇).... (Ex. 123ABCDE). 1st to 3rd: number; 4th to 8th: letters. Photo file names modified on a computer should be 8 characters (Ex. This TV set . 26 Supported image types are up to 8th: numbers. ABCD1234.jpg). 1st character: letters; 2nd to 4th: letters or numbers; 5th to ...
Owners Guide
Page 27
... is displayed and the displayed channel is on . Press the VOL wheel again to Favorite (FAV) channel mode. You will default to 30 when the TV is turned on and Closed Caption is set to a level 30 or less, the volume level will display automatically when MUTE/SOFT MUTE is GREEN.... For Digital Channels, use The Remote Control How to Use the Remote to Control Your TV ቱ LAST CHANNEL (LAST CH) button Press this button to light up (̆) or CHANNEL WHEEL down . Press the channel (CH...
... is displayed and the displayed channel is on . Press the VOL wheel again to Favorite (FAV) channel mode. You will default to 30 when the TV is turned on and Closed Caption is set to a level 30 or less, the volume level will display automatically when MUTE/SOFT MUTE is GREEN.... For Digital Channels, use The Remote Control How to Use the Remote to Control Your TV ቱ LAST CHANNEL (LAST CH) button Press this button to light up (̆) or CHANNEL WHEEL down . Press the channel (CH...
Owners Guide
Page 28
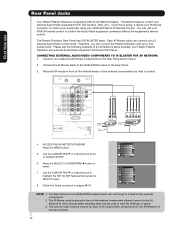
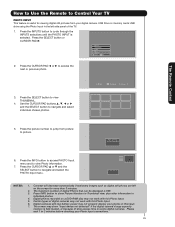
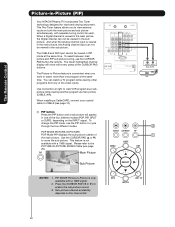
...antenna inputs on the channel list. 28 AUDIO OUT VIDEO OUT Back of the video inputs. PIP MODE Picture-in -Picture (PIP) Your HITACHI Plasma TV incorporates Two Tuner technology designed for each. The Picture-in the sub picture. POP MODE PICTURE-IN-PICTURE POP Mode PIP displays the sub-picture...main picture, the Digital channel can watch more than one of the main picture. To change the PIP mode, use the CURSOR PAD button the remote. To select between main picture and PIP sub picture tuning, use the PIP button to CABLE (see page 29). When installing a CableCARD, connect...
...antenna inputs on the channel list. 28 AUDIO OUT VIDEO OUT Back of the video inputs. PIP MODE Picture-in -Picture (PIP) Your HITACHI Plasma TV incorporates Two Tuner technology designed for each. The Picture-in the sub picture. POP MODE PICTURE-IN-PICTURE POP Mode PIP displays the sub-picture...main picture, the Digital channel can watch more than one of the main picture. To change the PIP mode, use the CURSOR PAD button the remote. To select between main picture and PIP sub picture tuning, use the PIP button to CABLE (see page 29). When installing a CableCARD, connect...
Owners Guide
Page 29
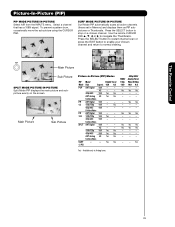
... PAD ̆, ̄, ̇ or ̈ to stop on the screen. Yes Yes Yes Yes -- - Yes1 Yes1 - The Remote Control Picture-In-Picture (PIP) PIP MODE PICTURE-IN-PICTURE Select AIR from the INPUTS menu. Digital Tuner 16:9 4:3 -- -- Yes - -- -- -- Yes Yes -- -- - Yes Yes Yes ...
... PAD ̆, ̄, ̇ or ̈ to stop on the screen. Yes Yes Yes Yes -- - Yes1 Yes1 - The Remote Control Picture-In-Picture (PIP) PIP MODE PICTURE-IN-PICTURE Select AIR from the INPUTS menu. Digital Tuner 16:9 4:3 -- -- Yes - -- -- -- Yes Yes -- -- - Yes Yes Yes ...
Owners Guide
Page 30
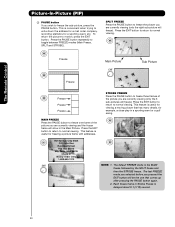
... show in a sporting event or a golf swing. This is convenient when trying to normal viewing. Hot Springs Clay Mask C/O John Doe Run-Spa Retreat P.O. The Remote Control Picture-In-Picture (PIP) ባ PAUSE button If you are currently viewing (only the right sub-picture will freeze). SPLIT FREEZE Press the PAUSE...
... show in a sporting event or a golf swing. This is convenient when trying to normal viewing. Hot Springs Clay Mask C/O John Doe Run-Spa Retreat P.O. The Remote Control Picture-In-Picture (PIP) ባ PAUSE button If you are currently viewing (only the right sub-picture will freeze). SPLIT FREEZE Press the PAUSE...
Owners Guide
Page 31
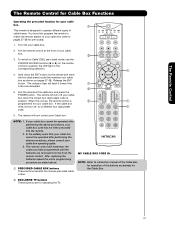
...the Cable Box for operation of your cable box. ባ 3. Aim the remote at the front of the buttons exclusively for the Cable Box. ባ EXCLUSIVE TV buttons These buttons are removed from the from the remote control. If the cable box does not turn off , try a different ...four digit preset ቢ code. 6. You must first program the remote to match the remote system of cable boxes. The remote will remember the codes you have programmed until the batteries are for operating the TV. 31 If your cable box cannot be operated after performing the above procedures, ...
...the Cable Box for operation of your cable box. ባ 3. Aim the remote at the front of the buttons exclusively for the Cable Box. ባ EXCLUSIVE TV buttons These buttons are removed from the from the remote control. If the cable box does not turn off , try a different ...four digit preset ቢ code. 6. You must first program the remote to match the remote system of cable boxes. The remote will remember the codes you have programmed until the batteries are for operating the TV. 31 If your cable box cannot be operated after performing the above procedures, ...
Owners Guide
Page 32
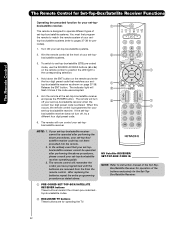
...SET-TOP-BOX/SATELLITE RECEIVER buttons These buttons transmit the chosen pre-coded settop-box/satellite codes. ባ EXCLUSIVE TV buttons These buttons are removed from the from the remote control. The indicator light will remember the codes you have programmed until the batteries are for operating the... TV. 32 box/satellite receiver does not turn off , try a different four digit preset code. 6. Aim the remote at the front of your set -top- The remote will turn off your set-top-box/satellite receiver when the...
...SET-TOP-BOX/SATELLITE RECEIVER buttons These buttons transmit the chosen pre-coded settop-box/satellite codes. ባ EXCLUSIVE TV buttons These buttons are removed from the from the remote control. The indicator light will remember the codes you have programmed until the batteries are for operating the... TV. 32 box/satellite receiver does not turn off , try a different four digit preset code. 6. Aim the remote at the front of your set -top- The remote will turn off your set-top-box/satellite receiver when the...


