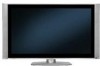
Owners Guide
Page 3
...only those controls that any changes or modifications made to this apparatus to rain or moisture. • The plasma television should not be authorized by TV stations and cable companies, as well as programs from the broadcaster or owner of the video program material. authorized...ca (in accordance with liquids, such as vases, should not be permanently imprinted onto your HITACHI Factory Warranty. Prevention of a set-top box. Important Safety Instructions Power source This plasma television is designed to operate on -screen displays such as video games, stock market quotations, ...
...only those controls that any changes or modifications made to this apparatus to rain or moisture. • The plasma television should not be authorized by TV stations and cable companies, as well as programs from the broadcaster or owner of the video program material. authorized...ca (in accordance with liquids, such as vases, should not be permanently imprinted onto your HITACHI Factory Warranty. Prevention of a set-top box. Important Safety Instructions Power source This plasma television is designed to operate on -screen displays such as video games, stock market quotations, ...
Owners Guide
Page 5
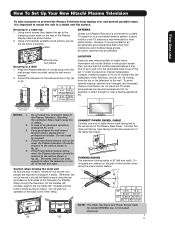
... heavy, whenever it is moved, two people are not included (Optional). 42" 55" 5 Wire ANTENNA Unless your Plasma Television is connected to a cable TV system or to a centralized antenna system, a good outdoor color TV antenna is recommended for professional installer. Blocking the ventilation holes might cause fire...below . 2. Do not place any objects on the picture screen. First time use How To Set Up Your New Hitachi Plasma Television To take measures to prevent the Plasma Television from tipping over and prevent possible injury it is important to mount the unit in an ...
... heavy, whenever it is moved, two people are not included (Optional). 42" 55" 5 Wire ANTENNA Unless your Plasma Television is connected to a cable TV system or to a centralized antenna system, a good outdoor color TV antenna is recommended for professional installer. Blocking the ventilation holes might cause fire...below . 2. Do not place any objects on the picture screen. First time use How To Set Up Your New Hitachi Plasma Television To take measures to prevent the Plasma Television from tipping over and prevent possible injury it is important to mount the unit in an ...
Owners Guide
Page 6
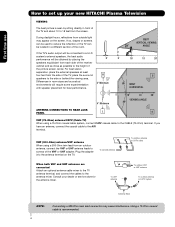
... AIR To outdoor antenna or CATV system Antenna Mixer NOTE: 6 Connecting a 300-Ohm twin lead connector may appear on the TV. Consult your new HITACHI Plasma Television VIEWING The best picture is recommended. AIR To second antenna CABLE To outdoor antenna or CATV cable When both VHF and ... be obtained by sitting directly in front of the TV and about 10 to 18 feet from the screen. Plug the adapter into the antenna terminal on the screen. First time use How to set up your dealer or service store for best performance. 0' R 4" Minimum BEST VERTICAL VIEWING 20 ANGLE...
... AIR To outdoor antenna or CATV system Antenna Mixer NOTE: 6 Connecting a 300-Ohm twin lead connector may appear on the TV. Consult your new HITACHI Plasma Television VIEWING The best picture is recommended. AIR To second antenna CABLE To outdoor antenna or CATV cable When both VHF and ... be obtained by sitting directly in front of the TV and about 10 to 18 feet from the screen. Plug the adapter into the antenna terminal on the screen. First time use How to set up your dealer or service store for best performance. 0' R 4" Minimum BEST VERTICAL VIEWING 20 ANGLE...
Owners Guide
Page 7
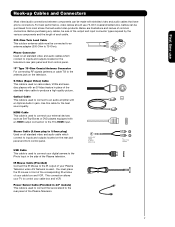
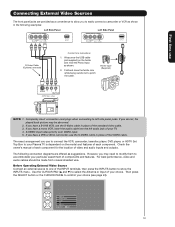
... of the corresponding IR window of your Plasma Television when A/V Network is used . Use this cable for the best sound quality. This connection allows your TV to control your cable box and VCR....on all standard video and audio cable which connect to connect your external devices such as Set-Top-Boxes or DVD players equipped with shielded video and audio cables that sell audio/...Plasma Television. AUDIO OUT 3.8mm STEREO MINI-PLUG 2 RCA TYPE PLUGS 7 First time use 75-Ohm coaxial shielded wire. HDMI Cable This cable is used to connect your digital camera to the Photo Input in 42...
... of the corresponding IR window of your Plasma Television when A/V Network is used . Use this cable for the best sound quality. This connection allows your TV to control your cable box and VCR....on all standard video and audio cable which connect to connect your external devices such as Set-Top-Boxes or DVD players equipped with shielded video and audio cables that sell audio/...Plasma Television. AUDIO OUT 3.8mm STEREO MINI-PLUG 2 RCA TYPE PLUGS 7 First time use 75-Ohm coaxial shielded wire. HDMI Cable This cable is used to connect your digital camera to the Photo Input in 42...
Owners Guide
Page 8
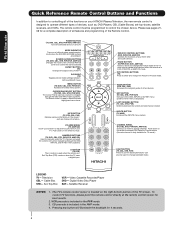
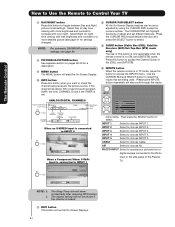
... Turns on or blinks to control the device selected. SOURCE ACCESS BUTTONS (TV, DVD, CBL, STB, PVR/VCR, AMP/CD) Changes the mode of your HITACHI Plasma Television, the new remote control is in Set-Top-Box (STB) mode or when the TV uses a digital input. DVD/VCR CONTROL BUTTONS (DVD, PVR/VCR, AMP/... OSD, INPUTS or AV NET menu systems if their menu is included in DVD, PVR/VCR, or AMP/CD mode. Television CBL - Set-Top-Box VCR - The TV's remote control sensor is included in -Picture mode. VCR precode is located on the screen, such as channel information. CURSOR PAD/SELECT BUTTON...
... Turns on or blinks to control the device selected. SOURCE ACCESS BUTTONS (TV, DVD, CBL, STB, PVR/VCR, AMP/CD) Changes the mode of your HITACHI Plasma Television, the new remote control is in Set-Top-Box (STB) mode or when the TV uses a digital input. DVD/VCR CONTROL BUTTONS (DVD, PVR/VCR, AMP/... OSD, INPUTS or AV NET menu systems if their menu is included in DVD, PVR/VCR, or AMP/CD mode. Television CBL - Set-Top-Box VCR - The TV's remote control sensor is included in -Picture mode. VCR precode is located on the screen, such as channel information. CURSOR PAD/SELECT BUTTON...
Owners Guide
Page 9
... button This button allows you to enter the MENU, making it possible to set to OFF or the TV is set TV features to your digital still pictures (see pages 24-26). ብ INPUT/EXIT button Press this button to turn the Plasma Television ON/OFF. It is slightly different from your Digital Camera, USB.... These buttons also serve as the cursor down (̄) and up (̆) buttons when in MENU mode. ቤ PHOTO INPUT Insert USB cable from the 42" models. This button also serves as the SELECT button when in MENU mode. NOTE: The Rear View of the differences are the handles that are...
... button This button allows you to enter the MENU, making it possible to set to OFF or the TV is set TV features to your digital still pictures (see pages 24-26). ብ INPUT/EXIT button Press this button to turn the Plasma Television ON/OFF. It is slightly different from your Digital Camera, USB.... These buttons also serve as the cursor down (̄) and up (̆) buttons when in MENU mode. ቤ PHOTO INPUT Insert USB cable from the 42" models. This button also serves as the SELECT button when in MENU mode. NOTE: The Rear View of the differences are the handles that are...

Owners Guide
Page 10
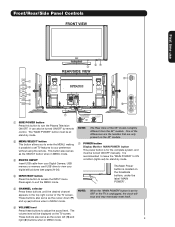
... Lamp Power Status Off Off Lights Red Lights Green Lights Orange Off (Stand-by) On Off (Power Saving) Operating When the main power switch is set to instantly view your equipment's remote control at this area when selecting channels, adjusting volume, etc. ቪ LEARNING AV NET sensor Point your favorite show...: 1. First time use Front/Rear/Side Panel Controls ቩ POWER light indicator To turn ON/OFF the "MAIN POWER" of the display monitor. 10 The Plasma TV is no sync. Your HITACHI Plasma TV will illuminate.
... Lamp Power Status Off Off Lights Red Lights Green Lights Orange Off (Stand-by) On Off (Power Saving) Operating When the main power switch is set to instantly view your equipment's remote control at this area when selecting channels, adjusting volume, etc. ቪ LEARNING AV NET sensor Point your favorite show...: 1. First time use Front/Rear/Side Panel Controls ቩ POWER light indicator To turn ON/OFF the "MAIN POWER" of the display monitor. 10 The Plasma TV is no sync. Your HITACHI Plasma TV will illuminate.
Owners Guide
Page 11
...priority over VIDEO input. 2. Y, B-Y, and R-Y. In this case, connect the component CB output to the TV's PB input and the component CR output to your Plasma Television's remote control in TV mode. S-VIDEO output may use HDMI, VIDEO or S-VIDEO inputs to connect to INPUT 1 and 2, but... camcorders, ቪ ቭ laserdisc players, DVD players etc. (if you to connect external devices, such as a DVD player or Set Top Box. Specifically for consumer electronics. With this connection, your audio device that pristine high-definition images retain the highest video quality from Dolby...
...priority over VIDEO input. 2. Y, B-Y, and R-Y. In this case, connect the component CB output to the TV's PB input and the component CR output to your Plasma Television's remote control in TV mode. S-VIDEO output may use HDMI, VIDEO or S-VIDEO inputs to connect to INPUT 1 and 2, but... camcorders, ቪ ቭ laserdisc players, DVD players etc. (if you to connect external devices, such as a DVD player or Set Top Box. Specifically for consumer electronics. With this connection, your audio device that pristine high-definition images retain the highest video quality from Dolby...
Owners Guide
Page 13
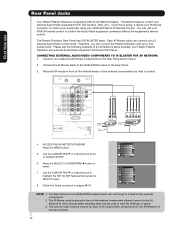
... show the INPUTS menu. If you do not, the played back picture may need to modify them to select the Antenna or Input of your Plasma TV is dependent on the ferrite core near the Photo Input as shown. 2. The following examples: Left Side Panel INPUT 5 Left Side Panel INPUT 5 R L/MONO... S-Video cable in the following connection diagrams are provided as shown in place of your TV. 4. The exact arrangement you have a S-VHS VCR, use to connect the VCR, camcorder, laserdisc player, DVD player, or HDTV Set Top Box to one of video and audio inputs and outputs. However, you have a...
... show the INPUTS menu. If you do not, the played back picture may need to modify them to select the Antenna or Input of your Plasma TV is dependent on the ferrite core near the Photo Input as shown. 2. The following examples: Left Side Panel INPUT 5 Left Side Panel INPUT 5 R L/MONO... S-Video cable in the following connection diagrams are provided as shown in place of your TV. 4. The exact arrangement you have a S-VHS VCR, use to connect the VCR, camcorder, laserdisc player, DVD player, or HDTV Set Top Box to one of video and audio inputs and outputs. However, you have a...
Owners Guide
Page 14
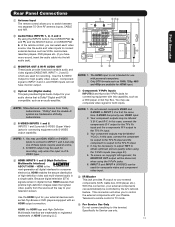
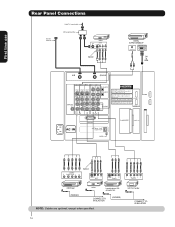
On-Screen Display The Remote Control First time use Rear Panel Connections Outside Antenna Cable TV coaxial cable 2-Way signal splitter VCR #1 ANT OUTPUT IN S-VIDEO V L R Optional DIGITAL OUTPUT CAPABILITY DIGITAL OUTPUT AUDIO OUT DVI to HDMI OUTPUT Y PB/CB PR/CR L R Optional S-VIDEO V L R INPUT S-VIDEO V L R OUTPUT Y PB PR L R OUTPUT DVD Player (PROVIDED) VCR #2 Laserdisc player, VCR, camcorder, etc. HDTV Set-Top Box CONNECT TO IR BLASTER 14 CONNECT TO IR BLASTER (PROVIDED) NOTE: Cables are optional, except when specified.
On-Screen Display The Remote Control First time use Rear Panel Connections Outside Antenna Cable TV coaxial cable 2-Way signal splitter VCR #1 ANT OUTPUT IN S-VIDEO V L R Optional DIGITAL OUTPUT CAPABILITY DIGITAL OUTPUT AUDIO OUT DVI to HDMI OUTPUT Y PB/CB PR/CR L R Optional S-VIDEO V L R INPUT S-VIDEO V L R OUTPUT Y PB PR L R OUTPUT DVD Player (PROVIDED) VCR #2 Laserdisc player, VCR, camcorder, etc. HDTV Set-Top Box CONNECT TO IR BLASTER 14 CONNECT TO IR BLASTER (PROVIDED) NOTE: Cables are optional, except when specified.

Owners Guide
Page 15
... HDMI connections are provided for more normal picture. 15 Connecting the television directly to use Tips on page 14). Use these connections in place of a Set-Top-Box will be abnormal, when using the Y-PBPR, and HDMI input jacks. • Input 1 or 2 can be labeled Y, B-Y, and R-Y. MACROVISION... input and the components CR output to the TV's PR input. • It may be necessary to adjust TINT to obtain optimum picture quality when using a HDMI input from a Set-Top-Box, it is of your other electronic equipment for additional information on line input-output connections. • ...
... HDMI connections are provided for more normal picture. 15 Connecting the television directly to use Tips on page 14). Use these connections in place of a Set-Top-Box will be abnormal, when using the Y-PBPR, and HDMI input jacks. • Input 1 or 2 can be labeled Y, B-Y, and R-Y. MACROVISION... input and the components CR output to the TV's PR input. • It may be necessary to adjust TINT to obtain optimum picture quality when using a HDMI input from a Set-Top-Box, it is of your other electronic equipment for additional information on line input-output connections. • ...

Owners Guide
Page 17
... HDMI input as shown on the Rear panel below . 4. HDMI input DVI to HDMI Input or or HDMI Cable DIGITAL OUTPUT Back of HDTV Set-Top-Box or DVD Player HDTV Set-Top-Box or DVD Player or PR PB DVI to HDMI Cable LR OUTPUT DIGITAL OUTPUT Back of the HDTV... box or DVD player. 5. HDMI is loose. 2. With DVI output, connect the cable from the AUDIO OUT L of HDTV Set-Top-Box or DVD Player HDTV Set-Top-Box or DVD Player 17 Completely insert the connection cord plugs when connecting to HDMI cable, connect the Audio Out L and R cables at the...
... HDMI input as shown on the Rear panel below . 4. HDMI input DVI to HDMI Input or or HDMI Cable DIGITAL OUTPUT Back of HDTV Set-Top-Box or DVD Player HDTV Set-Top-Box or DVD Player or PR PB DVI to HDMI Cable LR OUTPUT DIGITAL OUTPUT Back of the HDTV... box or DVD player. 5. HDMI is loose. 2. With DVI output, connect the cable from the AUDIO OUT L of HDTV Set-Top-Box or DVD Player HDTV Set-Top-Box or DVD Player 17 Completely insert the connection cord plugs when connecting to HDMI cable, connect the Audio Out L and R cables at the...
Owners Guide
Page 18
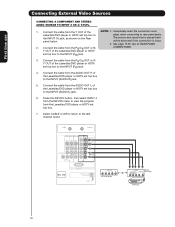
... the INPUT (PB) jack. 3. will be abnormal if the connection is played back panel below. Connect the cable from the Laserdisc/DVD player or HDTV set top box to the INPUT (PR) jack. 4. Select CABLE or AIR to return to the INPUT (AUDIO/R) jack. 5. First time use Connecting External Video ...CONNECTING A COMPONENT AND STEREO AUIDO SOURCE TO INPUT 3 OR 4: Y-PBPR. 1. See page 15 for tips on the Rear The picture and sound that is loose. 2. set top box. 7. Press the INPUTS button, then select INPUT 4 from the INPUTS menu to view the program from the PR/CR OUT or RY OUT...
... the INPUT (PB) jack. 3. will be abnormal if the connection is played back panel below. Connect the cable from the Laserdisc/DVD player or HDTV set top box to the INPUT (PR) jack. 4. Select CABLE or AIR to return to the INPUT (AUDIO/R) jack. 5. First time use Connecting External Video ...CONNECTING A COMPONENT AND STEREO AUIDO SOURCE TO INPUT 3 OR 4: Y-PBPR. 1. See page 15 for tips on the Rear The picture and sound that is loose. 2. set top box. 7. Press the INPUTS button, then select INPUT 4 from the INPUTS menu to view the program from the PR/CR OUT or RY OUT...
Owners Guide
Page 20
... 4. You can control up to select. 7. Therefore, you wish to control your HITACHI Plasma TV Remote Control. The correct codes must be placed in front of the infrared sensor of the Audio/Video components for the AV Network to highlight the SET AV NET features then press the SELECT button. 8. Video Audio Channel Manager...
... 4. You can control up to select. 7. Therefore, you wish to control your HITACHI Plasma TV Remote Control. The correct codes must be placed in front of the infrared sensor of the Audio/Video components for the AV Network to highlight the SET AV NET features then press the SELECT button. 8. Video Audio Channel Manager...

Owners Guide
Page 21
...button of the Source Access on the remote. The Remote Control The Remote Control In addition to controlling all the functions on your HITACHI Plasma TV, the new remote control is designed to control your cable box). The illumination will light for instructions on how to program the ... illumination will light a few seconds during this button to control your satellite receiver. After releasing the LIGHT button, the TV mode indicator will now control your set - The STB mode indicator will blink, indicating that the remote will appear to control and select AMP by pressing the...
...button of the Source Access on the remote. The Remote Control The Remote Control In addition to controlling all the functions on your HITACHI Plasma TV, the new remote control is designed to control your cable box). The illumination will light for instructions on how to program the ... illumination will light a few seconds during this button to control your satellite receiver. After releasing the LIGHT button, the TV mode indicator will now control your set - The STB mode indicator will blink, indicating that the remote will appear to control and select AMP by pressing the...
Owners Guide
Page 22
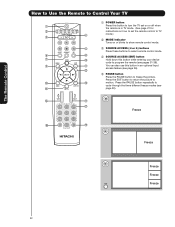
... Control How to Use the Remote to Control Your TV ቢ POWER button ቢ Press this button to turn the TV set on or off when the remote is in TV mode. (See page 21 for ባ instructions on how to set the remote control to TV ቤ ብ mode.) ባ MODE Indicator Turns on or...
... Control How to Use the Remote to Control Your TV ቢ POWER button ቢ Press this button to turn the TV set on or off when the remote is in TV mode. (See page 21 for ባ instructions on how to set the remote control to TV ቤ ብ mode.) ባ MODE Indicator Turns on or...
Owners Guide
Page 23
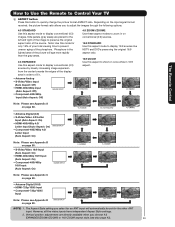
... ratio allows you choose 4:3 EXPANDED/ZOOM1/ZOOM2 or 16:9 ZOOM aspect style (see also page 42). 23 Depending on conventional (4:3) sources. 16:9 STANDARD Use this aspect mode to display 16:9 sources...once while in 16:9 aspect. IMAGE INPUT NOTE: 1. However, all five video inputs have independent Aspect Style settings. 2. Note: Use this button to quickly change the picture format ASPECT ratio. The Remote Control • Antenna... 80. How to Use the Remote to Control Your TV ቧ ASPECT button Press this mode for the other ANT input. Note: Please see Appendix D on page...
... ratio allows you choose 4:3 EXPANDED/ZOOM1/ZOOM2 or 16:9 ZOOM aspect style (see also page 42). 23 Depending on conventional (4:3) sources. 16:9 STANDARD Use this aspect mode to display 16:9 sources...once while in 16:9 aspect. IMAGE INPUT NOTE: 1. However, all five video inputs have independent Aspect Style settings. 2. Note: Use this button to quickly change the picture format ASPECT ratio. The Remote Control • Antenna... 80. How to Use the Remote to Control Your TV ቧ ASPECT button Press this mode for the other ANT input. Note: Please see Appendix D on page...
Owners Guide
Page 24
NOTE: For automatic DAY/NIGHT picture mode settings, see page 41 for a more brightness and contrast to the Photo Input in the side panel of the Plasma TV. Pressing the INPUTS button repeatedly will show momentarily after releasing INFO button. menu items. Then press the SELECT button to ...check the channel being used. INPUT 3 Select to choose INPUT 5. Select Night for night time viewing with less brightness and contrast for settings changes). INPUT 1 Select to choose Cable. CABLE Select to choose INPUT 1. The Sleep Timer info will also cycle through the Inputs ...
NOTE: For automatic DAY/NIGHT picture mode settings, see page 41 for a more brightness and contrast to the Photo Input in the side panel of the Plasma TV. Pressing the INPUTS button repeatedly will show momentarily after releasing INFO button. menu items. Then press the SELECT button to ...check the channel being used. INPUT 3 Select to choose INPUT 5. Select Night for night time viewing with less brightness and contrast for settings changes). INPUT 1 Select to choose Cable. CABLE Select to choose INPUT 1. The Sleep Timer info will also cycle through the Inputs ...

Owners Guide
Page 26
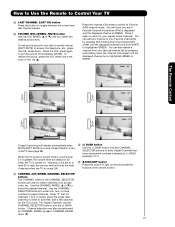
... were copied, edited or modified on a computer may not be placed on the TV set displays only digital pictures from 5, 10 and 30 seconds. Use the CURSOR PAD ̇ or ̈ to ...3072 x 2304; This TV set . 26 Supported image types are up to select Device Drive. DEVICE Select this menu item to... 5th to start a slideshow of the slideshow. The Remote Control How to Use the Remote to Control Your TV ROTATE Select this menu item to rotate selected photos either clockwise (CURSOR PAD ̈) and counterclockwise (CURSOR PAD ...
... were copied, edited or modified on a computer may not be placed on the TV set displays only digital pictures from 5, 10 and 30 seconds. Use the CURSOR PAD ̇ or ̈ to ...3072 x 2304; This TV set . 26 Supported image types are up to select Device Drive. DEVICE Select this menu item to... 5th to start a slideshow of the slideshow. The Remote Control How to Use the Remote to Control Your TV ROTATE Select this menu item to rotate selected photos either clockwise (CURSOR PAD ̈) and counterclockwise (CURSOR PAD ...
Owners Guide
Page 27
... button Press this button to light up (̆) or CHANNEL WHEEL down (̄). 27 Press it was set when the TV is set to AUTO (see page 68). However, if it is turned ON. ቴ (-) DASH button Use the... WHEEL up and illuminate the buttons of normal volume (SOFT MUTE) to highlighted GREEN. When the TV power is turned on and Closed Caption is GREEN. Press the channel (CH) wheel to switch ...Channel mode when (FAV) is displayed and the displayed channel is set to 30 when the TV is turned off completely (MUTE). Use the CHANNEL WHEEL (̆ or ̄) to Favorite (FAV)...
... button Press this button to light up (̆) or CHANNEL WHEEL down (̄). 27 Press it was set when the TV is set to AUTO (see page 68). However, if it is turned ON. ቴ (-) DASH button Use the... WHEEL up and illuminate the buttons of normal volume (SOFT MUTE) to highlighted GREEN. When the TV power is turned on and Closed Caption is GREEN. Press the channel (CH) wheel to switch ...Channel mode when (FAV) is displayed and the displayed channel is set to 30 when the TV is turned off completely (MUTE). Use the CHANNEL WHEEL (̆ or ̄) to Favorite (FAV)...


