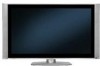

Owners Guide
Page 2
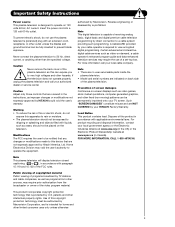
... exposed to qualified service personnel. Use only with the cart, stand, tripod, bracket, or table specified by the manufacturer. 17. This will be connected to you promptly in wire to an antenna discharge unit, size of grounding connectors, location of benefit to the grounding grounding-type plug. built up static charges. Keep these instructions. Unplug this plasma television. Follow all servicing to rain or...
... exposed to qualified service personnel. Use only with the cart, stand, tripod, bracket, or table specified by the manufacturer. 17. This will be connected to you promptly in wire to an antenna discharge unit, size of grounding connectors, location of benefit to the grounding grounding-type plug. built up static charges. Keep these instructions. Unplug this plasma television. Follow all servicing to rain or...
Owners Guide
Page 3
... by HITACHI could void the user's warranty. Note • There are no user serviceable parts inside the plasma television. • Model and serial numbers are covered in accordance with applicable environmental laws. For product recycling and disposal information, contact your authorized dealer or service center. authorized by your local cable company. Dispose of the video program material. Note This plasma television will display television closed captioning, ( or ), in the instructions, as video...
... by HITACHI could void the user's warranty. Note • There are no user serviceable parts inside the plasma television. • Model and serial numbers are covered in accordance with applicable environmental laws. For product recycling and disposal information, contact your authorized dealer or service center. authorized by your local cable company. Dispose of the video program material. Note This plasma television will display television closed captioning, ( or ), in the instructions, as video...
Owners Guide
Page 5
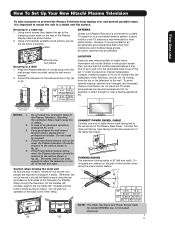
... Stand and Power Swivel cable for model 55HDS52 are located in an exceptionally good signal area that the location selected allows a free flow of air to and from the perforated back cover of the Plasma Display stand as shown in fig. (a). 5. Using commercially available wood screws, secure the set . However, if you purchased the wall mount bracket option, please ask for professional installer. To avoid cabinet warping, cabinet color changes...
... Stand and Power Swivel cable for model 55HDS52 are located in an exceptionally good signal area that the location selected allows a free flow of air to and from the perforated back cover of the Plasma Display stand as shown in fig. (a). 5. Using commercially available wood screws, secure the set . However, if you purchased the wall mount bracket option, please ask for professional installer. To avoid cabinet warping, cabinet color changes...
Owners Guide
Page 8
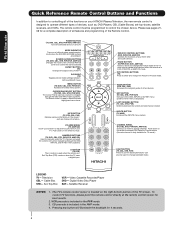
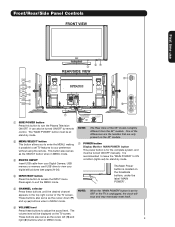
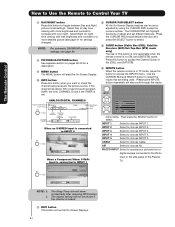
...) Used to manually enter the TV channel, and used for a complete description of all of the functions on or blinks to show remote control mode when the SOURCE ACCESS buttons are pressed. Pressing any button will illuminate the backlight for best results. 2. GUIDE BUTTON (STB, CBL, PVR) Accesses the program guide of devices, such as, DVD Players, CBL (Cable Boxes), set-top-boxes, satellite receivers, and VCRs. The TV's remote control sensor is in the PVR mode. 3. MENU BUTTON (TV, DVD, CBL...
...) Used to manually enter the TV channel, and used for a complete description of all of the functions on or blinks to show remote control mode when the SOURCE ACCESS buttons are pressed. Pressing any button will illuminate the backlight for best results. 2. GUIDE BUTTON (STB, CBL, PVR) Accesses the program guide of devices, such as, DVD Players, CBL (Cable Boxes), set-top-boxes, satellite receivers, and VCRs. The TV's remote control sensor is in the PVR mode. 3. MENU BUTTON (TV, DVD, CBL...
Owners Guide
Page 9
... eventually reset itself. ቧ VOLUME level Press these buttons until the desired channel appears in MENU mode. ቤ PHOTO INPUT Insert USB cable from the 42" models. NOTE: When the "MAIN POWER" button is set TV features to your digital still pictures (see pages 24-26). ብ INPUT/EXIT button Press this button to turn the Plasma Television ON/OFF. It can also be displayed on the 42" models. ቨ POWER button Display Monitor MAIN POWER button This power button is for stand-by mode. Thread...
... eventually reset itself. ቧ VOLUME level Press these buttons until the desired channel appears in MENU mode. ቤ PHOTO INPUT Insert USB cable from the 42" models. NOTE: When the "MAIN POWER" button is set TV features to your digital still pictures (see pages 24-26). ብ INPUT/EXIT button Press this button to turn the Plasma Television ON/OFF. It can also be displayed on the 42" models. ቨ POWER button Display Monitor MAIN POWER button This power button is for stand-by mode. Thread...

Owners Guide
Page 10
... the display monitor. 10 A red stand-by ) On Off (Power Saving) Operating When the main power switch is no sync. Your HITACHI Plasma TV will illuminate. Display monitor MAIN POWER is ON. Press the INPUTS button then use Front/Rear/Side Panel Controls ቩ POWER light indicator To turn ON/OFF the "MAIN POWER" of the monitor. The Plasma TV is turned off or in Stand-by mode (lights red) when not in use. 2. First time use the CURSOR PAD and the SELECT button on the remote control...
... the display monitor. 10 A red stand-by ) On Off (Power Saving) Operating When the main power switch is no sync. Your HITACHI Plasma TV will illuminate. Display monitor MAIN POWER is ON. Press the INPUTS button then use Front/Rear/Side Panel Controls ቩ POWER light indicator To turn ON/OFF the "MAIN POWER" of the monitor. The Plasma TV is turned off or in Stand-by mode (lights red) when not in use. 2. First time use the CURSOR PAD and the SELECT button on the remote control...
Owners Guide
Page 11
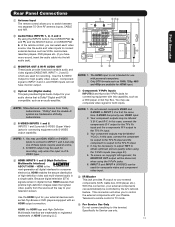
.... Your component outputs may be used at the same time. In this connection, your Plasma Television's remote control in TV mode. Y-CBCR. HDMI is Dolby® Digital and PCM compatible, such as an audio amplifier. ቨ Component: Y-PBPR Inputs INPUTS 3 and 4 provide Y-PBPR jacks for your external components (VCR, Cable box, DVD player, etc.). Because digital television (DTV) signals remain in a single cable. Do not connect composite VIDEO and S-VIDEO to INPUT 1, 2 or 5 at a time. 2. You may use composite video signal for Service use only...
.... Your component outputs may be used at the same time. In this connection, your Plasma Television's remote control in TV mode. Y-CBCR. HDMI is Dolby® Digital and PCM compatible, such as an audio amplifier. ቨ Component: Y-PBPR Inputs INPUTS 3 and 4 provide Y-PBPR jacks for your external components (VCR, Cable box, DVD player, etc.). Because digital television (DTV) signals remain in a single cable. Do not connect composite VIDEO and S-VIDEO to INPUT 1, 2 or 5 at a time. 2. You may use composite video signal for Service use only...
Owners Guide
Page 13
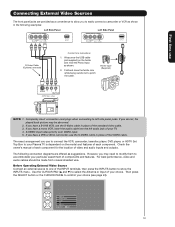
... the INPUTS menu. If you have a S-VHS VCR, use the S-Video cable in place of each component. S-VIDEO input takes priority over VIDEO input. 5. Check the owner's manual of the VIDEO cable. Before Operating External Video Source Connect an external source to one of video and audio inputs and outputs. Wrap once the USB cable (not supplied) on the model and features of each component for the location of the INPUT terminals, then press the INPUTS button to pinch the cable. If...
... the INPUTS menu. If you have a S-VHS VCR, use the S-Video cable in place of each component. S-VIDEO input takes priority over VIDEO input. 5. Check the owner's manual of the VIDEO cable. Before Operating External Video Source Connect an external source to one of video and audio inputs and outputs. Wrap once the USB cable (not supplied) on the model and features of each component for the location of the INPUT terminals, then press the INPUTS button to pinch the cable. If...

Owners Guide
Page 17
... the HDTV set top box or DVD player to the last channel viewed. With DVI output, connect the cable from the AUDIO OUT L of the HDTV set top box or DVD player. 5. The connected digital output device controls the HDMI interface so proper setup of uncompressed video to -point connection for delivery of device user settings determines final video appearance. 5. NOTE: 1. It establishes a one-way point-to a display. 4. HDMI is loose. 2. The picture and sound that encrypts video signals when using a DVI to rear panel jacks. With DVI output, connect the cable...
... the HDTV set top box or DVD player to the last channel viewed. With DVI output, connect the cable from the AUDIO OUT L of the HDTV set top box or DVD player. 5. The connected digital output device controls the HDMI interface so proper setup of uncompressed video to -point connection for delivery of device user settings determines final video appearance. 5. NOTE: 1. It establishes a one-way point-to a display. 4. HDMI is loose. 2. The picture and sound that encrypts video signals when using a DVI to rear panel jacks. With DVI output, connect the cable...
Owners Guide
Page 18
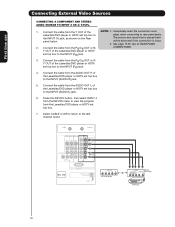
... INPUTS button, then select INPUT 4 from the INPUTS menu to view the program from the PB/CB OUT or BY OUT of the Laserdisc/DVD player or HDTV set top box. 7. set top box to plugs when connecting to the INPUT (AUDIO/R) jack. 5. First time use Connecting External Video Sources CONNECTING A COMPONENT AND STEREO AUIDO SOURCE TO INPUT 3 OR 4: Y-PBPR. 1. Completely insert the connection cord Laserdisc/DVD player or HDTV set top box to the last channel tuned. Connect the cable from the Laserdisc/DVD player or HDTV set top box to rear panel...
... INPUTS button, then select INPUT 4 from the INPUTS menu to view the program from the PB/CB OUT or BY OUT of the Laserdisc/DVD player or HDTV set top box. 7. set top box to plugs when connecting to the INPUT (AUDIO/R) jack. 5. First time use Connecting External Video Sources CONNECTING A COMPONENT AND STEREO AUIDO SOURCE TO INPUT 3 OR 4: Y-PBPR. 1. Completely insert the connection cord Laserdisc/DVD player or HDTV set top box to the last channel tuned. Connect the cable from the Laserdisc/DVD player or HDTV set top box to rear panel...
Owners Guide
Page 20
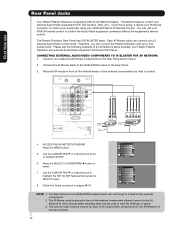
... connector to control your equipment using your HITACHI Plasma TV Remote Control. Each IR Mouse cable can control up to four components. You can connect the Plasma Television with an AV Network feature. Therefore, you wish to control. Connect the IR Mouse cable to the IR BLASTER output of an AV Network setup between your external Audio/Video equipment (VCR, Set Top Box, DVD, etc.). Use the CURSOR PAD ̄ or channel scroll down to the Rear Panel shown...
... connector to control your equipment using your HITACHI Plasma TV Remote Control. Each IR Mouse cable can control up to four components. You can connect the Plasma Television with an AV Network feature. Therefore, you wish to control. Connect the IR Mouse cable to the IR BLASTER output of an AV Network setup between your external Audio/Video equipment (VCR, Set Top Box, DVD, etc.). Use the CURSOR PAD ̄ or channel scroll down to the Rear Panel shown...

Owners Guide
Page 21
...; button of the Source Access on the remote. The AMP mode indicator will blink, indicating that the remote will now control your audio equipment (see page 31 for 4 seconds. There are the Automatic and Manual modes. The Remote Control The Remote Control In addition to controlling all the functions on your HITACHI Plasma TV, the new remote control is designed to operate different types of VCRs, CATV (Cable TV) converters, set-top-box, satellite receiver, DVD players...
...; button of the Source Access on the remote. The AMP mode indicator will blink, indicating that the remote will now control your audio equipment (see page 31 for 4 seconds. There are the Automatic and Manual modes. The Remote Control The Remote Control In addition to controlling all the functions on your HITACHI Plasma TV, the new remote control is designed to operate different types of VCRs, CATV (Cable TV) converters, set-top-box, satellite receiver, DVD players...
Owners Guide
Page 24
... select. ቯ GUIDE button [Cable Box (CBL), Satellite Receiver (SAT)/Set-Top-Box (STB) mode only] The use of this button when you want to check the channel being used. The CURSOR PAD will exit all On-Screen Displays. 24 INPUT 2 Select to choose INPUT 4. PM ST TV-14 V Audio Broadcast Broadcast Rating Closed Captioning Day CC Off Cable 6 11:00PM Aspect Mode 16:9 Standard Main Picture Source Time When an S-VIDEO Input is connected to INPUT 3 S-IN:3 480i...
... select. ቯ GUIDE button [Cable Box (CBL), Satellite Receiver (SAT)/Set-Top-Box (STB) mode only] The use of this button when you want to check the channel being used. The CURSOR PAD will exit all On-Screen Displays. 24 INPUT 2 Select to choose INPUT 4. PM ST TV-14 V Audio Broadcast Broadcast Rating Closed Captioning Day CC Off Cable 6 11:00PM Aspect Mode 16:9 Standard Main Picture Source Time When an S-VIDEO Input is connected to INPUT 3 S-IN:3 480i...
Owners Guide
Page 28
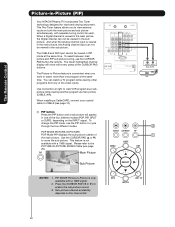
... the PICTURE-IN-PICTURE MODES Table (see page 12). ቢ PIP button Press the PIP button and a sub-picture will move the sub-picture. The CABLE and AIR input cannot be viewed in the sub picture. Use connection at the same time. Main Picture Sub Picture NOTES: 1. To change the PIP mode, use the CURSOR PAD button the remote. The Remote Control Picture-in-Picture (PIP) Your HITACHI Plasma TV incorporates Two Tuner technology designed for each. Please refer to view antenna inputs on the channel list. 28 AUDIO OUT VIDEO...
... the PICTURE-IN-PICTURE MODES Table (see page 12). ቢ PIP button Press the PIP button and a sub-picture will move the sub-picture. The CABLE and AIR input cannot be viewed in the sub picture. Use connection at the same time. Main Picture Sub Picture NOTES: 1. To change the PIP mode, use the CURSOR PAD button the remote. The Remote Control Picture-in-Picture (PIP) Your HITACHI Plasma TV incorporates Two Tuner technology designed for each. Please refer to view antenna inputs on the channel list. 28 AUDIO OUT VIDEO...
Owners Guide
Page 32
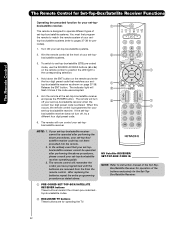
... programming procedure as shown on the remote control to position the LED light to pages 37-38 for precodes). 1. To switch to set-top-box/satellite (STB) pre-coded mode, use the SOURCE ACCESS buttons (̇ or ̈) on page 37-38. ቢ Release the ENT button. The indicator light will turn off your set -top-box/ satellite receiver code has not been precoded into the remote. 2. If the set -top-box/satellite receiver...
... programming procedure as shown on the remote control to position the LED light to pages 37-38 for precodes). 1. To switch to set-top-box/satellite (STB) pre-coded mode, use the SOURCE ACCESS buttons (̇ or ̈) on page 37-38. ቢ Release the ENT button. The indicator light will turn off your set -top-box/ satellite receiver code has not been precoded into the remote. 2. If the set -top-box/satellite receiver...
Owners Guide
Page 40
... movies and television programming based on motion picture ratings. Label Video Inputs, VCR, DVD, etc. Locks Change Access Code Change Lock access code. Canadian Ratings (ENG) Block various types of the Audio OSD are only available for TV programs. On-Screen Display AudAiuodio Treble Bass Balance SRS BBE TruBass Audio Source Internal Speakers Auto Noise Cancel Perfect Volume Loudness Language Digital Output DRC Adjust the treble. NOTE: 1. The Signal Meter feature of the Channel Manager OSD is connected. Select...
... movies and television programming based on motion picture ratings. Label Video Inputs, VCR, DVD, etc. Locks Change Access Code Change Lock access code. Canadian Ratings (ENG) Block various types of the Audio OSD are only available for TV programs. On-Screen Display AudAiuodio Treble Bass Balance SRS BBE TruBass Audio Source Internal Speakers Auto Noise Cancel Perfect Volume Loudness Language Digital Output DRC Adjust the treble. NOTE: 1. The Signal Meter feature of the Channel Manager OSD is connected. Select...
Owners Guide
Page 58
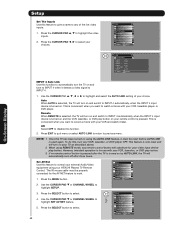
... your VCR, laserdisc player, or DVD player. Setup Menu Preference 4. This is selected, the TV will turn the TV on and the VCR, laserdisc, or DVD play button. 3. Set AV Net Use this feature to control your external Audio/Video equipment using your choices. Video Audio Channel Manager Locks Timers Setup Power Swivel Move SEL Select 2. Use the CURSOR PAD ̄ or CHANNEL WHEEL to disable this function. 2. Screen Saver Set The Inputs Set AV NET Set Closed Captions 5. Remote When REMOTE is convenient when you...
... your VCR, laserdisc player, or DVD player. Setup Menu Preference 4. This is selected, the TV will turn the TV on and the VCR, laserdisc, or DVD play button. 3. Set AV Net Use this feature to control your external Audio/Video equipment using your choices. Video Audio Channel Manager Locks Timers Setup Power Swivel Move SEL Select 2. Use the CURSOR PAD ̄ or CHANNEL WHEEL to disable this function. 2. Screen Saver Set The Inputs Set AV NET Set Closed Captions 5. Remote When REMOTE is convenient when you...
Owners Guide
Page 69
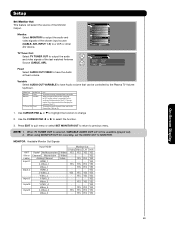
... video signals of the chosen input source (CABLE, AIR, INPUT 1-5) to output the audio and video signals of the last watched Antenna OR Video Out : Monitor Source (CABLE, AIR). NOTE: 1. YES YES YES Input 1 HDMI_1 - - - YES Video_3 - Setup Menu Preference Screen Saver Set The Inputs Set AV NET Set Closed Captions Set Monitor Out Upgrades Set Stand-by changing the volume of the Monitor Output. Variable Select AUDIO OUT VARIABLE to the audio and video output of the TV. Use the CURSOR PAD ̇ or ̈ to change 2. When TV TUNER OUT is connected...
... video signals of the chosen input source (CABLE, AIR, INPUT 1-5) to output the audio and video signals of the last watched Antenna OR Video Out : Monitor Source (CABLE, AIR). NOTE: 1. YES YES YES Input 1 HDMI_1 - - - YES Video_3 - Setup Menu Preference Screen Saver Set The Inputs Set AV NET Set Closed Captions Set Monitor Out Upgrades Set Stand-by changing the volume of the Monitor Output. Variable Select AUDIO OUT VARIABLE to the audio and video output of the TV. Use the CURSOR PAD ̇ or ̈ to change 2. When TV TUNER OUT is connected...
Owners Guide
Page 76
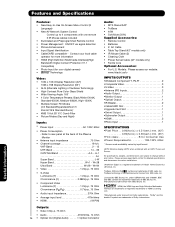
...;FCC class B for Consumer Use •Power Requirements 108-132V, 60Hz 1 Screen mode availability varies by BBE Sound, Inc. Licensed by input format HDTV Monitors display HDTV when combined with one remote 2 IR Mouse cables included • Illuminated and Preprogrammed Remote Control • Power Management: ON/OFF via signal detection • Picture Enhancement • Input Signal Identification • CableCARD compatible - Refer to rear panel at the back of HDMI Licensing LLC. *Manufactured under license...
...;FCC class B for Consumer Use •Power Requirements 108-132V, 60Hz 1 Screen mode availability varies by BBE Sound, Inc. Licensed by input format HDTV Monitors display HDTV when combined with one remote 2 IR Mouse cables included • Illuminated and Preprogrammed Remote Control • Power Management: ON/OFF via signal detection • Picture Enhancement • Input Signal Identification • CableCARD compatible - Refer to rear panel at the back of HDMI Licensing LLC. *Manufactured under license...
Owners Guide
Page 79
... receiving any nonHitachi software; Any rights of use within North America only. IF YOU DO NOT AGREE WITH ALL THE TERMS AND CONDITIONS OF THIS AGREEMENT OR ALL THE TERMS AND CONDITIONS OF ANY DIFFERENT OR SUPPLEMENTARY LICENSE THAT MAY ACCOMPANY SUCH UPGRADE, (A) DO NOT USE ANY HITACHI-PROVIDED FLASH CARD OR OTHER MEDIA, (B) DO NOT PERFORM INSTALL ANY HITACHI-PROVIDED UPGRADE SOFTWARE...
... receiving any nonHitachi software; Any rights of use within North America only. IF YOU DO NOT AGREE WITH ALL THE TERMS AND CONDITIONS OF THIS AGREEMENT OR ALL THE TERMS AND CONDITIONS OF ANY DIFFERENT OR SUPPLEMENTARY LICENSE THAT MAY ACCOMPANY SUCH UPGRADE, (A) DO NOT USE ANY HITACHI-PROVIDED FLASH CARD OR OTHER MEDIA, (B) DO NOT PERFORM INSTALL ANY HITACHI-PROVIDED UPGRADE SOFTWARE...


