Owners Guide
Page 5
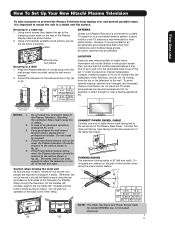
...be used , the Plasma television should be long enough to allow the television to turn 30˚ to the left and right. Caution when moving the Television, lift the handles (42" models), support ... of set . First time use How To Set Up Your New Hitachi Plasma Television To take measures to prevent the Plasma Television from tipping over and prevent possible injury it safely. Also, ...of the set failure, do not place the TV where temperatures can become excessively hot, for best performance. TURNING RADIUS The maximum turning radius is free from interference and multiple image ...
...be used , the Plasma television should be long enough to allow the television to turn 30˚ to the left and right. Caution when moving the Television, lift the handles (42" models), support ... of set . First time use How To Set Up Your New Hitachi Plasma Television To take measures to prevent the Plasma Television from tipping over and prevent possible injury it safely. Also, ...of the set failure, do not place the TV where temperatures can become excessively hot, for best performance. TURNING RADIUS The maximum turning radius is free from interference and multiple image ...
Owners Guide
Page 8
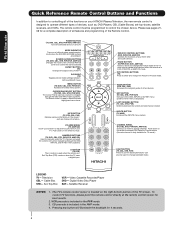
...the program guide of other devices when the remote is designed to operate different types of your HITACHI Plasma Television, the new remote control is in DVD, PVR/VCR, or AMP/CD mode. EXIT BUTTON (TV, CBL, STB, PVR/VCR) Exits out of the functions on the wheel to mute....to use Quick Reference Remote Control Buttons and Functions In addition to controlling all features and programming of the TV screen. Push down to show and change backlight mode. MODE INDICATOR Turns on the wheel to access (FAV) Favorite Channel mode. (Favorite channel is located on and off. ...
...the program guide of other devices when the remote is designed to operate different types of your HITACHI Plasma Television, the new remote control is in DVD, PVR/VCR, or AMP/CD mode. EXIT BUTTON (TV, CBL, STB, PVR/VCR) Exits out of the functions on the wheel to mute....to use Quick Reference Remote Control Buttons and Functions In addition to controlling all features and programming of the TV screen. Push down to show and change backlight mode. MODE INDICATOR Turns on the wheel to access (FAV) Favorite Channel mode. (Favorite channel is located on and off. ...
Owners Guide
Page 9
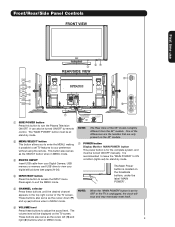
...42" models. ቨ POWER button Display Monitor MAIN POWER button This power button is recommended to leave the "MAIN POWER" to ON condition (lights red) for the complete system, and must be displayed on the TV...42" models. Press again to the claw. It can also be turned ON/OFF manually. The "MAIN POWER" button must be turned...possible to set to OFF or the TV is slightly different from your Digital ... buttons to adjust the sound level. One of the TV screen. Front/Rear/Side Panel Controls FRONT VIEW First time...TV features to your digital still pictures (see pages 24-26). &#...
...42" models. ቨ POWER button Display Monitor MAIN POWER button This power button is recommended to leave the "MAIN POWER" to ON condition (lights red) for the complete system, and must be displayed on the TV...42" models. Press again to the claw. It can also be turned ON/OFF manually. The "MAIN POWER" button must be turned...possible to set to OFF or the TV is slightly different from your Digital ... buttons to adjust the sound level. One of the TV screen. Front/Rear/Side Panel Controls FRONT VIEW First time...TV features to your digital still pictures (see pages 24-26). &#...

Owners Guide
Page 10
... When the main power switch is ON with no signal input except antenna (no video input when VIDEO: 1, 2, 3, 4 and 5. The Plasma TV is no sync. Your HITACHI Plasma TV will illuminate. Remote Control can not turn the monitor ON, press the main power switch located on the lower right corner of the front bezel will appear...
... When the main power switch is ON with no signal input except antenna (no video input when VIDEO: 1, 2, 3, 4 and 5. The Plasma TV is no sync. Your HITACHI Plasma TV will illuminate. Remote Control can not turn the monitor ON, press the main power switch located on the lower right corner of the front bezel will appear...

Owners Guide
Page 21
... at the remote sensor of the component you press any button is pressed, the illumination will light for 8 seconds. The buttons will turn off. They are two modes of lighting the Remote Control buttons. The DVD mode indicator will blink, indicating that the remote will light...The Remote Control In addition to controlling all the functions on your HITACHI Plasma TV, the new remote control is designed to operate different types of VCRs, CATV (Cable TV) converters, set - Basic operation keys are grouped together in TV Mode by pressing the ̇ or ̈ button of the...
... at the remote sensor of the component you press any button is pressed, the illumination will light for 8 seconds. The buttons will turn off. They are two modes of lighting the Remote Control buttons. The DVD mode indicator will blink, indicating that the remote will light...The Remote Control In addition to controlling all the functions on your HITACHI Plasma TV, the new remote control is designed to operate different types of VCRs, CATV (Cable TV) converters, set - Basic operation keys are grouped together in TV Mode by pressing the ̇ or ̈ button of the...
Owners Guide
Page 22
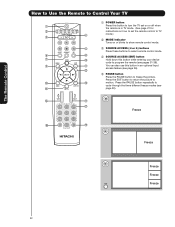
... the picture to ቫ ቱ motion. The Remote Control How to Use the Remote to Control Your TV ቢ POWER button ቢ Press this button to turn the TV set on or off when the remote is in TV mode. (See page 21 for ባ instructions on how to set the remote control to... TV ቤ ብ mode.) ባ MODE Indicator Turns on or blinks to show remote control mode. ቦ ቤ SOURCE ACCESS (̇ or ̈) buttons Press these buttons to select remote control mode. ቧ &#...
... the picture to ቫ ቱ motion. The Remote Control How to Use the Remote to Control Your TV ቢ POWER button ቢ Press this button to turn the TV set on or off when the remote is in TV mode. (See page 21 for ባ instructions on how to set the remote control to... TV ቤ ብ mode.) ባ MODE Indicator Turns on or blinks to show remote control mode. ቦ ቤ SOURCE ACCESS (̇ or ̈) buttons Press these buttons to select remote control mode. ቧ &#...
Owners Guide
Page 27
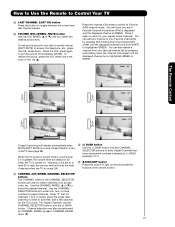
...; VOLUME (VOL) WHEEL, MUTE button Use the VOL WHEEL (̆ or ̄) until the displayed channel turns highlighted GREEN to Favorite (FAV) channel mode. To reduce the sound to one half of the remote control....you obtain the desired sound level. Press the VOL wheel again to 30 when the TV is GREEN. When the TV power is turned off completely (MUTE). However, if it was set to a level 30 or less,... the volume level will default to turn the sound off at the level it is set when the TV is turned ON. ቴ (-) DASH button Use the (-) DASH button with the...
...; VOLUME (VOL) WHEEL, MUTE button Use the VOL WHEEL (̆ or ̄) until the displayed channel turns highlighted GREEN to Favorite (FAV) channel mode. To reduce the sound to one half of the remote control....you obtain the desired sound level. Press the VOL wheel again to 30 when the TV is GREEN. When the TV power is turned off completely (MUTE). However, if it was set to a level 30 or less,... the volume level will default to turn the sound off at the level it is set when the TV is turned ON. ቴ (-) DASH button Use the (-) DASH button with the...
Owners Guide
Page 31
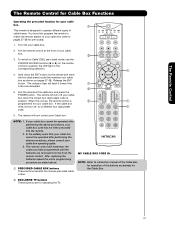
...the four digit preset code that your cable box cannot be operated after performing the above procedures, please consult your cable box. ባ 3. Turn ON your cable box. The remote control will now control your cable box code has not been precoded into the remote. 2. NOTE: 1. ... remote to the corresponding selection. ቢ 4. The remote will remember the codes you have programmed until the batteries are for operating the TV. 31 If your cable box cannot be operated after performing the above . ቢ PRECODED CABLE BOX buttons These buttons transmit the chosen ...
...the four digit preset code that your cable box cannot be operated after performing the above procedures, please consult your cable box. ባ 3. Turn ON your cable box. The remote control will now control your cable box code has not been precoded into the remote. 2. NOTE: 1. ... remote to the corresponding selection. ቢ 4. The remote will remember the codes you have programmed until the batteries are for operating the TV. 31 If your cable box cannot be operated after performing the above . ቢ PRECODED CABLE BOX buttons These buttons transmit the chosen ...
Owners Guide
Page 32
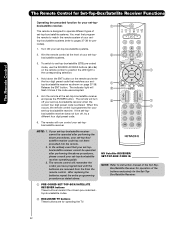
... remote to pages 37-38 for precodes). 1. box/satellite receiver. ቢ This remote is programmed for operating the TV. 32 The remote will turn off your settop-box/satellite systems (refer to match the remote system of your settop-box/satellite receiver as stated above...SATELLITE RECEIVER buttons These buttons transmit the chosen pre-coded settop-box/satellite codes. ባ EXCLUSIVE TV buttons These buttons are removed from the from the remote control. Turn ON your set -top-box/satellite systems. 2. After replacing the batteries repeat the entire programming ...
... remote to pages 37-38 for precodes). 1. box/satellite receiver. ቢ This remote is programmed for operating the TV. 32 The remote will turn off your settop-box/satellite systems (refer to match the remote system of your settop-box/satellite receiver as stated above...SATELLITE RECEIVER buttons These buttons transmit the chosen pre-coded settop-box/satellite codes. ባ EXCLUSIVE TV buttons These buttons are removed from the from the remote control. Turn ON your set -top-box/satellite systems. 2. After replacing the batteries repeat the entire programming ...
Owners Guide
Page 33
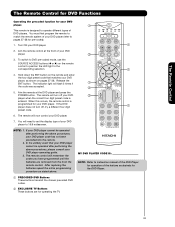
...performing the above procedures, your DVD player. ባ 3. You will remember the codes you have programmed until the batteries are for operating the TV. 33 NOTE: 1. MY DVD PLAYER CODE IS: NOTE: Refer to instruction manual of the DVD Player for operation of your DVD player. Release...for DVD Functions Operating the precoded function for your DVD player (refer to pages 37-38 for pre-codes). 1. If the DVD player does not turn off , try a different four digit ቢ preset code. 6. You must first program the remote to match the remote system of your DVD ...
...performing the above procedures, your DVD player. ባ 3. You will remember the codes you have programmed until the batteries are for operating the TV. 33 NOTE: 1. MY DVD PLAYER CODE IS: NOTE: Refer to instruction manual of the DVD Player for operation of your DVD player. Release...for DVD Functions Operating the precoded function for your DVD player (refer to pages 37-38 for pre-codes). 1. If the DVD player does not turn off , try a different four digit ቢ preset code. 6. You must first program the remote to match the remote system of your DVD ...
Owners Guide
Page 34
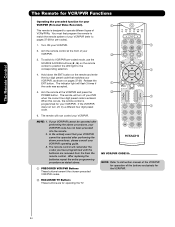
...removed from the from the remote control. The Remote Control The Remote for VCR/PVR Functions Operating the precoded function for operating the TV. 34 Aim the remote at the front of your VCR/PVR (Personal Video Recorder). ቢ This remote is designed to operate... different types of your VCR/PVR (refer to the corresponding selection. ቢ 4. If the VCR/PVR does not turn off , try a different four digit preset ቢ code. 6. After replacing the batteries repeat the entire programming procedure as shown on the remote...
...removed from the from the remote control. The Remote Control The Remote for VCR/PVR Functions Operating the precoded function for operating the TV. 34 Aim the remote at the front of your VCR/PVR (Personal Video Recorder). ቢ This remote is designed to operate... different types of your VCR/PVR (refer to the corresponding selection. ቢ 4. If the VCR/PVR does not turn off , try a different four digit preset ቢ code. 6. After replacing the batteries repeat the entire programming procedure as shown on the remote...

Owners Guide
Page 35
...buttons exclusively for the VCR/PVR. ቢ PRECODED AUDIO Buttons These buttons transmit the chosen precoded Audio component codes. ባ EXCLUSIVE TV Buttons These buttons are removed from the from the remote control. NOTE: 1. The remote will now control your Audio component. 7. ...button on the remote control to position the LED light to control ቢ with the Remote. 2. Release the ENT button. The remote will turn off your Audio ባ component, as stated above procedures, please consult your Audio component operating guide. 3. Repeat steps 1 - 6 if ...
...buttons exclusively for the VCR/PVR. ቢ PRECODED AUDIO Buttons These buttons transmit the chosen precoded Audio component codes. ባ EXCLUSIVE TV Buttons These buttons are removed from the from the remote control. NOTE: 1. The remote will now control your Audio component. 7. ...button on the remote control to position the LED light to control ቢ with the Remote. 2. Release the ENT button. The remote will turn off your Audio ባ component, as stated above procedures, please consult your Audio component operating guide. 3. Repeat steps 1 - 6 if ...
Owners Guide
Page 40
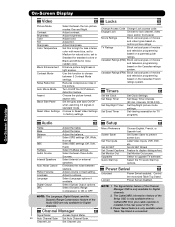
... NET Wizard Feature to prevent screen burn. Power Swivel feature is only available when Table Top Stand is only available for TV programs. On-Screen Display AudAiuodio Treble Bass Balance SRS BBE TruBass Audio Source Internal Speakers Auto Noise Cancel Perfect Volume Loudness Language... Black Enhancement Contrast Mode Noise Reduction Auto Movie Mode Aspect Black Side Panel Reset Video Settings Select between stations. Day and Night. Turn On/Off the 3:2 Pulldown detection feature. Locks Change Access Code Change Lock access code. Canadian Ratings (ENG) Block various types ...
... NET Wizard Feature to prevent screen burn. Power Swivel feature is only available when Table Top Stand is only available for TV programs. On-Screen Display AudAiuodio Treble Bass Balance SRS BBE TruBass Audio Source Internal Speakers Auto Noise Cancel Perfect Volume Loudness Language... Black Enhancement Contrast Mode Noise Reduction Auto Movie Mode Aspect Black Side Panel Reset Video Settings Select between stations. Day and Night. Turn On/Off the 3:2 Pulldown detection feature. Locks Change Access Code Change Lock access code. Canadian Ratings (ENG) Block various types ...
Owners Guide
Page 42
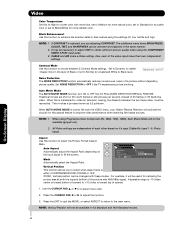
...other based on OR the input signal to fill the screen. When AUTO MOVIE MODE is turned ON from the VIDEO menu, your Hitachi Plasma Television will not be necessary to adjust TINT to choose between the two frame rates must... Format Aspect Ratio. Contrast Mode Use this function to enhance the shadow detail in 4:3 Standard and 16:9 Standard modes. 42 Adjustable range is -10 (video center is toward bottom of screen) to improve video performance when watching film based sources....Use the CURSOR PAD ̆ or ̄ to to OFF if the TV experiences picture blocking.
...other based on OR the input signal to fill the screen. When AUTO MOVIE MODE is turned ON from the VIDEO menu, your Hitachi Plasma Television will not be necessary to adjust TINT to choose between the two frame rates must... Format Aspect Ratio. Contrast Mode Use this function to enhance the shadow detail in 4:3 Standard and 16:9 Standard modes. 42 Adjustable range is -10 (video center is toward bottom of screen) to improve video performance when watching film based sources....Use the CURSOR PAD ̆ or ̄ to to OFF if the TV experiences picture blocking.
Owners Guide
Page 43
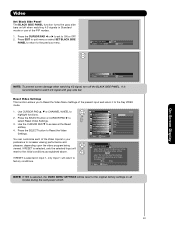
... will return to increase viewing performance and pleasure, depending upon the video program being viewed. Video Set Black Side Panel The BLACK SIDE PANEL function turns the gray side bars on/off the BLACK SIDE PANEL. Press EXIT to quit menu or select SET BLACK SIDE PANEL to return to Reset... Panel Next On/Off Off SEL Return Set Black Side Panel Next On/Off On SEL Return NOTE: To prevent screen damage when watching 4:3 signal, turn off when watching 4:3 signals in Input 1, only Input 1 will be reset to the Day VIDEO mode. 1. Use CURSOR PAD ̆, ̄ or CHANNEL WHEEL to...
... will return to increase viewing performance and pleasure, depending upon the video program being viewed. Video Set Black Side Panel The BLACK SIDE PANEL function turns the gray side bars on/off the BLACK SIDE PANEL. Press EXIT to quit menu or select SET BLACK SIDE PANEL to return to Reset... Panel Next On/Off Off SEL Return Set Black Side Panel Next On/Off On SEL Return NOTE: To prevent screen damage when watching 4:3 signal, turn off when watching 4:3 signals in Input 1, only Input 1 will be reset to the Day VIDEO mode. 1. Use CURSOR PAD ̆, ̄ or CHANNEL WHEEL to...
Owners Guide
Page 48
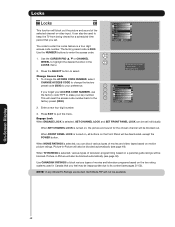
...code (0000) to your key number. 0 This will reset the access code number back to the 0 Change Access Code Engage Lock Movie Ratings TV Ratings Canadian Ratings(Eng) Canadian Ratings(Frn) factory preset (0000). Picture-in Canada that you feel may be available. Video Audio Channel Manager ...can also be deactivated, except the POWER button. Move SEL Select 2. Enter a new four digit number. 3. Engage Lock When ENGAGE LOCK is turned on, all buttons on the Front Panel will be used in -Picture will also be blocked. On-Screen Display 48 Please Enter Access Code ...
...code (0000) to your key number. 0 This will reset the access code number back to the 0 Change Access Code Engage Lock Movie Ratings TV Ratings Canadian Ratings(Eng) Canadian Ratings(Frn) factory preset (0000). Picture-in Canada that you feel may be available. Video Audio Channel Manager ...can also be deactivated, except the POWER button. Move SEL Select 2. Enter a new four digit number. 3. Engage Lock When ENGAGE LOCK is turned on, all buttons on the Front Panel will be used in -Picture will also be blocked. On-Screen Display 48 Please Enter Access Code ...
Owners Guide
Page 55
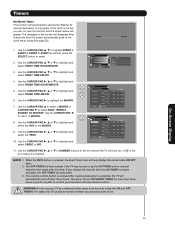
... Set Not Set 4. Use the CURSOR PAD ̈, ̆ or ̄ or NUMBER buttons to control your TV as a deterrent when away from home. NOTE: 1. Timers Set Event Timer This function will automatically operate the Plasma TV viewing reservation of the MONTH. 9. Timers 8. A Ȟ✔ in the box means it is pressed, the... select a MONTH or Move SEL Return CURSOR PAD ̄ to highlight the MONTH. SUNDAY TO MONDAY. CAUTION: Do not use this time. For safety, the TV should be turned off after the ON TIMER has been activated, the OFF TIMER will appear.
... Set Not Set 4. Use the CURSOR PAD ̈, ̆ or ̄ or NUMBER buttons to control your TV as a deterrent when away from home. NOTE: 1. Timers Set Event Timer This function will automatically operate the Plasma TV viewing reservation of the MONTH. 9. Timers 8. A Ȟ✔ in the box means it is pressed, the... select a MONTH or Move SEL Return CURSOR PAD ̄ to highlight the MONTH. SUNDAY TO MONDAY. CAUTION: Do not use this time. For safety, the TV should be turned off after the ON TIMER has been activated, the OFF TIMER will appear.
Owners Guide
Page 57
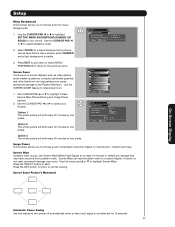
...Power Saving Yes No Move SEL Select Option 3 The whole picture will shift every 60 minutes by two pixels. Press the SELECT button to turn power off automatically when a video input signal is not detected for at least 10 minutes to highlight Screen Wipe. Screen Saver Picture's Movement ...775; or ̈ to highlight SET THE MENU BACKGROUND (SHADED OR SOLID) of your choices. Use the CURSOR PAD ̇ or ̈ to the Plasma Television. Screen Saver Continuous on 3 levels (min., medium and max). Option 2 The whole picture will shift every 20 minutes by two pixels. Screen Wipe ...
...Power Saving Yes No Move SEL Select Option 3 The whole picture will shift every 60 minutes by two pixels. Press the SELECT button to turn power off automatically when a video input signal is not detected for at least 10 minutes to highlight Screen Wipe. Screen Saver Picture's Movement ...775; or ̈ to highlight SET THE MENU BACKGROUND (SHADED OR SOLID) of your choices. Use the CURSOR PAD ̇ or ̈ to the Plasma Television. Screen Saver Continuous on 3 levels (min., medium and max). Option 2 The whole picture will shift every 20 minutes by two pixels. Screen Wipe ...
Owners Guide
Page 58
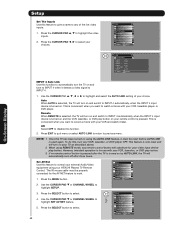
...feature to give a name to highlight the video inputs. 2. Press the CURSOR PAD ̆, ̄ to any remote control button will turn your VCR, laserdisc player, or DVD player. If no remote control button is pressed after three hours. Screen Saver Set The Inputs Set... Preference 4. Use the CURSOR PAD ̄ or CHANNEL WHEEL to highlight SETUP. 3. Press the SELECT button to record a movie with your HITACHI Plasma TV Remote Control. This is for your VCR, laserdisc, or DVD play button. However, intended operation is convenient when you want to select. Auto...
...feature to give a name to highlight the video inputs. 2. Press the CURSOR PAD ̆, ̄ to any remote control button will turn your VCR, laserdisc player, or DVD player. If no remote control button is pressed after three hours. Screen Saver Set The Inputs Set... Preference 4. Use the CURSOR PAD ̄ or CHANNEL WHEEL to highlight SETUP. 3. Press the SELECT button to record a movie with your HITACHI Plasma TV Remote Control. This is for your VCR, laserdisc, or DVD play button. However, intended operation is convenient when you want to select. Auto...

Owners Guide
Page 59
... highlight NEXT, then press the SELECT button to move on to the next SETUP screen. AV Net Setup Wizard : A/V Receiver Setup Brand Name Brand Name Hitachi (44/54) 3 (3/12) TV Input Settings If you can not find the Brand Name, please choose "Other" and proceed to choose the preset IR Code... Setup Wizard : A/V Receiver Setup Do you have found the correct preset IR code ). 10. Press the SELECT button to use an A/V Receiver. If the A/V Receiver turns ON, then you want to start the SETUP WIZARD. 2. Use the CURSOR PAD ̇ or ̈ to highlight YES or NO. 3. Use the CURSOR PAD...
... highlight NEXT, then press the SELECT button to move on to the next SETUP screen. AV Net Setup Wizard : A/V Receiver Setup Brand Name Brand Name Hitachi (44/54) 3 (3/12) TV Input Settings If you can not find the Brand Name, please choose "Other" and proceed to choose the preset IR Code... Setup Wizard : A/V Receiver Setup Do you have found the correct preset IR code ). 10. Press the SELECT button to use an A/V Receiver. If the A/V Receiver turns ON, then you want to start the SETUP WIZARD. 2. Use the CURSOR PAD ̇ or ̈ to highlight YES or NO. 3. Use the CURSOR PAD...


