Owners Guide
Page 20
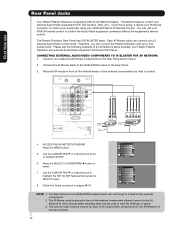
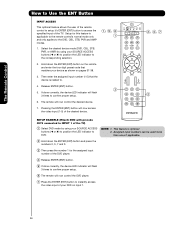
...Saver Set The Inputs Set AV NET Set Closed Captions Set Monitor Out Upgrades Quick Start Up Move SEL Return NOTE: 1. The correct codes must be chosen for the AV Network to highlight the SET AV NET features then press the SELECT button. 8. Connect the IR ...BLASTER output of the external components infrared sensor for each of the external components you can use Rear Panel Jacks Your Hitachi Plasma Television is setup, it allows your IR Mouse connector to control your equipment using your HITACHI Plasma TV Remote Control. Once this is equipped with up to four components.
...Saver Set The Inputs Set AV NET Set Closed Captions Set Monitor Out Upgrades Quick Start Up Move SEL Return NOTE: 1. The correct codes must be chosen for the AV Network to highlight the SET AV NET features then press the SELECT button. 8. Connect the IR ...BLASTER output of the external components infrared sensor for each of the external components you can use Rear Panel Jacks Your Hitachi Plasma Television is setup, it allows your IR Mouse connector to control your equipment using your HITACHI Plasma TV Remote Control. Once this is equipped with up to four components.
Owners Guide
Page 22
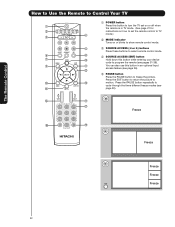
...to turn the TV set on or off when the remote is in TV mode. (See page 21 for ባ instructions on how to set the remote control to TV ቤ ብ mode.) ባ MODE Indicator Turns on or blinks to show remote control mode.... ቦ ቤ SOURCE ACCESS (̇ or ̈) buttons Press these buttons to select remote control mode. ቧ ቩ ብ SOURCE ACCESS (ENT) button ቨ ቯ Hold down this button while entering your device code to program the remote...
...to turn the TV set on or off when the remote is in TV mode. (See page 21 for ባ instructions on how to set the remote control to TV ቤ ብ mode.) ባ MODE Indicator Turns on or blinks to show remote control mode.... ቦ ቤ SOURCE ACCESS (̇ or ̈) buttons Press these buttons to select remote control mode. ቧ ቩ ብ SOURCE ACCESS (ENT) button ቨ ቯ Hold down this button while entering your device code to program the remote...
Owners Guide
Page 27
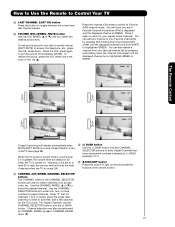
...For Digital Channels, use The Remote Control How to Use the Remote to Control Your TV ቱ LAST CHANNEL (LAST CH) button Press this button to 30 when the TV is turned on and Closed... Caption is set to a level 30 or less, the volume level will be performed by CHANNEL WHEEL up and illuminate the buttons of normal volume (SOFT MUTE) to select channels, lock access code... 27 Press it is set to WHITE. To reduce the sound to one half of the remote control. ታ CHANNEL (CH) WHEEL/CHANNEL SELECTOR buttons The CHANNEL wheel or the CHANNEL ...
...For Digital Channels, use The Remote Control How to Use the Remote to Control Your TV ቱ LAST CHANNEL (LAST CH) button Press this button to 30 when the TV is turned on and Closed... Caption is set to a level 30 or less, the volume level will be performed by CHANNEL WHEEL up and illuminate the buttons of normal volume (SOFT MUTE) to select channels, lock access code... 27 Press it is set to WHITE. To reduce the sound to one half of the remote control. ታ CHANNEL (CH) WHEEL/CHANNEL SELECTOR buttons The CHANNEL wheel or the CHANNEL ...
Owners Guide
Page 31
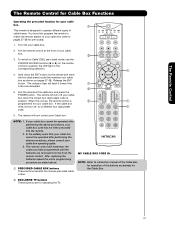
... to pages 37-38 for operating the TV. 31 The indicator light will turn off your cable box when the correct four digit preset code is ባ ቢ programmed for your cable box. ቢ This remote is designed to match the remote system of the buttons exclusively for the ...Cable Box. ባ EXCLUSIVE TV buttons These buttons are removed from the from the...
... to pages 37-38 for operating the TV. 31 The indicator light will turn off your cable box when the correct four digit preset code is ባ ቢ programmed for your cable box. ቢ This remote is designed to match the remote system of the buttons exclusively for the ...Cable Box. ባ EXCLUSIVE TV buttons These buttons are removed from the from the...
Owners Guide
Page 32
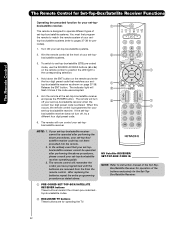
... the Set-TopBox/Satellite Receiver. ቢ PRE-CODED SET-TOP-BOX/SATELLITE RECEIVER buttons These buttons transmit the chosen pre-coded settop-box/satellite codes. ባ EXCLUSIVE TV buttons These buttons are removed from the from the remote control. Aim the remote at the front of your set-top-box/satellite... types of set-top-box/satellite systems. You must first program the remote to pages 37-38 for operating the TV. 32 Hold down the ENT button on the remote and enter the four digit preset code that your set-topbox/satellite receiver cannot be operated after performing the above...
... the Set-TopBox/Satellite Receiver. ቢ PRE-CODED SET-TOP-BOX/SATELLITE RECEIVER buttons These buttons transmit the chosen pre-coded settop-box/satellite codes. ባ EXCLUSIVE TV buttons These buttons are removed from the from the remote control. Aim the remote at the front of your set-top-box/satellite... types of set-top-box/satellite systems. You must first program the remote to pages 37-38 for operating the TV. 32 Hold down the ENT button on the remote and enter the four digit preset code that your set-topbox/satellite receiver cannot be operated after performing the above...
Owners Guide
Page 33
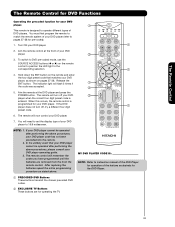
... for the DVD Player. ቢ PRECODED DVD Buttons These buttons transmit the chosen precoded DVD codes. ባ EXCLUSIVE TV Buttons These buttons are removed from the from the remote control. You must first program the remote to match the remote system of your DVD player. ባ 3. The indicator light will now control your DVD player...
... for the DVD Player. ቢ PRECODED DVD Buttons These buttons transmit the chosen precoded DVD codes. ባ EXCLUSIVE TV Buttons These buttons are removed from the from the remote control. You must first program the remote to match the remote system of your DVD player. ባ 3. The indicator light will now control your DVD player...
Owners Guide
Page 34
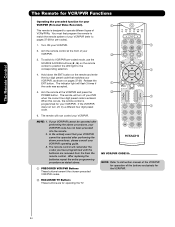
... on pages 37-38. You must first program the remote to match the remote system of your VCR/PVR (refer to pages 37-38 for pre-codes). 1. The indicator light will remember the codes you have programmed until the batteries are for operating the TV. 34 If your VCR/PVR cannot be operated after... performing the above . ቢ PRECODED VCR/PVR Buttons These buttons transmit the chosen precoded VCR/PVR codes. Hold down the ENT button on the remote control to position the LED light to VCR/...
... on pages 37-38. You must first program the remote to match the remote system of your VCR/PVR (refer to pages 37-38 for pre-codes). 1. The indicator light will remember the codes you have programmed until the batteries are for operating the TV. 34 If your VCR/PVR cannot be operated after... performing the above . ቢ PRECODED VCR/PVR Buttons These buttons transmit the chosen precoded VCR/PVR codes. Hold down the ENT button on the remote control to position the LED light to VCR/...

Owners Guide
Page 35
...ቢ PRECODED AUDIO Buttons These buttons transmit the chosen precoded Audio component codes. ባ EXCLUSIVE TV Buttons These buttons are removed from the from the remote control. The remote will flash 3 times if the code was accepted. 5. The indicator light will now control your Audio component. ...above procedures, your Audio component code has not been precoded into the remote. 2. Aim the remote control at the Audio component and press ቢ the POWER button. Repeat steps 1 - 6 if you have programmed until the batteries are for operating the TV. 35 Release the ENT ...
...ቢ PRECODED AUDIO Buttons These buttons transmit the chosen precoded Audio component codes. ባ EXCLUSIVE TV Buttons These buttons are removed from the from the remote control. The remote will flash 3 times if the code was accepted. 5. The indicator light will now control your Audio component. ...above procedures, your Audio component code has not been precoded into the remote. 2. Aim the remote control at the Audio component and press ቢ the POWER button. Repeat steps 1 - 6 if you have programmed until the batteries are for operating the TV. 35 Release the ENT ...
Owners Guide
Page 36
... position the LED indicator to . 4. If done correctly, the device LED indicator will now control the desired device. 7. The remote will flash 3 times to DVD. SETUP EXAMPLE (Hitachi DVD with precode 0573 connected to INPUT 1 of your SOURCE ACCESS buttons (̇ or ̈) to position the LED indicator.... ᕉ Press the ENTER (ENT) button to instantly access the video input of the TV) ᕃ Select DVD mode by using your DVD on the remote and enter the four digit preset code that the device is optional 2. Assigned input numbers can be used more than once if applicable...
... position the LED indicator to . 4. If done correctly, the device LED indicator will now control the desired device. 7. The remote will flash 3 times to DVD. SETUP EXAMPLE (Hitachi DVD with precode 0573 connected to INPUT 1 of your SOURCE ACCESS buttons (̇ or ̈) to position the LED indicator.... ᕉ Press the ENTER (ENT) button to instantly access the video input of the TV) ᕃ Select DVD mode by using your DVD on the remote and enter the four digit preset code that the device is optional 2. Assigned input numbers can be used more than once if applicable...
Owners Guide
Page 37
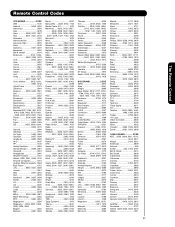
Remote Control Codes The Remote Control VCR BRAND CODE ABS 1972 Admiral 0048, 0209 Adventura 0000 Aiko ... 0047 HP 1972 Harley Davidson 0000 Harman/Kardon ......0038, 0081 Harwood 0072 Headquarter 0046 Hewlett Packard 1972 Hitachi 0000, 0041, 0042, 0105 Howard Computers............1972 Hughes Network Systems 0042 iBuy Power 1972 JVC 0067, 0041...Go Video ......0744, 0715, 0783 0833, 0869, 1075 Gradiente 0651 Greenhill 0717 Grundig 0705 Harman/Kardon 0702 Hitachi ..........0573, 0664, 0695 Hiteker 0672 IRT 0783 Initial 0717 Integra 0627 Hiteker 0672 JBL 0702 JVC......0623, ...
Remote Control Codes The Remote Control VCR BRAND CODE ABS 1972 Admiral 0048, 0209 Adventura 0000 Aiko ... 0047 HP 1972 Harley Davidson 0000 Harman/Kardon ......0038, 0081 Harwood 0072 Headquarter 0046 Hewlett Packard 1972 Hitachi 0000, 0041, 0042, 0105 Howard Computers............1972 Hughes Network Systems 0042 iBuy Power 1972 JVC 0067, 0041...Go Video ......0744, 0715, 0783 0833, 0869, 1075 Gradiente 0651 Greenhill 0717 Grundig 0705 Harman/Kardon 0702 Hitachi ..........0573, 0664, 0695 Hiteker 0672 IRT 0783 Initial 0717 Integra 0627 Hiteker 0672 JBL 0702 JVC......0623, ...
Owners Guide
Page 38
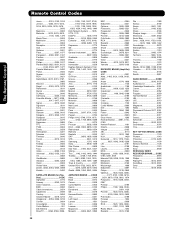
Remote Control Codes The Remote Control Jasco 0015, 0153, 0315 Jerrold ......... 0003, 0011, 0012, 0014, 0015, 0024, ... 0269, 0280, 1170 Expressvu 0775 GE 0566 GOI 0775 General Instrument ..........0869 0547, 0554 Gradiente 0856 HTS 0775 Hitachi 0819 homecable 0238 Hughes Network Systems 1142, ..0749, 1749, 1442, 1443, 1444 Hytek 0095 IQ 0210 IQ Prism...Denon 0004, 1360 Fisher 0042 Garrard 0463 Glory Horse 1263 Harman/Kardon ......0891, 0110, 0189 Hewlett Packard 1181 Hitachi 0228 Integra 0135 JBL 0110 JVC 0074, 1263 KLH 1428 Kenwood ......1313, 1570, 1569 0027, 0042, 0186...
Remote Control Codes The Remote Control Jasco 0015, 0153, 0315 Jerrold ......... 0003, 0011, 0012, 0014, 0015, 0024, ... 0269, 0280, 1170 Expressvu 0775 GE 0566 GOI 0775 General Instrument ..........0869 0547, 0554 Gradiente 0856 HTS 0775 Hitachi 0819 homecable 0238 Hughes Network Systems 1142, ..0749, 1749, 1442, 1443, 1444 Hytek 0095 IQ 0210 IQ Prism...Denon 0004, 1360 Fisher 0042 Garrard 0463 Glory Horse 1263 Harman/Kardon ......0891, 0110, 0189 Hewlett Packard 1181 Hitachi 0228 Integra 0135 JBL 0110 JVC 0074, 1263 KLH 1428 Kenwood ......1313, 1570, 1569 0027, 0042, 0186...
Owners Guide
Page 62
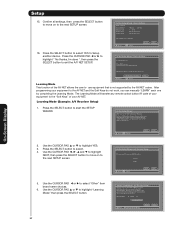
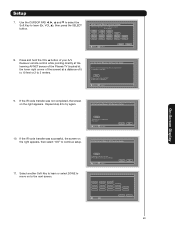
... that all settings, then press the SELECT button to move on to your AV NET. Setup 15. The Learning Mode will transfer any remote control button IR code of your AV network. Learning Mode (Example: A/V Receiver Setup) 1. AV Net Setup Wizard : A/V Receiver Setup Do you can manually... press the SELECT button to move on to select. 4. AV Net Setup Wizard : Device Settings DVD Settings Brand Name IR Code Set Video Input Audio Input Hitachi (31/77) 1 (1/5) Not Connected Not Connected All settings are placed in front of your equipment to Setup another device? ...
... that all settings, then press the SELECT button to move on to your AV NET. Setup 15. The Learning Mode will transfer any remote control button IR code of your AV network. Learning Mode (Example: A/V Receiver Setup) 1. AV Net Setup Wizard : A/V Receiver Setup Do you can manually... press the SELECT button to move on to select. 4. AV Net Setup Wizard : Device Settings DVD Settings Brand Name IR Code Set Video Input Audio Input Hitachi (31/77) 1 (1/5) Not Connected Not Connected All settings are placed in front of your equipment to Setup another device? ...
Owners Guide
Page 63
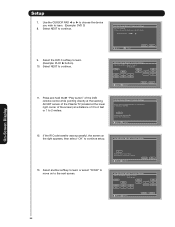
...the A/V Receiver softkey to learn ? VOL̆ Please wait while AV NET Learns the command.... Select another Soft Key to continue setup. If the IR code transfer was successful, the screen on the right appears, then select "OK" to learn ? AV Net Setup Wizard : A/V Receiver Setup 11. VOL &#... Setup 7. AV Net Setup Wizard : A/V Receiver Setup Press and hold the VOL ̆ button of your A/V Receiver remote control while pointing directly at the learning AV NET sensor of the Plasma TV (located at the lower right corner of the screen) at a distance of 5 to 10 feet or 2 to the next...
...the A/V Receiver softkey to learn ? VOL̆ Please wait while AV NET Learns the command.... Select another Soft Key to continue setup. If the IR code transfer was successful, the screen on the right appears, then select "OK" to learn ? AV Net Setup Wizard : A/V Receiver Setup 11. VOL &#... Setup 7. AV Net Setup Wizard : A/V Receiver Setup Press and hold the VOL ̆ button of your A/V Receiver remote control while pointing directly at the learning AV NET sensor of the Plasma TV (located at the lower right corner of the screen) at a distance of 5 to 10 feet or 2 to the next...
Owners Guide
Page 66
...Display 66 AV Net Setup Wizard : Custom Settings Press and hold the ̈ "Play button" of the DVD remote control while pointing directly at the learning AV NET sensor of the Plasma TV (located at the lower right corner of the screen) at a distance of 3 to 6 feet or 1 to.... Move SEL Select Back Next AV Net Setup Wizard : Custom Settings Select the DVD3 softkey to learn . (Example: DVD 3) 8. If the IR Code transfer was successful, the screen on to learn ? Select another softkey to the next screen. ̈ Transfer was successful. Setup 7. Select NEXT to ...
...Display 66 AV Net Setup Wizard : Custom Settings Press and hold the ̈ "Play button" of the DVD remote control while pointing directly at the learning AV NET sensor of the Plasma TV (located at the lower right corner of the screen) at a distance of 3 to 6 feet or 1 to.... Move SEL Select Back Next AV Net Setup Wizard : Custom Settings Select the DVD3 softkey to learn . (Example: DVD 3) 8. If the IR Code transfer was successful, the screen on to learn ? Select another softkey to the next screen. ̈ Transfer was successful. Setup 7. Select NEXT to ...
Owners Guide
Page 82
...47 Auto Channel Scan 46 Clock 53 Closed Captions Captions 68 Color Temperature 42 Color 41 Contrast 41 Contrast Mode 42 E Event Timer 55 External Video Source 13-19 Remote Control Functions 21-38 Programming Codes 37-38 Installing Batteries 4 S Screen Saver 57 Sharpness 41 Speakers 45...58 L Language Menu Language 56 Locks Change Access Code 48 Channel Lock 48 Front Panel Lock 48 Movie Ratings 49 TV Ratings 50 TV Ratings (Canadian - English 51 82 Index Index A Accessories 4 Antennas (Connecting 6 Aspect Ratio 23, 42 Audio TruBass 44 Audio Settings 44 Audio Source ...
...47 Auto Channel Scan 46 Clock 53 Closed Captions Captions 68 Color Temperature 42 Color 41 Contrast 41 Contrast Mode 42 E Event Timer 55 External Video Source 13-19 Remote Control Functions 21-38 Programming Codes 37-38 Installing Batteries 4 S Screen Saver 57 Sharpness 41 Speakers 45...58 L Language Menu Language 56 Locks Change Access Code 48 Channel Lock 48 Front Panel Lock 48 Movie Ratings 49 TV Ratings 50 TV Ratings (Canadian - English 51 82 Index Index A Accessories 4 Antennas (Connecting 6 Aspect Ratio 23, 42 Audio TruBass 44 Audio Settings 44 Audio Source ...


