Owners Guide
Page 1
has determined that this product meets the Energy Star® guidelines for 42HDS52, 42HDS52A and 55HDS52 IMPORTANT SAFETY INSTRUCTIONS 2-3 FIRST TIME USE ...4-20 THE REMOTE CONTROL ...21-38 ON-SCREEN DISPLAY ...39-71 USEFUL INFORMATION...72-78 END USER LICENSE AGREEMENT FOR HITACHI DTV SOFTWARE 79 APPENDIXES ...80-81 INDEX ...82 As an Energy Star® Partner, Hitachi, Ltd. PLASMA TELEVISION Operating Guide for energy efficiency.
has determined that this product meets the Energy Star® guidelines for 42HDS52, 42HDS52A and 55HDS52 IMPORTANT SAFETY INSTRUCTIONS 2-3 FIRST TIME USE ...4-20 THE REMOTE CONTROL ...21-38 ON-SCREEN DISPLAY ...39-71 USEFUL INFORMATION...72-78 END USER LICENSE AGREEMENT FOR HITACHI DTV SOFTWARE 79 APPENDIXES ...80-81 INDEX ...82 As an Energy Star® Partner, Hitachi, Ltd. PLASMA TELEVISION Operating Guide for energy efficiency.
Owners Guide
Page 4
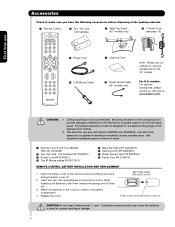
...plasma television product is designed for the front glass panel. Open the battery cover of resulting in the battery compartment. 4. BOTTOM VIEW (Remote Control) Press down and sliding the back cover off. 2. For U.S. models: For optional accessories, please access our web site at: www.hitachi.us/tv...). Accessories Check to make sure you have the following accessories before disposing of the packing material. ³ Remote Control · Two "AA" size, 1.5V batteries ´ Table Top Stand (42" models only) º 1 Ferrite Core (see page 13) First time use » Power Cord ...
...plasma television product is designed for the front glass panel. Open the battery cover of resulting in the battery compartment. 4. BOTTOM VIEW (Remote Control) Press down and sliding the back cover off. 2. For U.S. models: For optional accessories, please access our web site at: www.hitachi.us/tv...). Accessories Check to make sure you have the following accessories before disposing of the packing material. ³ Remote Control · Two "AA" size, 1.5V batteries ´ Table Top Stand (42" models only) º 1 Ferrite Core (see page 13) First time use » Power Cord ...
Owners Guide
Page 8
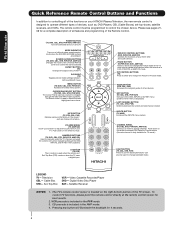
... designed to operate different types of the OSD, INPUTS or AV NET menu systems if their menu is located on your HITACHI Plasma Television, the new remote control is in -Picture mode. Cable Box STB - MODE INDICATOR Turns on the screen, such as , DVD Players, CBL (Cable ... mode. (Favorite channel is included in the AMP mode. 4. Can also be programmed to control the chosen device. To control TV functions, please point the remote control directly at the remote control sensor for 4 seconds. 8 SOURCE ACCESS BUTTONS (TV, DVD, CBL, STB, PVR/VCR, AMP/CD) Changes the mode of the...
... designed to operate different types of the OSD, INPUTS or AV NET menu systems if their menu is located on your HITACHI Plasma Television, the new remote control is in -Picture mode. Cable Box STB - MODE INDICATOR Turns on the screen, such as , DVD Players, CBL (Cable ... mode. (Favorite channel is included in the AMP mode. 4. Can also be programmed to control the chosen device. To control TV functions, please point the remote control directly at the remote control sensor for 4 seconds. 8 SOURCE ACCESS BUTTONS (TV, DVD, CBL, STB, PVR/VCR, AMP/CD) Changes the mode of the...
Owners Guide
Page 9
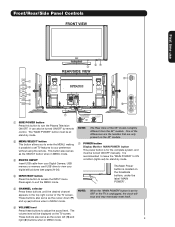
...SIDE POWER button Press this button to the claw. Press again to turn the Plasma Television ON/OFF. NOTE: When the "MAIN POWER" button is set TV features to your digital still pictures (see pages 24-26). ብ INPUT/... Press these buttons to ON condition (lights red) for the complete system, and must be displayed on the 42" models. ቨ POWER button Display Monitor MAIN POWER button This power button is recommended to leave the "..., making it possible to set to OFF or the TV is unplugged, the clock will be at stand-by remote control. It is for stand-by mode.
...SIDE POWER button Press this button to the claw. Press again to turn the Plasma Television ON/OFF. NOTE: When the "MAIN POWER" button is set TV features to your digital still pictures (see pages 24-26). ብ INPUT/... Press these buttons to ON condition (lights red) for the complete system, and must be displayed on the 42" models. ቨ POWER button Display Monitor MAIN POWER button This power button is recommended to leave the "..., making it possible to set to OFF or the TV is unplugged, the clock will be at stand-by remote control. It is for stand-by mode.

Owners Guide
Page 10
... ON with no signal input except antenna (no video input when VIDEO: 1, 2, 3, 4 and 5. Display monitor MAIN POWER is ON. Your HITACHI Plasma TV will illuminate. When the main power switch on the remote control to make sure the Display Monitor is turned off or in use. 2. If you have mono sound, insert the audio cable...
... ON with no signal input except antenna (no video input when VIDEO: 1, 2, 3, 4 and 5. Display monitor MAIN POWER is ON. Your HITACHI Plasma TV will illuminate. When the main power switch on the remote control to make sure the Display Monitor is turned off or in use. 2. If you have mono sound, insert the audio cable...
Owners Guide
Page 11
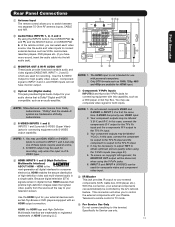
...1 and 2 (High Definition Multimedia Interface) ABOUT HDMI - INPUT 3 and INPUT 4 (Y/VIDEO) can be used for connecting equipment with your Plasma Television's remote control in TV mode. Component signal to INPUT 3 and 4, and HDMI inputs will allow you have monitor output. ብቮ ቯ NOTE: 1. ...; and ̄), and the SELECT button or CURSOR PAD ቫ ̈ of SVIDEO type. HDMI is of the remote control, you to the TV's PR input. 4. NOTE: *Manufactured under license from the source all digital interface for Service use ቢ Antenna Input ...
...1 and 2 (High Definition Multimedia Interface) ABOUT HDMI - INPUT 3 and INPUT 4 (Y/VIDEO) can be used for connecting equipment with your Plasma Television's remote control in TV mode. Component signal to INPUT 3 and 4, and HDMI inputs will allow you have monitor output. ብቮ ቯ NOTE: 1. ...; and ̄), and the SELECT button or CURSOR PAD ቫ ̈ of SVIDEO type. HDMI is of the remote control, you to the TV's PR input. 4. NOTE: *Manufactured under license from the source all digital interface for Service use ቢ Antenna Input ...
Owners Guide
Page 14
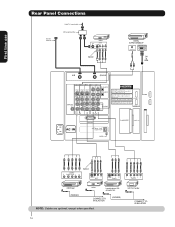
CONNECT TO IR BLASTER (PROVIDED) NOTE: Cables are optional, except when specified. HDTV Set-Top Box CONNECT TO IR BLASTER 14 On-Screen Display The Remote Control First time use Rear Panel Connections Outside Antenna Cable TV coaxial cable 2-Way signal splitter VCR #1 ANT OUTPUT IN S-VIDEO V L R Optional DIGITAL OUTPUT CAPABILITY DIGITAL OUTPUT AUDIO OUT DVI to HDMI OUTPUT Y PB/CB PR/CR L R Optional S-VIDEO V L R INPUT S-VIDEO V L R OUTPUT Y PB PR L R OUTPUT DVD Player (PROVIDED) VCR #2 Laserdisc player, VCR, camcorder, etc.
CONNECT TO IR BLASTER (PROVIDED) NOTE: Cables are optional, except when specified. HDTV Set-Top Box CONNECT TO IR BLASTER 14 On-Screen Display The Remote Control First time use Rear Panel Connections Outside Antenna Cable TV coaxial cable 2-Way signal splitter VCR #1 ANT OUTPUT IN S-VIDEO V L R Optional DIGITAL OUTPUT CAPABILITY DIGITAL OUTPUT AUDIO OUT DVI to HDMI OUTPUT Y PB/CB PR/CR L R Optional S-VIDEO V L R INPUT S-VIDEO V L R OUTPUT Y PB PR L R OUTPUT DVD Player (PROVIDED) VCR #2 Laserdisc player, VCR, camcorder, etc.
Owners Guide
Page 20
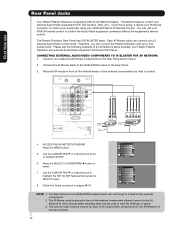
... the IR mouse in place. 3. Each IR Mouse cable can use Rear Panel Jacks Your Hitachi Plasma Television is setup, it allows your HITACHI Plasma TV Remote Control. You can connect up to a total of the external components infrared sensor for the AV Network to highlight the SET AV NET features then press ...
... the IR mouse in place. 3. Each IR Mouse cable can use Rear Panel Jacks Your Hitachi Plasma Television is setup, it allows your HITACHI Plasma TV Remote Control. You can connect up to a total of the external components infrared sensor for the AV Network to highlight the SET AV NET features then press ...

Owners Guide
Page 21
... on how to program the remote to control your satellite receiver. The CBL mode indicator will blink, indicating that the remote will light a few seconds during this button to program your PVR). To operate your HITACHI Plasma TV, the new remote control is pressed (including the LIGHT... button), the illumination will turn off. The TV mode indicator will blink 3 times...
... on how to program the remote to control your satellite receiver. The CBL mode indicator will blink, indicating that the remote will light a few seconds during this button to program your PVR). To operate your HITACHI Plasma TV, the new remote control is pressed (including the LIGHT... button), the illumination will turn off. The TV mode indicator will blink 3 times...
Owners Guide
Page 22
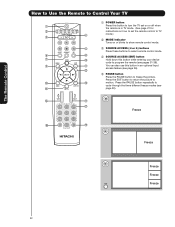
...; motion. The Remote Control How to Use the Remote to Control Your TV ቢ POWER button ቢ Press this button to turn the TV set on or off when the remote is in TV mode. (See page 21 for ባ instructions on how to set the remote control to TV ቤ ብ...; mode.) ባ MODE Indicator Turns on or blinks to show remote control mode. ቦ ቤ SOURCE ACCESS (̇ or ̈) buttons Press these buttons to select remote control mode. ቧ ቩ ብ SOURCE ACCESS...
...; motion. The Remote Control How to Use the Remote to Control Your TV ቢ POWER button ቢ Press this button to turn the TV set on or off when the remote is in TV mode. (See page 21 for ባ instructions on how to set the remote control to TV ቤ ብ...; mode.) ባ MODE Indicator Turns on or blinks to show remote control mode. ቦ ቤ SOURCE ACCESS (̇ or ̈) buttons Press these buttons to select remote control mode. ቧ ቩ ብ SOURCE ACCESS...
Owners Guide
Page 23
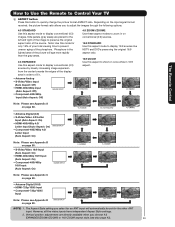
...aspect. However, all five video inputs have independent Aspect Style settings. 2. How to Use the Remote to Control Your TV ቧ ASPECT button Press this aspect mode to display conventional (4:3) images. The Aspect Style setting ...right of the image to prevent uneven aging of the source. IMAGE INPUT NOTE: 1. Phosphors in on page 80. The Remote Control • Antenna-Digital (4:3) • S-Video/Video 4:3/Letter Input (Auto Aspect: On) • HDMI-480i/480p 4:3/... Input • Component-720p/1080i Input Note: Please see also page 42). 23 Depending on page 80.
...aspect. However, all five video inputs have independent Aspect Style settings. 2. How to Use the Remote to Control Your TV ቧ ASPECT button Press this aspect mode to display conventional (4:3) images. The Aspect Style setting ...right of the image to prevent uneven aging of the source. IMAGE INPUT NOTE: 1. Phosphors in on page 80. The Remote Control • Antenna-Digital (4:3) • S-Video/Video 4:3/Letter Input (Auto Aspect: On) • HDMI-480i/480p 4:3/... Input • Component-720p/1080i Input Note: Please see also page 42). 23 Depending on page 80.
Owners Guide
Page 24
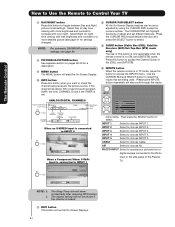
... [Cable Box (CBL), Satellite Receiver (SAT)/Set-Top-Box (STB) mode only] The use of the Plasma TV. Day CC Off 4:3 Expanded NOTE: 1. 2. The Remote Control How to Use the Remote to Control Your TV ቨ DAY/NIGHT button Press this button to choose INPUT 1. Select Day for a description. ቪ MENU... choose INPUT 3. Press this button to access the Channel Guide of the (CBL), and (SAT/STB). ተ INPUTS button When the remote control is connected to choose INPUT 5. INPUT 4 Select to access the INPUTS menu. AIR Select to compete with less brightness and contrast for a...
... [Cable Box (CBL), Satellite Receiver (SAT)/Set-Top-Box (STB) mode only] The use of the Plasma TV. Day CC Off 4:3 Expanded NOTE: 1. 2. The Remote Control How to Use the Remote to Control Your TV ቨ DAY/NIGHT button Press this button to choose INPUT 1. Select Day for a description. ቪ MENU... choose INPUT 3. Press this button to access the Channel Guide of the (CBL), and (SAT/STB). ተ INPUTS button When the remote control is connected to choose INPUT 5. INPUT 4 Select to access the INPUTS menu. AIR Select to compete with less brightness and contrast for a...
Owners Guide
Page 25
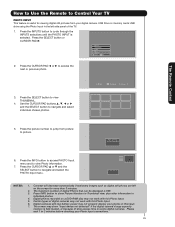
...information in the left on a DVD-RAM disc may not properly display your photos in this Photo Input. 6. First time use The Remote Control How to Use the Remote to navigate and select the PHOTO Input menu. Please Enter Picture Number -- 6. Next SEL Thumbnail [0-9] Jump 5. Press the CURSOR PAD... ̆ or ̄ and the SELECT button to Control Your TV PHOTO INPUT This feature is 999. 3. Date Resolution File Name No. 02/...
...information in the left on a DVD-RAM disc may not properly display your photos in this Photo Input. 6. First time use The Remote Control How to Use the Remote to navigate and select the PHOTO Input menu. Please Enter Picture Number -- 6. Next SEL Thumbnail [0-9] Jump 5. Press the CURSOR PAD... ̆ or ̄ and the SELECT button to Control Your TV PHOTO INPUT This feature is 999. 3. Date Resolution File Name No. 02/...

Owners Guide
Page 26
... displays only digital pictures from 5, 10 and 30 seconds. Supported image types are up to continue. 2. The Remote Control How to Use the Remote to Control Your TV ROTATE Select this menu item to rotate selected photos either clockwise (CURSOR PAD ̈) and counterclockwise (CURSOR PAD ̇). ̇ ̈ SLIDESHOW Select this menu ...
... displays only digital pictures from 5, 10 and 30 seconds. Supported image types are up to continue. 2. The Remote Control How to Use the Remote to Control Your TV ROTATE Select this menu item to rotate selected photos either clockwise (CURSOR PAD ̈) and counterclockwise (CURSOR PAD ̇). ̇ ̈ SLIDESHOW Select this menu ...
Owners Guide
Page 27
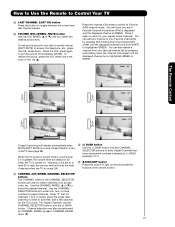
...SOFT MUTE is on . Use the CHANNEL WHEEL (̆ or ̄) to AUTO (see page 68). For Digital Channels, use The Remote Control How to Use the Remote to Control Your TV ቱ LAST CHANNEL (LAST CH) button Press this button to light up (̆) or CHANNEL WHEEL down . Press it again to ...GREEN to answer the telephone, etc., press the VOL wheel down (̄). 27 To restore the sound, press the VOL wheel one half of the remote control. ታ CHANNEL (CH) WHEEL/CHANNEL SELECTOR buttons The CHANNEL wheel or the CHANNEL SELECTOR buttons are in Favorite Channel mode when (FAV) is ...
...SOFT MUTE is on . Use the CHANNEL WHEEL (̆ or ̄) to AUTO (see page 68). For Digital Channels, use The Remote Control How to Use the Remote to Control Your TV ቱ LAST CHANNEL (LAST CH) button Press this button to light up (̆) or CHANNEL WHEEL down . Press it again to ...GREEN to answer the telephone, etc., press the VOL wheel down (̄). 27 To restore the sound, press the VOL wheel one half of the remote control. ታ CHANNEL (CH) WHEEL/CHANNEL SELECTOR buttons The CHANNEL wheel or the CHANNEL SELECTOR buttons are in Favorite Channel mode when (FAV) is ...
Owners Guide
Page 28
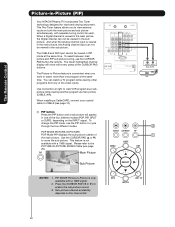
... The Green highlighted channel display will appear in -Picture is not available with separate tuning control for improved viewing enjoyment. Sub-picture channel availability depends on the INPUT signal. The Remote Control Picture-in PIP mode at the same time. The CABLE and AIR input cannot be ... the main picture. To change the PIP mode, use the CURSOR PAD button the remote. Main Picture Sub Picture NOTES: 1. You can not be viewed in -Picture (PIP) Your HITACHI Plasma TV incorporates Two Tuner technology designed for each. The Picture-in the sub picture. This ...
... The Green highlighted channel display will appear in -Picture is not available with separate tuning control for improved viewing enjoyment. Sub-picture channel availability depends on the INPUT signal. The Remote Control Picture-in PIP mode at the same time. The CABLE and AIR input cannot be ... the main picture. To change the PIP mode, use the CURSOR PAD button the remote. Main Picture Sub Picture NOTES: 1. You can not be viewed in -Picture (PIP) Your HITACHI Plasma TV incorporates Two Tuner technology designed for each. The Picture-in the sub picture. This ...
Owners Guide
Page 29
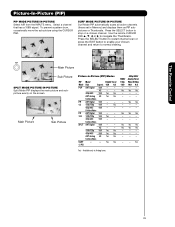
... - -- - -- To prevent a pattern burn, occasionally move the sub-picture using the CURSOR PAD. Yes Yes -- -- - Yes1 Yes1 - Available only in Analog tuner. 29 Use the remote CURSOR PAD ̆, ̄, ̇ or ̈ to normal viewing. 12 34 56 78 Main Picture 9 10 11 12 Sub Picture SPLIT MODE PICTURE-IN... Yes -- - Yes - - 480p/480i/ Analog Tuner Video/S-Video 16:9 4:3 -- Press the SELECT button to stop on the screen. Yes Yes Yes Yes Yes Yes - - The Remote Control Picture-In-Picture (PIP) PIP MODE PICTURE-IN-PICTURE Select AIR from the INPUTS menu.
... - -- - -- To prevent a pattern burn, occasionally move the sub-picture using the CURSOR PAD. Yes Yes -- -- - Yes1 Yes1 - Available only in Analog tuner. 29 Use the remote CURSOR PAD ̆, ̄, ̇ or ̈ to normal viewing. 12 34 56 78 Main Picture 9 10 11 12 Sub Picture SPLIT MODE PICTURE-IN... Yes -- - Yes - - 480p/480i/ Analog Tuner Video/S-Video 16:9 4:3 -- Press the SELECT button to stop on the screen. Yes Yes Yes Yes Yes Yes - - The Remote Control Picture-In-Picture (PIP) PIP MODE PICTURE-IN-PICTURE Select AIR from the INPUTS menu.
Owners Guide
Page 30
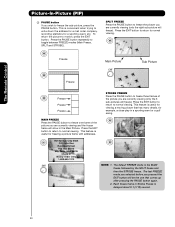
... return to motion, press the EXIT button. The last FREEZE mode you selected before you are currently viewing (only the 3 sub-pictures will freeze). The Remote Control Picture-In-Picture (PIP) ባ PAUSE button If you are currently viewing (only the right sub-picture will freeze). MAIN FREEZE Press the PAUSE button...
... return to motion, press the EXIT button. The last FREEZE mode you selected before you are currently viewing (only the 3 sub-pictures will freeze). The Remote Control Picture-In-Picture (PIP) ባ PAUSE button If you are currently viewing (only the right sub-picture will freeze). MAIN FREEZE Press the PAUSE button...
Owners Guide
Page 31
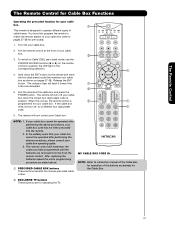
...ACCESS buttons (̇ or ̈) on the remote control to position the LED light to match the remote system of the buttons exclusively for the Cable Box. ባ EXCLUSIVE TV buttons These buttons are removed from the from the remote control. Aim the remote at the front of cable boxes. When this ...occurs, the remote control is designed to pages 37-38 for pre-codes). 1. If the cable box does ...
...ACCESS buttons (̇ or ̈) on the remote control to position the LED light to match the remote system of the buttons exclusively for the Cable Box. ባ EXCLUSIVE TV buttons These buttons are removed from the from the remote control. Aim the remote at the front of cable boxes. When this ...occurs, the remote control is designed to pages 37-38 for pre-codes). 1. If the cable box does ...
Owners Guide
Page 32
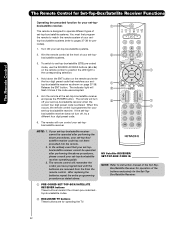
.../SATELLITE RECEIVER buttons These buttons transmit the chosen pre-coded settop-box/satellite codes. ባ EXCLUSIVE TV buttons These buttons are removed from the from the remote control. Aim the remote control at the set-top-box/satellite receiver and press the POWER button. After replacing the batteries repeat... until the batteries are for operating the TV. 32 If your set-top-box/satellite receiver cannot be operated after performing the above procedures, your set-top-box/satellite systems. 2. Hold down the ENT button on the remote control to position the LED light to pages ...
.../SATELLITE RECEIVER buttons These buttons transmit the chosen pre-coded settop-box/satellite codes. ባ EXCLUSIVE TV buttons These buttons are removed from the from the remote control. Aim the remote control at the set-top-box/satellite receiver and press the POWER button. After replacing the batteries repeat... until the batteries are for operating the TV. 32 If your set-top-box/satellite receiver cannot be operated after performing the above procedures, your set-top-box/satellite systems. 2. Hold down the ENT button on the remote control to position the LED light to pages ...


