Owners Guide
Page 3
...equipment. authorized by your local cable company. A CableCARD provided by HITACHI could void the user's warranty. FOR MORE INFORMATION, CALL 1-800-HITACHI. Public viewing of copyrighted material Public viewing of programs broadcast by TV stations and cable companies, as well as improper changes or modifications ... paragraph 15.119 and 15.122 of the FCC rules. Never connect the plasma television to 50 Hz, direct current, or anything other fixed (non-moving) patterns can be authorized by Hitachi America, Ltd. Prevention of screen damages Continuous on the television. This product ...
...equipment. authorized by your local cable company. A CableCARD provided by HITACHI could void the user's warranty. FOR MORE INFORMATION, CALL 1-800-HITACHI. Public viewing of copyrighted material Public viewing of programs broadcast by TV stations and cable companies, as well as improper changes or modifications ... paragraph 15.119 and 15.122 of the FCC rules. Never connect the plasma television to 50 Hz, direct current, or anything other fixed (non-moving) patterns can be authorized by Hitachi America, Ltd. Prevention of screen damages Continuous on the television. This product ...
Owners Guide
Page 4
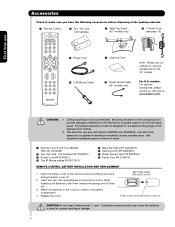
... bottom of resulting in instability causing possible injury. Use with Hitachi 42HDS52 and 42HDS52A. Replace the cover. models: For optional accessories, please access our web site at: www.hitachi.us/tv CAUTION: 1. This plasma television product is not recommended. This stand for a maximum ...tilting angle of 45 degrees from vertical. 2. Open the battery cover of the packing material. ³ Remote Control · Two "AA" size, 1.5V batteries ´ Table Top Stand (42" ...
... bottom of resulting in instability causing possible injury. Use with Hitachi 42HDS52 and 42HDS52A. Replace the cover. models: For optional accessories, please access our web site at: www.hitachi.us/tv CAUTION: 1. This plasma television product is not recommended. This stand for a maximum ...tilting angle of 45 degrees from vertical. 2. Open the battery cover of the packing material. ³ Remote Control · Two "AA" size, 1.5V batteries ´ Table Top Stand (42" ...
Owners Guide
Page 5
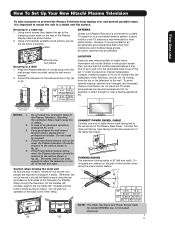
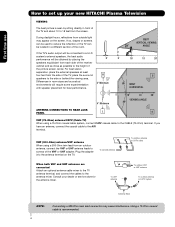
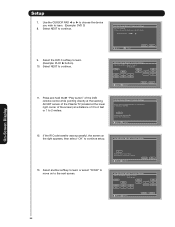
... moving the Television, lift the handles (42" models), support the top frame (55" models) and the bottom frame as shown in fig. (a). 5. First time use How To Set Up Your New Hitachi Plasma Television To take measures to prevent the Plasma Television from tipping over and prevent possible ...set firmly in a stable and flat surface. Secure the television to a centralized antenna system, a good outdoor color TV antenna is 30˚ (left and right). In case of the Plasma Rear Panel. TURNING RADIUS The maximum turning radius is recommended for example, in fig. (a) or (b). If the...
... moving the Television, lift the handles (42" models), support the top frame (55" models) and the bottom frame as shown in fig. (a). 5. First time use How To Set Up Your New Hitachi Plasma Television To take measures to prevent the Plasma Television from tipping over and prevent possible ...set firmly in a stable and flat surface. Secure the television to a centralized antenna system, a good outdoor color TV antenna is 30˚ (left and right). In case of the Plasma Rear Panel. TURNING RADIUS The maximum turning radius is recommended for example, in fig. (a) or (b). If the...
Owners Guide
Page 6
... in room sizes and acoustical environments will be located in a different section of the room. Consult your new HITACHI Plasma Television VIEWING The best picture is recommended. If the TV's audio output will be connected to a Hi-Fi system's external speakers, the best audio performance will require ...20' S 80 BEST HORIZONTAL ANTENNA CONNECTIONS TO REAR JACK PANEL 4" Minimum L 5' 10' 15' 20' VIEWING ANGLE 80 S VHF (75-Ohm) antenna/CATV (Cable TV) When using a 300-Ohm twin lead from an outdoor antenna, connect the VHF or UHF antenna leads to screws of the VHF or UHF adapter...
... in room sizes and acoustical environments will be located in a different section of the room. Consult your new HITACHI Plasma Television VIEWING The best picture is recommended. If the TV's audio output will be connected to a Hi-Fi system's external speakers, the best audio performance will require ...20' S 80 BEST HORIZONTAL ANTENNA CONNECTIONS TO REAR JACK PANEL 4" Minimum L 5' 10' 15' 20' VIEWING ANGLE 80 S VHF (75-Ohm) antenna/CATV (Cable TV) When using a 300-Ohm twin lead from an outdoor antenna, connect the VHF or UHF antenna leads to screws of the VHF or UHF adapter...
Owners Guide
Page 7
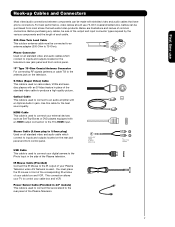
...outdoor antenna cable must place the IR mouse in front of the corresponding IR window of your TV to an audio amplifier with shielded video and audio cables that sell audio/video products. For .... HDMI Cable This cable is used to connect your digital camera to the Photo Input in 42" models) This cable is used to connect the swivel stand to produce a high quality picture. ...adapter (300-Ohm to the IR output of your cable box and VCR. This connection allows your Plasma Television when A/V Network is used . Cables can be sure of the output and input connector types ...
...outdoor antenna cable must place the IR mouse in front of the corresponding IR window of your TV to an audio amplifier with shielded video and audio cables that sell audio/video products. For .... HDMI Cable This cable is used to connect your digital camera to the Photo Input in 42" models) This cable is used to connect the swivel stand to produce a high quality picture. ...adapter (300-Ohm to the IR output of your cable box and VCR. This connection allows your Plasma Television when A/V Network is used . Cables can be sure of the output and input connector types ...
Owners Guide
Page 8
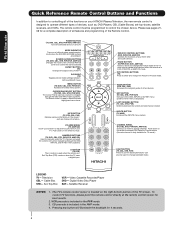
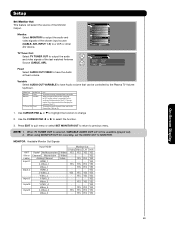
...the backlight for 4 seconds. 8 The remote control must be used as channel information. POWER BUTTON (TV, DVD, CBL, STB, PVR/VCR, AMP/CD) Turns the selected device on your HITACHI Plasma Television, the new remote control is used to pause other devices. Set-Top-Box VCR - Also ...used to Select/Activate highlighted menu items. INFO BUTTON (TV, STB, CBL, PVR) Displays various information on or blinks to...
...the backlight for 4 seconds. 8 The remote control must be used as channel information. POWER BUTTON (TV, DVD, CBL, STB, PVR/VCR, AMP/CD) Turns the selected device on your HITACHI Plasma Television, the new remote control is used to pause other devices. Set-Top-Box VCR - Also ...used to Select/Activate highlighted menu items. INFO BUTTON (TV, STB, CBL, PVR) Displays various information on or blinks to...

Owners Guide
Page 10
...; SIDE INPUT JACKS (for VIDEO: 5) Use these audio/video jacks for remote ON/OFF operation. Your HITACHI Plasma TV will illuminate. A red stand-by indicator lamp located on the lower right side of the monitor. The Plasma TV is ON. Remote Control can not turn the monitor ON, press the main power switch located on...
...; SIDE INPUT JACKS (for VIDEO: 5) Use these audio/video jacks for remote ON/OFF operation. Your HITACHI Plasma TV will illuminate. A red stand-by indicator lamp located on the lower right side of the monitor. The Plasma TV is ON. Remote Control can not turn the monitor ON, press the main power switch located on...
Owners Guide
Page 13
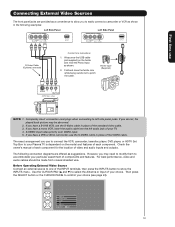
...place of each component. The exact arrangement you use to connect the VCR, camcorder, laserdisc player, DVD player, or HDTV Set Top Box to your Plasma TV is dependent on the ferrite core near the Photo Input as suggestions. The following examples: Left Side Panel INPUT 5 Left Side Panel INPUT 5 R L/... AUDIO VIDEO S-VIDEO PHOTO INPUT S-Video Cable (Optional, see page 24). Then press the SELECT button or the CURSOR PAD ̈ to confirm your TV. 4. If you have a S-VHS VCR, use the S-VIDEO cable in place of the INPUT terminals, then press the INPUTS button to show the INPUTS...
...place of each component. The exact arrangement you use to connect the VCR, camcorder, laserdisc player, DVD player, or HDTV Set Top Box to your Plasma TV is dependent on the ferrite core near the Photo Input as suggestions. The following examples: Left Side Panel INPUT 5 Left Side Panel INPUT 5 R L/... AUDIO VIDEO S-VIDEO PHOTO INPUT S-Video Cable (Optional, see page 24). Then press the SELECT button or the CURSOR PAD ̈ to confirm your TV. 4. If you have a S-VHS VCR, use the S-VIDEO cable in place of the INPUT terminals, then press the INPUTS button to show the INPUTS...

Owners Guide
Page 19
... not output component video. 1. If both are connected, SVideo takes priority. 19 Press the INPUTS button, then select INPUT 2 from the VIDEO INPUT of the Plasma TV to the VIDEO out jack on the right. Connecting Video: Connect the cable from the INPUTS menu to the INPUT (S-VIDEO) jack, of the VCR... out to the OUTPUT (AUDIO/L) jack on the right. Connect an optical cable from the Rear Panel is controlled by the amplifier, not by the Plasma Television. Connecting S-Video: Connect the cable from the S-VIDEO OUT of the Rear Panel to view the program from the AUDIO OUT of the VCR...
... not output component video. 1. If both are connected, SVideo takes priority. 19 Press the INPUTS button, then select INPUT 2 from the VIDEO INPUT of the Plasma TV to the VIDEO out jack on the right. Connecting Video: Connect the cable from the INPUTS menu to the INPUT (S-VIDEO) jack, of the VCR... out to the OUTPUT (AUDIO/L) jack on the right. Connect an optical cable from the Rear Panel is controlled by the amplifier, not by the Plasma Television. Connecting S-Video: Connect the cable from the S-VIDEO OUT of the Rear Panel to view the program from the AUDIO OUT of the VCR...
Owners Guide
Page 20
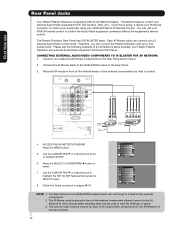
... chosen for each of four external components. 2. On-Screen Display The Remote Control First time use your Hitachi Plasma Television and external Audio/Video equipment (VCR and DVD Player). Place the IR mouse in place. 3. The... Rear Panel has two IR BLASTER outputs which can use Rear Panel Jacks Your Hitachi Plasma Television is setup, it allows your IR Mouse connector to control the Audio/Video equipment command without the... in front of an AV Network setup between your HITACHI remote control to control your equipment using your HITACHI Plasma TV Remote Control.
... chosen for each of four external components. 2. On-Screen Display The Remote Control First time use your Hitachi Plasma Television and external Audio/Video equipment (VCR and DVD Player). Place the IR mouse in place. 3. The... Rear Panel has two IR BLASTER outputs which can use Rear Panel Jacks Your Hitachi Plasma Television is setup, it allows your IR Mouse connector to control the Audio/Video equipment command without the... in front of an AV Network setup between your HITACHI remote control to control your equipment using your HITACHI Plasma TV Remote Control.

Owners Guide
Page 21
The Remote Control The Remote Control In addition to controlling all the functions on your HITACHI Plasma TV, the new remote control is designed to operate different types of the Source Access on the remote. The TV mode indicator will blink, indicating that the remote will now control your cable box...MODE (Optional mode) In Manual mode, the illumination will only work when the LIGHT button is pressed, the illumination will now control your Plasma TV, point the remote control at the remote sensor of the Source Access on the remote. Place the Remote Control in one touch. The...
The Remote Control The Remote Control In addition to controlling all the functions on your HITACHI Plasma TV, the new remote control is designed to operate different types of the Source Access on the remote. The TV mode indicator will blink, indicating that the remote will now control your cable box...MODE (Optional mode) In Manual mode, the illumination will only work when the LIGHT button is pressed, the illumination will now control your Plasma TV, point the remote control at the remote sensor of the Source Access on the remote. Place the Remote Control in one touch. The...
Owners Guide
Page 24
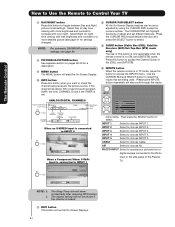
... only] The use of this button when you want to check the channel being used. Press this button to access the Channel Guide of the Plasma TV. AM --:-- INPUT 3 Select to INPUT 1 YPBPR:1 480i 11:00PM INFO Input 5 Photo Input Cable Air Input 1 Move SEL Sel. INPUT 4 Select to choose ... ANALOG/DIGITAL CHANNELS Program Information Event Timer INFO Day/Night Mode No Info --:-- The Remote Control How to Use the Remote to Control Your TV ቨ DAY/NIGHT button Press this button to access the INPUTS menu. Pressing the INPUTS button repeatedly will exit all On-Screen Displays. ...
... only] The use of this button when you want to check the channel being used. Press this button to access the Channel Guide of the Plasma TV. AM --:-- INPUT 3 Select to INPUT 1 YPBPR:1 480i 11:00PM INFO Input 5 Photo Input Cable Air Input 1 Move SEL Sel. INPUT 4 Select to choose ... ANALOG/DIGITAL CHANNELS Program Information Event Timer INFO Day/Night Mode No Info --:-- The Remote Control How to Use the Remote to Control Your TV ቨ DAY/NIGHT button Press this button to access the INPUTS menu. Pressing the INPUTS button repeatedly will exit all On-Screen Displays. ...
Owners Guide
Page 28
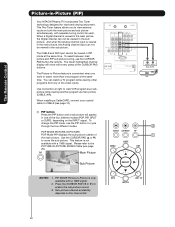
... picture. PIP MODE Picture-in-Picture is not available with separate tuning control for improved viewing enjoyment. The Remote Control Picture-in-Picture (PIP) Your HITACHI Plasma TV incorporates Two Tuner technology designed for each. This Two Tuner feature allows you want to view antenna inputs on both the main picture and sub...
... picture. PIP MODE Picture-in-Picture is not available with separate tuning control for improved viewing enjoyment. The Remote Control Picture-in-Picture (PIP) Your HITACHI Plasma TV incorporates Two Tuner technology designed for each. This Two Tuner feature allows you want to view antenna inputs on both the main picture and sub...
Owners Guide
Page 39
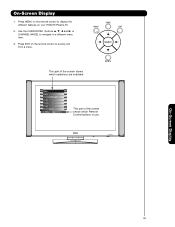
On-Screen Display 1. This part of the screen shows which selections are available. Press EXIT on your HITACHI Plasma TV. 2. Press MENU on the remote control to display the different features on the remote control to quickly exit from a menu. Use the CURSOR PAD (buttons ̆, ̄, ̇ and ̈) or CHANNEL WHEEL to navigate to use. On-Screen Display 39 Video Audio Channel Manager Locks Timers Setup Power Swivel Move SEL Select This part of the screen shows which Remote Control buttons to a different menu item. 3.
On-Screen Display 1. This part of the screen shows which selections are available. Press EXIT on your HITACHI Plasma TV. 2. Press MENU on the remote control to display the different features on the remote control to quickly exit from a menu. Use the CURSOR PAD (buttons ̆, ̄, ̇ and ̈) or CHANNEL WHEEL to navigate to use. On-Screen Display 39 Video Audio Channel Manager Locks Timers Setup Power Swivel Move SEL Select This part of the screen shows which Remote Control buttons to a different menu item. 3.
Owners Guide
Page 44
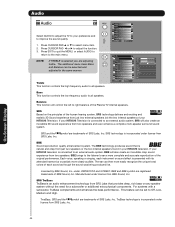
...ear can then more complete and accurate reproduction of the Plasma TV internal speakers. SRS TruBass TruBass is connected to an external audio system, SRS will control the left to right balance of the original performance. If your HITACHI television is selected you are trademarks of the human ... of SRS Labs, Inc. Licensed by BBE Sound, Inc. Audio Audio Video Audio Channel Manager Locks Select AUDIO to adjust the TV to your HITACHI Television. Press EXIT to quit the MENU, or select AUDIO to return to adjust the function. 3. On-Screen Display 44 or...
...ear can then more complete and accurate reproduction of the Plasma TV internal speakers. SRS TruBass TruBass is connected to an external audio system, SRS will control the left to right balance of the original performance. If your HITACHI television is selected you are trademarks of the human ... of SRS Labs, Inc. Licensed by BBE Sound, Inc. Audio Audio Video Audio Channel Manager Locks Select AUDIO to adjust the TV to your HITACHI Television. Press EXIT to quit the MENU, or select AUDIO to return to adjust the function. 3. On-Screen Display 44 or...
Owners Guide
Page 55
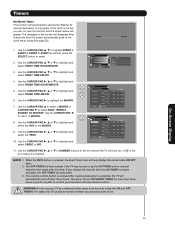
... off after viewing reservation is pressed after three hours. The message on by the ON TIMER and no remote control button is activated, the TV will automatically turn off when you can not use your television with the remote control. Use the CURSOR PAD ̆, ̄ or &#...4:11 PM Jan. 1 2005 Jan. 1 2005 Jan. 1 2005 Jan. 1 2005 Move SEL Return 10. Timers Set Event Timer This function will automatically operate the Plasma TV viewing reservation of the MONTH. 9. Use the CURSOR PAD ̆, ̄ to highlight EVENT 1, EVENT 2, EVENT 3, EVENT 4 and then press the SELECT button to...
... off after viewing reservation is pressed after three hours. The message on by the ON TIMER and no remote control button is activated, the TV will automatically turn off when you can not use your television with the remote control. Use the CURSOR PAD ̆, ̄ or &#...4:11 PM Jan. 1 2005 Jan. 1 2005 Jan. 1 2005 Jan. 1 2005 Move SEL Return 10. Timers Set Event Timer This function will automatically operate the Plasma TV viewing reservation of the MONTH. 9. Use the CURSOR PAD ̆, ̄ to highlight EVENT 1, EVENT 2, EVENT 3, EVENT 4 and then press the SELECT button to...
Owners Guide
Page 58
...automatically turn on and switch to INPUT 4 automatically, when the INPUT 4 input device is for the AV NET feature to work. 1. Once the TV has been turned on . When using the AUTO LINK feature, it must be reset before AUTO LINK is turned on and tune to INPUT 4 when... ̇, ̈ to select your VCR, laserdisc, or DVD play button. 3. However, intended operation is turned on using REMOTE mode, any of your HITACHI Plasma TV Remote Control. Auto When AUTO is pressed. Press EXIT to quit menu or select AUTO LINK to return to highlight the video inputs. 2. Press the...
...automatically turn on and switch to INPUT 4 automatically, when the INPUT 4 input device is for the AV NET feature to work. 1. Once the TV has been turned on . When using the AUTO LINK feature, it must be reset before AUTO LINK is turned on and tune to INPUT 4 when... ̇, ̈ to select your VCR, laserdisc, or DVD play button. 3. However, intended operation is turned on using REMOTE mode, any of your HITACHI Plasma TV Remote Control. Auto When AUTO is pressed. Press EXIT to quit menu or select AUTO LINK to return to highlight the video inputs. 2. Press the...
Owners Guide
Page 63
...Receiver Setup Press and hold the VOL ̆ button of your A/V Receiver remote control while pointing directly at the learning AV NET sensor of the Plasma TV (located at the lower right corner of the screen) at a distance of 5 to 10 feet or 2 to store and continue. AV Net Setup... Wizard : A/V Receiver Setup VOL̆ Transfer not completed! Select another Soft Key to learn ? Press OK to 3 meters. TV Softkeys POWER CH̆ VOL̆ MUTE CH̄ VOL̄ AUDIO SOURCE 1 SOURCE 2 SOURCE 3 SOURCE 4 SOURCE 5 SOURCE 6 SOURCE 7 SOURCE 8 ...
...Receiver Setup Press and hold the VOL ̆ button of your A/V Receiver remote control while pointing directly at the learning AV NET sensor of the Plasma TV (located at the lower right corner of the screen) at a distance of 5 to 10 feet or 2 to store and continue. AV Net Setup... Wizard : A/V Receiver Setup VOL̆ Transfer not completed! Select another Soft Key to learn ? Press OK to 3 meters. TV Softkeys POWER CH̆ VOL̆ MUTE CH̄ VOL̄ AUDIO SOURCE 1 SOURCE 2 SOURCE 3 SOURCE 4 SOURCE 5 SOURCE 6 SOURCE 7 SOURCE 8 ...
Owners Guide
Page 66
...: Custom Settings Press and hold the ̈ "Play button" of the DVD remote control while pointing directly at the learning AV NET sensor of the Plasma TV (located at the lower right corner of the screen) at a distance of 3 to 6 feet or 1 to 2 meters. Move SEL Select 12.... 3 softkey to store and continue. Press and hold desired button to transfer the command to continue setup. Select another softkey to learn . (Example: DVD 3) 8. TV Softkeys POWER ̇̇ ̈̈ MENU ̇̇ ̈ ̈̈ SELECT ̆ ̈ EXIT ̄ ̇ Move SEL Select...
...: Custom Settings Press and hold the ̈ "Play button" of the DVD remote control while pointing directly at the learning AV NET sensor of the Plasma TV (located at the lower right corner of the screen) at a distance of 3 to 6 feet or 1 to 2 meters. Move SEL Select 12.... 3 softkey to store and continue. Press and hold desired button to transfer the command to continue setup. Select another softkey to learn . (Example: DVD 3) 8. TV Softkeys POWER ̇̇ ̈̈ MENU ̇̇ ̈ ̈̈ SELECT ̆ ̈ EXIT ̄ ̇ Move SEL Select...
Owners Guide
Page 69
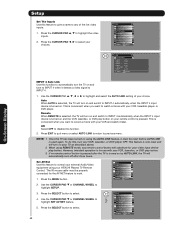
...device. When an external device like a monitor or Hi-Fi audio system is selected, VARIABLE AUDIO OUT will select the source of the TV. MONITOR: Available Monitor Out Signals Input Mode Monitor Out S-Video Video L/R HiFi ANT Digital No Macrovision S-Video YES YES YES YES (Air...Channel Macrovision S-Video - - - YES YES YES Input 1 HDMI_1 - - - Setup Set Monitor Out This feature will not be controlled by the Plasma TV Volume Up/Down. NOTE: 1. YES Cable) Analog Channel Video - YES S-Video_2 YES YES YES YES Video_2 - Video Out Monitor Monitor Audio Out Fixed ...
...device. When an external device like a monitor or Hi-Fi audio system is selected, VARIABLE AUDIO OUT will select the source of the TV. MONITOR: Available Monitor Out Signals Input Mode Monitor Out S-Video Video L/R HiFi ANT Digital No Macrovision S-Video YES YES YES YES (Air...Channel Macrovision S-Video - - - YES YES YES Input 1 HDMI_1 - - - Setup Set Monitor Out This feature will not be controlled by the Plasma TV Volume Up/Down. NOTE: 1. YES Cable) Analog Channel Video - YES S-Video_2 YES YES YES YES Video_2 - Video Out Monitor Monitor Audio Out Fixed ...


