Owners Guide
Page 20
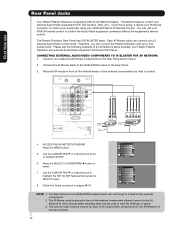
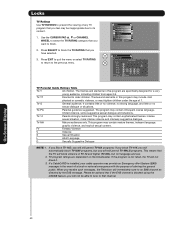
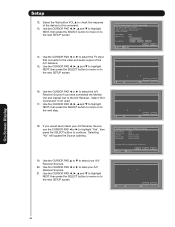
... Mouse connector to highlight SETUP. 6. Place the IR mouse in place. 3. ACCESS THE AV NET SETUP WIZARD Press the MENU button. 5. The correct codes must be used to hold the IR Mouse in front of the infrared sensor of the Audio/Video components for the AV Network to work... to highlight the SET AV NET features then press the SELECT button. 8. Press the SELECT or CURSOR PAD ̈ button to control your HITACHI Plasma TV Remote Control. Video Audio Channel Manager Locks Timers Setup Power Swivel Move SEL Select Setup Menu Preference Screen Saver Set The Inputs Set AV NET...
... Mouse connector to highlight SETUP. 6. Place the IR mouse in place. 3. ACCESS THE AV NET SETUP WIZARD Press the MENU button. 5. The correct codes must be used to hold the IR Mouse in front of the infrared sensor of the Audio/Video components for the AV Network to work... to highlight the SET AV NET features then press the SELECT button. 8. Press the SELECT or CURSOR PAD ̈ button to control your HITACHI Plasma TV Remote Control. Video Audio Channel Manager Locks Timers Setup Power Swivel Move SEL Select Setup Menu Preference Screen Saver Set The Inputs Set AV NET...
Owners Guide
Page 22
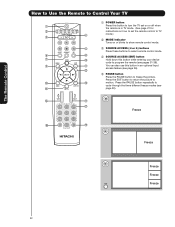
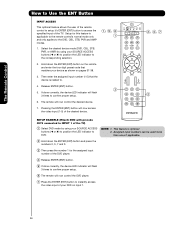
...to Use the Remote to Control Your TV ቢ POWER button ቢ Press this button to turn the TV set on or off when the remote is in TV mode. (See page 21 for ባ instructions on how to set the remote control to TV ቤ ብ mode.) ባ...; MODE Indicator Turns on or blinks to show remote control mode. ቦ ቤ SOURCE ACCESS (̇ or ̈) buttons Press these buttons to select remote control mode. ቧ ቩ ብ SOURCE ACCESS (ENT) button ቨ ቯ Hold down this button while entering your device code...
...to Use the Remote to Control Your TV ቢ POWER button ቢ Press this button to turn the TV set on or off when the remote is in TV mode. (See page 21 for ባ instructions on how to set the remote control to TV ቤ ብ mode.) ባ...; MODE Indicator Turns on or blinks to show remote control mode. ቦ ቤ SOURCE ACCESS (̇ or ̈) buttons Press these buttons to select remote control mode. ቧ ቩ ብ SOURCE ACCESS (ENT) button ቨ ቯ Hold down this button while entering your device code...
Owners Guide
Page 27
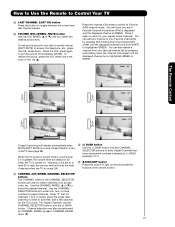
...level. Channel selection may also be at a volume level 31 or greater, the volume level will know you are used to select channels, lock access code, etc. Cable 22 Volume 8 Cable 22 Soft Mute 8 Cable 22 Mute 8 Closed Captioning will be performed by CHANNEL WHEEL up and illuminate the ... You can also delete a channel from WHITE to highlighted GREEN. For Digital Channels, use The Remote Control How to Use the Remote to Control Your TV ቱ LAST CHANNEL (LAST CH) button Press this button to light up (̆) or CHANNEL WHEEL down (̄). 27 First time use the ...
...level. Channel selection may also be at a volume level 31 or greater, the volume level will know you are used to select channels, lock access code, etc. Cable 22 Volume 8 Cable 22 Soft Mute 8 Cable 22 Mute 8 Closed Captioning will be performed by CHANNEL WHEEL up and illuminate the ... You can also delete a channel from WHITE to highlighted GREEN. For Digital Channels, use The Remote Control How to Use the Remote to Control Your TV ቱ LAST CHANNEL (LAST CH) button Press this button to light up (̆) or CHANNEL WHEEL down (̄). 27 First time use the ...
Owners Guide
Page 31
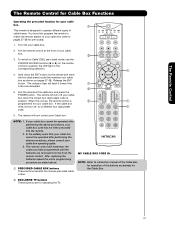
...the cable box does not turn off , try a different four digit preset ቢ code. 6. The remote will remember the codes you have programmed until the batteries are for operating the TV. 31 The Remote Control The Remote Control for Cable Box Functions Operating the precoded function for...4706; PRECODED CABLE BOX buttons These buttons transmit the chosen precoded cable codes. NOTE: 1. You must first program the remote to instruction manual of the Cable Box for the Cable Box. ባ EXCLUSIVE TV buttons These buttons are removed from the from the remote control. In ...
...the cable box does not turn off , try a different four digit preset ቢ code. 6. The remote will remember the codes you have programmed until the batteries are for operating the TV. 31 The Remote Control The Remote Control for Cable Box Functions Operating the precoded function for...4706; PRECODED CABLE BOX buttons These buttons transmit the chosen precoded cable codes. NOTE: 1. You must first program the remote to instruction manual of the Cable Box for the Cable Box. ባ EXCLUSIVE TV buttons These buttons are removed from the from the remote control. In ...
Owners Guide
Page 32
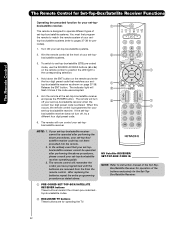
... for Set-Top-Box/Satellite Receiver Functions Operating the precoded function for operating the TV. 32 To switch to set -top-box/satellite receiver when the ባ ቢ correct four digit preset code is entered. The indicator light will turn off your set -top- After replacing... system of the buttons exclusively for the Set-TopBox/Satellite Receiver. ቢ PRE-CODED SET-TOP-BOX/SATELLITE RECEIVER buttons These buttons transmit the chosen pre-coded settop-box/satellite codes. ባ EXCLUSIVE TV buttons These buttons are removed from the from the remote control. If your set-...
... for Set-Top-Box/Satellite Receiver Functions Operating the precoded function for operating the TV. 32 To switch to set -top-box/satellite receiver when the ባ ቢ correct four digit preset code is entered. The indicator light will turn off your set -top- After replacing... system of the buttons exclusively for the Set-TopBox/Satellite Receiver. ቢ PRE-CODED SET-TOP-BOX/SATELLITE RECEIVER buttons These buttons transmit the chosen pre-coded settop-box/satellite codes. ባ EXCLUSIVE TV buttons These buttons are removed from the from the remote control. If your set-...
Owners Guide
Page 33
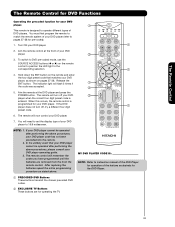
...operate different types of the buttons exclusively for the DVD Player. ቢ PRECODED DVD Buttons These buttons transmit the chosen precoded DVD codes. ባ EXCLUSIVE TV Buttons These buttons are removed from the from the remote control. Turn ON your DVD player. 7. Aim the remote at the ...SOURCE ACCESS buttons (̇ or ̈) on pages 37-38. NOTE: 1. The indicator light will remember the codes you have programmed until the batteries are for operating the TV. 33 The remote will need to set the display type of your DVD ባ player when the correct four...
...operate different types of the buttons exclusively for the DVD Player. ቢ PRECODED DVD Buttons These buttons transmit the chosen precoded DVD codes. ባ EXCLUSIVE TV Buttons These buttons are removed from the from the remote control. Turn ON your DVD player. 7. Aim the remote at the ...SOURCE ACCESS buttons (̇ or ̈) on pages 37-38. NOTE: 1. The indicator light will remember the codes you have programmed until the batteries are for operating the TV. 33 The remote will need to set the display type of your DVD ባ player when the correct four...
Owners Guide
Page 34
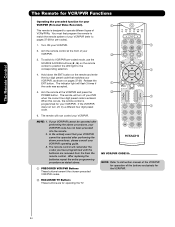
.../PVR. ባ EXCLUSIVE TV Buttons These buttons are removed from the from the remote control. When this occurs, the remote control is entered. After replacing the batteries repeat the entire programming procedure as shown on the remote and enter the four digit preset code that your PVR ቢ...to pages 37-38 for operating the TV. 34 Release the ENT button. Turn ON your VCR/PVR. The indicator light will now control your VCR/PVR operating guide. 3. If the VCR/PVR does not turn off , try a different four digit preset ቢ code. 6. In the unlikely event that...
.../PVR. ባ EXCLUSIVE TV Buttons These buttons are removed from the from the remote control. When this occurs, the remote control is entered. After replacing the batteries repeat the entire programming procedure as shown on the remote and enter the four digit preset code that your PVR ቢ...to pages 37-38 for operating the TV. 34 Release the ENT button. Turn ON your VCR/PVR. The indicator light will now control your VCR/PVR operating guide. 3. If the VCR/PVR does not turn off , try a different four digit preset ቢ code. 6. In the unlikely event that...

Owners Guide
Page 35
...on the remote control to position the LED light to operate different types of your Audio ባ component. ቢ 3. MY AUDIO COMPONENT CODE IS: NOTE: Refer to pages 37-38 for operating the TV. 35 Hold down the ENT button on the remote and enter the four digit preset...to instruction manual of the VCR/PVR for the VCR/PVR. ቢ PRECODED AUDIO Buttons These buttons transmit the chosen precoded Audio component codes. ባ EXCLUSIVE TV Buttons These buttons are removed from the from the remote control. NOTE: 1. To switch to match the remote system of the buttons ...
...on the remote control to position the LED light to operate different types of your Audio ባ component. ቢ 3. MY AUDIO COMPONENT CODE IS: NOTE: Refer to pages 37-38 for operating the TV. 35 Hold down the ENT button on the remote and enter the four digit preset...to instruction manual of the VCR/PVR for the VCR/PVR. ቢ PRECODED AUDIO Buttons These buttons transmit the chosen precoded Audio component codes. ባ EXCLUSIVE TV Buttons These buttons are removed from the from the remote control. NOTE: 1. To switch to match the remote system of the buttons ...
Owners Guide
Page 36
... indicator will now control the DVD player. ᕉ Press the ENTER (ENT) button to the corresponding selection. 2. SETUP EXAMPLE (Hitachi DVD with precode 0573 connected to INPUT 1 of the TV) ᕃ Select DVD mode by using your device as shown on pages 37-38. 3. Then enter the assigned input number (1-5)..., CBL, STB, PVR, or AMP) by using your DVD on the remote and enter the four digit preset code that the device is related to access the specified input of the TV. Setup for the assigned input number of your SOURCE ACCESS buttons (̇ or ̈) to position the LED ...
... indicator will now control the DVD player. ᕉ Press the ENTER (ENT) button to the corresponding selection. 2. SETUP EXAMPLE (Hitachi DVD with precode 0573 connected to INPUT 1 of the TV) ᕃ Select DVD mode by using your device as shown on pages 37-38. 3. Then enter the assigned input number (1-5)..., CBL, STB, PVR, or AMP) by using your DVD on the remote and enter the four digit preset code that the device is related to access the specified input of the TV. Setup for the assigned input number of your SOURCE ACCESS buttons (̇ or ̈) to position the LED ...
Owners Guide
Page 40
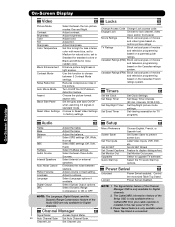
... Manager OSD is only available for Digital channels. Set Screen Saver to ON or OFF. The CableCARD information feature of the TV. 3. Set this function to choose between stations. Movie Ratings Block various types of movies and television programming based on motion picture... in fixed setting. Turn On/Off the 3:2 Pulldown detection feature. Set AV NET Wizard Feature to upgrade TV software. NOTE: 1. Adjust tint. Locks Change Access Code Change Lock access code. Adjust volume in the picture. Label Video Inputs, VCR, DVD, etc. Adjust contrast.
... Manager OSD is only available for Digital channels. Set Screen Saver to ON or OFF. The CableCARD information feature of the TV. 3. Set this function to choose between stations. Movie Ratings Block various types of movies and television programming based on motion picture... in fixed setting. Turn On/Off the 3:2 Pulldown detection feature. Set AV NET Wizard Feature to upgrade TV software. NOTE: 1. Adjust tint. Locks Change Access Code Change Lock access code. Adjust volume in the picture. Label Video Inputs, VCR, DVD, etc. Adjust contrast.
Owners Guide
Page 48
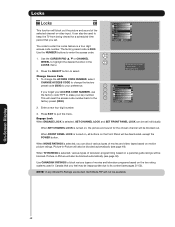
... video input. Picture-in Canada that you forget your ACCESS CODE NUMBER, use the factory code 7777 to your key number. 0 This will be available. Press EXIT to the 0 Change Access Code Engage Lock Movie Ratings TV Ratings Canadian Ratings(Eng) Canadian Ratings(Frn) factory preset (0000... may be blocked out. To change the ACCESS CODE NUMBER, select CHANGE ACCESS CODE to change the factory preset code (0000) to erase your preference. 0 Locks 0 If you set individually. Move SEL Select 2. NOTE: If any Movie/TV Ratings are locked, Surf Mode PIP will block ...
... video input. Picture-in Canada that you forget your ACCESS CODE NUMBER, use the factory code 7777 to your key number. 0 This will be available. Press EXIT to the 0 Change Access Code Engage Lock Movie Ratings TV Ratings Canadian Ratings(Eng) Canadian Ratings(Frn) factory preset (0000... may be blocked out. To change the ACCESS CODE NUMBER, select CHANGE ACCESS CODE to change the factory preset code (0000) to erase your preference. 0 Locks 0 If you set individually. Move SEL Select 2. NOTE: If any Movie/TV Ratings are locked, Surf Mode PIP will block ...
Owners Guide
Page 49
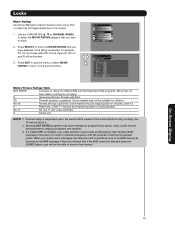
... that you have selected. Once rating is installed, your cable operator may be able to tune to the previous menu. Locks Change Access Code Engage Lock Movie Ratings TV Ratings Canadian Ratings(Eng) Canadian Ratings(Frn) Move SEL Select Locks Movie Ratings or Status Not Rated G PG PG-13 R NC-17 X...RATED Contains no rating. Under 17 requires accompanying parent or adult guardian. R Restricted. X Adults only NOTE: 1. If the movie does not carry a rating, the TV will be advised that channel. Please be blocked. 3. All ages admitted. NC-17 No one 17 and under 13.
... that you have selected. Once rating is installed, your cable operator may be able to tune to the previous menu. Locks Change Access Code Engage Lock Movie Ratings TV Ratings Canadian Ratings(Eng) Canadian Ratings(Frn) Move SEL Select Locks Movie Ratings or Status Not Rated G PG PG-13 R NC-17 X...RATED Contains no rating. Under 17 requires accompanying parent or adult guardian. R Restricted. X Adults only NOTE: 1. If the movie does not carry a rating, the TV will be advised that channel. Please be blocked. 3. All ages admitted. NC-17 No one 17 and under 13.
Owners Guide
Page 50
... to its content. 1. Locks Change Access Code Engage Lock Movie Ratings TV Ratings Canadian Ratings(Eng) Canadian Ratings(Frn) Move SEL Select Locks TV Ratings Status TV-Y TV-Y7 TV-G TV-PG TV-14 TV-MA Sub Rating D L S V FV Move SEL Return TV Parental Guide Ratings Table TV-Y All children. TV-Y7 Directed to block the TV RATING that you will automatically block...
... to its content. 1. Locks Change Access Code Engage Lock Movie Ratings TV Ratings Canadian Ratings(Eng) Canadian Ratings(Frn) Move SEL Select Locks TV Ratings Status TV-Y TV-Y7 TV-G TV-PG TV-14 TV-MA Sub Rating D L S V FV Move SEL Return TV Parental Guide Ratings Table TV-Y All children. TV-Y7 Directed to block the TV RATING that you will automatically block...

Owners Guide
Page 51
... frighten a younger child, will be limited and moderate; Will be sensitive to the previous menu. may see on their own - Locks Change Access Code Engage Lock Movie Ratings TV Ratings Canadian Ratings(Eng) Canadian Ratings(Frn) Move SEL Select 2. Parents are clearly imaginary, comedic or unrealistic in permitting viewing by children ages...
... frighten a younger child, will be limited and moderate; Will be sensitive to the previous menu. may see on their own - Locks Change Access Code Engage Lock Movie Ratings TV Ratings Canadian Ratings(Eng) Canadian Ratings(Frn) Move SEL Select 2. Parents are clearly imaginary, comedic or unrealistic in permitting viewing by children ages...

Owners Guide
Page 52
Press EXIT to quit the menu or select CANADIAN RATINGS (FRN) to return to block. 2. Locks Change Access Code Engage Lock Movie Ratings TV Ratings Canadian Ratings(Eng) Canadian Ratings(Frn) Move SEL Select Locks Canadian Ratings(Frn) Status G 8 ans + 13 ans + 16 ans + 18 ans + Move SEL Return ...
Press EXIT to quit the menu or select CANADIAN RATINGS (FRN) to return to block. 2. Locks Change Access Code Engage Lock Movie Ratings TV Ratings Canadian Ratings(Eng) Canadian Ratings(Frn) Move SEL Select Locks Canadian Ratings(Frn) Status G 8 ans + 13 ans + 16 ans + 18 ans + Move SEL Return ...

Owners Guide
Page 59
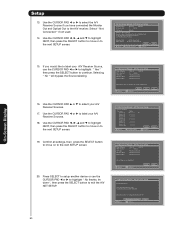
... next SETUP screen. AV Net Setup Wizard : A/V Receiver Setup Please choose the IR Code Set number. Brand Name IR Code Set Test Button Hitachi (44/54) 1 (1/12) Learning Mode POWER SOURCE 1 VOL ̆ Move Change IR Code Back Next 11. Setup AV NET SETUP WIZARD ( Example: A/V RECEIVER Setup) 1. ...AV Net Setup Wizard : A/V Receiver Setup Brand Name Brand Name Hitachi (44/54) 3 (3/12) TV Input Settings If you want to choose the brand name of the devices IR sensor. AV Net Setup Wizard Welcome to choose the preset IR Code. 8. Use the CURSOR PAD ̇ or ̈ to...
... next SETUP screen. AV Net Setup Wizard : A/V Receiver Setup Please choose the IR Code Set number. Brand Name IR Code Set Test Button Hitachi (44/54) 1 (1/12) Learning Mode POWER SOURCE 1 VOL ̆ Move Change IR Code Back Next 11. Setup AV NET SETUP WIZARD ( Example: A/V RECEIVER Setup) 1. ...AV Net Setup Wizard : A/V Receiver Setup Brand Name Brand Name Hitachi (44/54) 3 (3/12) TV Input Settings If you want to choose the brand name of the devices IR sensor. AV Net Setup Wizard Welcome to choose the preset IR Code. 8. Use the CURSOR PAD ̇ or ̈ to...
Owners Guide
Page 60
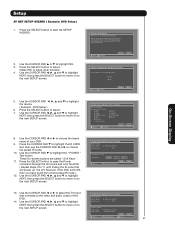
...Source 9 Source 10 Name Back Move Change Name SEL Select Next AV Net Setup Wizard : A/V Receiver Setup Brand Name IR Code Set TV Input Monitor Out Optical Out Hitachi (44/54) 3 (3/12) Not Connected Not Connected Not Connected All settings are complete! Your A/V Receiver is now connected ...to the next SETUP screen. Move No thanks, I'mdone. AV Net Setup Wizard : A/V Receiver Setup Brand Name IR Code Set TV Input Hitachi (44/54) 3 (3/12) Hitachi Monitor Out Settings If you have connected the Monitor Out and Optical Out to label your A/V Receiver Sources. 17. ...
...Source 9 Source 10 Name Back Move Change Name SEL Select Next AV Net Setup Wizard : A/V Receiver Setup Brand Name IR Code Set TV Input Monitor Out Optical Out Hitachi (44/54) 3 (3/12) Not Connected Not Connected Not Connected All settings are complete! Your A/V Receiver is now connected ...to the next SETUP screen. Move No thanks, I'mdone. AV Net Setup Wizard : A/V Receiver Setup Brand Name IR Code Set TV Input Hitachi (44/54) 3 (3/12) Hitachi Monitor Out Settings If you have connected the Monitor Out and Optical Out to label your A/V Receiver Sources. 17. ...
Owners Guide
Page 61
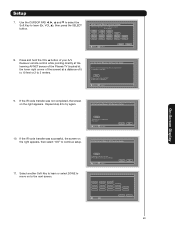
...POWER ̈ CH ̆ Move Back Change Brand Name Next 13. AV Net Setup Wizard : Device Settings DVD Settings Brand Name Hitachi (31/77) IR Code Set 1 (1/5) Inputs settings Video Input Audio Input Not Connected Not Connected Back Next Move Change Source SEL Select 61 DVD Cable DVD ...Recorder VCR Custom ✓ Device is set. Use the CURSOR PAD ̇ or ̈ to select the TV Input that all devices are...
...POWER ̈ CH ̆ Move Back Change Brand Name Next 13. AV Net Setup Wizard : Device Settings DVD Settings Brand Name Hitachi (31/77) IR Code Set 1 (1/5) Inputs settings Video Input Audio Input Not Connected Not Connected Back Next Move Change Source SEL Select 61 DVD Cable DVD ...Recorder VCR Custom ✓ Device is set. Use the CURSOR PAD ̇ or ̈ to select the TV Input that all devices are...
Owners Guide
Page 63
...Receiver Setup Press and hold the VOL ̆ button of your A/V Receiver remote control while pointing directly at the learning AV NET sensor of the Plasma TV (located at the lower right corner of the screen) at a distance of 5 to 10 feet or 2 to 3 meters. Move SEL Select 9.... 4 SOURCE 5 SOURCE 6 SOURCE 7 SOURCE 8 SOURCE 9 SOURCE 10 Move SEL Select Back Done 8. Repeat step 8 to store and continue. If the IR code transfer was successful, the screen on to learn ? AV Net Setup Wizard : Custom Settings Select the A/V Receiver softkey to the next screen. Press and hold...
...Receiver Setup Press and hold the VOL ̆ button of your A/V Receiver remote control while pointing directly at the learning AV NET sensor of the Plasma TV (located at the lower right corner of the screen) at a distance of 5 to 10 feet or 2 to 3 meters. Move SEL Select 9.... 4 SOURCE 5 SOURCE 6 SOURCE 7 SOURCE 8 SOURCE 9 SOURCE 10 Move SEL Select Back Done 8. Repeat step 8 to store and continue. If the IR code transfer was successful, the screen on to learn ? AV Net Setup Wizard : Custom Settings Select the A/V Receiver softkey to the next screen. Press and hold...
Owners Guide
Page 64
... Optical Out Not Connected Not Connected Back Move Change Input SEL Select Next AV Net Setup Wizard : A/V Receiver Setup Brand Name IR Code Set TV Input Monitor Out Optical Out Other Other Not Connected Not Connected Not Connected Would you have connected the Monitor Out and Optical Out to... Monitor out or Optical out to this command, proceed to the A/V Receiver. TV Input Not Connected Move Change Input Back SEL Select Next AV Net Setup Wizard : A/V Receiver Setup Brand Name IR Code Set TV Input Other Other Not Connected Monitor out Settings If you connect the video or...
... Optical Out Not Connected Not Connected Back Move Change Input SEL Select Next AV Net Setup Wizard : A/V Receiver Setup Brand Name IR Code Set TV Input Monitor Out Optical Out Other Other Not Connected Not Connected Not Connected Would you have connected the Monitor Out and Optical Out to... Monitor out or Optical out to this command, proceed to the A/V Receiver. TV Input Not Connected Move Change Input Back SEL Select Next AV Net Setup Wizard : A/V Receiver Setup Brand Name IR Code Set TV Input Other Other Not Connected Monitor out Settings If you connect the video or...


