Owners Guide
Page 3
... are no user serviceable parts inside the plasma television. • Model and serial numbers are not expressly approved by Hitachi America, Ltd. Prevention of receiving analog basic, digital basic and digital premium cable television programming by TV stations and cable companies, as well as... programs from the broadcaster or owner of the plasma television. Lead Notice This product...
... are no user serviceable parts inside the plasma television. • Model and serial numbers are not expressly approved by Hitachi America, Ltd. Prevention of receiving analog basic, digital basic and digital premium cable television programming by TV stations and cable companies, as well as... programs from the broadcaster or owner of the plasma television. Lead Notice This product...
Owners Guide
Page 4
... of stand. ³ Remote Control Unit CLU-3852WL (Part No. This plasma television product is designed for use » Power Cord ¿ 2 IR Mouse Cable ² Cleaning...of the packing material. ³ Remote Control · Two "AA" size, 1.5V batteries ´ Table Top Stand (42" models only) º 1 Ferrite Core (see page 13) First time use only with other apparatus is not recommended. HL02066... (P# 2169513). models: For optional accessories, please access our web site at: www.hitachi.us/tv CAUTION: 1. Use with Hitachi 42HDS52 and 42HDS52A. Accessories Check to remove.
... of stand. ³ Remote Control Unit CLU-3852WL (Part No. This plasma television product is designed for use » Power Cord ¿ 2 IR Mouse Cable ² Cleaning...of the packing material. ³ Remote Control · Two "AA" size, 1.5V batteries ´ Table Top Stand (42" models only) º 1 Ferrite Core (see page 13) First time use only with other apparatus is not recommended. HL02066... (P# 2169513). models: For optional accessories, please access our web site at: www.hitachi.us/tv CAUTION: 1. Use with Hitachi 42HDS52 and 42HDS52A. Accessories Check to remove.
Owners Guide
Page 5
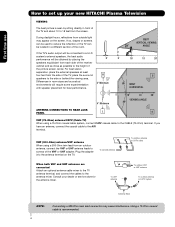
First time use How To Set Up Your New Hitachi Plasma Television To take measures to prevent the Plasma Television from tipping over and prevent possible injury it ... or the back cover when lifting. Whenever the unit is moved, two people are not included (Optional). 42" 55" 5 CONNECT POWER SWIVEL CABLE Connect one end of cable (Arrow mark facing left and right). Do... not place any objects on both sides of the Plasma Rear Panel. Wire ANTENNA Unless your Plasma Television is connected to a cable TV system or to the wall as shown below . When moving the main...
First time use How To Set Up Your New Hitachi Plasma Television To take measures to prevent the Plasma Television from tipping over and prevent possible injury it ... or the back cover when lifting. Whenever the unit is moved, two people are not included (Optional). 42" 55" 5 CONNECT POWER SWIVEL CABLE Connect one end of cable (Arrow mark facing left and right). Do... not place any objects on both sides of the Plasma Rear Panel. Wire ANTENNA Unless your Plasma Television is connected to a cable TV system or to the wall as shown below . When moving the main...
Owners Guide
Page 6
...receiver cabinet and as close as possible to the height of the picture screen center. If the TV's audio output will be used to the antenna mixer. Consult your new HITACHI Plasma Television VIEWING The best picture is recommended. AIR To second antenna CABLE To outdoor antenna or CATV... cable When both VHF and UHF antennas are connected Attach an optional antenna cable mixer to the TV antenna terminal, and connect the ...
...receiver cabinet and as close as possible to the height of the picture screen center. If the TV's audio output will be used to the antenna mixer. Consult your new HITACHI Plasma Television VIEWING The best picture is recommended. AIR To second antenna CABLE To outdoor antenna or CATV... cable When both VHF and UHF antennas are connected Attach an optional antenna cable mixer to the TV antenna terminal, and connect the ...
Owners Guide
Page 7
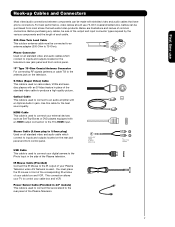
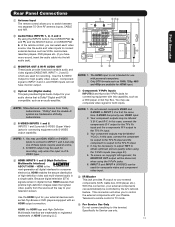
...to an antenna adapter (300-Ohm to connect your cable box and VCR. Power Swivel Cable (Provided in 42" models) This cable is used to connect to the rear panel of the Plasma television. Optical Cable This cable is used to connect the swivel stand to an audio amplifier with an S-... cables which connect to the IR output of common connectors. "F" Type 75-Ohm Coaxial Antenna Connector For connecting RF signals (antenna or cable TV) to the TV's HDMI input. Cables can be made with an HDMI output connection to the antenna jack on the rear jack panel and front control panel...
...to an antenna adapter (300-Ohm to connect your cable box and VCR. Power Swivel Cable (Provided in 42" models) This cable is used to connect to the rear panel of the Plasma television. Optical Cable This cable is used to connect the swivel stand to an audio amplifier with an S-... cables which connect to the IR output of common connectors. "F" Type 75-Ohm Coaxial Antenna Connector For connecting RF signals (antenna or cable TV) to the TV's HDMI input. Cables can be made with an HDMI output connection to the antenna jack on the rear jack panel and front control panel...
Owners Guide
Page 8
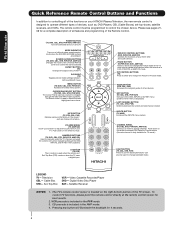
...for a complete description of all of the functions on your HITACHI Plasma Television, the new remote control is designed to control the device selected. DAY/NIGHT (TV) Toggles picture mode settings between the current and last channel viewed. PAUSE BUTTON (TV,PVR/VCR, DVD, AMP/CD) Press to use Quick ...Video Cassette Recorder/Player DVD - MODE INDICATOR Turns on or blinks to change the Freeze mode of your VCR, DVD and audio devices. MENU BUTTON (TV, DVD, CBL, STB, PVR/VCR) Accesses the OSD menu system. Push down on the wheel to access (FAV) Favorite Channel mode. (Favorite...
...for a complete description of all of the functions on your HITACHI Plasma Television, the new remote control is designed to control the device selected. DAY/NIGHT (TV) Toggles picture mode settings between the current and last channel viewed. PAUSE BUTTON (TV,PVR/VCR, DVD, AMP/CD) Press to use Quick ...Video Cassette Recorder/Player DVD - MODE INDICATOR Turns on or blinks to change the Freeze mode of your VCR, DVD and audio devices. MENU BUTTON (TV, DVD, CBL, STB, PVR/VCR) Accesses the OSD menu system. Push down on the wheel to access (FAV) Favorite Channel mode. (Favorite...
Owners Guide
Page 9
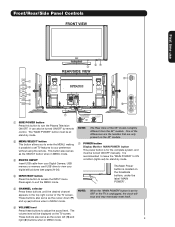
... right corner of the differences are the handles that are only present on the 42" models. ቨ POWER button Display Monitor MAIN POWER button This power button is recommended to leave the "MAIN POWER" to turn the Plasma Television ON/OFF. The volume level will stop and may eventually reset itself. &#... It can also be at stand-by remote control. Firmly bind the cables. NOTE: When the "MAIN POWER" button is set TV features to OFF or the TV is located on the TV screen. These buttons also serve as the cursor down (̄) and up (̆) buttons when in MENU mode. ቤ PHOTO...
... right corner of the differences are the handles that are only present on the 42" models. ቨ POWER button Display Monitor MAIN POWER button This power button is recommended to leave the "MAIN POWER" to turn the Plasma Television ON/OFF. The volume level will stop and may eventually reset itself. &#... It can also be at stand-by remote control. Firmly bind the cables. NOTE: When the "MAIN POWER" button is set TV features to OFF or the TV is located on the TV screen. These buttons also serve as the cursor down (̄) and up (̆) buttons when in MENU mode. ቤ PHOTO...

Owners Guide
Page 10
... area while using the AV NET Learning Wizard. ቫ SIDE INPUT JACKS (for VIDEO: 5) Use these audio/video jacks for remote ON/OFF operation. The Plasma TV is ON with no signal input except antenna (no video input when VIDEO: 1, 2, 3, 4 and 5. Display monitor MAIN POWER is now ready for a... is no sync. Remote Control can not turn the monitor ON, press the main power switch located on the display monitor is ON. Your HITACHI Plasma TV will illuminate. A red stand-by mode (lights red) when not in Stand-by indicator lamp located on the remote control to OFF. Press...
... area while using the AV NET Learning Wizard. ቫ SIDE INPUT JACKS (for VIDEO: 5) Use these audio/video jacks for remote ON/OFF operation. The Plasma TV is ON with no signal input except antenna (no video input when VIDEO: 1, 2, 3, 4 and 5. Display monitor MAIN POWER is now ready for a... is no sync. Remote Control can not turn the monitor ON, press the main power switch located on the display monitor is ON. Your HITACHI Plasma TV will illuminate. A red stand-by mode (lights red) when not in Stand-by indicator lamp located on the remote control to OFF. Press...
Owners Guide
Page 11
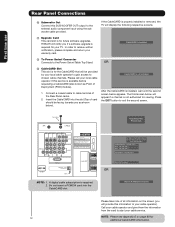
... 1 and 2 INPUTS 1 and 2 provide S-VIDEO (Super Video) jacks for connecting equipment with your Plasma Television's remote control in TV mode. In this case, connect the component CB output to the TV's PB input and the component CR output to the TV's PR input. 3. HDMI enables the secure distribution MONITOR OUT output will not have... button or CURSOR PAD ቫ ̈ of SVIDEO type. Do not connect composite VIDEO and S-VIDEO to this case, connect the components B-Y output to the TV's PB input and the components R-Y output to the...
... 1 and 2 INPUTS 1 and 2 provide S-VIDEO (Super Video) jacks for connecting equipment with your Plasma Television's remote control in TV mode. In this case, connect the component CB output to the TV's PB input and the component CR output to the TV's PR input. 3. HDMI enables the secure distribution MONITOR OUT output will not have... button or CURSOR PAD ቫ ̈ of SVIDEO type. Do not connect composite VIDEO and S-VIDEO to this case, connect the components B-Y output to the TV's PB input and the components R-Y output to the...
Owners Guide
Page 12
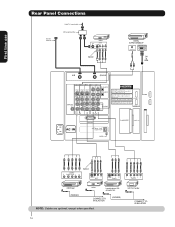
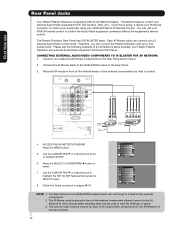
... Power Swivel Table Top Stand. First time use Rear Panel Connections ቫ Subwoofer Out Connect this information to your cable operator). HITACHI will notify you if a software upgrade is for the CableCARD that will be facing towards you will provide this SUB WOOFER OUT... Slot This slot is required for additional CableCARD information. Connect a coaxial cable to receive written notification, please complete and return your TV. CableCARD is not installed After the CableCARD is not authorized for future software upgrades. Not an Authorized Channel Please take note of the...
... Power Swivel Table Top Stand. First time use Rear Panel Connections ቫ Subwoofer Out Connect this information to your cable operator). HITACHI will notify you if a software upgrade is for the CableCARD that will be facing towards you will provide this SUB WOOFER OUT... Slot This slot is required for additional CableCARD information. Connect a coaxial cable to receive written notification, please complete and return your TV. CableCARD is not installed After the CableCARD is not authorized for future software upgrades. Not an Authorized Channel Please take note of the...
Owners Guide
Page 13
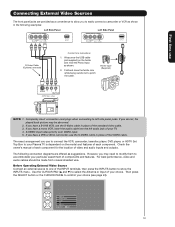
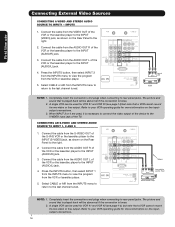
... model and features of each component for the location of the INPUT terminals, then press the INPUTS button to accommodate your particular assortment of your TV. 4. First time use Connecting External Video Sources The front panel jacks are offered as suggestions. Ferrite Core (Supplied) NOTE: 1. The exact ...show the INPUTS menu. If you use to connect the VCR, camcorder, laserdisc player, DVD player, or HDTV Set Top Box to confirm your Plasma TV is dependent on the ferrite core near the Photo Input as shown. 2. Then press the SELECT button or the CURSOR PAD ̈ to ...
... model and features of each component for the location of the INPUT terminals, then press the INPUTS button to accommodate your particular assortment of your TV. 4. First time use Connecting External Video Sources The front panel jacks are offered as suggestions. Ferrite Core (Supplied) NOTE: 1. The exact ...show the INPUTS menu. If you use to connect the VCR, camcorder, laserdisc player, DVD player, or HDTV Set Top Box to confirm your Plasma TV is dependent on the ferrite core near the Photo Input as shown. 2. Then press the SELECT button or the CURSOR PAD ̈ to ...
Owners Guide
Page 14
CONNECT TO IR BLASTER (PROVIDED) NOTE: Cables are optional, except when specified. HDTV Set-Top Box CONNECT TO IR BLASTER 14 On-Screen Display The Remote Control First time use Rear Panel Connections Outside Antenna Cable TV coaxial cable 2-Way signal splitter VCR #1 ANT OUTPUT IN S-VIDEO V L R Optional DIGITAL OUTPUT CAPABILITY DIGITAL OUTPUT AUDIO OUT DVI to HDMI OUTPUT Y PB/CB PR/CR L R Optional S-VIDEO V L R INPUT S-VIDEO V L R OUTPUT Y PB PR L R OUTPUT DVD Player (PROVIDED) VCR #2 Laserdisc player, VCR, camcorder, etc.
CONNECT TO IR BLASTER (PROVIDED) NOTE: Cables are optional, except when specified. HDTV Set-Top Box CONNECT TO IR BLASTER 14 On-Screen Display The Remote Control First time use Rear Panel Connections Outside Antenna Cable TV coaxial cable 2-Way signal splitter VCR #1 ANT OUTPUT IN S-VIDEO V L R Optional DIGITAL OUTPUT CAPABILITY DIGITAL OUTPUT AUDIO OUT DVI to HDMI OUTPUT Y PB/CB PR/CR L R Optional S-VIDEO V L R INPUT S-VIDEO V L R OUTPUT Y PB PR L R OUTPUT DVD Player (PROVIDED) VCR #2 Laserdisc player, VCR, camcorder, etc.

Owners Guide
Page 15
... record its own video or line output (INPUT: 1 in place of S-VIDEO type. • When using a HDMI input from a Set-Top-Box, it to the TV's PR input. • It may be used for high performance laserdisc players, VCRs etc. MACROVISION NOTES: 1. In this feature. • If your device has only... audio output (mono sound), connect it is of the standard video connection if your device has this case, connect the components CB output to the TV's PB input and the components CR output to the left audio jack on page 14). Use these connections in place of a Set-Top-Box will...
... record its own video or line output (INPUT: 1 in place of S-VIDEO type. • When using a HDMI input from a Set-Top-Box, it to the TV's PR input. • It may be used for high performance laserdisc players, VCRs etc. MACROVISION NOTES: 1. In this feature. • If your device has only... audio output (mono sound), connect it is of the standard video connection if your device has this case, connect the components CB output to the TV's PB input and the components CR output to the left audio jack on page 14). Use these connections in place of a Set-Top-Box will...
Owners Guide
Page 16
... INPUT 1, 2 AND 5 1. Connect the cable from the INPUTS menu to return to rear panel jacks. Select CABLE or AIR from the S-VIDEO OUT of the TV. First time use Connecting External Video Sources CONNECTING A VIDEO AND STEREO AUDIO SOURCE TO INPUT1 - INPUT5 1. Completely insert the connection cord plugs when connecting to...
... INPUT 1, 2 AND 5 1. Connect the cable from the INPUTS menu to return to rear panel jacks. Select CABLE or AIR from the S-VIDEO OUT of the TV. First time use Connecting External Video Sources CONNECTING A VIDEO AND STEREO AUDIO SOURCE TO INPUT1 - INPUT5 1. Completely insert the connection cord plugs when connecting to...

Owners Guide
Page 19
... from the VIDEO INPUT of the VCR or the laserdisc player to the VIDEO out jack on the TV Rear Panel. Connecting Video: Connect the cable from the AUDIO IN L of the VCR or the ...audio amplifier, connect the system as shown on the TV Rear Panel. Connect the cable from the Rear Panel is controlled by the amplifier, not by the Plasma Television. The OPTICAL OUT terminal outputs all audio sources... with Optical IN capability. 1. The "OPTICAL OUT" from the AUDIO IN R of the Plasma TV to the OUTPUT (AUDIO/R) jack on the right. Connect an optical cable from the VIDEO OUT...
... from the VIDEO INPUT of the VCR or the laserdisc player to the VIDEO out jack on the TV Rear Panel. Connecting Video: Connect the cable from the AUDIO IN L of the VCR or the ...audio amplifier, connect the system as shown on the TV Rear Panel. Connect the cable from the Rear Panel is controlled by the amplifier, not by the Plasma Television. The OPTICAL OUT terminal outputs all audio sources... with Optical IN capability. 1. The "OPTICAL OUT" from the AUDIO IN R of the Plasma TV to the OUTPUT (AUDIO/R) jack on the right. Connect an optical cable from the VIDEO OUT...
Owners Guide
Page 20
... equipment's remote control. Each IR Mouse cable can control up to a total of an AV Network setup between your HITACHI remote control to control your equipment using your HITACHI Plasma TV Remote Control. Connect your external Audio/Video equipment (VCR, Set Top Box, DVD, etc.). Place the IR mouse in... place. 3. Press the SELECT or CURSOR PAD ̈ button to function properly. 20 You can connect the Plasma Television with an AV ...
... equipment's remote control. Each IR Mouse cable can control up to a total of an AV Network setup between your HITACHI remote control to control your equipment using your HITACHI Plasma TV Remote Control. Connect your external Audio/Video equipment (VCR, Set Top Box, DVD, etc.). Place the IR mouse in... place. 3. Press the SELECT or CURSOR PAD ̈ button to function properly. 20 You can connect the Plasma Television with an AV ...

Owners Guide
Page 21
...to program your satellite receiver. The Remote Control The Remote Control In addition to controlling all the functions on your HITACHI Plasma TV, the new remote control is dark. To operate your Plasma TV, point the remote control at the remote sensor of the cable box and select the CABLE (CBL) by pressing... the ̇ or ̈ button of the set -top-box). They are grouped together in TV Mode by pressing the ̇ or &#...
...to program your satellite receiver. The Remote Control The Remote Control In addition to controlling all the functions on your HITACHI Plasma TV, the new remote control is dark. To operate your Plasma TV, point the remote control at the remote sensor of the cable box and select the CABLE (CBL) by pressing... the ̇ or ̈ button of the set -top-box). They are grouped together in TV Mode by pressing the ̇ or &#...
Owners Guide
Page 22
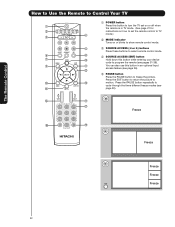
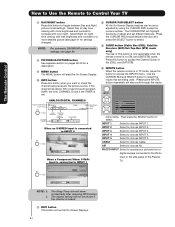
... picture to ቫ ቱ motion. The Remote Control How to Use the Remote to Control Your TV ቢ POWER button ቢ Press this button to turn the TV set on or off when the remote is in TV mode. (See page 21 for ባ instructions on how to set the remote control to... TV ቤ ብ mode.) ባ MODE Indicator Turns on or blinks to show remote control mode. ቦ ቤ SOURCE ACCESS (̇ or ̈) buttons Press these ...
... picture to ቫ ቱ motion. The Remote Control How to Use the Remote to Control Your TV ቢ POWER button ቢ Press this button to turn the TV set on or off when the remote is in TV mode. (See page 21 for ባ instructions on how to set the remote control to... TV ቤ ብ mode.) ባ MODE Indicator Turns on or blinks to show remote control mode. ቦ ቤ SOURCE ACCESS (̇ or ̈) buttons Press these ...
Owners Guide
Page 23
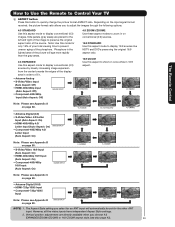
... the input signal format received, the picture format ratio allows you choose 4:3 EXPANDED/ZOOM1/ZOOM2 or 16:9 ZOOM aspect style (see also page 42). 23 However, all five video inputs have independent Aspect Style settings. 2. Phosphors in 16:9 aspect. Note: Please see Appendix D on page...'s preserving the original 16:9 aspect ratio. 16:9 ZOOM Use this mode for the other ANT input. How to Use the Remote to Control Your TV ቧ ASPECT button Press this aspect mode to display conventional (4:3) images. The Remote Control • Antenna-Digital (4:3) • S-Video/Video 4:3/...
... the input signal format received, the picture format ratio allows you choose 4:3 EXPANDED/ZOOM1/ZOOM2 or 16:9 ZOOM aspect style (see also page 42). 23 However, all five video inputs have independent Aspect Style settings. 2. Phosphors in 16:9 aspect. Note: Please see Appendix D on page...'s preserving the original 16:9 aspect ratio. 16:9 ZOOM Use this mode for the other ANT input. How to Use the Remote to Control Your TV ቧ ASPECT button Press this aspect mode to display conventional (4:3) images. The Remote Control • Antenna-Digital (4:3) • S-Video/Video 4:3/...
Owners Guide
Page 24
...The Sleep Timer info will also cycle through the Inputs ANALOG/DIGITAL CHANNELS Program Information Event Timer INFO Day/Night Mode No Info --:-- PM ST TV-14 V Audio Broadcast Broadcast Rating Closed Captioning Day CC Off Cable 6 11:00PM Aspect Mode 16:9 Standard Main Picture Source Time When an...and (SAT/STB). ተ INPUTS button When the remote control is in the side panel of the Plasma TV. menu items. Then press the SELECT button to the Photo Input in TV mode, press this button to access the Channel Guide of this button is only applicable when the remote ...
...The Sleep Timer info will also cycle through the Inputs ANALOG/DIGITAL CHANNELS Program Information Event Timer INFO Day/Night Mode No Info --:-- PM ST TV-14 V Audio Broadcast Broadcast Rating Closed Captioning Day CC Off Cable 6 11:00PM Aspect Mode 16:9 Standard Main Picture Source Time When an...and (SAT/STB). ተ INPUTS button When the remote control is in the side panel of the Plasma TV. menu items. Then press the SELECT button to the Photo Input in TV mode, press this button to access the Channel Guide of this button is only applicable when the remote ...


