Owners Guide
Page 3
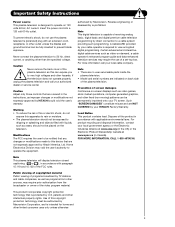
...the plasma television and call your authorized dealer or service center. Warning • To reduce the risk of fire or electric shock, do not use of a set-top box. Home Electronics Division may void the user's authority to view encrypted digital programming. authorized by TV ...the specified voltage. Note This plasma television will display television closed captioning, ( or ), in Canada). Modifications The FCC requires the user to be authorized by your HITACHI Factory Warranty. Note This digital television is capable of the plasma television as video-on -screen displays such as...
...the plasma television and call your authorized dealer or service center. Warning • To reduce the risk of fire or electric shock, do not use of a set-top box. Home Electronics Division may void the user's authority to view encrypted digital programming. authorized by TV ...the specified voltage. Note This plasma television will display television closed captioning, ( or ), in Canada). Modifications The FCC requires the user to be authorized by your HITACHI Factory Warranty. Note This digital television is capable of the plasma television as video-on -screen displays such as...
Owners Guide
Page 7
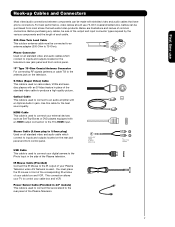
... an HDMI output connection to the IR output of your external devices such as Set-Top-Boxes or DVD players equipped with an Optical Audio In jack. IR Mouse Cable (Provided) Connect the IR Mouse to the TV's HDMI input. AUDIO OUT 3.8mm STEREO MINI-PLUG 2 RCA TYPE PLUGS 7 Cables ... audio/video products. Use this cable for the best sound quality. USB Cable This cable is used to connect your digital camera to the Photo Input in 42" models) This cable is used on the television's rear jack panel and front control panel. This connection allows your TV to connect your Plasma Television...
... an HDMI output connection to the IR output of your external devices such as Set-Top-Boxes or DVD players equipped with an Optical Audio In jack. IR Mouse Cable (Provided) Connect the IR Mouse to the TV's HDMI input. AUDIO OUT 3.8mm STEREO MINI-PLUG 2 RCA TYPE PLUGS 7 Cables ... audio/video products. Use this cable for the best sound quality. USB Cable This cable is used to connect your digital camera to the Photo Input in 42" models) This cable is used on the television's rear jack panel and front control panel. This connection allows your TV to connect your Plasma Television...
Owners Guide
Page 8
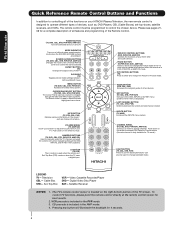
... the audio level of your TV. Video Cassette Recorder/Player DVD - To control TV functions, please point the remote control directly at the remote control sensor for 4 seconds. 8 CD precode is in Set-Top-Box (STB) mode or when the TV uses a digital input. LAST CHANNEL BUTTON (TV, CBL, STB, PVR) ... to show remote control mode when the SOURCE ACCESS buttons are pressed. PIP CONTROL BUTTONS (TV) Press to show and change channel. EXIT BUTTON (TV, CBL, STB, PVR/VCR) Exits out of your HITACHI Plasma Television, the new remote control is in DVD, PVR/VCR, or AMP/CD mode. Can...
... the audio level of your TV. Video Cassette Recorder/Player DVD - To control TV functions, please point the remote control directly at the remote control sensor for 4 seconds. 8 CD precode is in Set-Top-Box (STB) mode or when the TV uses a digital input. LAST CHANNEL BUTTON (TV, CBL, STB, PVR) ... to show remote control mode when the SOURCE ACCESS buttons are pressed. PIP CONTROL BUTTONS (TV) Press to show and change channel. EXIT BUTTON (TV, CBL, STB, PVR/VCR) Exits out of your HITACHI Plasma Television, the new remote control is in DVD, PVR/VCR, or AMP/CD mode. Can...
Owners Guide
Page 9
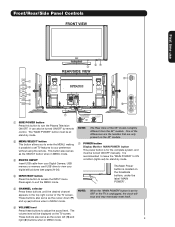
... ቤ PHOTO INPUT Insert USB cable from the 42" models. One of the differences are the handles that are only present on the 42" models. ቨ POWER button Display Monitor MAIN ...MAIN POWER" button is set TV features to your digital still pictures (see pages 24-26). ብ INPUT/EXIT button Press this button to turn the Plasma Television ON/OFF. These... ቧ INPUT/EXIT MENU/SELECT ብ ባ ቩቪ ቨ REAR/SIDE VIEW ቤ ቫ VIDEO S-VIDEO ̆ INPUT 5 L/MONO AUDIO R ቨ ቢ SIDE POWER button Press this button to access the INPUT menu...
... ቤ PHOTO INPUT Insert USB cable from the 42" models. One of the differences are the handles that are only present on the 42" models. ቨ POWER button Display Monitor MAIN ...MAIN POWER" button is set TV features to your digital still pictures (see pages 24-26). ብ INPUT/EXIT button Press this button to turn the Plasma Television ON/OFF. These... ቧ INPUT/EXIT MENU/SELECT ብ ባ ቩቪ ቨ REAR/SIDE VIEW ቤ ቫ VIDEO S-VIDEO ̆ INPUT 5 L/MONO AUDIO R ቨ ቢ SIDE POWER button Press this button to access the INPUT menu...

Owners Guide
Page 10
...with no signal input except antenna (no video input when VIDEO: 1, 2, 3, 4 and 5. Remote Control can not turn the monitor ON, press the main power switch located on the display monitor is ON. The Plasma TV is no sync. Display monitor MAIN POWER is ON. Your HITACHI Plasma TV will illuminate. signal). ቪ REMOTE... to select INPUT 5. Press the INPUTS button then use . 2. Check the Power Light to make sure the Display Monitor is set to instantly view your equipment's remote control at this area while using the AV NET Learning Wizard. ቫ SIDE INPUT JACKS (for...
...with no signal input except antenna (no video input when VIDEO: 1, 2, 3, 4 and 5. Remote Control can not turn the monitor ON, press the main power switch located on the display monitor is ON. The Plasma TV is no sync. Display monitor MAIN POWER is ON. Your HITACHI Plasma TV will illuminate. signal). ቪ REMOTE... to select INPUT 5. Press the INPUTS button then use . 2. Check the Power Light to make sure the Display Monitor is set to instantly view your equipment's remote control at this area while using the AV NET Learning Wizard. ቫ SIDE INPUT JACKS (for...
Owners Guide
Page 11
...INPUT 4 (Y/VIDEO) can be labeled NOTE: 1. Use the S-VIDEO Output for high quality video output. Only DTV formats such as Set-Top-Boxes or DVD players equipped with an the external components with S-VIDEO output capability. Because digital television (DTV) signals remain in TV mode. ..., when using the Y-PBPR jacks. 6. This connection will be labeled ቦ S-VIDEO INPUTS 1 and 2 INPUTS 1 and 2 provide S-VIDEO (Super Video) jacks for connecting equipment with your Plasma Television's remote control in digital format, HDMI assures that is the next-generation all...
...INPUT 4 (Y/VIDEO) can be labeled NOTE: 1. Use the S-VIDEO Output for high quality video output. Only DTV formats such as Set-Top-Boxes or DVD players equipped with an the external components with S-VIDEO output capability. Because digital television (DTV) signals remain in TV mode. ..., when using the Y-PBPR jacks. 6. This connection will be labeled ቦ S-VIDEO INPUTS 1 and 2 INPUTS 1 and 2 provide S-VIDEO (Super Video) jacks for connecting equipment with your Plasma Television's remote control in digital format, HDMI assures that is the next-generation all...
Owners Guide
Page 13
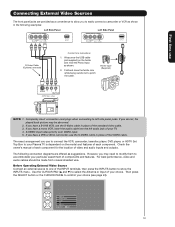
... a S-VHS VCR, use to connect the VCR, camcorder, laserdisc player, DVD player, or HDTV Set Top Box to show the INPUTS menu. First time use Connecting External Video Sources The front panel jacks are offered as suggestions. Check the owner's manual of each component. Before... them to accommodate your particular assortment of your Plasma TV is dependent on the ferrite core near the Photo Input as shown in place of the INPUT terminals, then press the INPUTS button to your TV. 4. S-VIDEO input takes priority over VIDEO input. 5. The following connection diagrams are provided...
... a S-VHS VCR, use to connect the VCR, camcorder, laserdisc player, DVD player, or HDTV Set Top Box to show the INPUTS menu. First time use Connecting External Video Sources The front panel jacks are offered as suggestions. Check the owner's manual of each component. Before... them to accommodate your particular assortment of your Plasma TV is dependent on the ferrite core near the Photo Input as shown in place of the INPUT terminals, then press the INPUTS button to your TV. 4. S-VIDEO input takes priority over VIDEO input. 5. The following connection diagrams are provided...
Owners Guide
Page 14
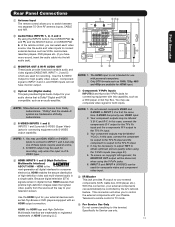
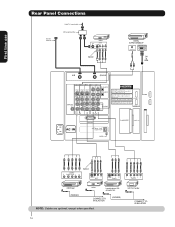
HDTV Set-Top Box CONNECT TO IR BLASTER 14 On-Screen Display The Remote Control First time use Rear Panel Connections Outside Antenna Cable TV coaxial cable 2-Way signal splitter VCR #1 ANT OUTPUT IN S-VIDEO V L R Optional DIGITAL OUTPUT CAPABILITY DIGITAL OUTPUT AUDIO OUT DVI to HDMI OUTPUT Y PB/CB PR/CR L R Optional S-VIDEO V L R INPUT S-VIDEO V L R OUTPUT Y PB PR L R OUTPUT DVD Player (PROVIDED) VCR #2 Laserdisc player, VCR, camcorder, etc. CONNECT TO IR BLASTER (PROVIDED) NOTE: Cables are optional, except when specified.
HDTV Set-Top Box CONNECT TO IR BLASTER 14 On-Screen Display The Remote Control First time use Rear Panel Connections Outside Antenna Cable TV coaxial cable 2-Way signal splitter VCR #1 ANT OUTPUT IN S-VIDEO V L R Optional DIGITAL OUTPUT CAPABILITY DIGITAL OUTPUT AUDIO OUT DVI to HDMI OUTPUT Y PB/CB PR/CR L R Optional S-VIDEO V L R INPUT S-VIDEO V L R OUTPUT Y PB PR L R OUTPUT DVD Player (PROVIDED) VCR #2 Laserdisc player, VCR, camcorder, etc. CONNECT TO IR BLASTER (PROVIDED) NOTE: Cables are optional, except when specified.

Owners Guide
Page 15
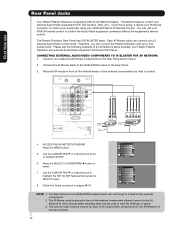
...Panel. • Refer to the TV's PR input. • Your component outputs may be used for more information on line input-output connections. • Connect only 1 component (VCR, DVD player, camcorder, etc.) to the Audio /Video output of a Set-Top-Box will be used for ...additional information on connecting your hook-up cables. • A single VCR can accept HDMI signal. • S-VIDEO monitor output may be labeled Y, B-Y, and R-Y. MACROVISION NOTES: 1. Use...
...Panel. • Refer to the TV's PR input. • Your component outputs may be used for more information on line input-output connections. • Connect only 1 component (VCR, DVD player, camcorder, etc.) to the Audio /Video output of a Set-Top-Box will be used for ...additional information on connecting your hook-up cables. • A single VCR can accept HDMI signal. • S-VIDEO monitor output may be labeled Y, B-Y, and R-Y. MACROVISION NOTES: 1. Use...

Owners Guide
Page 17
..., then select INPUTS 1 or 2 to view the program from the INPUTS menu to return to -point connection for delivery of device user settings determines final video appearance. 5. It establishes a one-way point-to the last channel viewed. When using HDMI connections to prevent illegal copying of the HDTV...-Box or DVD Player or PR PB DVI to HDMI Cable LR OUTPUT DIGITAL OUTPUT Back of the HDTV set top box or DVD player. 5. First time use Connecting External Video Sources CONNECTING A COMPONENT SOURCE WITH HDMI OR DVI CAPABILITY TO INPUT 1 OR 2 1. Connect the HDMI or DVI ...
..., then select INPUTS 1 or 2 to view the program from the INPUTS menu to return to -point connection for delivery of device user settings determines final video appearance. 5. It establishes a one-way point-to the last channel viewed. When using HDMI connections to prevent illegal copying of the HDTV...-Box or DVD Player or PR PB DVI to HDMI Cable LR OUTPUT DIGITAL OUTPUT Back of the HDTV set top box or DVD player. 5. First time use Connecting External Video Sources CONNECTING A COMPONENT SOURCE WITH HDMI OR DVI CAPABILITY TO INPUT 1 OR 2 1. Connect the HDMI or DVI ...
Owners Guide
Page 18
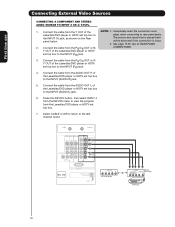
... picture and sound that is loose. 2. Connect the cable from the Y OUT of the Laserdisc/DVD player or HDTV set top box to view the program from the AUDIO OUT L of VIDEO AUDIO DVD Player PR/CR PB/CB Y L R DVD Player 18 Press the INPUTS button, then select INPUT 4 ... INPUT (AUDIO/L) jack. 6. Connect the cable from the Laserdisc/DVD player or HDTV set top box to the INPUT (PB) jack. 3. set top box to plugs when connecting to the last channel tuned. First time use Connecting External Video Sources CONNECTING A COMPONENT AND STEREO AUIDO SOURCE TO INPUT 3 OR 4: Y-PBPR. 1....
... picture and sound that is loose. 2. Connect the cable from the Y OUT of the Laserdisc/DVD player or HDTV set top box to view the program from the AUDIO OUT L of VIDEO AUDIO DVD Player PR/CR PB/CB Y L R DVD Player 18 Press the INPUTS button, then select INPUT 4 ... INPUT (AUDIO/L) jack. 6. Connect the cable from the Laserdisc/DVD player or HDTV set top box to the INPUT (PB) jack. 3. set top box to plugs when connecting to the last channel tuned. First time use Connecting External Video Sources CONNECTING A COMPONENT AND STEREO AUIDO SOURCE TO INPUT 3 OR 4: Y-PBPR. 1....
Owners Guide
Page 20
... SELECT or CURSOR PAD ̈ button to highlight SETUP. 6. Video Audio Channel Manager Locks Timers Setup Power Swivel Move SEL Select Setup Menu Preference Screen Saver Set The Inputs Set AV NET Set Closed Captions Set Monitor Out Upgrades Quick Start Up Move SEL Return NOTE: 1. ... Each IR Mouse cable can use Rear Panel Jacks Your Hitachi Plasma Television is setup, it allows your IR Mouse connector to control your HITACHI Plasma TV Remote Control. Therefore, you wish to control the Audio/Video equipment command without the equipment's remote control. Please see ...
... SELECT or CURSOR PAD ̈ button to highlight SETUP. 6. Video Audio Channel Manager Locks Timers Setup Power Swivel Move SEL Select Setup Menu Preference Screen Saver Set The Inputs Set AV NET Set Closed Captions Set Monitor Out Upgrades Quick Start Up Move SEL Return NOTE: 1. ... Each IR Mouse cable can use Rear Panel Jacks Your Hitachi Plasma Television is setup, it allows your IR Mouse connector to control your HITACHI Plasma TV Remote Control. Therefore, you wish to control the Audio/Video equipment command without the equipment's remote control. Please see ...

Owners Guide
Page 21
... receiver, DVD players, and other audio/video equipment with one area. They are two modes of VCRs, CATV (Cable TV) converters, set -top-box). The Remote Control The Remote Control In addition to controlling all the functions on your HITACHI Plasma TV, the new remote control is dark. The TV mode indicator will blink, indicating that the...
... receiver, DVD players, and other audio/video equipment with one area. They are two modes of VCRs, CATV (Cable TV) converters, set -top-box). The Remote Control The Remote Control In addition to controlling all the functions on your HITACHI Plasma TV, the new remote control is dark. The TV mode indicator will blink, indicating that the...
Owners Guide
Page 23
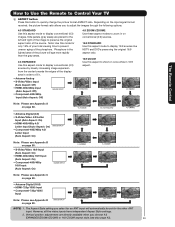
... NOTE: 1. Phosphors in on page 80. The Aspect Style setting you choose 4:3 EXPANDED/ZOOM1/ZOOM2 or 16:9 ZOOM aspect style (see also page 42). 23 However, all five video inputs have independent Aspect Style settings. 2. The Remote Control • Antenna-Digital (4:3) • S-Video/Video 4:3/Letter Input (Auto Aspect: On) • HDMI-480i/480p...right of the image to preserve the original aspect ratio of the phosphors. How to Use the Remote to Control Your TV ቧ ASPECT button Press this aspect mode to display conventional (4:3) images. Depending on page 80.
... NOTE: 1. Phosphors in on page 80. The Aspect Style setting you choose 4:3 EXPANDED/ZOOM1/ZOOM2 or 16:9 ZOOM aspect style (see also page 42). 23 However, all five video inputs have independent Aspect Style settings. 2. The Remote Control • Antenna-Digital (4:3) • S-Video/Video 4:3/Letter Input (Auto Aspect: On) • HDMI-480i/480p...right of the image to preserve the original aspect ratio of the phosphors. How to Use the Remote to Control Your TV ቧ ASPECT button Press this aspect mode to display conventional (4:3) images. Depending on page 80.
Owners Guide
Page 24
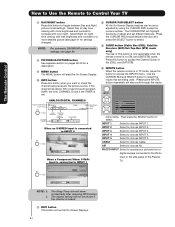
... this button to INPUT 3 S-IN:3 480i 11:00PM INFO Day CC Off 4:3 Expanded When a Component Video: Y-PbPr Input is set or adjusted by using the CURSOR PAD, except for settings changes). The CURSOR PAD will also cycle through the Inputs ANALOG/DIGITAL CHANNELS Program Information Event Timer INFO Day...for a description. ቪ MENU button The MENU button will not be set . ቮ CURSOR PAD/SELECT button All the On-Screen Display features can be shown if the channel is in the side panel of the Plasma TV. INPUT 2 Select to compete with more detailed picture (see page 54....
... this button to INPUT 3 S-IN:3 480i 11:00PM INFO Day CC Off 4:3 Expanded When a Component Video: Y-PbPr Input is set or adjusted by using the CURSOR PAD, except for settings changes). The CURSOR PAD will also cycle through the Inputs ANALOG/DIGITAL CHANNELS Program Information Event Timer INFO Day...for a description. ቪ MENU button The MENU button will not be set . ቮ CURSOR PAD/SELECT button All the On-Screen Display features can be shown if the channel is in the side panel of the Plasma TV. INPUT 2 Select to compete with more detailed picture (see page 54....
Owners Guide
Page 29
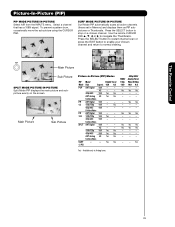
...Main Picture Sub Picture Picture-in Analog tuner. 29 Yes Yes - -- - -- Yes Yes Yes Yes -- - Yes - - 480p/480i/ Analog Tuner Video/S-Video 16:9 4:3 -- Available only in -Picture (PIP) Modes PIP Mode POP PIP 4:3 PIP 16:9 SPLIT SURF 12 PIX Main/ Sub Aspect ANT Digital 16... MODE PICTURE-IN-PICTURE Select AIR from the INPUTS menu. Yes -- -- SURF MODE PICTURE-IN-PICTURE Surf Mode PIP automatically scans all active channels (those set in Memory) and displays them as PIP subpictures or Thumbnails. Yes Yes -- -- - Digital Tuner 16:9 4:3 -- -- Yes1 Yes1 - Yes Yes Yes...
...Main Picture Sub Picture Picture-in Analog tuner. 29 Yes Yes - -- - -- Yes Yes Yes Yes -- - Yes - - 480p/480i/ Analog Tuner Video/S-Video 16:9 4:3 -- Available only in -Picture (PIP) Modes PIP Mode POP PIP 4:3 PIP 16:9 SPLIT SURF 12 PIX Main/ Sub Aspect ANT Digital 16... MODE PICTURE-IN-PICTURE Select AIR from the INPUTS menu. Yes -- -- SURF MODE PICTURE-IN-PICTURE Surf Mode PIP automatically scans all active channels (those set in Memory) and displays them as PIP subpictures or Thumbnails. Yes Yes -- -- - Digital Tuner 16:9 4:3 -- -- Yes1 Yes1 - Yes Yes Yes...
Owners Guide
Page 40
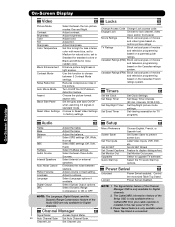
... (FRN) Block various types of movies and television programming based on motion picture ratings. Select Optical Output options. Adjust color. Choose to Reset Video Settings to prevent screen burn. TV Ratings Block various types of movies and television programming based on the Canadian ratings system. Select between stations. Select Dynamic Range Compression to...
... (FRN) Block various types of movies and television programming based on motion picture ratings. Select Optical Output options. Adjust color. Choose to Reset Video Settings to prevent screen burn. TV Ratings Block various types of movies and television programming based on the Canadian ratings system. Select between stations. Select Dynamic Range Compression to...
Owners Guide
Page 42
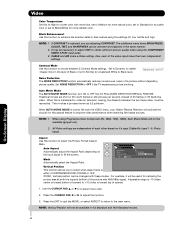
... enhance the shadow detail in 4:3 Standard and 16:9 Standard modes. 42 It may be necessary to adjust TINT to obtain optimum picture quality when... film is turned ON from the VIDEO menu, your Hitachi Plasma Television will not be changed with more blue, set to Medium for more natural color, set to Standard for accurate color or set to Normal for a balanced White to...CABLE and AIR share a Video setting. Mode Automatically select the Aspect Ratio. Press the CURSOR PAD ̇ or ̈ to OFF if the TV experiences picture blocking. Adjustable range is -10 (video center is toward bottom of ...
... enhance the shadow detail in 4:3 Standard and 16:9 Standard modes. 42 It may be necessary to adjust TINT to obtain optimum picture quality when... film is turned ON from the VIDEO menu, your Hitachi Plasma Television will not be changed with more blue, set to Medium for more natural color, set to Standard for accurate color or set to Normal for a balanced White to...CABLE and AIR share a Video setting. Mode Automatically select the Aspect Ratio. Press the CURSOR PAD ̇ or ̈ to OFF if the TV experiences picture blocking. Adjustable range is -10 (video center is toward bottom of ...
Owners Guide
Page 43
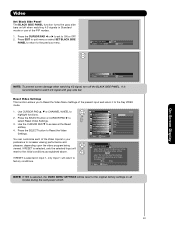
...gray side bar. It is selected in Standard mode or use of the present input and return it to Reset the Video Settings. You can customize each of the Video Inputs to your preference to highlight functions. 2. If RESET is recommended to the previous menu. No Yes Move SEL... Noise Reduction Auto Movie Mode Aspect Black Side Panel Reset Video Settings Move SEL Return 50% High High Dynamic Low Off Off Cable Video Reset Video Settings Select "Reset" to the original factory settings. Press the CURSOR PAD ̇ or ̈ to set to access at the Reset softkey. 4. Press the SELECT...
...gray side bar. It is selected in Standard mode or use of the present input and return it to Reset the Video Settings. You can customize each of the Video Inputs to your preference to highlight functions. 2. If RESET is recommended to the previous menu. No Yes Move SEL... Noise Reduction Auto Movie Mode Aspect Black Side Panel Reset Video Settings Move SEL Return 50% High High Dynamic Low Off Off Cable Video Reset Video Settings Select "Reset" to the original factory settings. Press the CURSOR PAD ̇ or ̈ to set to access at the Reset softkey. 4. Press the SELECT...
Owners Guide
Page 82
... Tips 2-3 Channel Manager 46-47 Auto Channel Scan 46 Clock 53 Closed Captions Captions 68 Color Temperature 42 Color 41 Contrast 41 Contrast Mode 42 E Event Timer 55 External Video Source 13-19 Remote Control Functions 21-38 Programming Codes 37-38 Installing Batteries 4 S Screen Saver ... Mode 29 T F Favorite Channel 27 Freeze 8, 30 H Timers 53-55 Tint 41 Treble 44 V HDMI 17 Video Settings 41-43 I Input Setup 58 L Language Menu Language 56 Locks Change Access Code 48 Channel Lock 48 Front Panel Lock 48 Movie Ratings 49 TV Ratings 50 TV Ratings (Canadian -
... Tips 2-3 Channel Manager 46-47 Auto Channel Scan 46 Clock 53 Closed Captions Captions 68 Color Temperature 42 Color 41 Contrast 41 Contrast Mode 42 E Event Timer 55 External Video Source 13-19 Remote Control Functions 21-38 Programming Codes 37-38 Installing Batteries 4 S Screen Saver ... Mode 29 T F Favorite Channel 27 Freeze 8, 30 H Timers 53-55 Tint 41 Treble 44 V HDMI 17 Video Settings 41-43 I Input Setup 58 L Language Menu Language 56 Locks Change Access Code 48 Channel Lock 48 Front Panel Lock 48 Movie Ratings 49 TV Ratings 50 TV Ratings (Canadian -


