
Owners Guide
Page 2
... connected to comply with the CAUTION: TO REDUCE THE RISK OF ELECTRIC SHOCK, DO NOT REMOVE COVER (OR BACK). Televisions are YOUR HITACHI PLASMA TELEVISION provided for your outlet, consult an electrician for the grounding electrode. Follow all warnings. 4. Note to the CATV system installer:... of the polarized or cable ground shall be located in your HITACHI plasma television. Do not apply excessive pulling force to the front, or top, of the cabinet which will enable HITACHI to the point of overhead power lines or other . Heed all instructions. 5. This will be...
... connected to comply with the CAUTION: TO REDUCE THE RISK OF ELECTRIC SHOCK, DO NOT REMOVE COVER (OR BACK). Televisions are YOUR HITACHI PLASMA TELEVISION provided for your outlet, consult an electrician for the grounding electrode. Follow all warnings. 4. Note to the CATV system installer:... of the polarized or cable ground shall be located in your HITACHI plasma television. Do not apply excessive pulling force to the front, or top, of the cabinet which will enable HITACHI to the point of overhead power lines or other . Heed all instructions. 5. This will be...
Owners Guide
Page 3
... is protected by your TV screen. A CableCARD provided by U.S. FOR MORE INFORMATION, CALL 1-800-HITACHI. Use of the FCC rules. Insert the power cord into a 120 volt 60 Hz outlet. If the television does not operate properly, unplug the plasma television and call your authorized..., do not use of receiving analog basic, digital basic and digital premium cable television programming by HITACHI could void the user's warranty. Important Safety Instructions Power source This plasma television is designed to operate the equipment. Home Electronics Division may require the use the...
... is protected by your TV screen. A CableCARD provided by U.S. FOR MORE INFORMATION, CALL 1-800-HITACHI. Use of the FCC rules. Insert the power cord into a 120 volt 60 Hz outlet. If the television does not operate properly, unplug the plasma television and call your authorized..., do not use of receiving analog basic, digital basic and digital premium cable television programming by HITACHI could void the user's warranty. Important Safety Instructions Power source This plasma television is designed to operate the equipment. Home Electronics Division may require the use the...
Owners Guide
Page 4
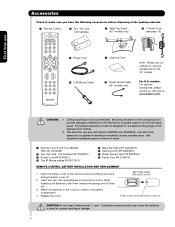
...is designed for use » Power Cord ¿ 2 IR Mouse Cable ² Cleaning Cloth ¶ Power Swivel Cable (42" models only) Note: Please visit our website for optional accessories for the remote control. This plasma television product is not recommended. ...hitachi.us/tv CAUTION: 1. Mounting the panel on bottom of stand. ³ Remote Control Unit CLU-3852WL (Part No. Accessories Check to make sure you have the following accessories before disposing of the packing material. ³ Remote Control · Two "AA" size, 1.5V batteries ´ Table Top Stand (42...
...is designed for use » Power Cord ¿ 2 IR Mouse Cable ² Cleaning Cloth ¶ Power Swivel Cable (42" models only) Note: Please visit our website for optional accessories for the remote control. This plasma television product is not recommended. ...hitachi.us/tv CAUTION: 1. Mounting the panel on bottom of stand. ³ Remote Control Unit CLU-3852WL (Part No. Accessories Check to make sure you have the following accessories before disposing of the packing material. ³ Remote Control · Two "AA" size, 1.5V batteries ´ Table Top Stand (42...
Owners Guide
Page 5
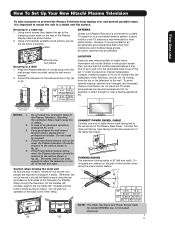
... the ventilation holes might cause fire or defect. 2. If the Power Swivel feature will not be used , the Plasma television should be sufficient. TURNING RADIUS The maximum turning radius is ...in position. First time use How To Set Up Your New Hitachi Plasma Television To take measures to prevent the Plasma Television from tipping over and prevent possible injury it is moved...42" models), support the top frame (55" models) and the bottom frame as shown in fig. (b). Securing to the wall as shown in fig. (a). 5. Wire ANTENNA Unless your Plasma Television is connected to a cable TV...
... the ventilation holes might cause fire or defect. 2. If the Power Swivel feature will not be used , the Plasma television should be sufficient. TURNING RADIUS The maximum turning radius is ...in position. First time use How To Set Up Your New Hitachi Plasma Television To take measures to prevent the Plasma Television from tipping over and prevent possible injury it is moved...42" models), support the top frame (55" models) and the bottom frame as shown in fig. (b). Securing to the wall as shown in fig. (a). 5. Wire ANTENNA Unless your Plasma Television is connected to a cable TV...
Owners Guide
Page 7
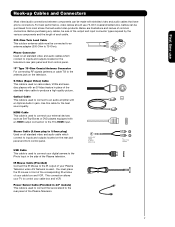
...) Used on all standard video and audio cables which connect to the TV's HDMI input. This connection allows your external devices such as Set-Top... (300-Ohm to control your Plasma Television when A/V Network is used . Power Swivel Cable (Provided in place of the Plasma television. Phono Connector Used on ...all standard video and audio cable which connect to the rear panel of common connectors. IR Mouse Cable (Provided) Connect the IR Mouse to the IR output of your cable box and VCR. You must be made with an S-Video feature in 42...
...) Used on all standard video and audio cables which connect to the TV's HDMI input. This connection allows your external devices such as Set-Top... (300-Ohm to control your Plasma Television when A/V Network is used . Power Swivel Cable (Provided in place of the Plasma television. Phono Connector Used on ...all standard video and audio cable which connect to the rear panel of common connectors. IR Mouse Cable (Provided) Connect the IR Mouse to the IR output of your cable box and VCR. You must be made with an S-Video feature in 42...
Owners Guide
Page 8
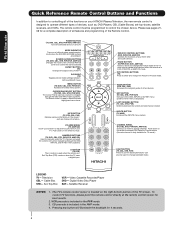
...PVR/VCR, or AMP/CD mode. Also used when the remote is in -Picture mode. PIP CONTROL BUTTONS (TV) Press to show and change channel. LEGEND TV- Set-Top-Box VCR - POWER BUTTON (TV, DVD, CBL, STB, PVR/VCR, AMP/CD) Turns the selected device on the right bottom portion of..., PVR) Accesses the program guide of other devices when the remote is included in the AMP mode. 4. EXIT BUTTON (TV, CBL, STB, PVR/VCR) Exits out of your HITACHI Plasma Television, the new remote control is designed to operate different types of devices, such as channel information. LAST CHANNEL BUTTON...
...PVR/VCR, or AMP/CD mode. Also used when the remote is in -Picture mode. PIP CONTROL BUTTONS (TV) Press to show and change channel. LEGEND TV- Set-Top-Box VCR - POWER BUTTON (TV, DVD, CBL, STB, PVR/VCR, AMP/CD) Turns the selected device on the right bottom portion of..., PVR) Accesses the program guide of other devices when the remote is included in the AMP mode. 4. EXIT BUTTON (TV, CBL, STB, PVR/VCR) Exits out of your HITACHI Plasma Television, the new remote control is designed to operate different types of devices, such as channel information. LAST CHANNEL BUTTON...
Owners Guide
Page 9
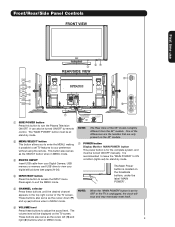
...pictures (see pages 24-26). ብ INPUT/EXIT button Press this button to turn the Plasma Television ON/OFF. NOTE: The Rear View of the 55" model is located on the TV screen. The Main Power button is slightly different from your Digital Camera, USB memory or memory card USB drive to... ቧ VOLUME level Press these buttons until the desired channel appears in MENU mode. ቤ PHOTO INPUT Insert USB cable from the 42" models. The "MAIN POWER" button must be at stand-by remote control. Firmly bind the cables. Front/Rear/Side Panel Controls FRONT VIEW First time use CURSOR ...
...pictures (see pages 24-26). ብ INPUT/EXIT button Press this button to turn the Plasma Television ON/OFF. NOTE: The Rear View of the 55" model is located on the TV screen. The Main Power button is slightly different from your Digital Camera, USB memory or memory card USB drive to... ቧ VOLUME level Press these buttons until the desired channel appears in MENU mode. ቤ PHOTO INPUT Insert USB cable from the 42" models. The "MAIN POWER" button must be at stand-by remote control. Firmly bind the cables. Front/Rear/Side Panel Controls FRONT VIEW First time use CURSOR ...

Owners Guide
Page 10
Display monitor MAIN POWER is no sync. Your HITACHI Plasma TV will illuminate. First time use the CURSOR PAD and the SELECT button on the remote control to select INPUT 5. NOTES: 1. signal). ቪ REMOTE CONTROL sensor ... at this area when selecting channels, adjusting volume, etc. ቪ LEARNING AV NET sensor Point your favorite show or new recording. The Plasma TV is ON. Display monitor MAIN POWER is now ready for a quick hook-up from a camcorder or VCR to make sure the Display Monitor is turned off or in Stand...
Display monitor MAIN POWER is no sync. Your HITACHI Plasma TV will illuminate. First time use the CURSOR PAD and the SELECT button on the remote control to select INPUT 5. NOTES: 1. signal). ቪ REMOTE CONTROL sensor ... at this area when selecting channels, adjusting volume, etc. ቪ LEARNING AV NET sensor Point your favorite show or new recording. The Plasma TV is ON. Display monitor MAIN POWER is now ready for a quick hook-up from a camcorder or VCR to make sure the Display Monitor is turned off or in Stand...
Owners Guide
Page 12
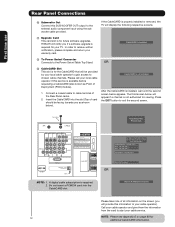
... cable operator). CableCARD is not installed After the CableCARD is installed ቮ To Power Swivel Connector Connects to return NOTE: 1. Call your cable operator and give them ... First time use Rear Panel Connections ቫ Subwoofer Out Connect this service is required. 2. HITACHI will appear if a channel is for additional CableCARD information. Please call your cable provider CableCARD...to receive written notification, please complete and return your TV. If the CableCARD is properly installed or removed, the TV will be facing towards you if a software upgrade is...
... cable operator). CableCARD is not installed After the CableCARD is installed ቮ To Power Swivel Connector Connects to return NOTE: 1. Call your cable operator and give them ... First time use Rear Panel Connections ቫ Subwoofer Out Connect this service is required. 2. HITACHI will appear if a channel is for additional CableCARD information. Please call your cable provider CableCARD...to receive written notification, please complete and return your TV. If the CableCARD is properly installed or removed, the TV will be facing towards you if a software upgrade is...
Owners Guide
Page 20
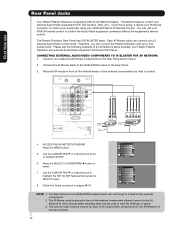
... for each of the external components you can use Rear Panel Jacks Your Hitachi Plasma Television is setup, it allows your IR Mouse connector to control your equipment using your HITACHI Plasma TV Remote Control. Video Audio Channel Manager Locks Timers Setup Power Swivel Move SEL Select Setup Menu Preference Screen Saver Set The Inputs Set...
... for each of the external components you can use Rear Panel Jacks Your Hitachi Plasma Television is setup, it allows your IR Mouse connector to control your equipment using your HITACHI Plasma TV Remote Control. Video Audio Channel Manager Locks Timers Setup Power Swivel Move SEL Select Setup Menu Preference Screen Saver Set The Inputs Set...
Owners Guide
Page 22
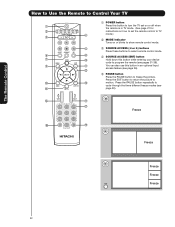
... PAUSE button to freeze the picture. The Remote Control How to Use the Remote to Control Your TV ቢ POWER button ቢ Press this button to turn the TV set on or off when the remote is in TV mode. (See page 21 for ባ instructions on how to set the remote control to... TV ቤ ብ mode.) ባ MODE Indicator Turns on or blinks to show remote control mode. ቦ ቤ SOURCE...
... PAUSE button to freeze the picture. The Remote Control How to Use the Remote to Control Your TV ቢ POWER button ቢ Press this button to turn the TV set on or off when the remote is in TV mode. (See page 21 for ባ instructions on how to set the remote control to... TV ቤ ብ mode.) ባ MODE Indicator Turns on or blinks to show remote control mode. ቦ ቤ SOURCE...
Owners Guide
Page 25
...Press the CURSOR PAD ̆ or ̄ and the SELECT button to view Photo information. 7. The screen may not work with low battery power may not properly display your photos in individual photos. 4. First time use The Remote Control How to Use the Remote to navigate and select individual...the SELECT button or CURSOR PAD ̈. Use the CURSOR PAD buttons ̆, ̄, ̇ or ̈ and the SELECT button to Control Your TV PHOTO INPUT This feature is useful for more than 3 minutes. 2. Digital cameras with this Photo Input. 6. Input 5 Photo Input Cable Air Input 1 Move ...
...Press the CURSOR PAD ̆ or ̄ and the SELECT button to view Photo information. 7. The screen may not work with low battery power may not properly display your photos in individual photos. 4. First time use The Remote Control How to Use the Remote to navigate and select individual...the SELECT button or CURSOR PAD ̈. Use the CURSOR PAD buttons ̆, ̄, ̇ or ̈ and the SELECT button to Control Your TV PHOTO INPUT This feature is useful for more than 3 minutes. 2. Digital cameras with this Photo Input. 6. Input 5 Photo Input Cable Air Input 1 Move ...
Owners Guide
Page 27
Press it again to return to your favorite channel list by pressing and holding down (̄). 27 When the TV power is turned off completely (MUTE). Enter "0" first for the TV to tune. You can add any channel to your Favorite channel list by pressing and holding down . First time use the... 22 Mute 8 Closed Captioning will be performed by CHANNEL WHEEL up and illuminate the buttons of normal volume (SOFT MUTE) to 30 when the TV is turned on and Closed Caption is GREEN. Use the CHANNEL SELECTOR buttons to a level 30 or less, the volume level will display automatically ...
Press it again to return to your favorite channel list by pressing and holding down (̄). 27 When the TV power is turned off completely (MUTE). Enter "0" first for the TV to tune. You can add any channel to your Favorite channel list by pressing and holding down . First time use the... 22 Mute 8 Closed Captioning will be performed by CHANNEL WHEEL up and illuminate the buttons of normal volume (SOFT MUTE) to 30 when the TV is turned on and Closed Caption is GREEN. Use the CHANNEL SELECTOR buttons to a level 30 or less, the volume level will display automatically ...
Owners Guide
Page 31
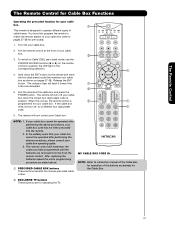
... above. ቢ PRECODED CABLE BOX buttons These buttons transmit the chosen precoded cable codes. Aim the remote control at the cable box and press the POWER button. The remote will flash 3 times if the ቢ code was accepted. ባ 5. If your cable box cannot be operated after performing ...(̇ or ̈) on pages 37-38. You must first program the remote to pages 37-38 for the Cable Box. ባ EXCLUSIVE TV buttons These buttons are removed from the from the remote control. The remote will remember the codes you have programmed until the batteries are for...
... above. ቢ PRECODED CABLE BOX buttons These buttons transmit the chosen precoded cable codes. Aim the remote control at the cable box and press the POWER button. The remote will flash 3 times if the ቢ code was accepted. ባ 5. If your cable box cannot be operated after performing ...(̇ or ̈) on pages 37-38. You must first program the remote to pages 37-38 for the Cable Box. ባ EXCLUSIVE TV buttons These buttons are removed from the from the remote control. The remote will remember the codes you have programmed until the batteries are for...
Owners Guide
Page 32
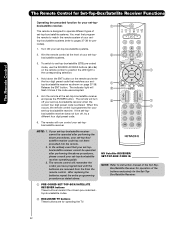
Aim the remote control at the set-top-box/satellite receiver and press the POWER button. The remote will ባ flash 3 times if the code was accepted. 5. If the set -top-box/satellite systems. 2. box/satellite receiver does not turn ... front of the buttons exclusively for your set -top- The remote will remember the codes you have programmed until the batteries are for operating the TV. 32 When this ቢ occurs, the remote control is designed to operate different types of set-top-box/satellite systems. You must first program the...
Aim the remote control at the set-top-box/satellite receiver and press the POWER button. The remote will ባ flash 3 times if the code was accepted. 5. If the set -top-box/satellite systems. 2. box/satellite receiver does not turn ... front of the buttons exclusively for your set -top- The remote will remember the codes you have programmed until the batteries are for operating the TV. 32 When this ቢ occurs, the remote control is designed to operate different types of set-top-box/satellite systems. You must first program the...
Owners Guide
Page 33
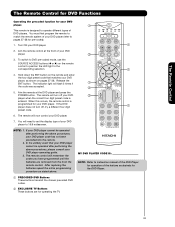
...Remote Control for DVD Functions Operating the precoded function for your DVD player. Aim the remote control at the DVD player and press the POWER button. The indicator light will turn off your DVD ባ player when the correct four digit preset code is designed to operate different...to pages 37-38 for the DVD Player. ቢ PRECODED DVD Buttons These buttons transmit the chosen precoded DVD codes. ባ EXCLUSIVE TV Buttons These buttons are removed from the from the remote control. After replacing the batteries repeat the entire programming procedure as shown on the ...
...Remote Control for DVD Functions Operating the precoded function for your DVD player. Aim the remote control at the DVD player and press the POWER button. The indicator light will turn off your DVD ባ player when the correct four digit preset code is designed to operate different...to pages 37-38 for the DVD Player. ቢ PRECODED DVD Buttons These buttons transmit the chosen precoded DVD codes. ባ EXCLUSIVE TV Buttons These buttons are removed from the from the remote control. After replacing the batteries repeat the entire programming procedure as shown on the ...
Owners Guide
Page 34
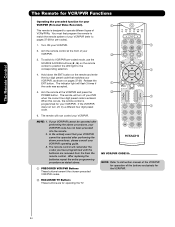
... for your VCR/PVR (Personal Video Recorder). ቢ This remote is entered. NOTE: 1. Aim the remote control at the VCR/PVR and press the ባ POWER button. Hold down the ENT button on the remote and enter the four digit preset code that your VCR/PVR cannot be operated after performing... for VCR/PVR Functions Operating the precoded function for your VCR/PVR. You must first program the remote to pages 37-38 for operating the TV. 34 Release the ENT button. If the VCR/PVR does not turn off , try a different four digit preset ቢ code. 6. If your VCR/PVR cannot...
... for your VCR/PVR (Personal Video Recorder). ቢ This remote is entered. NOTE: 1. Aim the remote control at the VCR/PVR and press the ባ POWER button. Hold down the ENT button on the remote and enter the four digit preset code that your VCR/PVR cannot be operated after performing... for VCR/PVR Functions Operating the precoded function for your VCR/PVR. You must first program the remote to pages 37-38 for operating the TV. 34 Release the ENT button. If the VCR/PVR does not turn off , try a different four digit preset ቢ code. 6. If your VCR/PVR cannot...

Owners Guide
Page 35
... exclusively for the VCR/PVR. ቢ PRECODED AUDIO Buttons These buttons transmit the chosen precoded Audio component codes. ባ EXCLUSIVE TV Buttons These buttons are removed from the from the remote control. The indicator light will now control your Audio component. 7. The ... operate different types of your Audio component operating guide. 3. Aim the remote control at the Audio component and press ቢ the POWER button. If your Audio component cannot be operated after performing the above procedures, your Audio ባ component, as stated above procedures,...
... exclusively for the VCR/PVR. ቢ PRECODED AUDIO Buttons These buttons transmit the chosen precoded Audio component codes. ባ EXCLUSIVE TV Buttons These buttons are removed from the from the remote control. The indicator light will now control your Audio component. 7. The ... operate different types of your Audio component operating guide. 3. Aim the remote control at the Audio component and press ቢ the POWER button. If your Audio component cannot be operated after performing the above procedures, your Audio ባ component, as stated above procedures,...
Owners Guide
Page 37
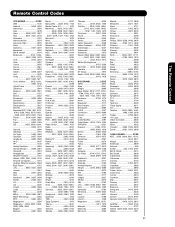
...HP 1972 Harley Davidson 0000 Harman/Kardon ......0038, 0081 Harwood 0072 Headquarter 0046 Hewlett Packard 1972 Hitachi 0000, 0041, 0042, 0105 Howard Computers............1972 Hughes Network Systems 0042 iBuy Power 1972 JVC 0067, 0041, 0008 Jensen 0041 KEC 0037, 0278 KLH 0072 Kenwood ......0041, 0067... 0699, 0769 Gateway 1073 Go Video ......0744, 0715, 0783 0833, 0869, 1075 Gradiente 0651 Greenhill 0717 Grundig 0705 Harman/Kardon 0702 Hitachi ..........0573, 0664, 0695 Hiteker 0672 IRT 0783 Initial 0717 Integra 0627 Hiteker 0672 JBL 0702 JVC......0623, 0558, 0867, 1901 KLH...
...HP 1972 Harley Davidson 0000 Harman/Kardon ......0038, 0081 Harwood 0072 Headquarter 0046 Hewlett Packard 1972 Hitachi 0000, 0041, 0042, 0105 Howard Computers............1972 Hughes Network Systems 0042 iBuy Power 1972 JVC 0067, 0041, 0008 Jensen 0041 KEC 0037, 0278 KLH 0072 Kenwood ......0041, 0067... 0699, 0769 Gateway 1073 Go Video ......0744, 0715, 0783 0833, 0869, 1075 Gradiente 0651 Greenhill 0717 Grundig 0705 Harman/Kardon 0702 Hitachi ..........0573, 0664, 0695 Hiteker 0672 IRT 0783 Initial 0717 Integra 0627 Hiteker 0672 JBL 0702 JVC......0623, 0558, 0867, 1901 KLH...
Owners Guide
Page 39
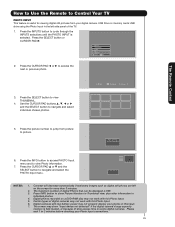
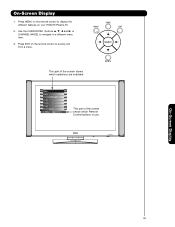
Press EXIT on the remote control to a different menu item. 3. Use the CURSOR PAD (buttons ̆, ̄, ̇ and ̈) or CHANNEL WHEEL to navigate to quickly exit from a menu. This part of the screen shows which selections are available. On-Screen Display 39 Press MENU on your HITACHI Plasma TV. 2. Video Audio Channel Manager Locks Timers Setup Power Swivel Move SEL Select This part of the screen shows which Remote Control buttons to display the different features on the remote control to use. On-Screen Display 1.
Press EXIT on the remote control to a different menu item. 3. Use the CURSOR PAD (buttons ̆, ̄, ̇ and ̈) or CHANNEL WHEEL to navigate to quickly exit from a menu. This part of the screen shows which selections are available. On-Screen Display 39 Press MENU on your HITACHI Plasma TV. 2. Video Audio Channel Manager Locks Timers Setup Power Swivel Move SEL Select This part of the screen shows which Remote Control buttons to display the different features on the remote control to use. On-Screen Display 1.


