Hitachi 42HDS69 Support Question
Hitachi 42HDS69 Support Question
Find answers below for this question about Hitachi 42HDS69 - 42" Plasma TV.Need a Hitachi 42HDS69 manual? We have 1 online manual for this item!
Question posted by ladymystical on March 5th, 2019
Missing Power Button
is there a way to purchase a power button for a 42 inch hatachi plasma tv? If yes, is there something specific a person needs to know when replacing the power button to make sure it works properly? Is there a catch lol
Current Answers
Answer #1: Posted by hzplj9 on March 7th, 2019 3:11 AM
hzplj9

Member since:
June 25th, 2012 Points: 4,873,510

Member since:
June 25th, 2012 Points: 4,873,510
Check out this ebay item. Using images in google you can find the part you need and verify with the part number.
If the TV does not power on there could be an issue with the power supply board rather than just the switch. Further investigation may be needed by an engineer.
Hope that helps.

Related Hitachi 42HDS69 Manual Pages
Owners Guide - Page 4
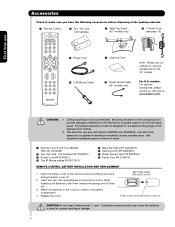
... Core (P# 2169513). When replacing old batteries, push them towards the springs and lift them out.
3. This stand for use
» Power Cord ¿ 2 IR Mouse Cable
² Cleaning Cloth
¶ Power Swivel Cable (42" models only)
Note: Please visit our website for optional accessories for the remote control. Accessories
Check to make sure you have the...
Owners Guide - Page 5
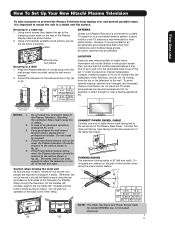
... transport it is recommended for stability. Also, be sure that is free from interference and multiple image ghosts, an indoor antenna may be lifted forward using the wall mount bracket. 2.
C
D
NOTE: The Table Top Stand and Power Swivel cable for professional installer. Keep the Plasma television 4 inches away from the
wall except when mounted using...
Owners Guide - Page 7
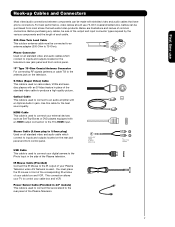
... camcorders, VCRs and laserdisc players with an S-Video feature in 42" models) This cable is used . "F" Type 75-Ohm Coaxial Antenna Connector For connecting RF signals (antenna or cable TV) to produce a high quality picture.
Power Swivel Cable (Provided in place of the Plasma television. Optical Cable This cable is used to inputs and outputs...
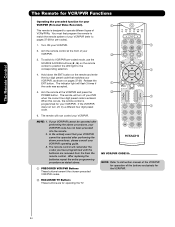
Owners Guide - Page 8
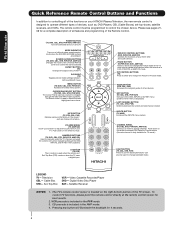
... all of the functions on the right bottom portion of the Remote Control.
PAUSE BUTTON (TV,PVR/VCR, DVD, AMP/CD) Press to show and change channel.
Video Cassette Recorder/Player DVD - VCR precode is located on your HITACHI Plasma Television, the new remote control is only available for numeric entry when navigating through...
Owners Guide - Page 9
...
AUDIO
R
ቨ
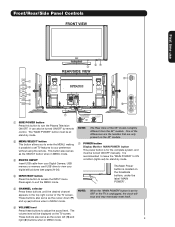
ቢ SIDE POWER button Press this button to OFF or the TV is for stand-by remote control. This button also serves as the cursor left (̇) and
9
right (̈) buttons when in MENU mode.
ቤ PHOTO INPUT Insert USB cable from the 42" models. Press again to turn the Plasma Television ON/OFF.
One of the...
Owners Guide - Page 10

...for remote ON/OFF operation. When the main power switch on the lower right side of the monitor.
Your HITACHI Plasma TV will illuminate. Check the Power Light to make sure the Display Monitor is turned off or in... ON, press the main power switch located on the display monitor is ON. NOTES: 1. Press the INPUTS button then use the CURSOR PAD and the SELECT button on the lower right corner...
Owners Guide - Page 20
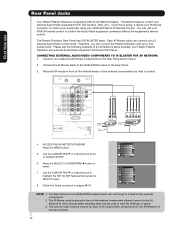
... components to highlight the SET AV NET features then press the SELECT button.
8. Connect your HITACHI Plasma TV Remote Control. Use the CURSOR PAD ̄ or channel scroll to the Rear Panel shown below.
2. Each IR Mouse cable can connect the Plasma Television with an AV Network feature. Infrared Sensor
IR Mouse
V L R OUTPUT
VCR
Infrared...
Owners Guide - Page 33
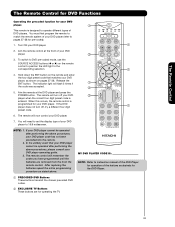
... press the
POWER button. To switch to DVD pre-coded mode, use the
SOURCE ACCESS buttons (̇ or ̈) on the remote
control to position the LED light to pages 37-38 for pre-codes).
1. Aim the remote at the front of your DVD player (refer to the
corresponding selection.
ቢ
4. After replacing the...
Owners Guide - Page 34
...Personal Video Recorder).
ቢ
This remote is entered. The remote will now control your VCR/PVR.
ቢ
2.
Release the
ENT button. Aim the remote at the front of the buttons exclusively for the VCR/PVR.
ባ EXCLUSIVE TV Buttons These buttons...the ENT button on pages 37-38. NOTE: 1. Aim the remote control at the VCR/PVR and press the
ባ
POWER button. In ...
Owners Guide - Page 35

... code was accepted.
5. After replacing the batteries repeat the entire programming procedure as shown on the remote and enter
the four digit preset code that your Audio component cannot be operated after performing the above . Aim the remote control at the Audio component and press
ቢ
the POWER button. If your Audio component...
Owners Guide - Page 39
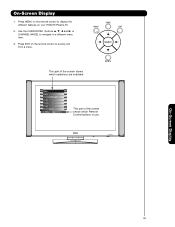
...Plasma TV.
2. This part of the screen shows which selections are available. On-Screen Display
39 Press EXIT on the remote control to display the different features on the remote control to quickly exit from a menu. Use the CURSOR PAD (buttons... ̆, ̄, ̇ and ̈) or CHANNEL WHEEL to navigate to use.
Video Audio Channel Manager Locks Timers Setup Power Swivel
...
Owners Guide - Page 48
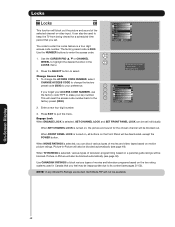
...erase your key number.
0
This will be deactivated, except the POWER button. Use the CURSOR PAD ̆, ̄ or CHANNEL
or
WHEEL...buttons to select.
NOTE: If any Movie/TV Ratings are locked, Surf Mode PIP will also be blocked automatically (see page 49). Press the SELECT button to enter the access code.
1. Picture-in -Picture will block out the picture and sound of television...
Owners Guide - Page 59

...̄ to highlight NEXT, then press the SELECT button to move on to the next SETUP screen. Press the SELECT button to pass the Power command through the IR mouse and onto the A/V ...mode. Before starting this TV, please select a TV Input. Press the SELECT button to select "YES". (Select YES to setup an A/V Receiver or NO to this wizard, please make sure that all devices are connected...
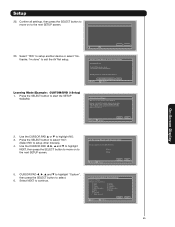
Owners Guide - Page 61
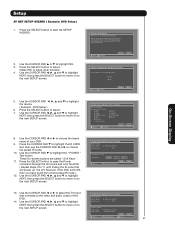
... )
1. Press the SELECT button to select.
(Select NO to the AV Net Setup Wizard. AV Net Setup Wizard
Welcome to setup other devices). 4. Yes No
Move SEL Select
Back
...TV Input that connects to the next SETUP screen. Press the SELECT button to highlight NO. 3.
Before starting this wizard, please make sure that will power up the A/V Receiver.
Press the SELECT button to pass the Power...
Owners Guide - Page 62
...Connected
All settings are placed in front of your A/V Receiver.
Move
No thanks, I'mdone. SEL Select
Yes
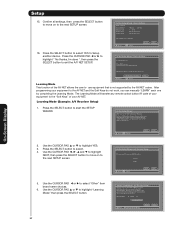
Learning Mode This function of your equipment to the "Soft Keys" of the AV NET allows the user... do not work, you can manually "LEARN" each one by the AV/NET codes. Press the SELECT button to the AV Net Setup Wizard.
Before starting this wizard, please make sure that is ...
Owners Guide - Page 65
... or select "No, thanks, I 'm done.
Before starting this wizard, please make sure that all settings, then press the SELECT button to move on to use an A/V Receiver.
AV Net Setup Wizard : A/V ... Name IR Code Set TV Input Monitor Out Optical Out
Other Other Not Connected Not Connected Not Connected
All settings are placed in front of the devices IR sensor.
Yes No
Move SEL Select...
Owners Guide - Page 71
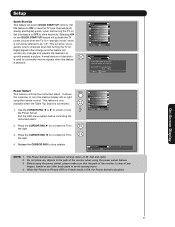
... feature to ON to
the right. The Power Swivel has a maximum turning radius of any fingers, hands or any changes and prepare the television to save electricity. Press the CURSOR PAD ̈ to to rotate the TV to have the TV tune channels quickly at 1st turn the plasma display left and right).
Set this...
Owners Guide - Page 77
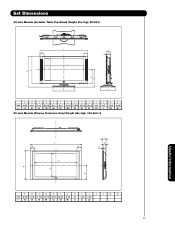
Set Dimensions
42 Inch Models (Includes Table Top Stand) Weight (lbs./kg): 98/44.5
55 Inch Models (Plasma Television Only) Weight (lbs./kg): 135.6/61.5
77
Useful Information
Owners Guide - Page 79
... secrets or other software or intellectual property. You specifically agree not to export or reexport the Software:...advance of the possibility of a HITACHI brand digital television (the "DTV"), and HITACHI America, Ltd.,...or make derivative works from receiving any person or entity who you know or have reason to know will...of Industry and Security nor any way out of your installation and use ...
Owners Guide - Page 81
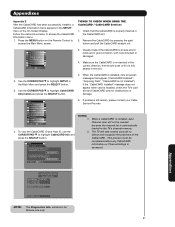
Video Audio TV Guide On Screen Channel Manager Locks Timers Setup
Move SEL Select
3. Make sure the CableCARD is re-inserted in the slot.
2.
Select the button below to detect ...are in the CableCARD slot.
2. window is properly inserted in good condition, with none blocked or damaged.
4. Visually inspect the CableCARD to the TV's channel memory. Setup Menu Preference Screen Saver ...
Similar Questions

Hitachi Ultravision 42 Inch Plasma Tv Wont Turn On
(Posted by Jfranka 9 years ago)

Hitachi 42 Inch Plasma Red Light Won't Turn On
(Posted by atodj 10 years ago)
I Have A Hitachi 42 Inch Plasma Tv That Sometimes Won't Turn On To The Blue Led
(Posted by jporter935 11 years ago)

About Why The Tv Is Red And Dark I Cant Figure Out How To Make It Work Again
i have a 43x24 plasma lcd with cd player i am not sure how old it is or the model number the store w...
i have a 43x24 plasma lcd with cd player i am not sure how old it is or the model number the store w...
(Posted by loveseeds 11 years ago)

Our Hitachi 42 Inch Plasma Tv Has Black Vertical Lines In It? Is This Fixable?
(Posted by judemc28 12 years ago)