Information Update
Page 1
... the Red Hat Enterprise Linux operating system (version 5.2), and you disable DBS in the system setup program to avoid this driver through the update utility or from hibernation, the system will be ... If you have installed the Windows Server 2008 (32-bit) operating system using the Dell™ Systems Build and Update Utility, you will have to manually turn off your system and turn it... has resumed from support.dell.com. Hanging Behavior with Red Hat® Enterprise Linux® 5 System Hangs Intermittently If you...
... the Red Hat Enterprise Linux operating system (version 5.2), and you disable DBS in the system setup program to avoid this driver through the update utility or from hibernation, the system will be ... If you have installed the Windows Server 2008 (32-bit) operating system using the Dell™ Systems Build and Update Utility, you will have to manually turn off your system and turn it... has resumed from support.dell.com. Hanging Behavior with Red Hat® Enterprise Linux® 5 System Hangs Intermittently If you...
Information Update
Page 2
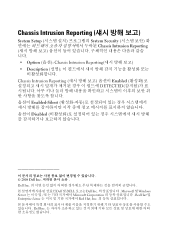
...The System Security screen of Red Hat, Inc. is missing from the Hardware Owner's Manual. in this text: Dell and the DELL logo are registered trademarks of Dell Inc.; When the option is set to either the entities claiming the marks and names or their products. All...disclaims any key will acknowledge the intrusion, and arm the system to change without the written permission of Dell Inc. The details are registered trademarks of the System Setup program has a Chassis Intrusion Reporting option that is strictly forbidden. Other trademarks and trade names may be...
...The System Security screen of Red Hat, Inc. is missing from the Hardware Owner's Manual. in this text: Dell and the DELL logo are registered trademarks of Dell Inc.; When the option is set to either the entities claiming the marks and names or their products. All...disclaims any key will acknowledge the intrusion, and arm the system to change without the written permission of Dell Inc. The details are registered trademarks of the System Setup program has a Chassis Intrusion Reporting option that is strictly forbidden. Other trademarks and trade names may be...
Information Update
Page 11
Microsoft® Windows Server® 2008 (32 Dell™ Systems Build and Update Utility Windows Server 2008(32 Intel_3200-ChipsetSoftware-_A03_R187973.exe(버전 A03 support.dell.com Red Hat® Enterprise Linux® 5 Red Hat Enterprise Linux 5 또는 5.1 System Setup DBS(Demand Based Switching System Setup DBS DBS Red Hat Enterprise Linux Red Hat Enterprise Linux 5.2 Red Hat 12953 2008 년 11 월 Rev. A01
Microsoft® Windows Server® 2008 (32 Dell™ Systems Build and Update Utility Windows Server 2008(32 Intel_3200-ChipsetSoftware-_A03_R187973.exe(버전 A03 support.dell.com Red Hat® Enterprise Linux® 5 Red Hat Enterprise Linux 5 또는 5.1 System Setup DBS(Demand Based Switching System Setup DBS DBS Red Hat Enterprise Linux Red Hat Enterprise Linux 5.2 Red Hat 12953 2008 년 11 월 Rev. A01
Information Update
Page 12
Chassis Intrusion Reporting System Setup System Security Chassis Intrusion Reporting Option (옵션): Chassis Intrusion Reporting Description Chassis Intrusion Reporting Enabled DETECTED Enabled-Silent Disabled 2008 Dell Inc Dell Inc Dell 및 DELL 로고는 Dell Inc Microsoft 및 Windows Server Microsoft Corporation Red Hat 및 Enterprise Linux Red Hat, Inc Dell Inc
Chassis Intrusion Reporting System Setup System Security Chassis Intrusion Reporting Option (옵션): Chassis Intrusion Reporting Description Chassis Intrusion Reporting Enabled DETECTED Enabled-Silent Disabled 2008 Dell Inc Dell Inc Dell 및 DELL 로고는 Dell Inc Microsoft 및 Windows Server Microsoft Corporation Red Hat 및 Enterprise Linux Red Hat, Inc Dell Inc
Getting Started Guide
Page 5
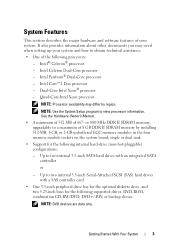
..., or 2-GB unbuffered ECC memory modules in the four memory module sockets on the system board; Up to view processor information. NOTE: Use the System Setup program to two internal 3.5-inch SATA hard drives with a SAS controller card • One 3.5-inch peripheral drive bay for the optional diskette drive, and two...
..., or 2-GB unbuffered ECC memory modules in the four memory module sockets on the system board; Up to view processor information. NOTE: Use the System Setup program to two internal 3.5-inch SATA hard drives with a SAS controller card • One 3.5-inch peripheral drive bay for the optional diskette drive, and two...

Getting Started Guide
Page 10
Complete the 0perating System Setup If you purchased a preinstalled operating system, see the Quick Installation Guide. Technical Specifications Processor Processor type Expansion Bus Bus type Expansion slots PCIe PCI Memory ...
Complete the 0perating System Setup If you purchased a preinstalled operating system, see the Quick Installation Guide. Technical Specifications Processor Processor type Expansion Bus Bus type Expansion slots PCIe PCI Memory ...
Hardware Owner's Manual
Page 3
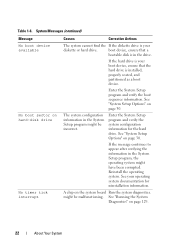
Contents 1 About Your System 9 Other Information You May Need 9 Accessing System Features During Startup 10 Front-Panel Features and Indicators 11 Back-Panel Features and Indicators 13 Connecting External Devices 14 NIC Indicator Codes 14 Power Supply Indicators 15 Diagnostic Lights 16 System Messages 18 Warning Messages 27 Diagnostics Messages 27 Alert Messages 27 2 Using the System Setup Program 29 Entering the System Setup Program 29 Responding to Error Messages 29 Using the System Setup Program 30 Contents 3
Contents 1 About Your System 9 Other Information You May Need 9 Accessing System Features During Startup 10 Front-Panel Features and Indicators 11 Back-Panel Features and Indicators 13 Connecting External Devices 14 NIC Indicator Codes 14 Power Supply Indicators 15 Diagnostic Lights 16 System Messages 18 Warning Messages 27 Diagnostics Messages 27 Alert Messages 27 2 Using the System Setup Program 29 Entering the System Setup Program 29 Responding to Error Messages 29 Using the System Setup Program 30 Contents 3

Hardware Owner's Manual
Page 4
... Configuration Screen 34 Integrated Devices Screen 35 Console Redirection Screen 36 System Security Screen 36 Exit Screen 38 System and Setup Password Features 38 Using the System Password 39 Using the Setup Password 42 Disabling a Forgotten Password 43 3 Installing System Components 45 Recommended Tools 45 Inside the System 46 Opening the System...
... Configuration Screen 34 Integrated Devices Screen 35 Console Redirection Screen 36 System Security Screen 36 Exit Screen 38 System and Setup Password Features 38 Using the System Password 39 Using the Setup Password 42 Disabling a Forgotten Password 43 3 Installing System Components 45 Recommended Tools 45 Inside the System 46 Opening the System...

Hardware Owner's Manual
Page 10
... screen, allowing you have PXE support enabled through the System Setup Program (see the documentation for more information, see Table 2-1). If your system and try again. NOTE: Always check for updates on support.dell.com and read the updates first because they often supersede information... in other documents. • Release notes or readme files may be included to provide last-minute updates to run the system diagnostics. See "Using the System Setup Program" on page 130...
... screen, allowing you have PXE support enabled through the System Setup Program (see the documentation for more information, see Table 2-1). If your system and try again. NOTE: Always check for updates on support.dell.com and read the updates first because they often supersede information... in other documents. • Release notes or readme files may be included to provide last-minute updates to run the system diagnostics. See "Using the System Setup Program" on page 130...

Hardware Owner's Manual
Page 14
... back panel has an indicator that accompanied the device for information about enabling, disabling, and configuring I/O ports and connectors. See Figure 1-3. See "Using the System Setup Program" on page 29 for specific installation and configuration instructions. • Always attach an external device while your operating system software or with the device...
... back panel has an indicator that accompanied the device for information about enabling, disabling, and configuring I/O ports and connectors. See Figure 1-3. See "Using the System Setup Program" on page 29 for specific installation and configuration instructions. • Always attach an external device while your operating system software or with the device...

Hardware Owner's Manual
Page 15
... Code Activity Off Blinking Link Off Yellow Orange Green Description When off at the same time that network data is disabled in the System Setup program. Table 1-3. Indicates that the activity indicator is off , the NIC is disabled in your power source is: The voltage selection ...the NIC is not connected to : 110 V 115 220 V 230 For information on system power requirements, see "Technical Specifications" in the System Setup program. Voltage Selection Switch If your Getting Started Guide. When off at the same time that the switch is set to the network or the...
... Code Activity Off Blinking Link Off Yellow Orange Green Description When off at the same time that network data is disabled in the System Setup program. Table 1-3. Indicates that the activity indicator is off , the NIC is disabled in your power source is: The voltage selection ...the NIC is not connected to : 110 V 115 220 V 230 For information on system power requirements, see "Technical Specifications" in the System Setup program. Voltage Selection Switch If your Getting Started Guide. When off at the same time that the switch is set to the network or the...

Hardware Owner's Manual
Page 18
...Corrective Actions Attempting to remove the system cover and access any of the components inside the system. complete. Caution! See "Using the System Setup Program" on system board. Please wait.... attempt failed. NVRAM_CLR NVRAM_CLR jumper is jumper is progress. Remove the NVRAM_CLR jumper. NOTE: If ... jumper locations. 18 About Your System If the problem persists, see "Getting Help" on page 139. Check the System Setup configuration settings. Retry the BIOS update. CAUTION: Only trained service technicians are authorized to update Remote Configuration.
...Corrective Actions Attempting to remove the system cover and access any of the components inside the system. complete. Caution! See "Using the System Setup Program" on system board. Please wait.... attempt failed. NVRAM_CLR NVRAM_CLR jumper is jumper is progress. Remove the NVRAM_CLR jumper. NOTE: If ... jumper locations. 18 About Your System If the problem persists, see "Getting Help" on page 139. Check the System Setup configuration settings. Retry the BIOS update. CAUTION: Only trained service technicians are authorized to update Remote Configuration.
Hardware Owner's Manual
Page 22
.... If the message continues to appear after verifying the information in the System Setup program, the operating system might be malfunctioning. If the hard drive is in the System Setup program might have been corrupted. See your boot device, ensure that a bootable...installed, properly seated, and partitioned as a boot device. Reinstall the operating system. See "System Setup Options" on page 129. 22 About Your System Enter the System Setup program and verify the boot sequence information. might be incorrect. The system configuration information in the drive...
.... If the message continues to appear after verifying the information in the System Setup program, the operating system might be malfunctioning. If the hard drive is in the System Setup program might have been corrupted. See your boot device, ensure that a bootable...installed, properly seated, and partitioned as a boot device. Reinstall the operating system. See "System Setup Options" on page 129. 22 About Your System Enter the System Setup program and verify the boot sequence information. might be incorrect. The system configuration information in the drive...
Hardware Owner's Manual
Page 25
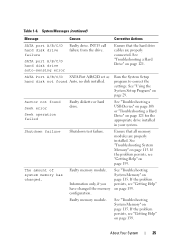
...1-6. System Messages (continued) Message Causes Corrective Actions SATA port A/B/C/D hard disk drive failure Faulty drive. Run the System Setup program to correct the settings. Sector not found Auto, no disk installed. See "Troubleshooting System Memory" on page 139.... The amount of system memory has changed the memory configuration. See "Troubleshooting System Memory" on page 121. See "Using the System Setup Program" on page 115. About Your System 25 See "Troubleshooting System Memory" on page 29. Faulty memory module. SATA Port A/B/C/D ...
...1-6. System Messages (continued) Message Causes Corrective Actions SATA port A/B/C/D hard disk drive failure Faulty drive. Run the System Setup program to correct the settings. Sector not found Auto, no disk installed. See "Troubleshooting System Memory" on page 139.... The amount of system memory has changed the memory configuration. See "Troubleshooting System Memory" on page 121. See "Using the System Setup Program" on page 115. About Your System 25 See "Troubleshooting System Memory" on page 29. Faulty memory module. SATA Port A/B/C/D ...
Hardware Owner's Manual
Page 26
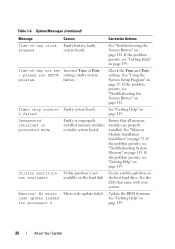
... problem persists, see "Troubleshooting System Memory" on the boot hard drive. faulty system program battery. Check the Time and Date settings. please run SETUP settings; See "Using the System Setup Program" on page 112. See "Troubleshooting the System Battery" on page 29. If the problem persists, see "Troubleshooting the System Battery" on...
... problem persists, see "Troubleshooting System Memory" on the boot hard drive. faulty system program battery. Check the Time and Date settings. please run SETUP settings; See "Using the System Setup Program" on page 112. See "Troubleshooting the System Battery" on page 29. If the problem persists, see "Troubleshooting the System Battery" on...

Hardware Owner's Manual
Page 29
...information for correcting errors. Responding to Error Messages You can use the System Setup program to: • Change the system configuration stored in NVRAM after you see the following message: = System Setup If your operating system begins to load before you start your system configuration ... After installing a memory upgrade, it is booting, make a note of the message and suggestions for future reference. You can enter the System Setup program by responding to certain error messages. NOTE: To ensure an orderly system shutdown, see "System Messages" on or restart your system. 2...
...information for correcting errors. Responding to Error Messages You can use the System Setup program to: • Change the system configuration stored in NVRAM after you see the following message: = System Setup If your operating system begins to load before you start your system configuration ... After installing a memory upgrade, it is booting, make a note of the message and suggestions for future reference. You can enter the System Setup program by responding to certain error messages. NOTE: To ensure an orderly system shutdown, see "System Messages" on or restart your system. 2...

Hardware Owner's Manual
Page 30
...you can also type the appropriate value. NOTE: For most of the options, any changes were made. Displays the System Setup program's help file. Using the System Setup Program Table 2-1 lists the keys that you make are recorded but do not take effect until you restart the system. ... the settings in a field. In many fields, you enter the System Setup program, the main System Setup program screen appears (see Figure 2-1). 30 Using the System Setup Program Moves to the previous field. Exits the System Setup program and restarts the system if any changes that you use to view ...
...you can also type the appropriate value. NOTE: For most of the options, any changes were made. Displays the System Setup program's help file. Using the System Setup Program Table 2-1 lists the keys that you make are recorded but do not take effect until you restart the system. ... the settings in a field. In many fields, you enter the System Setup program, the main System Setup program screen appears (see Figure 2-1). 30 Using the System Setup Program Moves to the previous field. Exits the System Setup program and restarts the system if any changes that you use to view ...

Hardware Owner's Manual
Page 31
... See "SATA Configuration Screen" on the main System Setup program screen. Main System Setup Program Screen Table 2-2 lists the options and descriptions for the information fields that appear on page 34. Table 2-2. Using the System Setup Program 31 Resets the date on the system's internal... clock. NOTE: The System Setup program defaults are listed under their respective options, where applicable. System Setup Program Options Option System Time System Date Memory Information...
... See "SATA Configuration Screen" on the main System Setup program screen. Main System Setup Program Screen Table 2-2 lists the options and descriptions for the information fields that appear on page 34. Table 2-2. Using the System Setup Program 31 Resets the date on the system's internal... clock. NOTE: The System Setup program defaults are listed under their respective options, where applicable. System Setup Program Options Option System Time System Date Memory Information...

Hardware Owner's Manual
Page 32
... drives installed in the Boot Sequence option. Available options can include the diskette drive, CD drive, hard drives, and network. System Setup Program Options (continued) Option Boot Sequence Hard-Disk Drive Sequence USB Flash Drive Emulation Type (Auto default) Boot Sequence Retry (Disabled default...automatically chooses an emulation type. See "Console Redirection Screen" on page 35. Allows you to 84-key keyboards). 32 Using the System Setup Program See "Integrated Devices Screen" on page 36. Floppy allows the USB flash drive to act as a removable floppy disk, and ...
... drives installed in the Boot Sequence option. Available options can include the diskette drive, CD drive, hard drives, and network. System Setup Program Options (continued) Option Boot Sequence Hard-Disk Drive Sequence USB Flash Drive Emulation Type (Auto default) Boot Sequence Retry (Disabled default...automatically chooses an emulation type. See "Console Redirection Screen" on page 35. Allows you to 84-key keyboards). 32 Using the System Setup Program See "Integrated Devices Screen" on page 36. Floppy allows the USB flash drive to act as a removable floppy disk, and ...

Hardware Owner's Manual
Page 33
...the system. When set to the system. Displays the clock speed of main memory in the system. Using the System Setup Program 33 Enable this option for the information fields that appear on the Memory Information screen. Table 2-3. Memory Information Screen... for host systems that appear on the CPU Information screen. Displays the bus speed of video memory. Table 2-4. Table 2-2. System Setup Program Options (continued) Option Description Report Keyboard Errors (Report default) Enables or disables reporting of the keyboard itself if a keyboard is...
...the system. When set to the system. Displays the clock speed of main memory in the system. Using the System Setup Program 33 Enable this option for the information fields that appear on the Memory Information screen. Table 2-3. Memory Information Screen... for host systems that appear on the CPU Information screen. Displays the bus speed of video memory. Table 2-4. Table 2-2. System Setup Program Options (continued) Option Description Report Keyboard Errors (Report default) Enables or disables reporting of the keyboard itself if a keyboard is...


