
Getting Started Guide
Page 3
Dell™ PowerEdge™ Getting Started With Your System Model EMT
Dell™ PowerEdge™ Getting Started With Your System Model EMT
Getting Started Guide
Page 5
... technical assistance. • One of the following internal hard-drive (non-hot-pluggable) configurations: - Intel® Celeron® processor - Intel Celeron Dual-Core processor - Getting Started With Your System 3 Dual-Core Intel Xeon® processor - Intel Core™2 Duo processor - It also provides information about other documents you may differ by...
... technical assistance. • One of the following internal hard-drive (non-hot-pluggable) configurations: - Intel® Celeron® processor - Intel Celeron Dual-Core processor - Getting Started With Your System 3 Dual-Core Intel Xeon® processor - Intel Core™2 Duo processor - It also provides information about other documents you may differ by...
Getting Started Guide
Page 6
... (32-bit x86) • Microsoft Windows Server 2008, Standard Edition (x64) • Microsoft Windows Server 2003, R2 and SP2 Standard Edition(32-bit x86) 4 Getting Started With Your System Supported Operating Systems Your system supports the following integrated features: • SATA controller that supports up to two cabled SATA hard drives...
... (32-bit x86) • Microsoft Windows Server 2008, Standard Edition (x64) • Microsoft Windows Server 2003, R2 and SP2 Standard Edition(32-bit x86) 4 Getting Started With Your System Supported Operating Systems Your system supports the following integrated features: • SATA controller that supports up to two cabled SATA hard drives...
Getting Started Guide
Page 7
...sometimes included with the system to describe changes to configure and install these options. NOTE: Always check for updates on support.dell.com. • CDs or DVDs included with your system provide documentation and tools for any components you purchased separately provides ...Linux Enterprise Server 10 (x86_64) Other Information You May Need CAUTION: The Product Information Guide provides important safety and regulatory information. Getting Started With Your System 5 Warranty information may be included within this document or as a separate document. • The Hardware Owner's ...
...sometimes included with the system to describe changes to configure and install these options. NOTE: Always check for updates on support.dell.com. • CDs or DVDs included with your system provide documentation and tools for any components you purchased separately provides ...Linux Enterprise Server 10 (x86_64) Other Information You May Need CAUTION: The Product Information Guide provides important safety and regulatory information. Getting Started With Your System 5 Warranty information may be included within this document or as a separate document. • The Hardware Owner's ...
Getting Started Guide
Page 8
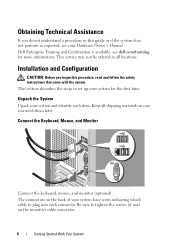
... (optional). The connectors on the monitor's cable connector. 6 Getting Started With Your System Installation and Configuration CAUTION: Before you begin this guide or if the system does not perform as expected, see dell.com/training for the first time. This service may not be offered... your Hardware Owner's Manual. see your system and identify each connector. This section describes the steps to plug into each item. Dell Enterprise Training and Certification is available; Obtaining Technical Assistance If you do not understand a procedure in case you need them later. ...
... (optional). The connectors on the monitor's cable connector. 6 Getting Started With Your System Installation and Configuration CAUTION: Before you begin this guide or if the system does not perform as expected, see dell.com/training for the first time. This service may not be offered... your Hardware Owner's Manual. see your system and identify each connector. This section describes the steps to plug into each item. Dell Enterprise Training and Certification is available; Obtaining Technical Assistance If you do not understand a procedure in case you need them later. ...

Getting Started Guide
Page 9
Adjust the monitor's controls until the displayed image is satisfactory. Getting Started With Your System 7 Next, plug the other end of the power cable into a grounded electrical outlet or a separate power source such as an uninterrupted power supply (UPS) or a power distribution unit (PDU). Turn on the System and Monitor Press the power button on the system and the monitor. Connect the System to Power Connect the system's power cable to the system. The power indicators should light.
Adjust the monitor's controls until the displayed image is satisfactory. Getting Started With Your System 7 Next, plug the other end of the power cable into a grounded electrical outlet or a separate power source such as an uninterrupted power supply (UPS) or a power distribution unit (PDU). Turn on the System and Monitor Press the power button on the system and the monitor. Connect the System to Power Connect the system's power cable to the system. The power indicators should light.

Getting Started Guide
Page 10
... PCIe x1, 3.3-V, 12-V (slot 4) 2 GB/sec PCIe x8 with the system. To install an operating system for 667or 800-MHz operation four 240-pin 8 Getting Started With Your System Be sure the operating system is installed before installing hardware or software not purchased with x4 bandwidth, 3.3-V, 12-V (slot 1) 4 GB/sec PCIe...
... PCIe x1, 3.3-V, 12-V (slot 4) 2 GB/sec PCIe x8 with the system. To install an operating system for 667or 800-MHz operation four 240-pin 8 Getting Started With Your System Be sure the operating system is installed before installing hardware or software not purchased with x4 bandwidth, 3.3-V, 12-V (slot 1) 4 GB/sec PCIe...
Getting Started Guide
Page 11
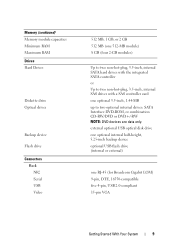
... SAS drives with a SAS controller card one RJ-45 (for Broadcom Gigabit LOM) 9-pin, DTE, 16550-compatible five 4-pin, USB 2.0-compliant 15-pin VGA Getting Started With Your System 9 Memory (continued) Memory module capacities Minimum RAM Maximum RAM Drives Hard Drives Diskette drive Optical drives Backup device Flash drive Connectors Back...
... SAS drives with a SAS controller card one RJ-45 (for Broadcom Gigabit LOM) 9-pin, DTE, 16550-compatible five 4-pin, USB 2.0-compliant 15-pin VGA Getting Started With Your System 9 Memory (continued) Memory module capacities Minimum RAM Maximum RAM Drives Hard Drives Diskette drive Optical drives Backup device Flash drive Connectors Back...

Getting Started Guide
Page 12
... 3.0-V lithium ion coin cell 414.1 mm (16.3 inches) 186.9 mm (7.40 inches) 460.14 mm (18.11 inches) 13 kg (28.70 lb) 10 Getting Started With Your System
... 3.0-V lithium ion coin cell 414.1 mm (16.3 inches) 186.9 mm (7.40 inches) 460.14 mm (18.11 inches) 13 kg (28.70 lb) 10 Getting Started With Your System

Getting Started Guide
Page 13
... change of 270 ips +/- 5% Altitude Operating -15.2 to 3,048 m (-50 to 10,000 ft) Storage -15.2 to 10,600 m (-50 to 35,000 ft) Getting Started With Your System 11 Environmental NOTE: For additional information about environmental measurements for specific system configurations, see...
... change of 270 ips +/- 5% Altitude Operating -15.2 to 3,048 m (-50 to 10,000 ft) Storage -15.2 to 10,600 m (-50 to 35,000 ft) Getting Started With Your System 11 Environmental NOTE: For additional information about environmental measurements for specific system configurations, see...

Getting Started Guide
Page 14
12 Getting Started With Your System
12 Getting Started With Your System
Hardware Owner's Manual
Page 6
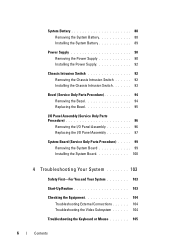
... Parts Procedure) . . . . . 99 Removing the System Board 99 Installing the System Board 100 4 Troubleshooting Your System 103 Safety First-For You and Your System 103 Start-Up Routine 103 Checking the Equipment 104 Troubleshooting External Connections 104 Troubleshooting the Video Subsystem 104 Troubleshooting the Keyboard or Mouse 105 6 Contents
... Parts Procedure) . . . . . 99 Removing the System Board 99 Installing the System Board 100 4 Troubleshooting Your System 103 Safety First-For You and Your System 103 Start-Up Routine 103 Checking the Equipment 104 Troubleshooting External Connections 104 Troubleshooting the Video Subsystem 104 Troubleshooting the Keyboard or Mouse 105 6 Contents

Hardware Owner's Manual
Page 9
... Your System 9 Other Information You May Need NOTE: Important safety and regulatory information is provided in this document or as a separate document. • The Getting Started Guide provides an overview of system features, setting up your system, and technical specifications. • CDs or DVDs included with your system provide documentation and...
... Your System 9 Other Information You May Need NOTE: Important safety and regulatory information is provided in this document or as a separate document. • The Getting Started Guide provides an overview of system features, setting up your system, and technical specifications. • CDs or DVDs included with your system provide documentation and...

Hardware Owner's Manual
Page 15
... information on system power requirements, see "Technical Specifications" in the System Setup program. Voltage Selection Switch If your power source is disabled in your Getting Started Guide. NIC Indicator Codes Indicator Type Indicator Code Activity Off Blinking Link Off Yellow Orange Green Description When off at the same time that the...
... information on system power requirements, see "Technical Specifications" in the System Setup program. Voltage Selection Switch If your power source is disabled in your Getting Started Guide. NIC Indicator Codes Indicator Type Indicator Code Activity Off Blinking Link Off Yellow Orange Green Description When off at the same time that the...

Hardware Owner's Manual
Page 21
.... installed. Faulty system board. See expecting value "Troubleshooting System Memory double word logic failure at address, installed memory modules, modules are properly read failure at start address to terminate the memory test. See "Getting Help" on page 139. If the problem persists, see "Getting Help" on page 139. during POST to...
.... installed. Faulty system board. See expecting value "Troubleshooting System Memory double word logic failure at address, installed memory modules, modules are properly read failure at start address to terminate the memory test. See "Getting Help" on page 139. If the problem persists, see "Getting Help" on page 139. during POST to...

Hardware Owner's Manual
Page 29
... Entering the System Setup Program 1 Turn on page 18 for correcting errors. Using the System Setup Program 29 Using the System Setup Program After you start your system. If an error message appears while the system is normal for your system to send a message the first time you set up your...
... Entering the System Setup Program 1 Turn on page 18 for correcting errors. Using the System Setup Program 29 Using the System Setup Program After you start your system. If an error message appears while the system is normal for your system to send a message the first time you set up your...

Hardware Owner's Manual
Page 32
... searches the hard drives during system startup. The selections depend on the PCI bus, and any installed expansion cards that was specified in your system starts up with the NumLock mode activated on page 42 for boot devices during system startup. Hard disk allows the USB flash drive to each of...
... searches the hard drives during system startup. The selections depend on the PCI bus, and any installed expansion cards that was specified in your system starts up with the NumLock mode activated on page 42 for boot devices during system startup. Hard disk allows the USB flash drive to each of...

Hardware Owner's Manual
Page 37
...Setup Password field and then change the Password Status option to Enabled prevents the system password from being changed or disabled at system start -up by pressing . See support.dell.com for additional TPM documentation. When set to On with Pre-boot Measurements, the system reports the TPM to the operating ... Status TPM Security (Off default) Description Setting the Setup Password option to Locked. In this state, you can disable the system password at system start-up by both operating systems and programs. It is integrated into the system board, and it can be disabled at system...
...Setup Password field and then change the Password Status option to Enabled prevents the system password from being changed or disabled at system start -up by pressing . See support.dell.com for additional TPM documentation. When set to On with Pre-boot Measurements, the system reports the TPM to the operating ... Status TPM Security (Off default) Description Setting the Setup Password option to Locked. In this state, you can disable the system password at system start-up by both operating systems and programs. It is integrated into the system board, and it can be disabled at system...
Hardware Owner's Manual
Page 39
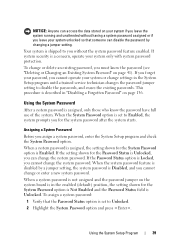
... 39 Using the System Password After a system password is described in the enabled (default) position, the setting shown for the system password after the system starts. This procedure is assigned, only those who know the password (see "Deleting or Changing an Existing System Password" on page 41). When the System Password...
... 39 Using the System Password After a system password is described in the enabled (default) position, the setting shown for the system password after the system starts. This procedure is assigned, only those who know the password (see "Deleting or Changing an Existing System Password" on page 41). When the System Password...

Hardware Owner's Manual
Page 42
... one of these combinations, the system beeps. The password assignment is illegal for the setup password. To erase a character when entering your password. When you start the System Setup program, the program prompts you cannot disable or change an existing system password). 42 Using the System Setup Program If you do...
... one of these combinations, the system beeps. The password assignment is illegal for the setup password. To erase a character when entering your password. When you start the System Setup program, the program prompts you cannot disable or change an existing system password). 42 Using the System Setup Program If you do...


