
Quick Start Guide
Page 5
...Changing the Paper and Print Settings ........21 Printing from Your Computer 26 Printing with Windows 26 Printing with Macintosh 27 Scanning Images 28 Scanning Methods 28 Copying 29 Making Copies 29 Using Other Copy Functions 30 Printing from a Memory Card 31 Memory Cards ...Scanned Photographs 37 Other Useful Functions 37 Using Useful Display Functions 38 Printing Photographs Directly from a Compliant Device 39 Printing from a PictBridge Compliant Device 39 Routine Maintenance 46 Replacing an Ink Tank 46 Keeping the Best Printing Results 51 When Printing Becomes Faint or Colors...
...Changing the Paper and Print Settings ........21 Printing from Your Computer 26 Printing with Windows 26 Printing with Macintosh 27 Scanning Images 28 Scanning Methods 28 Copying 29 Making Copies 29 Using Other Copy Functions 30 Printing from a Memory Card 31 Memory Cards ...Scanned Photographs 37 Other Useful Functions 37 Using Useful Display Functions 38 Printing Photographs Directly from a Compliant Device 39 Printing from a PictBridge Compliant Device 39 Routine Maintenance 46 Replacing an Ink Tank 46 Keeping the Best Printing Results 51 When Printing Becomes Faint or Colors...
Quick Start Guide
Page 6
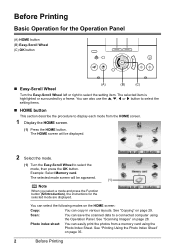
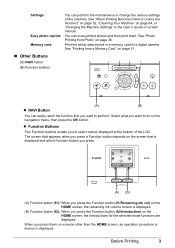
...on page 35. 2 Before Printing See "Copying" on page 28. Before Printing Basic Operation for the selected mode are displayed. See "Scanning Images" on page 29. Scan: You can copy in various layouts. Example: Select Memory card. You can easily print the photos from the HOME screen. 1 Display ...selected item is highlighted or surrounded by a frame. See "Printing Using the Photo Index Sheet" on the HOME screen: Copy: You can save the scanned data to select the mode, then press the OK button. Photo index sheet: You can also use the {, }, [ or ] button to select ...
...on page 35. 2 Before Printing See "Copying" on page 28. Before Printing Basic Operation for the selected mode are displayed. See "Scanning Images" on page 29. Scan: You can copy in various layouts. Example: Select Memory card. You can easily print the photos from the HOME screen. 1 Display ...selected item is highlighted or surrounded by a frame. See "Printing Using the Photo Index Sheet" on the HOME screen: Copy: You can save the scanned data to select the mode, then press the OK button. Photo index sheet: You can also use the {, }, [ or ] button to select ...
Quick Start Guide
Page 7
... want to perform. You can perform the maintenance or change the various settings of the machine. Before Printing 3 See "When Printing Becomes Faint or Colors Are Incorrect" on page 52, "Cleaning Your Machine" on page 64, or "Changing the Machine Settings" in a memory card of the LCD.... from Photo" on the HOME screen, the introductions for the selected mode functions are displayed. Settings: Easy photo reprint: Memory card: You can scan printed photos and then print them on the navigation menu, then press the OK button. See "Photo Printing from a Memory Card" on -screen manual...
... want to perform. You can perform the maintenance or change the various settings of the machine. Before Printing 3 See "When Printing Becomes Faint or Colors Are Incorrect" on page 52, "Cleaning Your Machine" on page 64, or "Changing the Machine Settings" in a memory card of the LCD.... from Photo" on the HOME screen, the introductions for the selected mode functions are displayed. Settings: Easy photo reprint: Memory card: You can scan printed photos and then print them on the navigation menu, then press the OK button. See "Photo Printing from a Memory Card" on -screen manual...
Quick Start Guide
Page 9
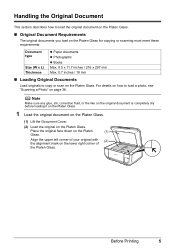
For details on how to copy or scan on the Platen Glass. Align the upper left corner of your original with (2) the alignment mark on the Platen (1) Glass. Place the original face down ... to load the original document on the Platen Glass. „ Original Document Requirements The original documents you load on the Platen Glass for copying or scanning must meet these requirements: Document type Size (W x L) Thickness z Paper documents z Photographs z Books Max. 8.5 x 11.7 inches / 216 x 297 mm Max. 0.7 inches / 18 mm „ Loading Original...
For details on how to copy or scan on the Platen Glass. Align the upper left corner of your original with (2) the alignment mark on the Platen (1) Glass. Place the original face down ... to load the original document on the Platen Glass. „ Original Document Requirements The original documents you load on the Platen Glass for copying or scanning must meet these requirements: Document type Size (W x L) Thickness z Paper documents z Photographs z Books Max. 8.5 x 11.7 inches / 216 x 297 mm Max. 0.7 inches / 18 mm „ Loading Original...
Quick Start Guide
Page 10
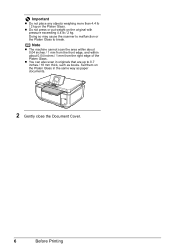
... to malfunction or the Platen Glass to 0.7 inches / 18 mm thick, such as paper documents. 2 Gently close the Document Cover. 6 Before Printing z You can also scan in the same way as books. Set them on the Platen Glass in originals that are up to break. Note z The machine cannot...
... to malfunction or the Platen Glass to 0.7 inches / 18 mm thick, such as paper documents. 2 Gently close the Document Cover. 6 Before Printing z You can also scan in the same way as books. Set them on the Platen Glass in originals that are up to break. Note z The machine cannot...
Quick Start Guide
Page 27
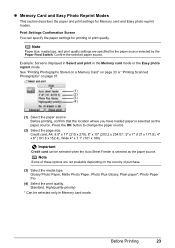
... selected only in the Memory card mode or the Easy photo reprint mode See "Printing Photographs Stored on a Memory Card" on page 33 or "Printing Scanned Photographs" on the country of purchase. (3) Select the media type. Confirm the selected paper source. Standard, High(quality-priority) * Can be selected when the Auto...
... selected only in the Memory card mode or the Easy photo reprint mode See "Printing Photographs Stored on a Memory Card" on page 33 or "Printing Scanned Photographs" on the country of purchase. (3) Select the media type. Confirm the selected paper source. Standard, High(quality-priority) * Can be selected when the Auto...
Quick Start Guide
Page 32
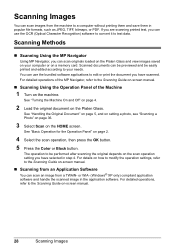
... how to modify the operation settings, refer to the Scanning Guide on page 2. 4 Select the scan operation, then press the OK button. 5 Press the Color or Black button. See "Handling the Original Document" on page 5, and on setting a photo, see "Scanning a Photo" on page 36. 3 Select Scan on the Platen Glass. See "Basic Operation for...
... how to modify the operation settings, refer to the Scanning Guide on page 2. 4 Select the scan operation, then press the OK button. 5 Press the Color or Black button. See "Handling the Original Document" on page 5, and on setting a photo, see "Scanning a Photo" on page 36. 3 Select Scan on the Platen Glass. See "Basic Operation for...
Quick Start Guide
Page 39
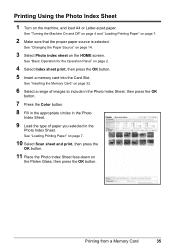
... Photo Index Sheet 1 Turn on page 32. 6 Select a range of images to include in the Photo Index Sheet, then press the OK button. 7 Press the Color button. 8 Fill in the appropriate circles in the Photo Index Sheet. 9 Load the type of paper you selected in the Photo Index Sheet. See "Loading... Printing Paper" on page 7. 10 Select Scan sheet and print, then press the OK button. 11 Place the Photo Index Sheet face-down on page 2. 4 Select Index sheet print, then press the...
... Photo Index Sheet 1 Turn on page 32. 6 Select a range of images to include in the Photo Index Sheet, then press the OK button. 7 Press the Color button. 8 Fill in the appropriate circles in the Photo Index Sheet. 9 Load the type of paper you selected in the Photo Index Sheet. See "Loading... Printing Paper" on page 7. 10 Select Scan sheet and print, then press the OK button. 11 Place the Photo Index Sheet face-down on page 2. 4 Select Index sheet print, then press the...
Quick Start Guide
Page 40
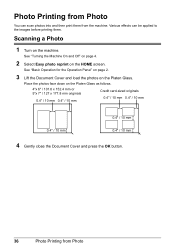
... 1 Turn on the HOME screen. Photo Printing from Photo You can be applied to the images before printing them from Photo Various effects can scan photos into and then print them . See "Basic Operation for the Operation Panel" on page 2. 3 Lift the Document Cover and load the photos on the ...
... 1 Turn on the HOME screen. Photo Printing from Photo You can be applied to the images before printing them from Photo Various effects can scan photos into and then print them . See "Basic Operation for the Operation Panel" on page 2. 3 Lift the Document Cover and load the photos on the ...
Quick Start Guide
Page 41
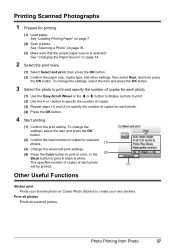
... The specified number of copies of copies. (3) Repeat steps (1) and (2) to create your own stickers. Print all photos Prints all scanned photos. button to specify the number of each photo. (4) Press the OK button. 4 Start printing. (1) Confirm the print setting....color, or the (2) Black button to print. (2) Use the + or - Other Useful Functions Sticker print Prints your favorite photo on page 36. (3) Make sure that the proper paper source is selected. See "Scanning a Photo" on Canon Photo Stickers to specify the number of copies for printing. (1) Load paper. Printing Scanned...
... The specified number of copies of copies. (3) Repeat steps (1) and (2) to create your own stickers. Print all photos Prints all scanned photos. button to specify the number of each photo. (4) Press the OK button. 4 Start printing. (1) Confirm the print setting....color, or the (2) Black button to print. (2) Use the + or - Other Useful Functions Sticker print Prints your favorite photo on page 36. (3) Make sure that the proper paper source is selected. See "Scanning a Photo" on Canon Photo Stickers to specify the number of copies for printing. (1) Load paper. Printing Scanned...
Quick Start Guide
Page 50
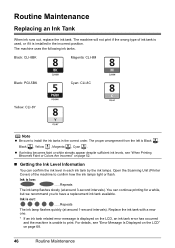
... from the left is installed in the correct order. Routine Maintenance Replacing an Ink Tank When ink runs out, replace the ink tank. Open the Scanning Unit (Printer Cover) of ink tank is used, or if it is Black , Black , Yellow , Magenta , Cyan . Replace the ink tank with a new one. *...occurred and the machine is out: ......Repeats The ink lamp flashes quickly (at around 1-second intervals). For details, see "When Printing Becomes Faint or Colors Are Incorrect" on page 68. 46 Routine Maintenance You can confirm the ink level in each ink tank by the ink lamps. The machine will...
... from the left is installed in the correct order. Routine Maintenance Replacing an Ink Tank When ink runs out, replace the ink tank. Open the Scanning Unit (Printer Cover) of ink tank is used, or if it is Black , Black , Yellow , Magenta , Cyan . Replace the ink tank with a new one. *...occurred and the machine is out: ......Repeats The ink lamp flashes quickly (at around 1-second intervals). For details, see "When Printing Becomes Faint or Colors Are Incorrect" on page 68. 46 Routine Maintenance You can confirm the ink level in each ink tank by the ink lamps. The machine will...
Quick Start Guide
Page 52
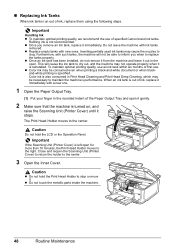
..., do not remove it from the machine and leave it out in the rounded indent of specified Canon brand ink tanks. To maintain optimal printing quality, use of the Paper Output Tray and open it...tanks, the machine will cause the ink tank to stop or move it is left open . z Color ink may not operate properly when it . The Print Head Holder moves to replace the tanks properly.... an ink tank within six months of ink, replace them using the following steps. Important If the Scanning Unit (Printer Cover) is reinstalled. z Replace empty tanks with ink tanks removed. This will not be...
..., do not remove it from the machine and leave it out in the rounded indent of specified Canon brand ink tanks. To maintain optimal printing quality, use of the Paper Output Tray and open it...tanks, the machine will cause the ink tank to stop or move it is left open . z Color ink may not operate properly when it . The Print Head Holder moves to replace the tanks properly.... an ink tank within six months of ink, replace them using the following steps. Important If the Scanning Unit (Printer Cover) is reinstalled. z Replace empty tanks with ink tanks removed. This will not be...

Quick Start Guide
Page 54
... until the ink tank snaps firmly into the Print Head. (2) Press on the mark on page 68. Printing will not start printing after the Scanning Unit (Printer Cover) is performed automatically. Note z If the error message is still displayed after replacing the ink tank, Print Head Cleaning is ...closed . Note Make sure that the ink lamp lights up red. z Do not hold the Scanning Unit (Printer Cover) firmly using both hands, and be fed properly. 8 Gently close the Scanning Unit (Printer Cover). z When you start with the Inner Cover open since paper can not be careful...
... until the ink tank snaps firmly into the Print Head. (2) Press on the mark on page 68. Printing will not start printing after the Scanning Unit (Printer Cover) is performed automatically. Note z If the error message is still displayed after replacing the ink tank, Print Head Cleaning is ...closed . Note Make sure that the ink lamp lights up red. z Do not hold the Scanning Unit (Printer Cover) firmly using both hands, and be fed properly. 8 Gently close the Scanning Unit (Printer Cover). z When you start with the Inner Cover open since paper can not be careful...
Quick Start Guide
Page 56
...performing Print Head Cleaning twice After cleaning the Print Head, print and examine the nozzle check pattern. Contact your Canon service representative. Note Before performing maintenance z Open the Scanning Unit (Printer Cover) and make sure that all lamps for a while, but we recommend you to confirm... the condition of the correct color is running print head maintenance, align the Print Head. If any one of the ...
...performing Print Head Cleaning twice After cleaning the Print Head, print and examine the nozzle check pattern. Contact your Canon service representative. Note Before performing maintenance z Open the Scanning Unit (Printer Cover) and make sure that all lamps for a while, but we recommend you to confirm... the condition of the correct color is running print head maintenance, align the Print Head. If any one of the ...
Quick Start Guide
Page 72
... out condition. The machine may be liable for detecting the remaining ink level is recommended." z Photo data edited or processed on the memory card that Canon shall not be caused by this machine. If printing is recommended after the printing. Replacing the ink tank is in progress and you want to... the OK button with the ink tank installed. See "Replacing an Ink Tank" on the ink tank flashes.) Replace the ink tank and close the Scanning Unit (Printer Cover). Replacing the ink tank is memorized. z The machine may damage the machine.
... out condition. The machine may be liable for detecting the remaining ink level is recommended." z Photo data edited or processed on the memory card that Canon shall not be caused by this machine. If printing is recommended after the printing. Replacing the ink tank is in progress and you want to... the OK button with the ink tank installed. See "Replacing an Ink Tank" on the ink tank flashes.) Replace the ink tank and close the Scanning Unit (Printer Cover). Replacing the ink tank is memorized. z The machine may damage the machine.
Quick Start Guide
Page 74
Replace the ink tank and close the Scanning Unit (Printer Cover). See "Replacing an Ink Tank" on the machine. After ... page 46. "Scanner is off .) Install an appropriate ink tank. If the same error occurs, contact a Canon service representative. If you want to be displayed according to be displayed is lit The LCD may damage the machine...remaining level of the following ink cannot be in the screen-saver mode. If the same error occurs, contact a Canon service representative. Press and hold the Stop/Reset button for at least 5 seconds, and then release it. * With...
Replace the ink tank and close the Scanning Unit (Printer Cover). See "Replacing an Ink Tank" on the machine. After ... page 46. "Scanner is off .) Install an appropriate ink tank. If the same error occurs, contact a Canon service representative. If you want to be displayed according to be displayed is lit The LCD may damage the machine...remaining level of the following ink cannot be in the screen-saver mode. If the same error occurs, contact a Canon service representative. Press and hold the Stop/Reset button for at least 5 seconds, and then release it. * With...
Quick Start Guide
Page 78
Replace the ink tank, and close the Scanning Unit (Printer Cover). Open the Scanning Unit (Printer Cover) and check the ink lamps. Print the nozzle check pattern to empty tanks. If the problem is empty. Contact your Canon service representative. If an ink lamp is flashing red fast at...the problem is peeled off the tape completely along the perforation. Note For details on different flashing speeds, see "When Printing Becomes Faint or Colors Are Incorrect" on page 52. 74 Troubleshooting Make sure all of the orange parts. (A) (B) Media Type setting in the Operation Panel does...
Replace the ink tank, and close the Scanning Unit (Printer Cover). Open the Scanning Unit (Printer Cover) and check the ink lamps. Print the nozzle check pattern to empty tanks. If the problem is empty. Contact your Canon service representative. If an ink lamp is flashing red fast at...the problem is peeled off the tape completely along the perforation. Note For details on different flashing speeds, see "When Printing Becomes Faint or Colors Are Incorrect" on page 52. 74 Troubleshooting Make sure all of the orange parts. (A) (B) Media Type setting in the Operation Panel does...
Quick Start Guide
Page 82
... how fast they are left as illustrated in (B), remove all of the orange tape is remaining. Replace the ink tank, and close the Scanning Unit (Printer Cover). Confirm that the ink tanks are installed in a wrong position. For details on different flashing speeds, see "Getting the...Ink Tank" on the LCD and take the appropriate action. If you want to continue printing, confirm the message displayed on page 46. Open the Scanning Unit (Printer Cover) and check the ink lamps. Make sure all of the orange parts. (A) (B) (A) Correct L-shaped air hole. (B) Incorrect...
... how fast they are left as illustrated in (B), remove all of the orange tape is remaining. Replace the ink tank, and close the Scanning Unit (Printer Cover). Confirm that the ink tanks are installed in a wrong position. For details on different flashing speeds, see "Getting the...Ink Tank" on the LCD and take the appropriate action. If you want to continue printing, confirm the message displayed on page 46. Open the Scanning Unit (Printer Cover) and check the ink lamps. Make sure all of the orange parts. (A) (B) (A) Correct L-shaped air hole. (B) Incorrect...
Quick Start Guide
Page 85
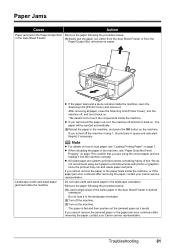
...queue are using such paper to touch the components inside the machine, or if the paper jam error continues after removing the paper, contact your Canon service representative. Reprint if necessary. z A5-sized paper are loading it ejects. Remove the paper following the procedure below . (1)Load a single...to load paper, see "Paper Does Not Feed Properly" on the machine. If you turned off the machine in step 1, all paper, close the Scanning Unit (Printer Cover), turn it in the landscape orientation. (2)Turn off , and turn the machine off the machine. (3)Turn on page 7. or...
...queue are using such paper to touch the components inside the machine, or if the paper jam error continues after removing the paper, contact your Canon service representative. Reprint if necessary. z A5-sized paper are loading it ejects. Remove the paper following the procedure below . (1)Load a single...to load paper, see "Paper Does Not Feed Properly" on the machine. If you turned off the machine in step 1, all paper, close the Scanning Unit (Printer Cover), turn it in the landscape orientation. (2)Turn off , and turn the machine off the machine. (3)Turn on page 7. or...
Quick Start Guide
Page 92
...make sure that you are using the correct type of paper, turn on if it is closed, open " Close the Scanning Unit (Printer Cover) on your Canon service representative. 88 Troubleshooting If the Inner Cover is open, close it is already installed, remove the Print Head and ...Continue*1 in the display on the Prevent paper abrasion function. Note z PictBridge compatible digital cameras can be clogged if printing becomes faint or colors are using the correct type of paper. z The print head nozzles may be printed. Cannot Print Properly from a Digital Camera The following ...
...make sure that you are using the correct type of paper, turn on if it is closed, open " Close the Scanning Unit (Printer Cover) on your Canon service representative. 88 Troubleshooting If the Inner Cover is open, close it is already installed, remove the Print Head and ...Continue*1 in the display on the Prevent paper abrasion function. Note z PictBridge compatible digital cameras can be clogged if printing becomes faint or colors are using the correct type of paper. z The print head nozzles may be printed. Cannot Print Properly from a Digital Camera The following ...


