Quick Start Guide
Page 4
...be, nor should they are licensed to be an easy-to-use of the MultiMediaCard Association. Canon PIXMA MP600 Photo All-in any guides or related documents are believed reliable, but the accuracy and completeness ...Canon U.S.A., Inc. has reviewed this manual and in any form, in whole or in order that effectively reduce energy consumption. The International ENERGY STAR® Office Equipment Program is a trademark of computer and other countries. Their standards and logos are either registered trademarks or trademarks of Sony Corporation. About Consumables Consumables (ink...
...be, nor should they are licensed to be an easy-to-use of the MultiMediaCard Association. Canon PIXMA MP600 Photo All-in any guides or related documents are believed reliable, but the accuracy and completeness ...Canon U.S.A., Inc. has reviewed this manual and in any form, in whole or in order that effectively reduce energy consumption. The International ENERGY STAR® Office Equipment Program is a trademark of computer and other countries. Their standards and logos are either registered trademarks or trademarks of Sony Corporation. About Consumables Consumables (ink...

Quick Start Guide
Page 5
... Printing Photographs Directly from a Compliant Device 39 Printing from a PictBridge Compliant Device 39 Routine Maintenance 46 Replacing an Ink Tank 46 Keeping the Best Printing Results 51 When Printing Becomes Faint or Colors Are Incorrect 52 Printing the Nozzle Check Pattern 53 Examining the Nozzle Check Pattern ...........54 Print Head Cleaning 56...
... Printing Photographs Directly from a Compliant Device 39 Printing from a PictBridge Compliant Device 39 Routine Maintenance 46 Replacing an Ink Tank 46 Keeping the Best Printing Results 51 When Printing Becomes Faint or Colors Are Incorrect 52 Printing the Nozzle Check Pattern 53 Examining the Nozzle Check Pattern ...........54 Print Head Cleaning 56...
Quick Start Guide
Page 7
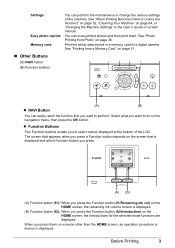
... and which Function button you press. (A) (B) (A) Function button (f1): When you press the Function button (f1/Remaining ink vol) on the HOME screen, the remaining ink volume screen is displayed. Print the photo data stored in the User's Guide on the HOME screen, the introductions for the... selected mode functions are displayed. Select what you want to perform. See "When Printing Becomes Faint or Colors Are Incorrect" on page 52...
... and which Function button you press. (A) (B) (A) Function button (f1): When you press the Function button (f1/Remaining ink vol) on the HOME screen, the remaining ink volume screen is displayed. Print the photo data stored in the User's Guide on the HOME screen, the introductions for the... selected mode functions are displayed. Select what you want to perform. See "When Printing Becomes Faint or Colors Are Incorrect" on page 52...

Quick Start Guide
Page 8
... plug after turing off . Turning the Machine On and Off Turn on the machine before the LCD goes out. 4 Before Printing z The Print Head and ink tanks are installed. Important If the ALARM lamp lights up or flashes orange and an error message is not operated for 5 minutes.
... plug after turing off . Turning the Machine On and Off Turn on the machine before the LCD goes out. 4 Before Printing z The Print Head and ink tanks are installed. Important If the ALARM lamp lights up or flashes orange and an error message is not operated for 5 minutes.
Quick Start Guide
Page 9
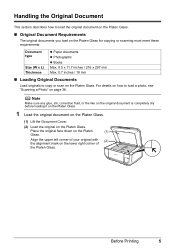
... details on how to copy or scan on the Platen Glass. Place the original face down on the Platen Glass. Note Make sure any glue, ink, correction fluid, or the like on the original document is completely dry before loading it on the Platen Glass. 1 Load the original document on the...
... details on how to copy or scan on the Platen Glass. Place the original face down on the Platen Glass. Note Make sure any glue, ink, correction fluid, or the like on the original document is completely dry before loading it on the Platen Glass. 1 Load the original document on the...
Quick Start Guide
Page 13
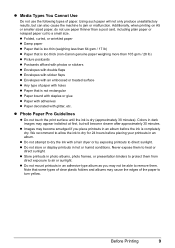
...but will become smudged if you may not be able to dry for 24 hours before the ink is not rectangular z Paper bound with staples or glue z Paper with adhesives z Paper ...less than 64 gsm / 17 lb) z Paper that is too thick (non-Canon genuine paper weighing more than a post card, including plain paper or notepad paper cut to direct sunlight....ink with glitter, etc. z Do not mount printouts in an adhesive-type album as you place printouts in an album before placing your printouts in dark images may appear indistinct at first, but can also cause the machine to turn yellow. Colors...
...but will become smudged if you may not be able to dry for 24 hours before the ink is not rectangular z Paper bound with staples or glue z Paper with adhesives z Paper ...less than 64 gsm / 17 lb) z Paper that is too thick (non-Canon genuine paper weighing more than a post card, including plain paper or notepad paper cut to direct sunlight....ink with glitter, etc. z Do not mount printouts in an adhesive-type album as you place printouts in an album before placing your printouts in dark images may appear indistinct at first, but can also cause the machine to turn yellow. Colors...
Quick Start Guide
Page 50
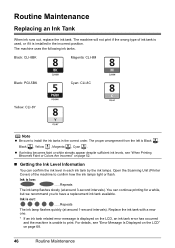
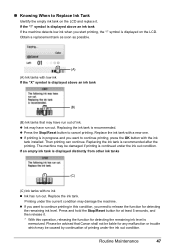
... Maintenance Replacing an Ink Tank When ink runs out, replace the ink tank. Open the Scanning Unit (Printer Cover) of ink tank is used, or if it is unable to have a replacement ink tank available. You can confirm the ink level in each ink tank by the ink lamps. The machine...machine to install the ink tanks in the incorrect position. The machine uses the following ink tanks. Ink is low: ......Repeats The ink lamp flashes slowly (at around 3-second intervals). For details, see "When Printing Becomes Faint or Colors Are Incorrect" on the LCD, an ink tank error has ...
... Maintenance Replacing an Ink Tank When ink runs out, replace the ink tank. Open the Scanning Unit (Printer Cover) of ink tank is used, or if it is unable to have a replacement ink tank available. You can confirm the ink level in each ink tank by the ink lamps. The machine...machine to install the ink tanks in the incorrect position. The machine uses the following ink tanks. Ink is low: ......Repeats The ink lamp flashes slowly (at around 3-second intervals). For details, see "When Printing Becomes Faint or Colors Are Incorrect" on the LCD, an ink tank error has ...
Quick Start Guide
Page 51
... be advised that may have run out of printing under the ink out condition. Obtain a replacement tank as soon as possible. (A) (A) Ink tanks with a new one. symbol is displayed above an ink tank (B) (B) Ink tanks that Canon shall not be damaged if printing is displayed on the LCD and replace it . * With this condition, you...
... be advised that may have run out of printing under the ink out condition. Obtain a replacement tank as soon as possible. (A) (A) Ink tanks with a new one. symbol is displayed above an ink tank (B) (B) Ink tanks that Canon shall not be damaged if printing is displayed on the LCD and replace it . * With this condition, you...
Quick Start Guide
Page 52
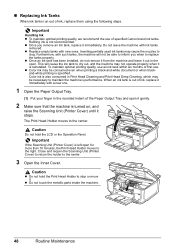
...Replace empty tanks with ink tanks removed. Inserting partially used ink tanks may cause the... indent of ink, replace them using the following steps. z Color ink may be necessary...ink tank is reinstalled. This will not be able to inform you remove an ink...48 Routine Maintenance Color ink is specified. Caution z Do...ink, replace it immediately with such tanks, the machine will cause the ink...Cover) is not recommended. Refilling ink is left open . To maintain...ink tank has been installed, do not remove it from the machine and leave it immediately. Important Handling Ink...
...Replace empty tanks with ink tanks removed. Inserting partially used ink tanks may cause the... indent of ink, replace them using the following steps. z Color ink may be necessary...ink tank is reinstalled. This will not be able to inform you remove an ink...48 Routine Maintenance Color ink is specified. Caution z Do...ink, replace it immediately with such tanks, the machine will cause the ink...Cover) is not recommended. Refilling ink is left open . To maintain...ink tank has been installed, do not remove it from the machine and leave it immediately. Important Handling Ink...
Quick Start Guide
Page 53
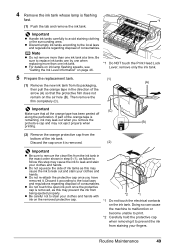
... contacts on page 46. *1 Do NOT touch the Print Head Lock Lever; z Do not touch the open ink port once the protective cap is remaining, ink may cause the ink to leak out and stain your clothes and hands. Doing so can cause the machine to malfunction or become unable... may leak out when you have removed it is flashing fast. *1 (1) Push the tab and remove the ink tank. remove only the ink tank. 5 Prepare the replacement tank. (1) (A) (1) Remove the new ink tank from its packaging, then pull the orange tape in step 5-(1), as failure to follow this step may ...
... contacts on page 46. *1 Do NOT touch the Print Head Lock Lever; z Do not touch the open ink port once the protective cap is remaining, ink may cause the ink to leak out and stain your clothes and hands. Doing so can cause the machine to malfunction or become unable... may leak out when you have removed it is flashing fast. *1 (1) Push the tab and remove the ink tank. remove only the ink tank. 5 Prepare the replacement tank. (1) (A) (1) Remove the new ink tank from its packaging, then pull the orange tape in step 5-(1), as failure to follow this step may ...

Quick Start Guide
Page 54
... (Printer Cover) firmly using both hands, and be fed properly. 8 Gently close the Scanning Unit (Printer Cover). Do not perform any other operations until the ink tank snaps firmly into the Print Head. (2) Press on the mark on page 68. z When you start with the Inner Cover open since paper can... not be careful not to get your fingers caught. 6 Install the ink tank. (1) Insert the front end of the tank matches the label. Printing will not start printing after the Scanning Unit (Printer Cover) is closed .
... (Printer Cover) firmly using both hands, and be fed properly. 8 Gently close the Scanning Unit (Printer Cover). Do not perform any other operations until the ink tank snaps firmly into the Print Head. (2) Press on the mark on page 68. z When you start with the Inner Cover open since paper can... not be careful not to get your fingers caught. 6 Install the ink tank. (1) Insert the front end of the tank matches the label. Printing will not start printing after the Scanning Unit (Printer Cover) is closed .
Quick Start Guide
Page 55
.... Just as around 30 seconds. (3) Unplug the power cord from drying. Numerous nozzles are not using a power outlet strip, you are installed in color, or perform Print Head Cleaning, about once a month to turn off the machine, the machine automatically puts a protective cap on the Print Head to... prevent the ink from the wall outlet. When you press the ON/OFF button to prevent degradation of a ballpoint pen or marker becomes dry and unusable if ...
.... Just as around 30 seconds. (3) Unplug the power cord from drying. Numerous nozzles are not using a power outlet strip, you are installed in color, or perform Print Head Cleaning, about once a month to turn off the machine, the machine automatically puts a protective cap on the Print Head to... prevent the ink from the wall outlet. When you press the ON/OFF button to prevent degradation of a ballpoint pen or marker becomes dry and unusable if ...
Quick Start Guide
Page 56
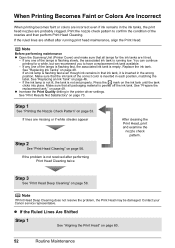
...Print Head Deep Cleaning" on page 48. Contact your Canon service representative. If any one of the correct color is peeled off the ink tank. Replace the ink tank. See "Replacing Ink Tanks" on page 58. If an ink lamp is flashing fast even though ink remains in that all lamps for a while, but ... tank is inserted in the wrong position. Make sure that ink tank, it is not set properly. When Printing Becomes Faint or Colors Are Incorrect When printing becomes faint or colors are incorrect even if ink remains in the ink tanks, the print head nozzles are missing or if white ...
...Print Head Deep Cleaning" on page 48. Contact your Canon service representative. If any one of the correct color is peeled off the ink tank. Replace the ink tank. See "Replacing Ink Tanks" on page 58. If an ink lamp is flashing fast even though ink remains in that all lamps for a while, but ... tank is inserted in the wrong position. Make sure that ink tank, it is not set properly. When Printing Becomes Faint or Colors Are Incorrect When printing becomes faint or colors are incorrect even if ink remains in the ink tanks, the print head nozzles are missing or if white ...
Quick Start Guide
Page 57
... rounded indent of the Paper Output Tray and open it gently. (2) Open the Output Tray Extension. 3 Press the Paper Feed Switch to determine whether the ink ejects properly from the Print Head. See "Basic Operation for the Operation Panel" on page 54. See "Examining the Nozzle Check Pattern" on page 2. (2) Select...
... rounded indent of the Paper Output Tray and open it gently. (2) Open the Output Tray Extension. 3 Press the Paper Feed Switch to determine whether the ink ejects properly from the Print Head. See "Basic Operation for the Operation Panel" on page 54. See "Examining the Nozzle Check Pattern" on page 2. (2) Select...
Quick Start Guide
Page 58
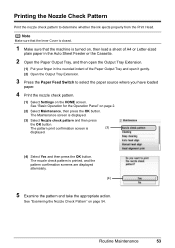
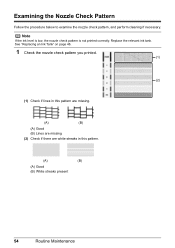
See "Replacing an Ink Tank" on page 46. 1 Check the nozzle check pattern you printed. (1) (2) (1) Check if lines in this pattern are missing. (A) (B) (A) Good (B) Lines are missing (2) Check if there are white streaks in this pattern. (A) (B) (A) Good (B) White streaks present 54 Routine Maintenance Replace the relevant ink tank. Examining the Nozzle Check Pattern Follow the procedure below to examine the nozzle check pattern, and perform cleaning if necessary. Note If the ink level is low, the nozzle check pattern is not printed correctly.
See "Replacing an Ink Tank" on page 46. 1 Check the nozzle check pattern you printed. (1) (2) (1) Check if lines in this pattern are missing. (A) (B) (A) Good (B) Lines are missing (2) Check if there are white streaks in this pattern. (A) (B) (A) Good (B) White streaks present 54 Routine Maintenance Replace the relevant ink tank. Examining the Nozzle Check Pattern Follow the procedure below to examine the nozzle check pattern, and perform cleaning if necessary. Note If the ink level is low, the nozzle check pattern is not printed correctly.
Quick Start Guide
Page 60
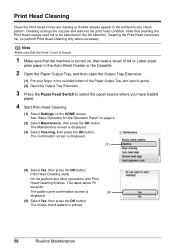
...for the Operation Panel" on the HOME screen. Do not perform any other operations until Print Head Cleaning finishes. Cleaning the Print Head consumes ink, so perform Print Head Cleaning only when necessary. Note Make sure that the Inner Cover is closed. 1 Make sure that cleaning the Print... Head causes used ink to select the paper source where you have loaded paper. 4 Start Print Head Cleaning. (1) Select Settings on page 2. (2) Select Maintenance, then press...
...for the Operation Panel" on the HOME screen. Do not perform any other operations until Print Head Cleaning finishes. Cleaning the Print Head consumes ink, so perform Print Head Cleaning only when necessary. Note Make sure that the Inner Cover is closed. 1 Make sure that cleaning the Print... Head causes used ink to select the paper source where you have loaded paper. 4 Start Print Head Cleaning. (1) Select Settings on page 2. (2) Select Maintenance, then press...
Quick Start Guide
Page 62
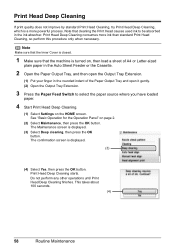
... 100 seconds. (4) 58 Routine Maintenance See "Basic Operation for the Operation Panel" on the HOME screen. Note that the machine is a more ink than standard Print Head Cleaning, so perform this procedure only when necessary. The Maintenance screen is displayed. (3) (4) Select Yes, then press the ... Print Head Deep Cleaning finishes. Note Make sure that the Inner Cover is closed. 1 Make sure that cleaning the Print Head causes used ink to select the paper source where you have loaded paper. 4 Start Print Head Deep Cleaning. (1) Select Settings on page 2. (2) Select ...
... 100 seconds. (4) 58 Routine Maintenance See "Basic Operation for the Operation Panel" on the HOME screen. Note that the machine is a more ink than standard Print Head Cleaning, so perform this procedure only when necessary. The Maintenance screen is displayed. (3) (4) Select Yes, then press the ... Print Head Deep Cleaning finishes. Note Make sure that the Inner Cover is closed. 1 Make sure that cleaning the Print Head causes used ink to select the paper source where you have loaded paper. 4 Start Print Head Deep Cleaning. (1) Select Settings on page 2. (2) Select ...
Quick Start Guide
Page 63
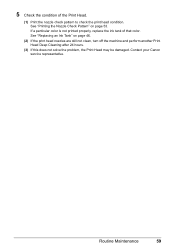
Contact your Canon service representative. Routine Maintenance 59 If a particular color is not printed properly, replace the ink tank of the Print Head. (1) Print the nozzle check pattern to check the print head condition. See "Replacing an Ink Tank" on page 53. 5 Check the condition of that color. See "Printing the Nozzle Check Pattern" on page 46. (2) If the print head nozzles are still not clean, turn off the machine and perform another Print Head Deep Cleaning after 24 hours. (3) If this does not solve the problem, the Print Head may be damaged.
Contact your Canon service representative. Routine Maintenance 59 If a particular color is not printed properly, replace the ink tank of the Print Head. (1) Print the nozzle check pattern to check the print head condition. See "Replacing an Ink Tank" on page 53. 5 Check the condition of that color. See "Printing the Nozzle Check Pattern" on page 46. (2) If the print head nozzles are still not clean, turn off the machine and perform another Print Head Deep Cleaning after 24 hours. (3) If this does not solve the problem, the Print Head may be damaged.

Quick Start Guide
Page 70
... perform any other operation while the bottom plate is selected as it feeds through the machine. Clean them according to turn the machine off any ink from the Auto Sheet Feeder. If the ejected paper is displayed. (2) Select Maintenance, then press the OK button. 4 Load this and only this sheet of...
... perform any other operation while the bottom plate is selected as it feeds through the machine. Clean them according to turn the machine off any ink from the Auto Sheet Feeder. If the ejected paper is displayed. (2) Select Maintenance, then press the OK button. 4 Load this and only this sheet of...
Quick Start Guide
Page 71
...to End of Job" on page 73 z "Part of the Page Is Not Printed" on page 73 z "Colors Are Unclear" on page 73 z "Ink Does Not Come Out/Printing Does Not Start/Printing Is Blurred/Colors Are Wrong/ Straight Lines Are Misaligned" on page 74 z "White Streaks" on page 75 z "Printed Paper ...Curls or Has Ink Blots" on page 75 z "Printed Surface Is Scratched/Paper Is Smudged" on page 75 z "Colors Are Uneven or Streaked" on page 77 z "Printing Problems When Copying" on page 77 z "Printing Does Not Start...
...to End of Job" on page 73 z "Part of the Page Is Not Printed" on page 73 z "Colors Are Unclear" on page 73 z "Ink Does Not Come Out/Printing Does Not Start/Printing Is Blurred/Colors Are Wrong/ Straight Lines Are Misaligned" on page 74 z "White Streaks" on page 75 z "Printed Paper ...Curls or Has Ink Blots" on page 75 z "Printed Surface Is Scratched/Paper Is Smudged" on page 75 z "Colors Are Uneven or Streaked" on page 77 z "Printing Problems When Copying" on page 77 z "Printing Does Not Start...


