
Quick Start Guide
Page 5
... the Operation Panel ........2 Turning the Machine On and Off 4 Handling the Original Document 5 Loading Printing Paper 7 Changing the Paper and Print Settings ........21 Printing from Your Computer 26 Printing with Windows 26 Printing with Macintosh 27 Scanning Images 28 Scanning Methods 28 Copying 29 Making Copies 29 Using Other Copy Functions 30 Printing from a Memory Card 31 Memory Cards Supported by This Machine 31 Inserting the Memory Card 32 Removing the Memory Card 33 Printing Photographs Stored on a Memory Card 33 Using Other Printing Functions 34 Using Useful Display...
... the Operation Panel ........2 Turning the Machine On and Off 4 Handling the Original Document 5 Loading Printing Paper 7 Changing the Paper and Print Settings ........21 Printing from Your Computer 26 Printing with Windows 26 Printing with Macintosh 27 Scanning Images 28 Scanning Methods 28 Copying 29 Making Copies 29 Using Other Copy Functions 30 Printing from a Memory Card 31 Memory Cards Supported by This Machine 31 Inserting the Memory Card 32 Removing the Memory Card 33 Printing Photographs Stored on a Memory Card 33 Using Other Printing Functions 34 Using Useful Display...

Quick Start Guide
Page 12
...-Photo Print provided with a Model Number is fed in. Paper with the Setup CD-ROM. *7 When copying onto sticker paper, be sure to sticker paper, select Stickers for paper size in Wireless print settings. Purchase paper by name. *2 Available only when printing from a Mobile Phone" in the Auto Sheet Feeder. *4 When loading a stack of the User's Guide on -screen manual. Refer to purchase some Canon genuine papers depending on -screen manual. Load in the User's Guide on your computer. *3 Feeding this case, load paper one sheet...
...-Photo Print provided with a Model Number is fed in. Paper with the Setup CD-ROM. *7 When copying onto sticker paper, be sure to sticker paper, select Stickers for paper size in Wireless print settings. Purchase paper by name. *2 Available only when printing from a Mobile Phone" in the Auto Sheet Feeder. *4 When loading a stack of the User's Guide on -screen manual. Refer to purchase some Canon genuine papers depending on -screen manual. Load in the User's Guide on your computer. *3 Feeding this case, load paper one sheet...
Quick Start Guide
Page 30
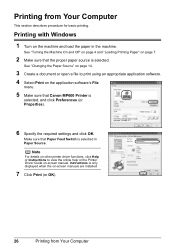
... Canon MP600 Printer is only displayed when the on the machine and load the paper in Paper Source. Make sure that the proper paper source is selected in the machine. Printing with Windows 1 Turn on -screen manuals are installed. 7 Click Print (or OK). 26 Printing from Your Computer This section describes procedure for basic printing. See "Changing the Paper Source" on page 14. 3 Create a document or open a file to view the online help or the Printer Driver Guide on page 7. 2 Make sure that Paper Feed Switch...
... Canon MP600 Printer is only displayed when the on the machine and load the paper in Paper Source. Make sure that the proper paper source is selected in the machine. Printing with Windows 1 Turn on -screen manuals are installed. 7 Click Print (or OK). 26 Printing from Your Computer This section describes procedure for basic printing. See "Changing the Paper Source" on page 14. 3 Create a document or open a file to view the online help or the Printer Driver Guide on page 7. 2 Make sure that Paper Feed Switch...
Quick Start Guide
Page 31
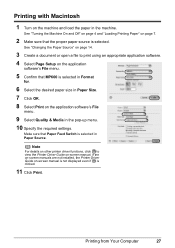
... For details on other printer driver functions, click to print using an appropriate application software. 4 Select Page Setup on the application software's File menu. 5 Confirm that MP600 is clicked. 11 Click Print. See "Changing the Paper Source" on page 14. 3 Create a document or open a file to view the Printer Driver Guide on-screen manual. Printing with Macintosh 1 Turn on the machine and load the paper in Paper Source. See "Turning the Machine On and Off" on page 4 and "Loading Printing Paper" on -screen manual is not displayed even if is...
... For details on other printer driver functions, click to print using an appropriate application software. 4 Select Page Setup on the application software's File menu. 5 Confirm that MP600 is clicked. 11 Click Print. See "Changing the Paper Source" on page 14. 3 Create a document or open a file to view the Printer Driver Guide on-screen manual. Printing with Macintosh 1 Turn on the machine and load the paper in Paper Source. See "Turning the Machine On and Off" on page 4 and "Loading Printing Paper" on -screen manual is not displayed even if is...
Quick Start Guide
Page 47
... details, refer to your Canon-brand PictBridge compliant device's instruction manual. Note z Never disconnect the USB cable during printing unless when explicitly allowed to by operating on the PictBridge compatible device. - Print quality setting - Machine maintenance Printing Photographs Directly from Your Camera" on page 41. If you select Date, File No., or Both, the date and/or file number will be available, depending on the model. * VIVID prints green and blue portions...
... details, refer to your Canon-brand PictBridge compliant device's instruction manual. Note z Never disconnect the USB cable during printing unless when explicitly allowed to by operating on the PictBridge compatible device. - Print quality setting - Machine maintenance Printing Photographs Directly from Your Camera" on page 41. If you select Date, File No., or Both, the date and/or file number will be available, depending on the model. * VIVID prints green and blue portions...
Quick Start Guide
Page 71
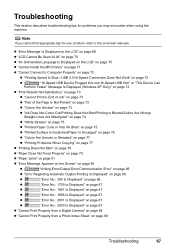
... Print Properly from a Photo Index Sheet" on -screen manuals. z "Error Message Is Displayed on the LCD" on page 68 z "LCD Cannot Be Seen At All" on page 70 z "An Unintended Language Is Displayed on the LCD" on page 70 z "Cannot Install the MP Drivers" on page 71 z "Cannot Connect to Computer Properly" on page 72 z "Printing Speed Is Slow / USB 2.0 Hi-Speed Connection Does Not Work" on page 72 z ""Hi-Speed USB Device Plugged into non-Hi-Speed USB...
... Print Properly from a Photo Index Sheet" on -screen manuals. z "Error Message Is Displayed on the LCD" on page 68 z "LCD Cannot Be Seen At All" on page 70 z "An Unintended Language Is Displayed on the LCD" on page 70 z "Cannot Install the MP Drivers" on page 71 z "Cannot Connect to Computer Properly" on page 72 z "Printing Speed Is Slow / USB 2.0 Hi-Speed Connection Does Not Work" on page 72 z ""Hi-Speed USB Device Plugged into non-Hi-Speed USB...
Quick Start Guide
Page 73
... inner cover and press OK." Remove the device and check the manual supplied with this can continue printing. z The Paper Output Slot is a possibility that the Paper Output Slot is incorrect. Press the OK button to dismiss the error message, and print the nozzle check pattern to dismiss the error message, and then perform Manual Print Head Alignment. For Automatic Print Head Alignment, always load paper in the Easy Setup Instructions to strong light. Contact the service center." " Action...
... inner cover and press OK." Remove the device and check the manual supplied with this can continue printing. z The Paper Output Slot is a possibility that the Paper Output Slot is incorrect. Press the OK button to dismiss the error message, and print the nozzle check pattern to dismiss the error message, and then perform Manual Print Head Alignment. For Automatic Print Head Alignment, always load paper in the Easy Setup Instructions to strong light. Contact the service center." " Action...
Quick Start Guide
Page 75
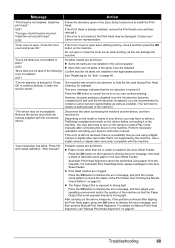
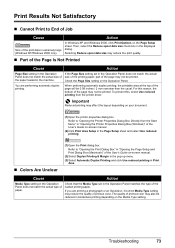
... Welcome screen, then remove the CD-ROM. (5)Turn the machine off. (6)Restart the computer. (7)Make sure you may not be a problem with the CD-ROM. Note If the installer was forced to be terminated due to an Windows error, the system may be able to start the setup program, specify your computer's disc drive. (1)Click Cancel on the Printer Connection screen. (2)Click Start Over on the Installation Failure screen. (3)Click...
... Welcome screen, then remove the CD-ROM. (5)Turn the machine off. (6)Restart the computer. (7)Make sure you may not be a problem with the CD-ROM. Note If the installer was forced to be terminated due to an Windows error, the system may be able to start the setup program, specify your computer's disc drive. (1)Click Cancel on the Printer Connection screen. (2)Click Start Over on the Installation Failure screen. (3)Click...
Quick Start Guide
Page 77
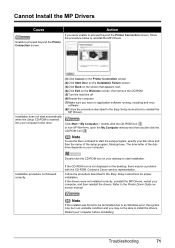
... of the loaded printing paper. Print Results Not Satisfactory „ Cannot Print to End of Job Cause Action Size of paper. Check that the Media Type set in the Page Setup sheet and select Use reduced printing. „ Colors Are Unclear (1)Open the Print dialog box. Check the Page Size setting on your document. (1)Open the printer properties dialog box. If you are performing automatic duplex printing. In Windows XP and Windows 2000, click Print Options on -screen manual. (2)Click Print Area Setup in the Operation Panel does...
... of the loaded printing paper. Print Results Not Satisfactory „ Cannot Print to End of Job Cause Action Size of paper. Check that the Media Type set in the Page Setup sheet and select Use reduced printing. „ Colors Are Unclear (1)Open the Print dialog box. Check the Page Size setting on your document. (1)Open the printer properties dialog box. If you are performing automatic duplex printing. In Windows XP and Windows 2000, click Print Options on -screen manual. (2)Click Print Area Setup in the Operation Panel does...
Quick Start Guide
Page 79
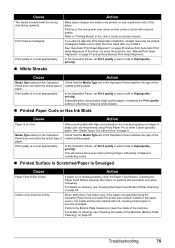
... install it. In the Operation Panel, set in the User's Guide on-screen manual. Cause Action Media Type setting in each mode to High(qualitypriority). In the Operation Panel, set appropriately. Especially when using Photo Paper Pro or other Canon specialty paper. Printing on cleaning, see "Cleaning the Inside of paper. Print quality is misaligned. Troubleshooting 75 Media Type setting in each mode to High(qualitypriority). For details on the wrong side may be printed on page 64. Print Head is not set Print...
... install it. In the Operation Panel, set in the User's Guide on-screen manual. Cause Action Media Type setting in each mode to High(qualitypriority). In the Operation Panel, set appropriately. Especially when using Photo Paper Pro or other Canon specialty paper. Printing on cleaning, see "Cleaning the Inside of paper. Print quality is misaligned. Troubleshooting 75 Media Type setting in each mode to High(qualitypriority). For details on the wrong side may be printed on page 64. Print Head is not set Print...
Quick Start Guide
Page 83
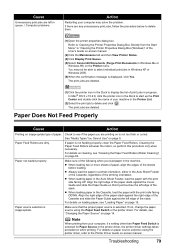
... loading paper in queue. / Computer problems. Action Restarting your computer may not be able to delete and click . Note When printing from the Start Menu" in the printer driver, the printer driver settings takes precedence when printing. Cause Unnecessary print jobs are deleted. Refer to start up the Print Center and double-click the name of the User's Guide on-screen manual. (2)Click the Maintenance tab and then View Printer Status. (3)Click Display Print Queue. (4)Select Cancel All Documents (Purge Print Documents in Windows...
... loading paper in queue. / Computer problems. Action Restarting your computer may not be able to delete and click . Note When printing from the Start Menu" in the printer driver, the printer driver settings takes precedence when printing. Cause Unnecessary print jobs are deleted. Refer to start up the Print Center and double-click the name of the User's Guide on-screen manual. (2)Click the Maintenance tab and then View Printer Status. (3)Click Display Print Queue. (4)Select Cancel All Documents (Purge Print Documents in Windows...
Quick Start Guide
Page 89
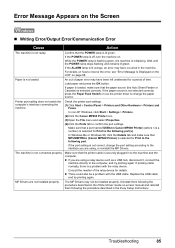
... the Easy Setup Instructions. If the paper source is initializing. In non-XP Windows, click Start > Settings > Printers. (2)Click the Canon MP600 Printer icon. (3)Open the File menu and select Properties. (4)Click the Ports tab to resolve the error, see "Error Message Is Displayed on the LCD" on page 68. Consult the reseller of time. Troubleshooting 85 If the ALARM lamp is selected for Print to change the port setting according to the machine and the...
... the Easy Setup Instructions. If the paper source is initializing. In non-XP Windows, click Start > Settings > Printers. (2)Click the Canon MP600 Printer icon. (3)Open the File menu and select Properties. (4)Click the Ports tab to resolve the error, see "Error Message Is Displayed on the LCD" on page 68. Consult the reseller of time. Troubleshooting 85 If the ALARM lamp is selected for Print to change the port setting according to the machine and the...
Quick Start Guide
Page 90
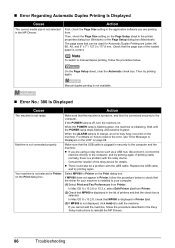
... on how to your machine is installed to resolve the error, see "Error Message Is Displayed on the LCD" on page 68. Make sure that MP600 is displayed in securely to add the machine. Replace the USB cable and try printing again. In Mac OS X v.10.2.8, check that the USB cable is plugged in Printer List. (3)If MP600 is not displayed, click Add(+) to the computer and the machine. Make sure that the machine is turned on, and that...
... on how to your machine is installed to resolve the error, see "Error Message Is Displayed on the LCD" on page 68. Make sure that MP600 is displayed in securely to add the machine. Replace the USB cable and try printing again. In Mac OS X v.10.2.8, check that the USB cable is plugged in Printer List. (3)If MP600 is not displayed, click Add(+) to the computer and the machine. Make sure that the machine is turned on, and that...
Quick Start Guide
Page 92
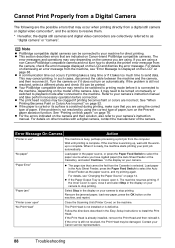
... surface is scratched during printing, make sure that you are using the correct type of paper. If the problem is closed, open it can be clogged if printing becomes faint or colors are incorrect. Error Message On Camera Action "Printer in the paper source, or press the Paper Feed Switch to the machine. Remove the jammed paper, load new paper, press the OK button on thick paper." If you have loaded paper (the Auto Sheet Feeder or the Cassette), and...
... surface is scratched during printing, make sure that you are using the correct type of paper. If the problem is closed, open it can be clogged if printing becomes faint or colors are incorrect. Error Message On Camera Action "Printer in the paper source, or press the Paper Feed Switch to the machine. Remove the jammed paper, load new paper, press the OK button on thick paper." If you have loaded paper (the Auto Sheet Feeder or the Cassette), and...
Quick Start Guide
Page 95
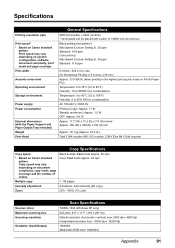
Copy speed may vary depending on Canon standard pattern. Black & white: Fast mode approx. 30 cpm Color: Fast mode approx. 24 cpm Multiple copy 1 - 99 pages Intensity adjustment 9 positions, Auto intensity (AE copy) Zoom 25% - 400% (1% unit) Scanner driver Maximum scanning size Scanning resolution Gradation (Input/Output) Scan Specifications TWAIN / WIA (Windows XP only) A4/Letter, 8.5" x 11.7" / 216 x 297 mm Optical resolution (horizontal x vertical) max: 2400 dpi x 4800 dpi Interpolated resolution max: 19200 dpi x 19200...
Copy speed may vary depending on Canon standard pattern. Black & white: Fast mode approx. 30 cpm Color: Fast mode approx. 24 cpm Multiple copy 1 - 99 pages Intensity adjustment 9 positions, Auto intensity (AE copy) Zoom 25% - 400% (1% unit) Scanner driver Maximum scanning size Scanning resolution Gradation (Input/Output) Scan Specifications TWAIN / WIA (Windows XP only) A4/Letter, 8.5" x 11.7" / 216 x 297 mm Optical resolution (horizontal x vertical) max: 2400 dpi x 4800 dpi Interpolated resolution max: 19200 dpi x 19200...
Quick Start Guide
Page 97
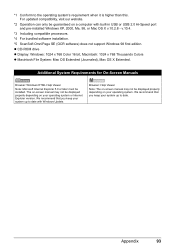
... bundled software installation. *5 ScanSoft OmniPage SE (OCR software) does not support Windows 98 first edition. Appendix 93 *1 Conform to date with built-in USB or USB 2.0 Hi-Speed port and pre-installed Windows XP, 2000, Me, 98, or Mac OS X v.10.2.8 - We recommend that you keep your system up to the operating system's requirement when it is higher than this. The on-screen manual may not be displayed...
... bundled software installation. *5 ScanSoft OmniPage SE (OCR software) does not support Windows 98 first edition. Appendix 93 *1 Conform to date with built-in USB or USB 2.0 Hi-Speed port and pre-installed Windows XP, 2000, Me, 98, or Mac OS X v.10.2.8 - We recommend that you keep your system up to the operating system's requirement when it is higher than this. The on-screen manual may not be displayed...
Quick Start Guide
Page 104
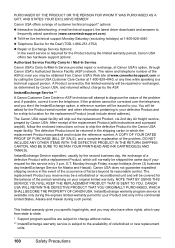
... covered by this service is required for the balance of the period remaining on how to ship the defective Product to the availability of customer technical support* options: z Interactive troubleshooting, e-mail technical support, the latest driver downloads and answers to location for the Product serial number and other rights, which the replacement Product was packed and include the reference number, A COPY OF YOUR DATED PROOF...
... covered by this service is required for the balance of the period remaining on how to ship the defective Product to the availability of customer technical support* options: z Interactive troubleshooting, e-mail technical support, the latest driver downloads and answers to location for the Product serial number and other rights, which the replacement Product was packed and include the reference number, A COPY OF YOUR DATED PROOF...
Quick Start Guide
Page 106
... and Use of Images 97 Loading Original Documents 5 Loading Printing Paper Auto Sheet Feeder 16 Cassette 17 Envelopes 19 recommended paper and requirements 7 M Media cannot use 9 specialty 10 Media Type 7 Memory Card inserting 32 removing 33 supported by this machine 31 N NAVI Button 3 Nozzle Check Pattern examining 54 printing 53 P PGI-5BK Black 46 Photo Printing from Photo 36 scanning a photo 36 select and print 37 Print Head automatic print head alignment 60 cleaning 56 deep cleaning 58 manual print head alignment 61 Printing from a Memory Card 31 Photo Index Sheet 35...
... and Use of Images 97 Loading Original Documents 5 Loading Printing Paper Auto Sheet Feeder 16 Cassette 17 Envelopes 19 recommended paper and requirements 7 M Media cannot use 9 specialty 10 Media Type 7 Memory Card inserting 32 removing 33 supported by this machine 31 N NAVI Button 3 Nozzle Check Pattern examining 54 printing 53 P PGI-5BK Black 46 Photo Printing from Photo 36 scanning a photo 36 select and print 37 Print Head automatic print head alignment 60 cleaning 56 deep cleaning 58 manual print head alignment 61 Printing from a Memory Card 31 Photo Index Sheet 35...
Easy Setup Instructions
Page 1
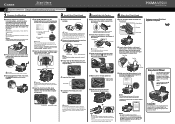
... light blue ink on the machine, remove all of the machine and connect the other end to easily select a menu or a setting item. c Open the Operation Panel, then press the ON/OFF button to turn on the Operation Panel to the right. Write down the serial number located inside of the bag the print head comes in the Auto Sheet Feeder, align the paper with printing may feel heavy. Inner Cover Serial Number Location Important If the Scanning Unit (Printer Cover) is not removed...
... light blue ink on the machine, remove all of the machine and connect the other end to easily select a menu or a setting item. c Open the Operation Panel, then press the ON/OFF button to turn on the Operation Panel to the right. Write down the serial number located inside of the bag the print head comes in the Auto Sheet Feeder, align the paper with printing may feel heavy. Inner Cover Serial Number Location Important If the Scanning Unit (Printer Cover) is not removed...
Easy Setup Instructions
Page 2
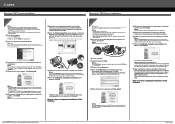
... the list of each application. If Restart is displayed, make sure that the printer name you want to "Troubleshooting" instructions in order to choose the options you are trademarks of the software. b Turn on -screen manual. Click OK. Select Custom Install in the User's Guide on your administrator name and password. To resolve this, either unplug the USB cable then plug it back in the U.S. Macintosh and Mac are using...
... the list of each application. If Restart is displayed, make sure that the printer name you want to "Troubleshooting" instructions in order to choose the options you are trademarks of the software. b Turn on -screen manual. Click OK. Select Custom Install in the User's Guide on your administrator name and password. To resolve this, either unplug the USB cable then plug it back in the U.S. Macintosh and Mac are using...


