Quick Start Guide
Page 4
...STAR guidelines for 5 years after production has stopped. Specifications are trademarks of Fuji Photo Film Co., Ltd. has determined that this manual thoroughly in -One. Their standards and logos are office equipment such as computers, monitors, printers, faxes and copiers. All information ...Duo and Memory Stick Pro Duo are not intended to be, nor should they be , representation or warranties concerning the products described. Canon PIXMA MP600 Photo All-in which business can participate voluntarily. It is a trademark of Apple Computer, Inc., registered in part, without notice....
...STAR guidelines for 5 years after production has stopped. Specifications are trademarks of Fuji Photo Film Co., Ltd. has determined that this manual thoroughly in -One. Their standards and logos are office equipment such as computers, monitors, printers, faxes and copiers. All information ...Duo and Memory Stick Pro Duo are not intended to be, nor should they be , representation or warranties concerning the products described. Canon PIXMA MP600 Photo All-in which business can participate voluntarily. It is a trademark of Apple Computer, Inc., registered in part, without notice....

Quick Start Guide
Page 5
... PictBridge Compliant Device 39 Routine Maintenance 46 Replacing an Ink Tank 46 Keeping the Best Printing Results 51 When Printing Becomes Faint or Colors Are Incorrect 52 Printing the Nozzle Check Pattern 53 Examining the Nozzle Check Pattern ...........54 Print Head Cleaning 56 Print Head Deep Cleaning ... 85 Cannot Print Properly from a Digital Camera 88 Cannot Print Properly from a Photo Index Sheet 89 Appendix 90 Reading the On-screen Manuals 90 Specifications 91 Safety Precautions 94 Legal Limitations on Use of Your Product and Use of Images 97 Users in the U.S.A 98 Index 102...
... PictBridge Compliant Device 39 Routine Maintenance 46 Replacing an Ink Tank 46 Keeping the Best Printing Results 51 When Printing Becomes Faint or Colors Are Incorrect 52 Printing the Nozzle Check Pattern 53 Examining the Nozzle Check Pattern ...........54 Print Head Cleaning 56 Print Head Deep Cleaning ... 85 Cannot Print Properly from a Digital Camera 88 Cannot Print Properly from a Photo Index Sheet 89 Appendix 90 Reading the On-screen Manuals 90 Specifications 91 Safety Precautions 94 Legal Limitations on Use of Your Product and Use of Images 97 Users in the U.S.A 98 Index 102...
Quick Start Guide
Page 7
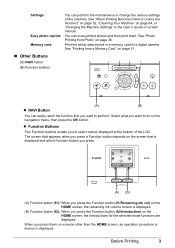
Print the photo data stored in the User's Guide on-screen manual. The screen that appears when you press a Function button depends on page 64, or "Changing the Machine Settings" in a memory card of a digital camera. Before ... is displayed and which Function button you press. (A) (B) (A) Function button (f1): When you want to do on page 36. See "When Printing Becomes Faint or Colors Are Incorrect" on page 52, "Cleaning Your Machine" on the screen that you press the Function button (f1/Remaining ink vol) on the HOME screen...
Print the photo data stored in the User's Guide on-screen manual. The screen that appears when you press a Function button depends on page 64, or "Changing the Machine Settings" in a memory card of a digital camera. Before ... is displayed and which Function button you press. (A) (B) (A) Function button (f1): When you want to do on page 36. See "When Printing Becomes Faint or Colors Are Incorrect" on page 52, "Cleaning Your Machine" on the screen that you press the Function button (f1/Remaining ink vol) on the HOME screen...

Quick Start Guide
Page 12
... on mobile phones, refer to "Setting the Page Size, Media Type, and Layout When Printing from a Mobile Phone" of the User's Guide on -screen manual. Note For a detailed description of the User's Guide on your computer. *3 Feeding this case, load paper one sheet at a time. *5 SG-201 ...Number is fed in. When printing photos stored in a memory card to sticker paper, be able to purchase some Canon genuine papers depending on -screen manual. Refer to "Printing on -screen manual. Paper with the Setup CD-ROM. *7 When copying onto sticker paper, be sure to select Sticker print in ...
... on mobile phones, refer to "Setting the Page Size, Media Type, and Layout When Printing from a Mobile Phone" of the User's Guide on -screen manual. Note For a detailed description of the User's Guide on your computer. *3 Feeding this case, load paper one sheet at a time. *5 SG-201 ...Number is fed in. When printing photos stored in a memory card to sticker paper, be able to purchase some Canon genuine papers depending on -screen manual. Refer to "Printing on -screen manual. Paper with the Setup CD-ROM. *7 When copying onto sticker paper, be sure to select Sticker print in ...
Quick Start Guide
Page 15
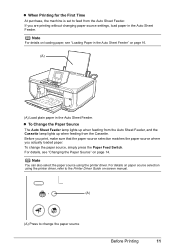
... Driver Guide on page 16. (A) (A) Load plain paper in the Auto Sheet Feeder. For details, see "Loading Paper in the Auto Sheet Feeder" on -screen manual. (A) (A) Press to change the paper source, simply press the Paper Feed Switch. z When Printing for the First Time At purchase, the machine is set to...
... Driver Guide on page 16. (A) (A) Load plain paper in the Auto Sheet Feeder. For details, see "Loading Paper in the Auto Sheet Feeder" on -screen manual. (A) (A) Press to change the paper source, simply press the Paper Feed Switch. z When Printing for the First Time At purchase, the machine is set to...
Quick Start Guide
Page 16
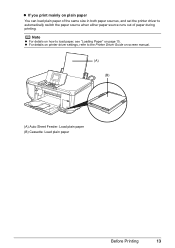
This way, you use regularly. z For details on printer driver settings, refer to the Printer Driver Guide on-screen manual. (A) (B) (A) Auto Sheet Feeder: Load paper of various types and sizes, including photo paper. (B) Cassette: Load paper you use most regularly, such as plain paper, you ...
This way, you use regularly. z For details on printer driver settings, refer to the Printer Driver Guide on-screen manual. (A) (B) (A) Auto Sheet Feeder: Load paper of various types and sizes, including photo paper. (B) Cassette: Load paper you use most regularly, such as plain paper, you ...
Quick Start Guide
Page 17
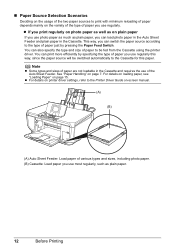
z If you print mainly on page 15. Note z For details on how to load paper, see "Loading Paper" on plain paper You can load plain paper of the same size in both paper sources, and set the printer driver to the Printer Driver Guide on-screen manual. (A) (B) (A) Auto Sheet Feeder: Load plain paper (B) Cassette: Load plain paper Before Printing 13 z For details on printer driver settings, refer to automatically switch the paper source when either paper source runs out of paper during printing.
z If you print mainly on page 15. Note z For details on how to load paper, see "Loading Paper" on plain paper You can load plain paper of the same size in both paper sources, and set the printer driver to the Printer Driver Guide on-screen manual. (A) (B) (A) Auto Sheet Feeder: Load plain paper (B) Cassette: Load plain paper Before Printing 13 z For details on printer driver settings, refer to automatically switch the paper source when either paper source runs out of paper during printing.
Quick Start Guide
Page 18
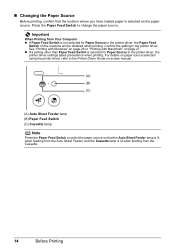
... feeding from the Cassette. 14 Before Printing For details on paper source selection using the printer driver, refer to the Printer Driver Guide on-screen manual. (A) (B) (C) (A) Auto Sheet Feeder lamp (B) Paper Feed Switch (C) Cassette lamp Note Press the Paper Feed Switch to change the paper source. Confirm the setting in the...
... feeding from the Cassette. 14 Before Printing For details on paper source selection using the printer driver, refer to the Printer Driver Guide on-screen manual. (A) (B) (C) (A) Auto Sheet Feeder lamp (B) Paper Feed Switch (C) Cassette lamp Note Press the Paper Feed Switch to change the paper source. Confirm the setting in the...
Quick Start Guide
Page 19
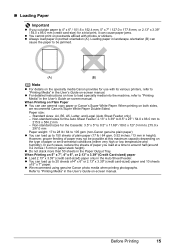
....0 x 127.0 mm to 215.9 x 297.0 mm Paper weight: 17 to 28 lb / 64 to 105 gsm (non-Canon genuine plain paper) z You can load up to "Printing Media" in the User's Guide on-screen manual. Non-standard sizes for the Auto Sheet Feeder: 2.13" x 3.39" to 8.5" x 23" / 54.0 x 86.0 mm ...to "Printing Media" in the User's Guide on-screen manual. z We recommend using genuine Canon photo media when printing photographs. „ Loading Paper Important z If you load at this maximum capacity depending on the type of paper or...
....0 x 127.0 mm to 215.9 x 297.0 mm Paper weight: 17 to 28 lb / 64 to 105 gsm (non-Canon genuine plain paper) z You can load up to "Printing Media" in the User's Guide on-screen manual. Non-standard sizes for the Auto Sheet Feeder: 2.13" x 3.39" to 8.5" x 23" / 54.0 x 86.0 mm ...to "Printing Media" in the User's Guide on-screen manual. z We recommend using genuine Canon photo media when printing photographs. „ Loading Paper Important z If you load at this maximum capacity depending on the type of paper or...

Quick Start Guide
Page 20
.... Put your finger in the Auto Sheet Feeder 1 Flatten the four corners of the paper before printing. 2 Prepare to the Printer Driver Guide on-screen manual. (3) (2) 16 Before Printing
.... Put your finger in the Auto Sheet Feeder 1 Flatten the four corners of the paper before printing. 2 Prepare to the Printer Driver Guide on-screen manual. (3) (2) 16 Before Printing
Quick Start Guide
Page 22
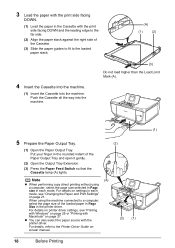
..., select the page size of the loaded paper in Page Size in the printer driver. Push the Cassette all the way into the machine. screen manual. (2) (1) 18 Before Printing For details on page 26 or "Printing with the printer driver. 3 Load the paper with the print side facing DOWN. (1) Load the...
..., select the page size of the loaded paper in Page Size in the printer driver. Push the Cassette all the way into the machine. screen manual. (2) (1) 18 Before Printing For details on page 26 or "Printing with the printer driver. 3 Load the paper with the print side facing DOWN. (1) Load the...
Quick Start Guide
Page 26
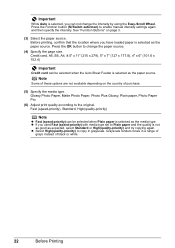
... page 3. (3) Select the paper source. Glossy Photo Paper, Matte Photo Paper, Photo Plus Glossy, Plain paper, Photo Paper Pro (6) Adjust print quality according to enable manual intensity settings again and then specify the intensity. Grayscale renders tones in grayscale. See "Function Buttons" on the country of black or white. 22 Before...
... page 3. (3) Select the paper source. Glossy Photo Paper, Matte Photo Paper, Photo Plus Glossy, Plain paper, Photo Paper Pro (6) Adjust print quality according to enable manual intensity settings again and then specify the intensity. Grayscale renders tones in grayscale. See "Function Buttons" on the country of black or white. 22 Before...
Quick Start Guide
Page 30
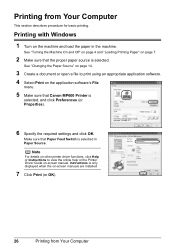
... 4 Select Print on the application software's File menu. 5 Make sure that Canon MP600 Printer is only displayed when the on page 7. 2 Make sure that Paper Feed Switch is selected. Printing with Windows 1 Turn on -screen manual. See "Turning the Machine On and Off" on page 4 and "Loading... Printing Paper" on -screen manuals are installed. 7 Click Print (or OK). 26 Printing from Your Computer This section describes procedure...
... 4 Select Print on the application software's File menu. 5 Make sure that Canon MP600 Printer is only displayed when the on page 7. 2 Make sure that Paper Feed Switch is selected. Printing with Windows 1 Turn on -screen manual. See "Turning the Machine On and Off" on page 4 and "Loading... Printing Paper" on -screen manuals are installed. 7 Click Print (or OK). 26 Printing from Your Computer This section describes procedure...
Quick Start Guide
Page 31
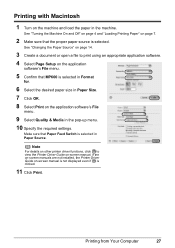
...Printer Driver Guide on the application software's File menu. 9 Select Quality & Media in Paper Size. 7 Click OK. 8 Select Print on -screen manual. Printing from Your Computer 27 Note For details on other printer driver functions, click to print using an appropriate application software. 4 Select Page Setup ...on the application software's File menu. 5 Confirm that MP600 is selected in Format for. 6 Select the desired paper size in the pop-up menu. 10 Specify the required settings. If the on...
...Printer Driver Guide on the application software's File menu. 9 Select Quality & Media in Paper Size. 7 Click OK. 8 Select Print on -screen manual. Printing from Your Computer 27 Note For details on other printer driver functions, click to print using an appropriate application software. 4 Select Page Setup ...on the application software's File menu. 5 Confirm that MP600 is selected in Format for. 6 Select the desired paper size in the pop-up menu. 10 Specify the required settings. If the on...
Quick Start Guide
Page 32
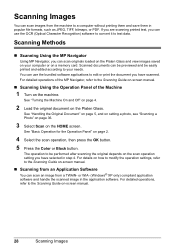
... (Optical Character Recognition) software to convert it to your computer or on the HOME screen. For detailed operations, refer to the Scanning Guide on-screen manual. „ Scanning from a TWAIN- See "Turning the Machine On and Off" on page 4. 2 Load the original document on page 2. 4 Select ...the scan operation, then press the OK button. 5 Press the Color or Black button. See "Handling the Original Document" on page 5, and on setting a photo, see "Scanning a Photo" on page 36. 3 Select Scan on...
... (Optical Character Recognition) software to convert it to your computer or on the HOME screen. For detailed operations, refer to the Scanning Guide on-screen manual. „ Scanning from a TWAIN- See "Turning the Machine On and Off" on page 4. 2 Load the original document on page 2. 4 Select ...the scan operation, then press the OK button. 5 Press the Color or Black button. See "Handling the Original Document" on page 5, and on setting a photo, see "Scanning a Photo" on page 36. 3 Select Scan on...

Quick Start Guide
Page 44
... up the PictBridge compliant device for direct printing. Perform necessary operations on the device or select Play mode manually after connecting the device to the machine. 3 Connect the PictBridge compliant device to the machine. If your device, you may also... with PictBridge before connecting it on automatically. You may have to turn it to this machine according to instructions given in the device's instruction manual. (1) Make sure that the PictBridge compliant device is correctly connected. Note If does not appear, see "Cannot Print Properly from a Compliant ...
... up the PictBridge compliant device for direct printing. Perform necessary operations on the device or select Play mode manually after connecting the device to the machine. 3 Connect the PictBridge compliant device to the machine. If your device, you may also... with PictBridge before connecting it on automatically. You may have to turn it to this machine according to instructions given in the device's instruction manual. (1) Make sure that the PictBridge compliant device is correctly connected. Note If does not appear, see "Cannot Print Properly from a Compliant ...
Quick Start Guide
Page 45
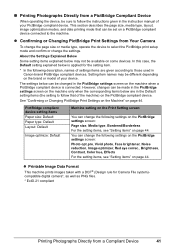
... Vivid photo, Face brightener, Noise reduction, Image optimizer, Red eye correc., Brightness, Contrast, Color hue, Effects For the setting items, see "Setting items" on some devices. z Confirming ...PictBridge compliant device. The settings below is connected. You can be made in Canon-brand PictBridge compliant devices. In this case, the Default setting explained below can..., image optimization modes, and date printing mode that of settings items are in the instruction manual of your PictBridge compliant device. z Printable Image Data Format This machine prints images taken with...
... Vivid photo, Face brightener, Noise reduction, Image optimizer, Red eye correc., Brightness, Contrast, Color hue, Effects For the setting items, see "Setting items" on some devices. z Confirming ...PictBridge compliant device. The settings below is connected. You can be made in Canon-brand PictBridge compliant devices. In this case, the Default setting explained below can..., image optimization modes, and date printing mode that of settings items are in the instruction manual of your PictBridge compliant device. z Printable Image Data Format This machine prints images taken with...
Quick Start Guide
Page 47
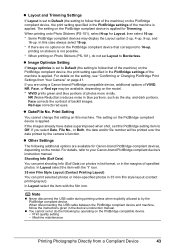
...or index-specified photos in the margins of the machine) on the PictBridge compliant device, the print setting specified in the device's instruction manual. In Layout select the item with the "i" icon. 35 mm Film Style Layout (Contact Printing Layout) You can print shooting Info... PictBridge compliant device is applied. z Layout and Trimming Settings If Layout is set to Default (the setting to your Canon-brand PictBridge compliant device's instruction manual. Print Setting You cannot change this setting on this PictBridge setting item to follow that of specified photos. z Other ...
...or index-specified photos in the margins of the machine) on the PictBridge compliant device, the print setting specified in the device's instruction manual. In Layout select the item with the "i" icon. 35 mm Film Style Layout (Contact Printing Layout) You can print shooting Info... PictBridge compliant device is applied. z Layout and Trimming Settings If Layout is set to Default (the setting to your Canon-brand PictBridge compliant device's instruction manual. Print Setting You cannot change this setting on this PictBridge setting item to follow that of specified photos. z Other ...
Quick Start Guide
Page 64
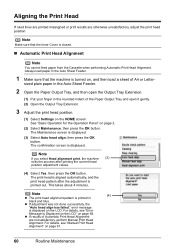
...Maintenance, then press the OK button. Aligning the Print Head If ruled lines are printed misaligned or print results are not satisfactory, perform Manual Print Head Alignment. The confirmation screen is closed. „ Automatic Print Head Alignment Note You cannot feed paper from the Cassette when ...head position. See "Basic Operation for the Operation Panel" on page 68. The Maintenance screen is printed out. For details, see "Manual Print Head Alignment" on the HOME screen. The print head is aligned automatically, and the print head pattern after printing the current head...
...Maintenance, then press the OK button. Aligning the Print Head If ruled lines are printed misaligned or print results are not satisfactory, perform Manual Print Head Alignment. The confirmation screen is closed. „ Automatic Print Head Alignment Note You cannot feed paper from the Cassette when ...head position. See "Basic Operation for the Operation Panel" on page 68. The Maintenance screen is printed out. For details, see "Manual Print Head Alignment" on the HOME screen. The print head is aligned automatically, and the print head pattern after printing the current head...

Quick Start Guide
Page 65
... indent of the Paper Output Tray and open it gently. (2) Open the Output Tray Extension. 3 Press the Paper Feed Switch to perform Manual Print Head Alignment. The Maintenance screen is displayed. Routine Maintenance 61 Important You cannot print the print head alignment pattern if paper of size ... Head Alignment" on page 60. 1 Make sure that the machine is turned on page 2. 5 Select Maintenance, then press the OK button. „ Manual Print Head Alignment If the results of Automatic Print Head Alignment are not satisfactory, follow the procedure below to select the paper source where you...
... indent of the Paper Output Tray and open it gently. (2) Open the Output Tray Extension. 3 Press the Paper Feed Switch to perform Manual Print Head Alignment. The Maintenance screen is displayed. Routine Maintenance 61 Important You cannot print the print head alignment pattern if paper of size ... Head Alignment" on page 60. 1 Make sure that the machine is turned on page 2. 5 Select Maintenance, then press the OK button. „ Manual Print Head Alignment If the results of Automatic Print Head Alignment are not satisfactory, follow the procedure below to select the paper source where you...


