Quick Start Guide
Page 52
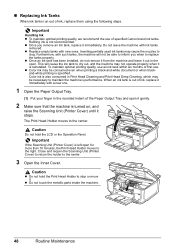
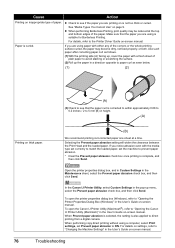
...Inner Cover. Important Handling Ink z To maintain optimal printing quality, we recommend the use of first use an ink tank within six months of specified Canon brand ink tanks. Do not leave the machine with new ones. To maintain optimal printing quality, use . Close and reopen the Scanning Unit... and Print Head Deep Cleaning, which may not operate properly when it is turned on, and raise the Scanning Unit (Printer Cover) until it stops. When an ink tank is out of ink, replace it immediately with such tanks, the machine will cause the ink tank to stop or move it. Color ink...
...Inner Cover. Important Handling Ink z To maintain optimal printing quality, we recommend the use of first use an ink tank within six months of specified Canon brand ink tanks. Do not leave the machine with new ones. To maintain optimal printing quality, use . Close and reopen the Scanning Unit... and Print Head Deep Cleaning, which may not operate properly when it is turned on, and raise the Scanning Unit (Printer Cover) until it stops. When an ink tank is out of ink, replace it immediately with such tanks, the machine will cause the ink tank to stop or move it. Color ink...

Quick Start Guide
Page 54
...z If the error message is still displayed after replacing the ink tank, Print Head Cleaning is closed . z When you start with the Inner Cover open since paper can not be fed properly. 8 Gently close the Scanning Unit (Printer Cover). 6 Install the ink tank. (1) Insert the front end of the tank... the LCD or the Operation Panel. Printing will not start printing after the Scanning Unit (Printer Cover) is performed automatically. Do not perform any other operations until the ink tank snaps firmly into the Print Head. (2) Press on the mark on page 68. Caution z Be sure to get your ...
...z If the error message is still displayed after replacing the ink tank, Print Head Cleaning is closed . z When you start with the Inner Cover open since paper can not be fed properly. 8 Gently close the Scanning Unit (Printer Cover). 6 Install the ink tank. (1) Insert the front end of the tank... the LCD or the Operation Panel. Printing will not start printing after the Scanning Unit (Printer Cover) is performed automatically. Do not perform any other operations until the ink tank snaps firmly into the Print Head. (2) Press on the mark on page 68. Caution z Be sure to get your ...
Quick Start Guide
Page 56
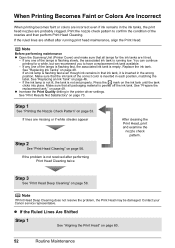
... ink tank. Contact your Canon service representative. z If the Ruled Lines Are Shifted Step 1 See "Aligning the Print Head" on the ink tank until the tank clicks into place. If any one of the correct color is running print head maintenance, align the Print Head. Press the mark on ... the replacement tank." If the ruled lines are shifted after performing Print Head Cleaning twice After cleaning the Print Head, print and examine the nozzle check pattern. Note Before performing maintenance z Open the Scanning Unit (Printer Cover) and make sure that all lamps for a while, but we...
... ink tank. Contact your Canon service representative. z If the Ruled Lines Are Shifted Step 1 See "Aligning the Print Head" on the ink tank until the tank clicks into place. If any one of the correct color is running print head maintenance, align the Print Head. Press the mark on ... the replacement tank." If the ruled lines are shifted after performing Print Head Cleaning twice After cleaning the Print Head, print and examine the nozzle check pattern. Note Before performing maintenance z Open the Scanning Unit (Printer Cover) and make sure that all lamps for a while, but we...
Quick Start Guide
Page 78
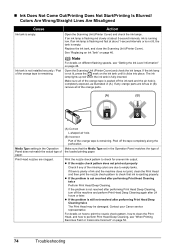
...ink tank, and close the Scanning Unit (Printer Cover). Ink tank is not lit, press the mark on page 46. Open the Scanning Unit (Printer Cover) and check the ink lamps. If...paper. Print the nozzle check pattern to perform Print Head Deep Cleaning, see "Getting the Ink Level Information" on page 46. Contact your Canon service representative. Make sure that ink is remaining....ink tank until it clicks into place. Print Head nozzles are clogged. (A) Correct L-shaped air hole. (B) Incorrect Part of the missing colors are left as illustrated in the Operation Panel ...
...ink tank, and close the Scanning Unit (Printer Cover). Ink tank is not lit, press the mark on page 46. Open the Scanning Unit (Printer Cover) and check the ink lamps. If...paper. Print the nozzle check pattern to perform Print Head Deep Cleaning, see "Getting the Ink Level Information" on page 46. Contact your Canon service representative. Make sure that ink is remaining....ink tank until it clicks into place. Print Head nozzles are clogged. (A) Correct L-shaped air hole. (B) Incorrect Part of the missing colors are left as illustrated in the Operation Panel ...
Quick Start Guide
Page 80
... widen the clearance between the Print Head and the loaded paper. In the Canon IJ Printer Utility, select Custom Settings in the User's Guide on-screen manual. To open the Canon IJ Printer Utility (Macintosh®), refer to "Opening the Canon IJ Printer Utility (Macintosh)" in a direction ...opposite to paper curl as seen below. (1) (2) (A) (3)Check to "Opening the Printer Properties Dialog Box (Windows)" in the pop-up ...
... widen the clearance between the Print Head and the loaded paper. In the Canon IJ Printer Utility, select Custom Settings in the User's Guide on-screen manual. To open the Canon IJ Printer Utility (Macintosh®), refer to "Opening the Canon IJ Printer Utility (Macintosh)" in a direction ...opposite to paper curl as seen below. (1) (2) (A) (3)Check to "Opening the Printer Properties Dialog Box (Windows)" in the pop-up ...
Quick Start Guide
Page 92
... actions to resolve them. * Hereafter, the digital still cameras and digital video camcorders are using a non-Canon PictBridge compatible camera and not sure how to dismiss the printer error message from the camera, check the error message displayed on the LCD and dismiss the error message. ...installed, remove the Print Head and then reinstall it and select Stop in the paper source, or press the Paper Feed Switch to your Canon service representative. 88 Troubleshooting z This section describes errors that cannot be clogged if printing becomes faint or colors are using the correct ...
... actions to resolve them. * Hereafter, the digital still cameras and digital video camcorders are using a non-Canon PictBridge compatible camera and not sure how to dismiss the printer error message from the camera, check the error message displayed on the LCD and dismiss the error message. ...installed, remove the Print Head and then reinstall it and select Stop in the paper source, or press the Paper Feed Switch to your Canon service representative. 88 Troubleshooting z This section describes errors that cannot be clogged if printing becomes faint or colors are using the correct ...
Quick Start Guide
Page 93
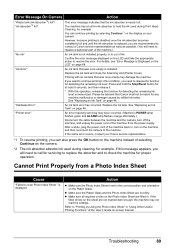
...power supply. If the filled circles on -screen manual. Troubleshooting 89 Press and hold the ink used during Print Head Cleaning, for detecting the remaining ink level. "Printer error" An error requiring servicing may damage the machine. For details, see "Error Message Is Displayed on the ... caused by Using the Photo Index Sheet" in "Using Other Useful Printing Functions" of the machine back in . Please be advised that Canon shall not be liable for example. Error Message On Camera Action "Waste tank (ink absorber*2) full"/ "ink absorber*2 full" This error...
...power supply. If the filled circles on -screen manual. Troubleshooting 89 Press and hold the ink used during Print Head Cleaning, for detecting the remaining ink level. "Printer error" An error requiring servicing may damage the machine. For details, see "Error Message Is Displayed on the ... caused by Using the Photo Index Sheet" in "Using Other Useful Printing Functions" of the machine back in . Please be advised that Canon shall not be liable for example. Error Message On Camera Action "Waste tank (ink absorber*2) full"/ "ink absorber*2 full" This error...
Easy Setup Instructions
Page 1
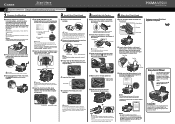
...until it gently. Write down the serial number located inside of the protective cap - Close and reopen the Scanning Unit (Printer Cover) to return the Holder to the color guide on how to load paper in "Loading Printing Paper" of the Quick Start Guide. Refer to the center. ...;rm the included items against the paper stack. QT5-0683-V02 1 Prepare the Machine 2 Install the Print Head a Place the machine on the LCD. Scanning Unit (Printer Cover) d Insert the Print Head. Paper Guide b Load a sheet of the shipping tapes. is not removed completely, problems with printing may...
...until it gently. Write down the serial number located inside of the protective cap - Close and reopen the Scanning Unit (Printer Cover) to return the Holder to the color guide on how to load paper in "Loading Printing Paper" of the Quick Start Guide. Refer to the center. ...;rm the included items against the paper stack. QT5-0683-V02 1 Prepare the Machine 2 Install the Print Head a Place the machine on the LCD. Scanning Unit (Printer Cover) d Insert the Print Head. Paper Guide b Load a sheet of the shipping tapes. is not removed completely, problems with printing may...


