
Quick Start Guide
Page 5
... Routine Maintenance 46 Replacing an Ink Tank 46 Keeping the Best Printing Results 51 When Printing Becomes Faint or Colors Are Incorrect 52 Printing the Nozzle Check Pattern 53 Examining the Nozzle Check Pattern ...........54 Print Head Cleaning 56 Print Head Deep Cleaning 58 Aligning the Print Head 60 Cleaning Your Machine 64 Troubleshooting 67 Error Message...
... Routine Maintenance 46 Replacing an Ink Tank 46 Keeping the Best Printing Results 51 When Printing Becomes Faint or Colors Are Incorrect 52 Printing the Nozzle Check Pattern 53 Examining the Nozzle Check Pattern ...........54 Print Head Cleaning 56 Print Head Deep Cleaning 58 Aligning the Print Head 60 Cleaning Your Machine 64 Troubleshooting 67 Error Message...
Quick Start Guide
Page 6
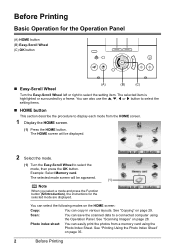
...Wheel (A) (B) (C) Turn the Easy-Scroll Wheel left or right to a connected computer using the Photo Index Sheet. Photo index sheet: You can easily print the photos from the HOME screen. 1 Display the HOME screen. (1) Press the HOME button. Scan: You can select the following modes on page ...29. See "Scanning Images" on page 35. 2 Before Printing See "Printing Using the Photo Index Sheet" on page 28. The HOME screen will be displayed. 2 Select the mode. (1) Turn the Easy-Scroll Wheel to...
...Wheel (A) (B) (C) Turn the Easy-Scroll Wheel left or right to a connected computer using the Photo Index Sheet. Photo index sheet: You can easily print the photos from the HOME screen. 1 Display the HOME screen. (1) Press the HOME button. Scan: You can select the following modes on page ...29. See "Scanning Images" on page 35. 2 Before Printing See "Printing Using the Photo Index Sheet" on page 28. The HOME screen will be displayed. 2 Select the mode. (1) Turn the Easy-Scroll Wheel to...
Quick Start Guide
Page 7
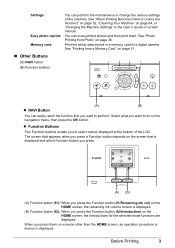
...a memory card of the LCD. When you press them . Before Printing 3 z Function Buttons Two Function buttons enable you press the Function button (f1/Remaining ink vol) on -screen manual. See "When Printing Becomes Faint or Colors Are Incorrect" on page 52, "Cleaning Your Machine" on the HOME... screen, the introductions for the selected mode functions are displayed. Print the photo data stored in the User's Guide on the HOME...
...a memory card of the LCD. When you press them . Before Printing 3 z Function Buttons Two Function buttons enable you press the Function button (f1/Remaining ink vol) on -screen manual. See "When Printing Becomes Faint or Colors Are Incorrect" on page 52, "Cleaning Your Machine" on the HOME... screen, the introductions for the selected mode functions are displayed. Print the photo data stored in the User's Guide on the HOME...

Quick Start Guide
Page 8
..." on page 68. 2 If you are using the machine connected to a computer, turn off the machine, press the ON/OFF button. See "Keeping the Best Printing Results" on the machine. z The Screen-saver Mode The LCD goes out if the machine is removed from the wall outlet with the POWER lamp... the display. Important About the Power Plug When removing the power plug after turing off . If the power plug is not operated for 5 minutes. z The Print Head and ink tanks are installed. The POWER lamp flashes green, and changes to your computer. „ Turning off the Machine 1 To turn on your...
..." on page 68. 2 If you are using the machine connected to a computer, turn off the machine, press the ON/OFF button. See "Keeping the Best Printing Results" on the machine. z The Screen-saver Mode The LCD goes out if the machine is removed from the wall outlet with the POWER lamp... the display. Important About the Power Plug When removing the power plug after turing off . If the power plug is not operated for 5 minutes. z The Print Head and ink tanks are installed. The POWER lamp flashes green, and changes to your computer. „ Turning off the Machine 1 To turn on your...
Quick Start Guide
Page 9
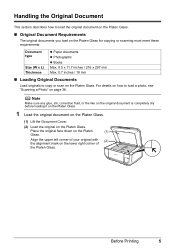
... on page 36. Place the original face down on the lower right corner of your original with (2) the alignment mark on the Platen (1) Glass. Before Printing 5 Align the upper left corner of the Platen Glass. Handling the Original Document This section describes how to load the original document on the Platen...
... on page 36. Place the original face down on the lower right corner of your original with (2) the alignment mark on the Platen (1) Glass. Before Printing 5 Align the upper left corner of the Platen Glass. Handling the Original Document This section describes how to load the original document on the Platen...
Quick Start Guide
Page 10
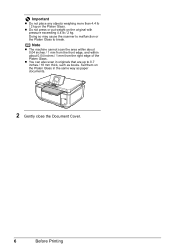
... may cause the scanner to malfunction or the Platen Glass to 0.7 inches / 18 mm thick, such as paper documents. 2 Gently close the Document Cover. 6 Before Printing
... may cause the scanner to malfunction or the Platen Glass to 0.7 inches / 18 mm thick, such as paper documents. 2 Gently close the Document Cover. 6 Before Printing
Quick Start Guide
Page 11
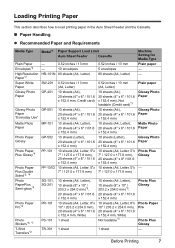
... Glossy Photo Paper Matte Photo Paper Glossy Photo Paper Photo Plus Glossy - Photo Plus Glossy Photo Paper Pro Photo Plus Glossy - Loading Printing Paper This section describes how to load printing paper in the Auto Sheet Feeder and the Cassette. „ Paper Handling z Recommended Paper and Requirements Media Type Plain Paper Envelopes...
... Glossy Photo Paper Matte Photo Paper Glossy Photo Paper Photo Plus Glossy - Photo Plus Glossy Photo Paper Pro Photo Plus Glossy - Loading Printing Paper This section describes how to load printing paper in the Auto Sheet Feeder and the Cassette. „ Paper Handling z Recommended Paper and Requirements Media Type Plain Paper Envelopes...

Quick Start Guide
Page 12
... the User's Guide on your country. *1 Paper is fed in Wireless print settings. When printing photos stored in a memory card to sticker paper, be able to "Printing on Stickers (Sticker Print)" in the User's Guide on -screen manual. Refer to purchase some Canon genuine papers depending on -screen manual. Purchase paper by Model Number. You...
... the User's Guide on your country. *1 Paper is fed in Wireless print settings. When printing photos stored in a memory card to sticker paper, be able to "Printing on Stickers (Sticker Print)" in the User's Guide on -screen manual. Refer to purchase some Canon genuine papers depending on -screen manual. Purchase paper by Model Number. You...
Quick Start Guide
Page 13
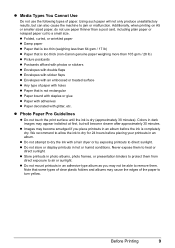
...or by exposing printouts to direct sunlight. Never expose them from direct exposure to dry for 24 hours before the ink is too thick (non-Canon genuine paper weighing more than a post card, including plain paper or notepad paper cut to remove them. z Images may become clearer after ... such paper will become smudged if you may not be able to a small size. Colors in hot or humid conditions. z Do not store or display printouts in dark images may cause the edges of paper. Before Printing 9 z Do not attempt to heat or direct sunlight. z Do not mount printouts in...
...or by exposing printouts to direct sunlight. Never expose them from direct exposure to dry for 24 hours before the ink is too thick (non-Canon genuine paper weighing more than a post card, including plain paper or notepad paper cut to remove them. z Images may become clearer after ... such paper will become smudged if you may not be able to a small size. Colors in hot or humid conditions. z Do not store or display printouts in dark images may cause the edges of paper. Before Printing 9 z Do not attempt to heat or direct sunlight. z Do not mount printouts in...

Quick Start Guide
Page 14
„ Using Specialty Media Canon recommends that you use Canon genuine media to load printing paper; the Auto Sheet Feeder, found at the top of the machine, and the Cassette, found at the front of the machine. (A) (B) (A) Auto Sheet Feeder (B) Cassette 10 Before Printing z Photo Quality Media z Glossy Photo Paper z Matte Photo Paper z Photo Paper... Suited for Business Documents z High Resolution Paper „ Using the Auto Sheet Feeder and the Cassette This machine offers two paper sources to ensure optimal print quality.
„ Using Specialty Media Canon recommends that you use Canon genuine media to load printing paper; the Auto Sheet Feeder, found at the top of the machine, and the Cassette, found at the front of the machine. (A) (B) (A) Auto Sheet Feeder (B) Cassette 10 Before Printing z Photo Quality Media z Glossy Photo Paper z Matte Photo Paper z Photo Paper... Suited for Business Documents z High Resolution Paper „ Using the Auto Sheet Feeder and the Cassette This machine offers two paper sources to ensure optimal print quality.
Quick Start Guide
Page 15
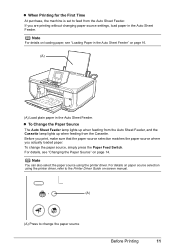
...paper, see "Changing the Paper Source" on paper source selection using the printer driver. Before you print, make sure that the paper source selection matches the paper source where you are printing without changing paper source settings, load paper in the Auto Sheet Feeder. To change the paper ... on page 16. (A) (A) Load plain paper in the Auto Sheet Feeder" on -screen manual. (A) (A) Press to feed from the Cassette. z When Printing for the First Time At purchase, the machine is set to change the paper source, simply press the Paper Feed Switch. For details, see "Loading...
...paper, see "Changing the Paper Source" on paper source selection using the printer driver. Before you print, make sure that the paper source selection matches the paper source where you are printing without changing paper source settings, load paper in the Auto Sheet Feeder. To change the paper ... on page 16. (A) (A) Load plain paper in the Auto Sheet Feeder" on -screen manual. (A) (A) Press to feed from the Cassette. z When Printing for the First Time At purchase, the machine is set to change the paper source, simply press the Paper Feed Switch. For details, see "Loading...
Quick Start Guide
Page 16
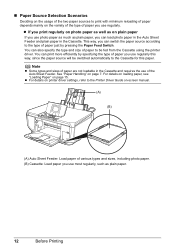
... paper in the Auto Sheet Feeder and plain paper in the Cassette and requires the use photo paper as much as plain paper. 12 Before Printing See "Paper Handling" on page 15. z For details on printer driver settings, refer to the Printer Driver Guide on-screen manual. (A) (B) (A) Auto Sheet ...Cassette using the printer driver. This way, you use regularly. You can switch the paper source according to the type of paper you can print more efficiently by specifying the type of paper just by pressing the Paper Feed Switch. „ Paper Source Selection Scenarios Deciding on the usage...
... paper in the Auto Sheet Feeder and plain paper in the Cassette and requires the use photo paper as much as plain paper. 12 Before Printing See "Paper Handling" on page 15. z For details on printer driver settings, refer to the Printer Driver Guide on-screen manual. (A) (B) (A) Auto Sheet ...Cassette using the printer driver. This way, you use regularly. You can switch the paper source according to the type of paper you can print more efficiently by specifying the type of paper just by pressing the Paper Feed Switch. „ Paper Source Selection Scenarios Deciding on the usage...
Quick Start Guide
Page 17
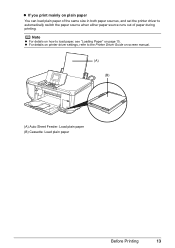
z For details on printer driver settings, refer to automatically switch the paper source when either paper source runs out of paper during printing. z If you print mainly on plain paper You can load plain paper of the same size in both paper sources, and set the printer driver to the Printer Driver Guide on-screen manual. (A) (B) (A) Auto Sheet Feeder: Load plain paper (B) Cassette: Load plain paper Before Printing 13 Note z For details on how to load paper, see "Loading Paper" on page 15.
z For details on printer driver settings, refer to automatically switch the paper source when either paper source runs out of paper during printing. z If you print mainly on plain paper You can load plain paper of the same size in both paper sources, and set the printer driver to the Printer Driver Guide on-screen manual. (A) (B) (A) Auto Sheet Feeder: Load plain paper (B) Cassette: Load plain paper Before Printing 13 Note z For details on how to load paper, see "Loading Paper" on page 15.
Quick Start Guide
Page 18
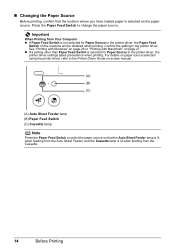
Confirm the setting in the printer driver, the printer driver settings takes precedence when printing. Important When Printing from the Cassette. 14 Before Printing See "Printing with Windows" on page 26 or "Printing with Macintosh" on page 27. For details on paper source selection using the printer driver, refer ...Paper Feed Switch (C) Cassette lamp Note Press the Paper Feed Switch to change the paper source. „ Changing the Paper Source Before printing, confirm that the Auto Sheet Feeder lamp is lit when feeding from the Auto Sheet Feeder, and the Cassette lamp is lit when ...
Confirm the setting in the printer driver, the printer driver settings takes precedence when printing. Important When Printing from the Cassette. 14 Before Printing See "Printing with Windows" on page 26 or "Printing with Macintosh" on page 27. For details on paper source selection using the printer driver, refer ...Paper Feed Switch (C) Cassette lamp Note Press the Paper Feed Switch to change the paper source. „ Changing the Paper Source Before printing, confirm that the Auto Sheet Feeder lamp is lit when feeding from the Auto Sheet Feeder, and the Cassette lamp is lit when ...
Quick Start Guide
Page 19
.... In such cases, reduce the sheets of paper you cut plain paper to be jammed. (A) (B) Note z For details on the specialty media Canon provides for a trial print, it can use with photos or stickers. z You can load up to 20 sheets of 4" x 6" or 2.13" x 3.39" (... on the type of paper or environmental conditions (either very high or low temperature and humidity). However, proper feeding of 5" x 7" paper. When Printing on both sides, we recommend Canon's Super White Paper Double-Sided. Non-standard sizes for the Cassette: 3.5" x 5" to 8.5" x 11.69" / 89.0 x 127.0 mm ...
.... In such cases, reduce the sheets of paper you cut plain paper to be jammed. (A) (B) Note z For details on the specialty media Canon provides for a trial print, it can use with photos or stickers. z You can load up to 20 sheets of 4" x 6" or 2.13" x 3.39" (... on the type of paper or environmental conditions (either very high or low temperature and humidity). However, proper feeding of 5" x 7" paper. When Printing on both sides, we recommend Canon's Super White Paper Double-Sided. Non-standard sizes for the Cassette: 3.5" x 5" to 8.5" x 11.69" / 89.0 x 127.0 mm ...

Quick Start Guide
Page 20
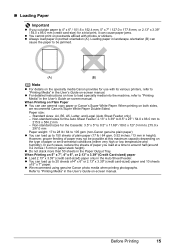
... number of paper neatly before loading. Loading paper without aligning the edges may cause paper jams. z If paper is curled." on -screen manual. (3) (2) 16 Before Printing Note You can also select the paper source with the printer driver. Note z Align the edges of sheets from the package, just before... printing. 2 Prepare to the Printer Driver Guide on page 76. See "Paper is curled, hold the opposing curled corners and gently bend them on a level surface. - z ...
... number of paper neatly before loading. Loading paper without aligning the edges may cause paper jams. z If paper is curled." on -screen manual. (3) (2) 16 Before Printing Note You can also select the paper source with the printer driver. Note z Align the edges of sheets from the package, just before... printing. 2 Prepare to the Printer Driver Guide on page 76. See "Paper is curled, hold the opposing curled corners and gently bend them on a level surface. - z ...

Quick Start Guide
Page 21
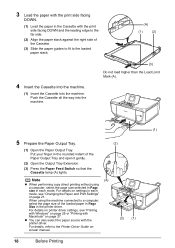
...the Paper Support. on page 21. When using a computer, select the page size selected in Page size in each menu, see "Printing with Windows" on page 26 or "Printing with the print side facing UP. (2) Align the paper stack against the left side of the paper stack. Do not load higher than the... 1 Flatten the four corners of the paper before loading it . 3 Load the paper. (1) Load the paper in the Auto Sheet Feeder with Macintosh" on the print surface. z Loading Paper in the Cassette Some types and sizes of paper are not loadable in the Cassette and requires the use only the Cassette...
...the Paper Support. on page 21. When using a computer, select the page size selected in Page size in each menu, see "Printing with Windows" on page 26 or "Printing with the print side facing UP. (2) Align the paper stack against the left side of the paper stack. Do not load higher than the... 1 Flatten the four corners of the paper before loading it . 3 Load the paper. (1) Load the paper in the Auto Sheet Feeder with Macintosh" on the print surface. z Loading Paper in the Cassette Some types and sizes of paper are not loadable in the Cassette and requires the use only the Cassette...
Quick Start Guide
Page 22
...on page 21. For details, refer to the Printer Driver Guide on page 27. z You can also select the paper source with the print side facing DOWN and the leading edge to the far side. (2) Align the paper stack against the right side of the Cassette. (3) ...open it gently. (2) Open the Output Tray Extension. (3) Press the Paper Feed Switch so that the Cassette lamp (A) lights. Note (A) z When performing copy direct printing without using the machine connected to the loaded paper stack. (A) (1) (2) 4 Insert the Cassette into the machine. (1) Insert the Cassette into the machine. (3) ...
...on page 21. For details, refer to the Printer Driver Guide on page 27. z You can also select the paper source with the print side facing DOWN and the leading edge to the far side. (2) Align the paper stack against the right side of the Cassette. (3) ...open it gently. (2) Open the Output Tray Extension. (3) Press the Paper Feed Switch so that the Cassette lamp (A) lights. Note (A) z When performing copy direct printing without using the machine connected to the loaded paper stack. (A) (1) (2) 4 Insert the Cassette into the machine. (1) Insert the Cassette into the machine. (3) ...
Quick Start Guide
Page 23
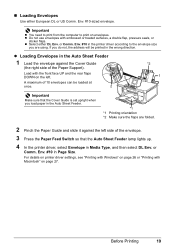
... at once. 2 *2 1 Important Make sure that the Auto Sheet Feeder lamp lights up. 4 In the printer driver, select Envelope in the Auto Sheet Feeder. *1 *1 Printing orientation *2 Make sure the flaps are using. z Loading Envelopes in Page Size. z Do not use envelopes with the front face UP and the rear flaps... DOWN on the left side of 10 envelopes can be printed in the wrong direction. or Comm. Important z You need to print from the computer to the envelope size you are folded. 2 Pinch the Paper Guide and slide it against the...
... at once. 2 *2 1 Important Make sure that the Auto Sheet Feeder lamp lights up. 4 In the printer driver, select Envelope in the Auto Sheet Feeder. *1 *1 Printing orientation *2 Make sure the flaps are using. z Loading Envelopes in Page Size. z Do not use envelopes with the front face UP and the rear flaps... DOWN on the left side of 10 envelopes can be printed in the wrong direction. or Comm. Important z You need to print from the computer to the envelope size you are folded. 2 Pinch the Paper Guide and slide it against the...
Quick Start Guide
Page 24
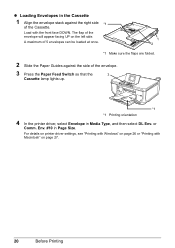
... Slide the Paper Guides against the right side *1 of the envelope. 3 Press the Paper Feed Switch so that the 3 Cassette lamp lights up. *1 *1 Printing orientation 4 In the printer driver, select Envelope in Media Type, and then select DL Env. or Comm. Env. #10 in Page Size. z Loading Envelopes... stack against the side of the Cassette. The flap of the envelope will appear facing UP on page 27. 20 Before Printing For details on printer driver settings, see "Printing with Windows" on page 26 or "Printing with the front face DOWN. Load with Macintosh" on the left side.
... Slide the Paper Guides against the right side *1 of the envelope. 3 Press the Paper Feed Switch so that the 3 Cassette lamp lights up. *1 *1 Printing orientation 4 In the printer driver, select Envelope in Media Type, and then select DL Env. or Comm. Env. #10 in Page Size. z Loading Envelopes... stack against the side of the Cassette. The flap of the envelope will appear facing UP on page 27. 20 Before Printing For details on printer driver settings, see "Printing with Windows" on page 26 or "Printing with the front face DOWN. Load with Macintosh" on the left side.


