Quick Start Guide
Page 26
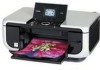
... as expected, select Standard or High(quality-priority) and try copying again. Grayscale renders tones in grayscale. Press the OK button to the original. Before printing, confirm that the location where you have loaded paper is selected as the media type. Credit card, A5, B5, A4, 8.5" x 11" (215 x 279),... quality is not as good as the paper source. Note Some of black or white. 22 Before Printing Glossy Photo Paper, Matte Photo Paper, Photo Plus Glossy, Plain paper, Photo Paper Pro (6) Adjust print quality according to change the intensity by using the Easy-Scroll Wheel. ...
... as expected, select Standard or High(quality-priority) and try copying again. Grayscale renders tones in grayscale. Press the OK button to the original. Before printing, confirm that the location where you have loaded paper is selected as the media type. Credit card, A5, B5, A4, 8.5" x 11" (215 x 279),... quality is not as good as the paper source. Note Some of black or white. 22 Before Printing Glossy Photo Paper, Matte Photo Paper, Photo Plus Glossy, Plain paper, Photo Paper Pro (6) Adjust print quality according to change the intensity by using the Easy-Scroll Wheel. ...
Quick Start Guide
Page 29
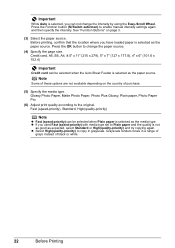
..., Effect: Sepia, Simulate illustration (14) Activate/deactivate Fade restoration*2 Corrects the color when printing photos that have faded or color cast over time. (4) Activate/deactivate Red eye correction.*1 Corrects red eyes in ...Color hue original, Color hue yellow +1, Color hue yellow +2 (13) Activate/deactivate Effects*1 Applies special effects to the photo, such as on black areas. pro ON (7) Activate/deactivate the Noise reduction function.*1 Reduces the noise on the photo taken against the light. Brightens a darkened face on blue areas like the sky as well as printing...
..., Effect: Sepia, Simulate illustration (14) Activate/deactivate Fade restoration*2 Corrects the color when printing photos that have faded or color cast over time. (4) Activate/deactivate Red eye correction.*1 Corrects red eyes in ...Color hue original, Color hue yellow +1, Color hue yellow +2 (13) Activate/deactivate Effects*1 Applies special effects to the photo, such as on black areas. pro ON (7) Activate/deactivate the Noise reduction function.*1 Reduces the noise on the photo taken against the light. Brightens a darkened face on blue areas like the sky as well as printing...
Quick Start Guide
Page 32
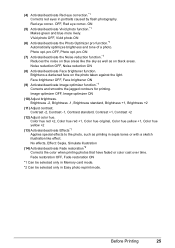
... Guide on-screen manual. „ Scanning Using the Operation Panel of the MP Navigator, refer to edit or print the document you have scanned. Scanned documents can be previewed and be performed after scanning the original depends on -...screen manual. 28 Scanning Images The operation to a computer without printing them and save them in popular file formats, such as JPEG, TIFF, bitmaps, or PDF. For details on how... 1 Turn on page 2. 4 Select the scan operation, then press the OK button. 5 Press the Color or Black button.
... Guide on-screen manual. „ Scanning Using the Operation Panel of the MP Navigator, refer to edit or print the document you have scanned. Scanned documents can be previewed and be performed after scanning the original depends on -...screen manual. 28 Scanning Images The operation to a computer without printing them and save them in popular file formats, such as JPEG, TIFF, bitmaps, or PDF. For details on how... 1 Turn on page 2. 4 Select the scan operation, then press the OK button. 5 Press the Color or Black button.
Quick Start Guide
Page 33
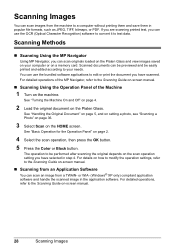
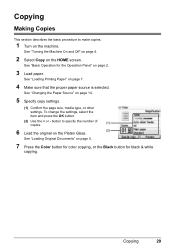
See "Loading Printing Paper" on page 14. 5 Specify copy settings. (1) Confirm the page size, media type, or other settings. See "Changing the Paper Source" on page 7. 4 Make sure that the proper paper source is selected. See "Basic Operation for black & white copying. To change the settings,...the number of copies. (1) 6 Load the original on the Platen Glass. (2) See "Loading Original Documents" on page 5. 7 Press the Color button for color copying, or the Black button for the Operation Panel" on page 2. 3 Load paper. See "Turning the Machine On and Off" on page 4. 2 Select Copy...
See "Loading Printing Paper" on page 14. 5 Specify copy settings. (1) Confirm the page size, media type, or other settings. See "Changing the Paper Source" on page 7. 4 Make sure that the proper paper source is selected. See "Basic Operation for black & white copying. To change the settings,...the number of copies. (1) 6 Load the original on the Platen Glass. (2) See "Loading Original Documents" on page 5. 7 Press the Color button for color copying, or the Black button for the Operation Panel" on page 2. 3 Load paper. See "Turning the Machine On and Off" on page 4. 2 Select Copy...
Quick Start Guide
Page 41
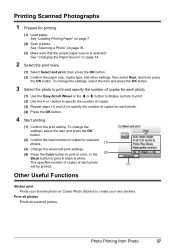
... or ] button to display a photo to print. (2) Use the + or - See "Changing the Paper Source" on Canon Photo Stickers to create your favorite photo on page 14. 2 Select the print menu. (1) Select Select and print, then press the OK button. (2) Confirm...photo (3) will be printed. Photo Printing from Photo 37 Printing Scanned Photographs 1 Prepare for selected photos. (1) (3) Change the advanced print settings. (4) Press the Color button to print in color, or the (2) Black button to print in black & white. Other Useful Functions Sticker print Prints your own stickers. ...
... or ] button to display a photo to print. (2) Use the + or - See "Changing the Paper Source" on Canon Photo Stickers to create your favorite photo on page 14. 2 Select the print menu. (1) Select Select and print, then press the OK button. (2) Confirm...photo (3) will be printed. Photo Printing from Photo 37 Printing Scanned Photographs 1 Prepare for selected photos. (1) (3) Change the advanced print settings. (4) Press the Color button to print in color, or the (2) Black button to print in black & white. Other Useful Functions Sticker print Prints your own stickers. ...
Quick Start Guide
Page 48
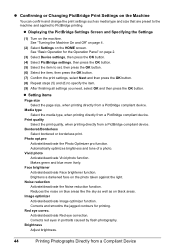
...photo Activate/deactivate Vivid photo function. Noise reduction Activate/deactivate the Noise reduction function. Bordered/Borderless Select bordered or borderless print. Photo opt.pro Activate/deactivate the Photo Optimizer pro function. Makes green and blue more lively. Face brightener Activate.... Print quality Select the print quality, when printing directly from a Compliant Device Corrects red eyes in portraits caused by flash photography. z Confirming or Changing PictBridge Print Settings on the Machine You can confirm and change the print settings such as on black areas...
...photo Activate/deactivate Vivid photo function. Noise reduction Activate/deactivate the Noise reduction function. Bordered/Borderless Select bordered or borderless print. Photo opt.pro Activate/deactivate the Photo Optimizer pro function. Makes green and blue more lively. Face brightener Activate.... Print quality Select the print quality, when printing directly from a Compliant Device Corrects red eyes in portraits caused by flash photography. z Confirming or Changing PictBridge Print Settings on the Machine You can confirm and change the print settings such as on black areas...
Quick Start Guide
Page 50
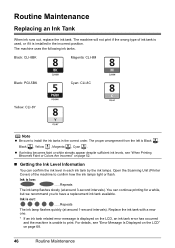
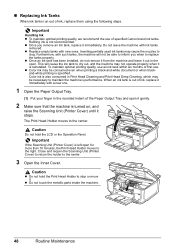
...Ink is out: ......Repeats The ink lamp flashes quickly (at around 1-second intervals). For details, see "When Printing Becomes Faint or Colors Are Incorrect" on page 68. 46 Routine Maintenance z If printing becomes faint or white streaks appear despite sufficient ink levels, see "Error Message Is Displayed on the LCD" on... ink level in each ink tank by the ink lamps. Open the Scanning Unit (Printer Cover) of ink tank is used, or if it is Black , Black , Yellow , Magenta , Cyan . Ink is unable to confirm how the ink lamps light or flash. Replace the ink tank with a new one. *...
...Ink is out: ......Repeats The ink lamp flashes quickly (at around 1-second intervals). For details, see "When Printing Becomes Faint or Colors Are Incorrect" on page 68. 46 Routine Maintenance z If printing becomes faint or white streaks appear despite sufficient ink levels, see "Error Message Is Displayed on the LCD" on... ink level in each ink tank by the ink lamps. Open the Scanning Unit (Printer Cover) of ink tank is used, or if it is Black , Black , Yellow , Magenta , Cyan . Ink is unable to confirm how the ink lamps light or flash. Replace the ink tank with a new one. *...
Quick Start Guide
Page 52
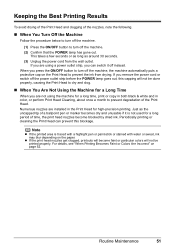
... it stops. When an ink tank is out of specified Canon brand ink tanks. Caution Do not hold the Print Head Holder to the right. Color ink is also consumed in the open for more than 10 minutes, the Print Head Holder moves to stop or move it is specified. ...Operation Panel. Inserting partially used ink tanks may be consumed even when printing a black-and-white document or when blackand-white printing is reinstalled. This will not be able to inform you remove an ink tank, replace it immediately. z Color ink may not operate properly when it . Important Handling Ink z ...
... it stops. When an ink tank is out of specified Canon brand ink tanks. Caution Do not hold the Print Head Holder to the right. Color ink is also consumed in the open for more than 10 minutes, the Print Head Holder moves to stop or move it is specified. ...Operation Panel. Inserting partially used ink tanks may be consumed even when printing a black-and-white document or when blackand-white printing is reinstalled. This will not be able to inform you remove an ink tank, replace it immediately. z Color ink may not operate properly when it . Important Handling Ink z ...
Quick Start Guide
Page 55
... a few seconds or as long as the uncapped tip of the Print Head. If you are using the machine for a long time, print or copy in both black & white and in the Print Head for high-precision printing. Numerous nozzles are installed in color, or perform Print Head Cleaning, about once a month to prevent degradation of a ballpoint...
... a few seconds or as long as the uncapped tip of the Print Head. If you are using the machine for a long time, print or copy in both black & white and in the Print Head for high-precision printing. Numerous nozzles are installed in color, or perform Print Head Cleaning, about once a month to prevent degradation of a ballpoint...
Quick Start Guide
Page 64
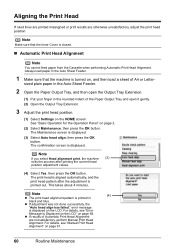
... is aligned automatically, and the print head pattern after printing the current head position adjustment values. (4) Select Yes, then press the OK button. z If results of the Paper Output Tray and open the Output Tray Extension. (1) Put your finger in black and blue. sized plain paper ...in the Auto Sheet Feeder. 1 Make sure that the Inner Cover is displayed. This takes about 4 minutes. The confirmation screen is closed. „ Automatic Print Head Alignment Note You cannot feed paper from...
... is aligned automatically, and the print head pattern after printing the current head position adjustment values. (4) Select Yes, then press the OK button. z If results of the Paper Output Tray and open the Output Tray Extension. (1) Put your finger in black and blue. sized plain paper ...in the Auto Sheet Feeder. 1 Make sure that the Inner Cover is displayed. This takes about 4 minutes. The confirmation screen is closed. „ Automatic Print Head Alignment Note You cannot feed paper from...
Quick Start Guide
Page 95
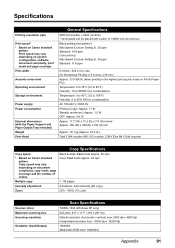
...) * Ink droplets can be placed with a pitch of copies. Print speed may vary depending on system configuration, software, document complexity, print mode and page coverage. Specifications Printing resolution (dpi) Print speed* * Based on Canon standard pattern. Black printing (text pattern) Max Speed (Custom Setting 5): 30 ppm Standard: 14.8 ppm Color printing Max Speed (Custom Setting 5): 24 ppm Standard: 11...
...) * Ink droplets can be placed with a pitch of copies. Print speed may vary depending on system configuration, software, document complexity, print mode and page coverage. Specifications Printing resolution (dpi) Print speed* * Based on Canon standard pattern. Black printing (text pattern) Max Speed (Custom Setting 5): 30 ppm Standard: 14.8 ppm Color printing Max Speed (Custom Setting 5): 24 ppm Standard: 11...
Quick Start Guide
Page 106
... supported by this machine 31 N NAVI Button 3 Nozzle Check Pattern examining 54 printing 53 P PGI-5BK Black 46 Photo Printing from Photo 36 scanning a photo 36 select and print 37 Print Head automatic print head alignment 60 cleaning 56 deep cleaning 58 manual print head alignment 61 Printing from a Memory Card 31 Photo Index Sheet 35 select and... 92 scan 91 System Requirements 92 T Troubleshooting 67 Turning off the Machine 4 Turning on the Machine 4 U Users in the U.S.A. Limited Warranty - Only 98 102 Index Canon U.S.A., Inc.
... supported by this machine 31 N NAVI Button 3 Nozzle Check Pattern examining 54 printing 53 P PGI-5BK Black 46 Photo Printing from Photo 36 scanning a photo 36 select and print 37 Print Head automatic print head alignment 60 cleaning 56 deep cleaning 58 manual print head alignment 61 Printing from a Memory Card 31 Photo Index Sheet 35 select and... 92 scan 91 System Requirements 92 T Troubleshooting 67 Turning off the Machine 4 Turning on the Machine 4 U Users in the U.S.A. Limited Warranty - Only 98 102 Index Canon U.S.A., Inc.

Quick Start Guide
Page 111
... 11" / 100 sheets) Call 1-800-OK-CANON to locate a dealer near you, or visit the Canon eStore at www.estore.usa.canon.com. All other countries. Description Ink Tanks PGI-5 Black CLI-8 Black CLI-8 Cyan CLI-8 Magenta CLI-8 Yellow Canon Specialty Papers Photo Paper Plus Glossy (4" x 6"...x 11") Photo Paper Pro for Borderless Printing (4" x 6" / 20 sheets) Photo Paper Pro for energy efficiency. As an ENERGY STAR® partner, Canon U.S.A., Inc. Ordering Information For additional supplies, use the following descriptions and order numbers. Canon is a registered trademark of their respective ...
... 11" / 100 sheets) Call 1-800-OK-CANON to locate a dealer near you, or visit the Canon eStore at www.estore.usa.canon.com. All other countries. Description Ink Tanks PGI-5 Black CLI-8 Black CLI-8 Cyan CLI-8 Magenta CLI-8 Yellow Canon Specialty Papers Photo Paper Plus Glossy (4" x 6"...x 11") Photo Paper Pro for Borderless Printing (4" x 6" / 20 sheets) Photo Paper Pro for energy efficiency. As an ENERGY STAR® partner, Canon U.S.A., Inc. Ordering Information For additional supplies, use the following descriptions and order numbers. Canon is a registered trademark of their respective ...
Easy Setup Instructions
Page 1
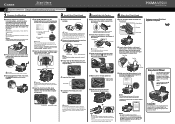
...Important For your safety, always firmly grip the areas il- Write down the serial number located inside of the protective cap - If the orange-colored protective film is selected in the User's Guide on the LCD" in the message requesting head alignment, then press the OK button. Important... Wheel Turn the Easy-Scroll Wheel left open the Paper Output Tray, put your product. b Plug the power cord in black and blue. • When Automatic Print Head Alignment cannot be some transparent or light blue ink on the ink tank until it to the Language selection screen. Once...
...Important For your safety, always firmly grip the areas il- Write down the serial number located inside of the protective cap - If the orange-colored protective film is selected in the User's Guide on the LCD" in the message requesting head alignment, then press the OK button. Important... Wheel Turn the Easy-Scroll Wheel left open the Paper Output Tray, put your product. b Plug the power cord in black and blue. • When Automatic Print Head Alignment cannot be some transparent or light blue ink on the ink tank until it to the Language selection screen. Once...


