
Quick Start Guide
Page 5
...Paper 7 Changing the Paper and Print Settings ........21 Printing from Your Computer 26 Printing with Windows 26 Printing with Macintosh 27 Scanning Images 28 Scanning Methods 28 Copying 29 Making Copies 29 ...an Ink Tank 46 Keeping the Best Printing Results 51 When Printing Becomes Faint or Colors Are Incorrect 52 Printing the Nozzle Check Pattern 53 Examining the Nozzle Check Pattern ..............All 70 An Unintended Language Is Displayed on the LCD 70 Cannot Install the MP Drivers 71 Cannot Connect to Computer Properly ........ 72 Print Results Not Satisfactory 73 Printing Does...
...Paper 7 Changing the Paper and Print Settings ........21 Printing from Your Computer 26 Printing with Windows 26 Printing with Macintosh 27 Scanning Images 28 Scanning Methods 28 Copying 29 Making Copies 29 ...an Ink Tank 46 Keeping the Best Printing Results 51 When Printing Becomes Faint or Colors Are Incorrect 52 Printing the Nozzle Check Pattern 53 Examining the Nozzle Check Pattern ..............All 70 An Unintended Language Is Displayed on the LCD 70 Cannot Install the MP Drivers 71 Cannot Connect to Computer Properly ........ 72 Print Results Not Satisfactory 73 Printing Does...
Quick Start Guide
Page 18
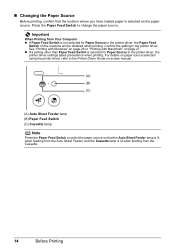
See "Printing with Windows" on page 26 or "Printing with Macintosh" on -screen manual. (A) (B) (C) (A) Auto Sheet Feeder lamp (B) Paper Feed Switch (C) Cassette lamp Note Press the Paper Feed Switch ... feeding from the Auto Sheet Feeder, and the Cassette lamp is not selected for Paper Source in the printer driver, the printer driver settings takes precedence when printing. Confirm the setting in the printer driver, the Paper Feed Switch on the machine will be disabled when printing. Press the Paper Feed Switch to...
See "Printing with Windows" on page 26 or "Printing with Macintosh" on -screen manual. (A) (B) (C) (A) Auto Sheet Feeder lamp (B) Paper Feed Switch (C) Cassette lamp Note Press the Paper Feed Switch ... feeding from the Auto Sheet Feeder, and the Cassette lamp is not selected for Paper Source in the printer driver, the printer driver settings takes precedence when printing. Confirm the setting in the printer driver, the Paper Feed Switch on the machine will be disabled when printing. Press the Paper Feed Switch to...

Quick Start Guide
Page 21
.... 1 Flatten the four corners of the paper stack. When using a computer, select the page size selected in Page size in each menu, see "Printing with Windows" on page 26 or "Printing with the print side facing UP. (2) Align the paper stack against the left side of the paper before loading it... you load photo paper such as Photo Paper Pro, in the Cassette for any usage restrictions in the Cassette, you load paper in the printer driver. 3 Load the paper. (1) Load the paper in the Auto Sheet Feeder with Macintosh" on page 27. z Loading Paper in the Cassette Some types and ...
.... 1 Flatten the four corners of the paper stack. When using a computer, select the page size selected in Page size in each menu, see "Printing with Windows" on page 26 or "Printing with the print side facing UP. (2) Align the paper stack against the left side of the paper before loading it... you load photo paper such as Photo Paper Pro, in the Cassette for any usage restrictions in the Cassette, you load paper in the printer driver. 3 Load the paper. (1) Load the paper in the Auto Sheet Feeder with Macintosh" on page 27. z Loading Paper in the Cassette Some types and ...
Quick Start Guide
Page 22
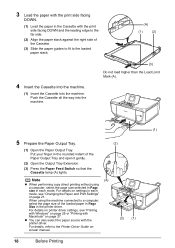
... Tray and open it gently. (2) Open the Output Tray Extension. (3) Press the Paper Feed Switch so that the Cassette lamp (A) lights. For details on printer driver settings, see "Changing the Paper and Print Settings" on settings in each mode. Put your finger in the rounded indent of the Cassette. (3) Slide the... Paper Output Tray. (3) (1) Open the Paper Output Tray. When using a computer, select the page size selected in Page size in each mode, see "Printing with Windows" on page 26 or "Printing with the printer driver. Push the Cassette all the way into the machine.
... Tray and open it gently. (2) Open the Output Tray Extension. (3) Press the Paper Feed Switch so that the Cassette lamp (A) lights. For details on printer driver settings, see "Changing the Paper and Print Settings" on settings in each mode. Put your finger in the rounded indent of the Cassette. (3) Slide the... Paper Output Tray. (3) (1) Open the Paper Output Tray. When using a computer, select the page size selected in Page size in each mode, see "Printing with Windows" on page 26 or "Printing with the printer driver. Push the Cassette all the way into the machine.
Quick Start Guide
Page 23
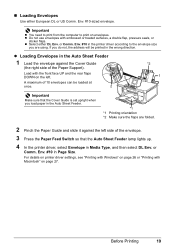
... print on the left side of 10 envelopes can be printed in Media Type, and then select DL Env. For details on printer driver settings, see "Printing with Windows" on page 26 or "Printing with the front face UP and the rear flaps DOWN on envelopes. or Comm. „ Loading Envelopes ... you do not, the address will be loaded at once. 2 *2 1 Important Make sure that the Auto Sheet Feeder lamp lights up. 4 In the printer driver, select Envelope in the wrong direction. Env. #10-sized envelope. If you load paper in Page Size. or Comm. Env. #10 in the Auto Sheet...
... print on the left side of 10 envelopes can be printed in Media Type, and then select DL Env. For details on printer driver settings, see "Printing with Windows" on page 26 or "Printing with the front face UP and the rear flaps DOWN on envelopes. or Comm. „ Loading Envelopes ... you do not, the address will be loaded at once. 2 *2 1 Important Make sure that the Auto Sheet Feeder lamp lights up. 4 In the printer driver, select Envelope in the wrong direction. Env. #10-sized envelope. If you load paper in Page Size. or Comm. Env. #10 in the Auto Sheet...
Quick Start Guide
Page 24
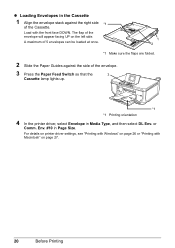
For details on printer driver settings, see "Printing with Windows" on page 26 or "Printing with the front face DOWN. A maximum of 5 envelopes can be loaded at once. 1 2 *1 Make sure the flaps are folded. 2 Slide ... envelope stack against the side of the envelope. 3 Press the Paper Feed Switch so that the 3 Cassette lamp lights up. *1 *1 Printing orientation 4 In the printer driver, select Envelope in Page Size. or Comm. The flap of the envelope will appear facing UP on page 27. 20 Before Printing Env. #10 in...
For details on printer driver settings, see "Printing with Windows" on page 26 or "Printing with the front face DOWN. A maximum of 5 envelopes can be loaded at once. 1 2 *1 Make sure the flaps are folded. 2 Slide ... envelope stack against the side of the envelope. 3 Press the Paper Feed Switch so that the 3 Cassette lamp lights up. *1 *1 Printing orientation 4 In the printer driver, select Envelope in Page Size. or Comm. The flap of the envelope will appear facing UP on page 27. 20 Before Printing Env. #10 in...
Quick Start Guide
Page 30
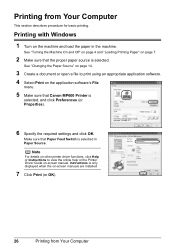
Make sure that Canon MP600 Printer is selected in the machine. Note For details on other printer driver functions, click Help or Instructions to print using an appropriate application software. 4 Select Print on the application software's File menu. 5 Make sure ... Paper Source. See "Turning the Machine On and Off" on page 4 and "Loading Printing Paper" on -screen manual. Instructions is selected. Printing with Windows 1 Turn on -screen manuals are installed. 7 Click Print (or OK). 26 Printing from Your Computer This section describes procedure for basic printing. Printing from...
Make sure that Canon MP600 Printer is selected in the machine. Note For details on other printer driver functions, click Help or Instructions to print using an appropriate application software. 4 Select Print on the application software's File menu. 5 Make sure ... Paper Source. See "Turning the Machine On and Off" on page 4 and "Loading Printing Paper" on -screen manual. Instructions is selected. Printing with Windows 1 Turn on -screen manuals are installed. 7 Click Print (or OK). 26 Printing from Your Computer This section describes procedure for basic printing. Printing from...
Quick Start Guide
Page 71
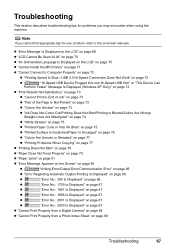
... or Has Ink Blots" on page 75 z "Printed Surface Is Scratched/Paper Is Smudged" on page 75 z "Colors Are Uneven or Streaked" on page 77 z "Printing Problems When Copying" on page 77 z "Printing Does Not ... page 70 z "An Unintended Language Is Displayed on the LCD" on page 70 z "Cannot Install the MP Drivers" on page 71 z "Cannot Connect to Computer Properly" on page 72 z "Printing Speed Is Slow / USB...-Speed USB Hub" or "This Device Can Perform Faster" Message Is Displayed (Windows XP Only)" on page 72 z "Print Results Not Satisfactory" on page 73 z "Cannot Print to ...
... or Has Ink Blots" on page 75 z "Printed Surface Is Scratched/Paper Is Smudged" on page 75 z "Colors Are Uneven or Streaked" on page 77 z "Printing Problems When Copying" on page 77 z "Printing Does Not ... page 70 z "An Unintended Language Is Displayed on the LCD" on page 70 z "Cannot Install the MP Drivers" on page 71 z "Cannot Connect to Computer Properly" on page 72 z "Printing Speed Is Slow / USB...-Speed USB Hub" or "This Device Can Perform Faster" Message Is Displayed (Windows XP Only)" on page 72 z "Print Results Not Satisfactory" on page 73 z "Cannot Print to ...
Quick Start Guide
Page 75
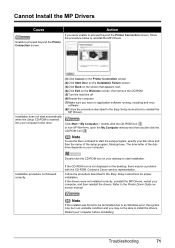
...before reinstalling. In non-XP Windows, open the My Computer window and then double-click the CD-ROM icon . If the CD-ROM icon is inserted into your desktop to reinstall the MP Drivers. The drive letter of the setup program, Msetup4.exe. Contact a Canon service representative. Note If the... installer was forced to be terminated due to an Windows error, the system may be in an unstable condition and you...
...before reinstalling. In non-XP Windows, open the My Computer window and then double-click the CD-ROM icon . If the CD-ROM icon is inserted into your desktop to reinstall the MP Drivers. The drive letter of the setup program, Msetup4.exe. Contact a Canon service representative. Note If the... installer was forced to be terminated due to an Windows error, the system may be in an unstable condition and you...
Quick Start Guide
Page 76
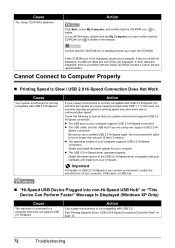
... Hi-Speed, the machine will operate at a lower speed provided under USB 1.1. Contact a Canon service representative. Check the following to use a certified USB 2.0 Hi-Speed cable. Cannot Connect...non-Hi-Speed USB Hub" or "This Device Can Perform Faster" Message Is Displayed (Windows XP Only) Cause The machine is connected to Computer Properly „ Printing Speed Is Slow...Connection Does Not Work Cause Your system environment is defective. z The USB 2.0 Hi-Speed driver operates properly. We recommend the cable to communication speed. z The operating system of your ...
... Hi-Speed, the machine will operate at a lower speed provided under USB 1.1. Contact a Canon service representative. Check the following to use a certified USB 2.0 Hi-Speed cable. Cannot Connect...non-Hi-Speed USB Hub" or "This Device Can Perform Faster" Message Is Displayed (Windows XP Only) Cause The machine is connected to Computer Properly „ Printing Speed Is Slow...Connection Does Not Work Cause Your system environment is defective. z The USB 2.0 Hi-Speed driver operates properly. We recommend the cable to communication speed. z The operating system of your ...
Quick Start Guide
Page 77
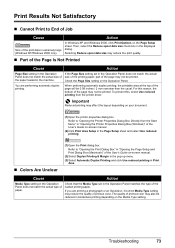
... driver. the paper loaded in Print Area. Refer to "Opening the Print Dialog Box" in "Opening the Page Setup and Print Dialog Box (Macintosh)" of paper. If you are performing automatic duplex printing. To prevent this reason, the bottom of the print data is extremely large (Windows XP/Windows ...2000 only). Check that the Media Type set in the Page Setup sheet and select Use reduced printing. „ Colors Are Unclear (1)Open the Print dialog box. Check the Page Size setting on the...
... driver. the paper loaded in Print Area. Refer to "Opening the Print Dialog Box" in "Opening the Page Setup and Print Dialog Box (Macintosh)" of paper. If you are performing automatic duplex printing. To prevent this reason, the bottom of the print data is extremely large (Windows XP/Windows ...2000 only). Check that the Media Type set in the Page Setup sheet and select Use reduced printing. „ Colors Are Unclear (1)Open the Print dialog box. Check the Page Size setting on the...
Quick Start Guide
Page 80
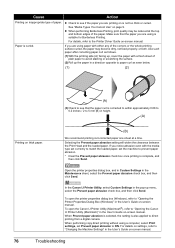
...Guide on -screen manual. 76 Troubleshooting In the Canon IJ Printer Utility, select Custom Settings in the Maintenance sheet, select the Prevent paper abrasion check box, and then click Send. To open the printer properties dialog box (Windows), refer to see that the paper you notice abrasion... selected, the setting is curled. For details, refer to direct printing from a digital camera. Paper is also applied to the Printer Driver Guide on inappropriate type of the corners or the whole printing surface curled, the paper may be reduced at a time. Cause Action ...
...Guide on -screen manual. 76 Troubleshooting In the Canon IJ Printer Utility, select Custom Settings in the Maintenance sheet, select the Prevent paper abrasion check box, and then click Send. To open the printer properties dialog box (Windows), refer to see that the paper you notice abrasion... selected, the setting is curled. For details, refer to direct printing from a digital camera. Paper is also applied to the Printer Driver Guide on inappropriate type of the corners or the whole printing surface curled, the paper may be reduced at a time. Cause Action ...
Quick Start Guide
Page 83
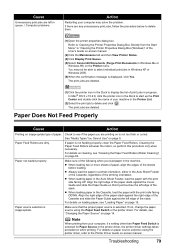
... the paper source using the printer driver, refer to the Printer Driver Guide on page 15. z When loading paper in progress. Cause Unnecessary print jobs are left in queue. / Computer problems. Action Restarting your computer may not be able to select individual print jobs in Windows XP or Windows 2000. (5)When the confirmation message...
... the paper source using the printer driver, refer to the Printer Driver Guide on page 15. z When loading paper in progress. Cause Unnecessary print jobs are left in queue. / Computer problems. Action Restarting your computer may not be able to select individual print jobs in Windows XP or Windows 2000. (5)When the confirmation message...
Quick Start Guide
Page 89
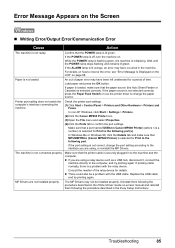
...OK button. If paper is loaded, make sure that MPUSBPRNnn (Canon MP600 Printer) is lit orange, an error may not be a problem with the relay device. In non-XP Windows, click Start > Settings > Printers. (2)Click the Canon MP600 Printer icon. (3)Open the File menu and select Properties. (4)...z If you are not installed properly. Replace the USB cable and try printing again. Uninstall them following the procedure described in the Printer Driver Guide on-screen manual and reinstall them following port(s). For details on . Check the printer port settings. (1)Click Start > Control Panel...
...OK button. If paper is loaded, make sure that MPUSBPRNnn (Canon MP600 Printer) is lit orange, an error may not be a problem with the relay device. In non-XP Windows, click Start > Settings > Printers. (2)Click the Canon MP600 Printer icon. (3)Open the File menu and select Properties. (4)...z If you are not installed properly. Replace the USB cable and try printing again. Uninstall them following the procedure described in the Printer Driver Guide on-screen manual and reinstall them following port(s). For details on . Check the printer port settings. (1)Click Start > Control Panel...
Quick Start Guide
Page 90
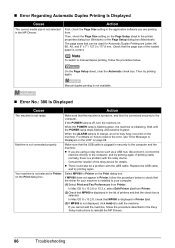
... a relay device such as a USB hub, disconnect it is connected securely to reinstall the MP Drivers. 86 Troubleshooting If MP600 does not appear in the MP Drivers. „ Error Regarding Automatic Duplex Printing Is Displayed Cause The correct media size is selected. Consult... the reseller of printers and that the USB cable is not displayed, click Add(+) to the computer and the machine. Select MP600 in the printer properties dialog box (Windows...
... a relay device such as a USB hub, disconnect it is connected securely to reinstall the MP Drivers. 86 Troubleshooting If MP600 does not appear in the MP Drivers. „ Error Regarding Automatic Duplex Printing Is Displayed Cause The correct media size is selected. Consult... the reseller of printers and that the USB cable is not displayed, click Add(+) to the computer and the machine. Select MP600 in the printer properties dialog box (Windows...
Quick Start Guide
Page 95
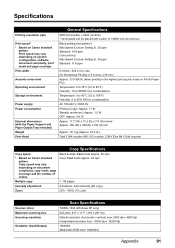
...coverage and the number of 1/9600 inch at minimum. Specifications Printing resolution (dpi) Print speed* * Based on Canon standard pattern. Print width Acoustic noise level Operating environment Storage environment Power supply Power consumption External dimensions (with the...Fast mode approx. 30 cpm Color: Fast mode approx. 24 cpm Multiple copy 1 - 99 pages Intensity adjustment 9 positions, Auto intensity (AE copy) Zoom 25% - 400% (1% unit) Scanner driver Maximum scanning size Scanning resolution Gradation (Input/Output) Scan Specifications TWAIN / WIA (Windows XP only) A4/Letter,...
...coverage and the number of 1/9600 inch at minimum. Specifications Printing resolution (dpi) Print speed* * Based on Canon standard pattern. Print width Acoustic noise level Operating environment Storage environment Power supply Power consumption External dimensions (with the...Fast mode approx. 30 cpm Color: Fast mode approx. 24 cpm Multiple copy 1 - 99 pages Intensity adjustment 9 positions, Auto intensity (AE copy) Zoom 25% - 400% (1% unit) Scanner driver Maximum scanning size Scanning resolution Gradation (Input/Output) Scan Specifications TWAIN / WIA (Windows XP only) A4/Letter,...
Easy Setup Instructions
Page 2
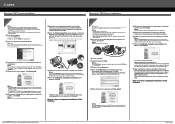
...OK. f When the main menu appears, click Easy Install. The system is shown in the User's Guide on to Windows as an Administrator before continuing. • Before installing the driver, disable all anti-virus programs and automatically loading programs. a Connect one end of the USB cable to the computer, ... turn the machine on your administrator name or password, click , then follow the on the inside of each application. QT5-0683-V02 © 2006 Canon Inc. Adobe and Adobe RGB (1998) are using . • Log on . To resolve this, either unplug the USB cable then plug it ...
...OK. f When the main menu appears, click Easy Install. The system is shown in the User's Guide on to Windows as an Administrator before continuing. • Before installing the driver, disable all anti-virus programs and automatically loading programs. a Connect one end of the USB cable to the computer, ... turn the machine on your administrator name or password, click , then follow the on the inside of each application. QT5-0683-V02 © 2006 Canon Inc. Adobe and Adobe RGB (1998) are using . • Log on . To resolve this, either unplug the USB cable then plug it ...


