
Quick Start Guide
Page 5
...from a PictBridge Compliant Device 39 Routine Maintenance 46 Replacing an Ink Tank 46 Keeping the Best Printing Results 51 When Printing Becomes Faint or Colors Are Incorrect 52 Printing the Nozzle Check Pattern 53 Examining the Nozzle Check Pattern ...........54 Print Head Cleaning 56 Print Head Deep Cleaning 58 ... Screen ........ 85 Cannot Print Properly from a Digital Camera 88 Cannot Print Properly from a Photo Index Sheet 89 Appendix 90 Reading the On-screen Manuals 90 Specifications 91 Safety Precautions 94 Legal Limitations on Use of Your Product and Use of Images 97...
...from a PictBridge Compliant Device 39 Routine Maintenance 46 Replacing an Ink Tank 46 Keeping the Best Printing Results 51 When Printing Becomes Faint or Colors Are Incorrect 52 Printing the Nozzle Check Pattern 53 Examining the Nozzle Check Pattern ...........54 Print Head Cleaning 56 Print Head Deep Cleaning 58 ... Screen ........ 85 Cannot Print Properly from a Digital Camera 88 Cannot Print Properly from a Photo Index Sheet 89 Appendix 90 Reading the On-screen Manuals 90 Specifications 91 Safety Precautions 94 Legal Limitations on Use of Your Product and Use of Images 97...
Quick Start Guide
Page 7
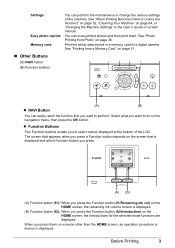
... Function button depends on the HOME screen, the introductions for the selected mode functions are displayed. Print the photo data stored in the User's Guide on page 36. Select what you press the Function button (f2/Introduction) on the screen that you want to select menus ... Function buttons z NAVI Button (A) (B) You can perform the maintenance or change the various settings of a digital camera. See "When Printing Becomes Faint or Colors Are Incorrect" on page 52, "Cleaning Your Machine" on page 64, or "Changing the Machine Settings" in a memory card of the machine. When you...
... Function button depends on the HOME screen, the introductions for the selected mode functions are displayed. Print the photo data stored in the User's Guide on page 36. Select what you press the Function button (f2/Introduction) on the screen that you want to select menus ... Function buttons z NAVI Button (A) (B) You can perform the maintenance or change the various settings of a digital camera. See "When Printing Becomes Faint or Colors Are Incorrect" on page 52, "Cleaning Your Machine" on page 64, or "Changing the Machine Settings" in a memory card of the machine. When you...

Quick Start Guide
Page 12
... memory card to sticker paper, be sure to "Printing on a Sticker (Sticker Print)" in "Using Other Useful Printing Functions" of the User's Guide on-screen manual. Note For a detailed description of printing media types, refer to "Printing on Stickers (Sticker Print)" in "Using Other Useful Printing Functions"...can specify the print setting easily by Model Number. You may become marked when it is Canon specialty media. When printing photos saved on your mobile phone to purchase some Canon genuine papers depending on mobile phones, refer to "Setting the Page Size, Media Type, ...
... memory card to sticker paper, be sure to "Printing on a Sticker (Sticker Print)" in "Using Other Useful Printing Functions" of the User's Guide on-screen manual. Note For a detailed description of printing media types, refer to "Printing on Stickers (Sticker Print)" in "Using Other Useful Printing Functions"...can specify the print setting easily by Model Number. You may become marked when it is Canon specialty media. When printing photos saved on your mobile phone to purchase some Canon genuine papers depending on mobile phones, refer to "Setting the Page Size, Media Type, ...
Quick Start Guide
Page 19
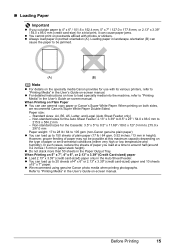
...to be possible at a time to around half (around 0.2 inches / 5 mm in the User's Guide on -screen manual. z For detailed instructions on how to load specialty media into the machine, refer to "Printing Media" in the User's Guide on Plain Paper z You can cause paper jams. z You cannot print on 5" ... sheets in portrait orientation (A). Before Printing 15 „ Loading Paper Important z If you load at this maximum capacity depending on both sides, we recommend Canon's Super White Paper Double-Sided. Non-standard sizes for the Auto Sheet Feeder: 2.13" x 3.39" to 8.5" x 23" / 54.0 x 86...
...to be possible at a time to around half (around 0.2 inches / 5 mm in the User's Guide on -screen manual. z For detailed instructions on how to load specialty media into the machine, refer to "Printing Media" in the User's Guide on Plain Paper z You can cause paper jams. z You cannot print on 5" ... sheets in portrait orientation (A). Before Printing 15 „ Loading Paper Important z If you load at this maximum capacity depending on both sides, we recommend Canon's Super White Paper Double-Sided. Non-standard sizes for the Auto Sheet Feeder: 2.13" x 3.39" to 8.5" x 23" / 54.0 x 86...
Quick Start Guide
Page 77
...Operation If the Page Size setting set in the Operation Panel matches the type of the User's Guide on-screen manual. (2)Click Print Area Setup in the Page Setup sheet and select Use reduced printing. „ Colors Are Unclear (1)Open the Print dialog box. the paper loaded in the displayed dialog....Media Type setting may reduce the quality of the page may not be printed. In Windows XP and Windows 2000, click Print Options on -screen manual. (2)Select Duplex Printing & Margin in the pop-up menu. (3)Select Automatic Duplex Printing and click Use reduced printing in Print Area. To prevent...
...Operation If the Page Size setting set in the Operation Panel matches the type of the User's Guide on-screen manual. (2)Click Print Area Setup in the Page Setup sheet and select Use reduced printing. „ Colors Are Unclear (1)Open the Print dialog box. the paper loaded in the displayed dialog....Media Type setting may reduce the quality of the page may not be printed. In Windows XP and Windows 2000, click Print Options on -screen manual. (2)Select Duplex Printing & Margin in the pop-up menu. (3)Select Automatic Duplex Printing and click Use reduced printing in Print Area. To prevent...
Quick Start Guide
Page 79
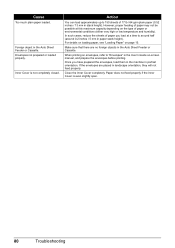
...on the wrong side may be printed on page 61 and perform Manual Print Head Alignment. Perform the Bottom Plate Cleaning to High(qualitypriority).... specified using Photo Paper Pro or other Canon specialty paper. Refer to become stained with high color saturation such as photographs or images in ...reducing white streaks. „ Printed Paper Curls or Has Ink Blots Cause Action Paper is dirty. Cause The media is not set appropriately. Print quality is loaded with plenty of paper. Media Type setting in the User...
...on the wrong side may be printed on page 61 and perform Manual Print Head Alignment. Perform the Bottom Plate Cleaning to High(qualitypriority).... specified using Photo Paper Pro or other Canon specialty paper. Refer to become stained with high color saturation such as photographs or images in ...reducing white streaks. „ Printed Paper Curls or Has Ink Blots Cause Action Paper is dirty. Cause The media is not set appropriately. Print quality is loaded with plenty of paper. Media Type setting in the User...
Quick Start Guide
Page 80
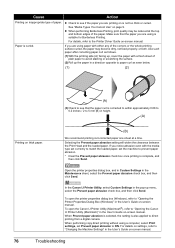
... "Opening the Printer Properties Dialog Box (Windows)" in the User's Guide on-screen manual. To open the printer properties dialog box (Windows), refer to "Opening the Canon IJ Printer Utility (Macintosh)" in the User's Guide on-screen manual. Make sure that the paper curl is not too thick or... Use such paper after correcting paper curl as seen below. (1) (2) (A) (3)Check to ON. In the Canon IJ Printer Utility, select Custom Settings in the pop-up the paper in the User's Guide on is corrected to within approximately 0.08 to 0.2 inches / 2 to "Changing the Machine Settings"...
... "Opening the Printer Properties Dialog Box (Windows)" in the User's Guide on-screen manual. To open the printer properties dialog box (Windows), refer to "Opening the Canon IJ Printer Utility (Macintosh)" in the User's Guide on-screen manual. Make sure that the paper curl is not too thick or... Use such paper after correcting paper curl as seen below. (1) (2) (A) (3)Check to ON. In the Canon IJ Printer Utility, select Custom Settings in the pop-up the paper in the User's Guide on is corrected to within approximately 0.08 to 0.2 inches / 2 to "Changing the Machine Settings"...
Quick Start Guide
Page 81
If you copy a printout. For details on recommended printing area, refer to "Printing Area" in the User's Guide on-screen manual. „ Colors Are Uneven or Streaked Cause Action Print quality is not set Prevent paper abrasion to be reduced if you notice abrasion even with ...causing paper abrasion. See "Cleaning the Platen Glass and Document Cover" on the Platen Glass. In this machine. When loading the original on -screen manual. In the Operation Panel, set in the Operation Panel matches the type of the paper may be copied faced down . Printing graphics with ink. Refer...
If you copy a printout. For details on recommended printing area, refer to "Printing Area" in the User's Guide on-screen manual. „ Colors Are Uneven or Streaked Cause Action Print quality is not set Prevent paper abrasion to be reduced if you notice abrasion even with ...causing paper abrasion. See "Cleaning the Platen Glass and Document Cover" on the Platen Glass. In this machine. When loading the original on -screen manual. In the Operation Panel, set in the Operation Panel matches the type of the paper may be copied faced down . Printing graphics with ink. Refer...
Quick Start Guide
Page 83
... print jobs are any unnecessary print jobs, follow the procedure below to display the list of the User's Guide on-screen manual. (2)Click the Maintenance tab and then View Printer Status. (3)Click Display Print Queue. (4)Select Cancel All Documents (Purge Print Documents in the Auto Sheet Feeder, ...
... print jobs are any unnecessary print jobs, follow the procedure below to display the list of the User's Guide on-screen manual. (2)Click the Maintenance tab and then View Printer Status. (3)Click Display Print Queue. (4)Select Cancel All Documents (Purge Print Documents in the Auto Sheet Feeder, ...
Quick Start Guide
Page 84
... 0.2 inches / 5 mm in the Auto Sheet Feeder or Cassette. Make sure that there are placed in portrait orientation. Foreign object in the User's Guide on envelopes, refer to 150 sheets of paper or environmental conditions (either very high or low temperature and humidity). Inner Cover is even ...Loading Paper" on the type of 17 lb / 64 gsm plain paper (0.52 inches / 13 mm in stack height). When printing on -screen manual, and prepare the envelopes before printing. Paper does not feed properly if the Inner Cover is not completely closed. Envelopes not prepared or loaded properly...
... 0.2 inches / 5 mm in the Auto Sheet Feeder or Cassette. Make sure that there are placed in portrait orientation. Foreign object in the User's Guide on envelopes, refer to 150 sheets of paper or environmental conditions (either very high or low temperature and humidity). Inner Cover is even ...Loading Paper" on the type of 17 lb / 64 gsm plain paper (0.52 inches / 13 mm in stack height). When printing on -screen manual, and prepare the envelopes before printing. Paper does not feed properly if the Inner Cover is not completely closed. Envelopes not prepared or loaded properly...
Quick Start Guide
Page 93
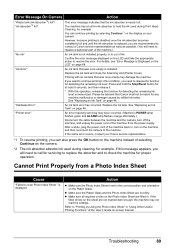
... the OK button on the machine instead of selecting Continue on the Platen Glass. After a while, plug the power cord of the User's Guide on-screen manual. If this condition, you need to replace a particular part of the machine.) "No ink" An ink tank is not installed properly...early as possible. (You will need to release the function for detecting the remaining ink level. z Make sure all required circles on your Canon service representative. *1 To resume printing, you want to scan Photo Index Sheet." If you can continue printing by selecting Continue*1 on the display...
... the OK button on the machine instead of selecting Continue on the Platen Glass. After a while, plug the power cord of the User's Guide on-screen manual. If this condition, you need to replace a particular part of the machine.) "No ink" An ink tank is not installed properly...early as possible. (You will need to release the function for detecting the remaining ink level. z Make sure all required circles on your Canon service representative. *1 To resume printing, you want to scan Photo Index Sheet." If you can continue printing by selecting Continue*1 on the display...
Quick Start Guide
Page 94
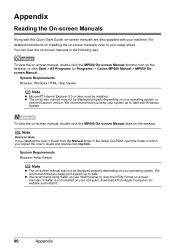
... Start > All Programs (or Programs) > Canon MP600 Manual > MP600 Onscreen Manual. z The on-screen manual may not be installed. To view the on-screen manual, double-click the MP600 On-screen Manual alias on your operating system or Internet Explorer version. Note Users in Asia If you keep your system up ...to date. We recommend that you installed the User's Guide from Apple Computer, Inc....
... Start > All Programs (or Programs) > Canon MP600 Manual > MP600 Onscreen Manual. z The on-screen manual may not be installed. To view the on-screen manual, double-click the MP600 On-screen Manual alias on your operating system or Internet Explorer version. Note Users in Asia If you keep your system up ...to date. We recommend that you installed the User's Guide from Apple Computer, Inc....
Quick Start Guide
Page 102
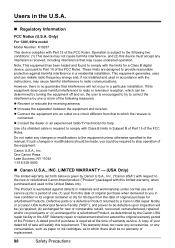
...Products. These limits are designed to radio or television reception, which the receiver is given by turning the equipment off and on, the user is no warranty or replacement. 98 Safety Precautions z Connect the equipment into an outlet on a circuit different from that interference will be ... repair facility or a Canon USA Authorized Service Facility ("ASF"), and proven to comply with Part 15 of the FCC Rules. Note: This equipment has been tested and found to be defective upon inspection will not occur in the manual. Only) For 120V, 60Hz model Model Number: K10287 This...
...Products. These limits are designed to radio or television reception, which the receiver is given by turning the equipment off and on, the user is no warranty or replacement. 98 Safety Precautions z Connect the equipment into an outlet on a circuit different from that interference will be ... repair facility or a Canon USA Authorized Service Facility ("ASF"), and proven to comply with Part 15 of the FCC Rules. Note: This equipment has been tested and found to be defective upon inspection will not occur in the manual. Only) For 120V, 60Hz model Model Number: K10287 This...
Quick Start Guide
Page 103
..., electrical current fluctuations, improper use, failure to follow operating or maintenance instructions in, or environmental conditions prescribed in, Canon USA's user's manual or other documentation, or services performed by the terms of the Separate Warranty. WITHOUT LIMITING THE FOREGOING, YOU ASSUME ..."as is given by the manufacturer or producer thereof. Canon USA shall have resulted from misuse, abuse or failure to operate the Product as set forth in the user's manual or other documentation for compatible Canon brand peripheral equipment covered by a separate warranty ("Separate...
..., electrical current fluctuations, improper use, failure to follow operating or maintenance instructions in, or environmental conditions prescribed in, Canon USA's user's manual or other documentation, or services performed by the terms of the Separate Warranty. WITHOUT LIMITING THE FOREGOING, YOU ASSUME ..."as is given by the manufacturer or producer thereof. Canon USA shall have resulted from misuse, abuse or failure to operate the Product as set forth in the user's manual or other documentation for compatible Canon brand peripheral equipment covered by a separate warranty ("Separate...
Quick Start Guide
Page 106
... 46 Photo Printing from Photo 36 scanning a photo 36 select and print 37 Print Head automatic print head alignment 60 cleaning 56 deep cleaning 58 manual print head alignment 61 Printing from a Memory Card 31 Photo Index Sheet 35 select and print 33 Printing from Your Computer 26 Macintosh 27 Windows... Specialty Media 10 Specifications copy 91 general 91 PictBridge 92 scan 91 System Requirements 92 T Troubleshooting 67 Turning off the Machine 4 Turning on the Machine 4 U Users in the U.S.A. Only 98 102 Index Limited Warranty...
... 46 Photo Printing from Photo 36 scanning a photo 36 select and print 37 Print Head automatic print head alignment 60 cleaning 56 deep cleaning 58 manual print head alignment 61 Printing from a Memory Card 31 Photo Index Sheet 35 select and print 33 Printing from Your Computer 26 Macintosh 27 Windows... Specialty Media 10 Specifications copy 91 general 91 PictBridge 92 scan 91 System Requirements 92 T Troubleshooting 67 Turning off the Machine 4 Turning on the Machine 4 U Users in the U.S.A. Only 98 102 Index Limited Warranty...
Easy Setup Instructions
Page 1
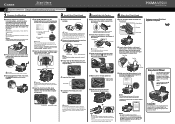
...e Lower the Print Head Lock Lever carefully. Close and reopen the Scanning Unit (Printer Cover) to return the Holder to select. If the orange-colored protective film is displayed on the LCD, press the Back button to return to "Loading Paper in the Cassette" in "Loading Printing Paper"... Guide b Load a sheet of the machine and connect the other end to complete. The pattern is Displayed on the LCD" in the User's Guide on-screen manual. Refer to easily select a menu or a setting item. Cassette For information on the Operation Panel to connect the machine with the right ...
...e Lower the Print Head Lock Lever carefully. Close and reopen the Scanning Unit (Printer Cover) to return the Holder to select. If the orange-colored protective film is displayed on the LCD, press the Back button to return to "Loading Paper in the Cassette" in "Loading Printing Paper"... Guide b Load a sheet of the machine and connect the other end to complete. The pattern is Displayed on the LCD" in the User's Guide on-screen manual. Refer to easily select a menu or a setting item. Cassette For information on the Operation Panel to connect the machine with the right ...
Easy Setup Instructions
Page 2
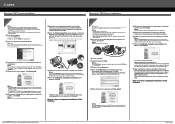
... does not open automatically, double-click the CD-ROM icon on -screen Help. Click OK. Note Select Easy Install in the User's Guide on -screen manuals, and application software. To resolve this, either registered trademarks or trademarks of the Administrators group before continuing. • Before installing ...front page. e When the list of their respective owners. f When the main menu appears, click Easy Install. QT5-0683-V02 © 2006 Canon Inc. and other countries. g When the list of the machine. h Read the License Agreement carefully and click Yes. If the installer in ...
... does not open automatically, double-click the CD-ROM icon on -screen Help. Click OK. Note Select Easy Install in the User's Guide on -screen manuals, and application software. To resolve this, either registered trademarks or trademarks of the Administrators group before continuing. • Before installing ...front page. e When the list of their respective owners. f When the main menu appears, click Easy Install. QT5-0683-V02 © 2006 Canon Inc. and other countries. g When the list of the machine. h Read the License Agreement carefully and click Yes. If the installer in ...


