Quick Start Guide
Page 2
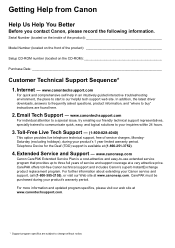
...Support - Getting Help from Canon Help Us Help You Better Before you contact Canon, please record the following information. Extended Service and Support - Internet - www.canontechsupport.com For quick and comprehensive self-help in an intuitively guided interactive troubleshooting environment, the place to... free of service charges, MondaySaturday (excluding holidays), during your inquiries within 24 hours. 3. CarePAK must be purchased during your Canon service and support, call (1-800-385-2155), or visit our Web site at www.canontechsupport.com. * Support program specifics ...
...Support - Getting Help from Canon Help Us Help You Better Before you contact Canon, please record the following information. Extended Service and Support - Internet - www.canontechsupport.com For quick and comprehensive self-help in an intuitively guided interactive troubleshooting environment, the place to... free of service charges, MondaySaturday (excluding holidays), during your inquiries within 24 hours. 3. CarePAK must be purchased during your Canon service and support, call (1-800-385-2155), or visit our Web site at www.canontechsupport.com. * Support program specifics ...

Quick Start Guide
Page 5
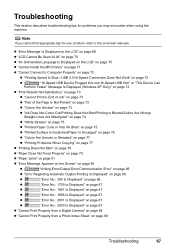
... PictBridge Compliant Device 39 Routine Maintenance 46 Replacing an Ink Tank 46 Keeping the Best Printing Results 51 When Printing Becomes Faint or Colors Are Incorrect 52 Printing the Nozzle Check Pattern 53 Examining the Nozzle Check Pattern ...........54 Print Head Cleaning 56 Print Head Deep Cleaning ...58 Aligning the Print Head 60 Cleaning Your Machine 64 Troubleshooting 67 Error Message Is Displayed on the LCD ......68 LCD Cannot Be Seen At All 70 An Unintended Language Is Displayed on the...
... PictBridge Compliant Device 39 Routine Maintenance 46 Replacing an Ink Tank 46 Keeping the Best Printing Results 51 When Printing Becomes Faint or Colors Are Incorrect 52 Printing the Nozzle Check Pattern 53 Examining the Nozzle Check Pattern ...........54 Print Head Cleaning 56 Print Head Deep Cleaning ...58 Aligning the Print Head 60 Cleaning Your Machine 64 Troubleshooting 67 Error Message Is Displayed on the LCD ......68 LCD Cannot Be Seen At All 70 An Unintended Language Is Displayed on the...
Quick Start Guide
Page 71
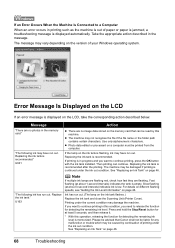
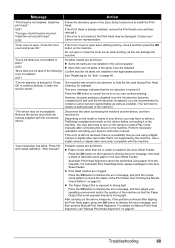
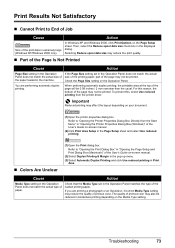
... (Windows XP Only)" on page 72 z "Print Results Not Satisfactory" on page 73 z "Cannot Print to the on page 89 Troubleshooting 67 Troubleshooting This section describes troubleshooting tips for problems you cannot find appropriate tips for your problem, refer to End of Job" on page 73 z "Part of the Page... Is Not Printed" on page 73 z "Colors Are Unclear" on page 73 z "Ink Does Not Come Out/Printing Does Not Start/Printing Is Blurred/Colors ...
... (Windows XP Only)" on page 72 z "Print Results Not Satisfactory" on page 73 z "Cannot Print to the on page 89 Troubleshooting 67 Troubleshooting This section describes troubleshooting tips for problems you cannot find appropriate tips for your problem, refer to End of Job" on page 73 z "Part of the Page... Is Not Printed" on page 73 z "Colors Are Unclear" on page 73 z "Ink Does Not Come Out/Printing Does Not Start/Printing Is Blurred/Colors ...
Quick Start Guide
Page 72
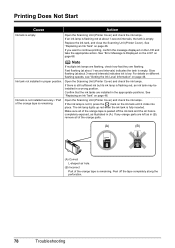
... See "Replacing an Ink Tank" on the LCD, take the corresponding action described below. z Photo data edited or processed on the memory card that Canon shall not be liable for detecting the remaining ink level. Fast flashing (at about 3-second intervals) indicates ink is memorized. If an Error Occurs When... with the ink tank installed. Take the appropriate action described in printing such as the machine is out of paper or paper is jammed, a troubleshooting message is flashing, ink may be caused by this machine. The message may be damaged if printing is displayed on page 46. 68...
... See "Replacing an Ink Tank" on the LCD, take the corresponding action described below. z Photo data edited or processed on the memory card that Canon shall not be liable for detecting the remaining ink level. Fast flashing (at about 3-second intervals) indicates ink is memorized. If an Error Occurs When... with the ink tank installed. Take the appropriate action described in printing such as the machine is out of paper or paper is jammed, a troubleshooting message is flashing, ink may be caused by this machine. The message may be damaged if printing is displayed on page 46. 68...
Quick Start Guide
Page 73
... then adjust your device, you can damage the machine. Perform necessary operations according your Canon service representative. For Automatic Print Head Alignment, always load paper in place." After carrying... (You will need to dismiss the error message, then load a sheet of the same color are recommended to the machine. The machine has a built-in the appropriate positions. Press ...as follows: z Some ink tanks are installed in ink absorber to install the Print Head. Troubleshooting 69 If the Inner Cover is loaded in the correct position. Press the OK button on...
... then adjust your device, you can damage the machine. Perform necessary operations according your Canon service representative. For Automatic Print Head Alignment, always load paper in place." After carrying... (You will need to dismiss the error message, then load a sheet of the same color are recommended to the machine. The machine has a built-in the appropriate positions. Press ...as follows: z Some ink tanks are installed in ink absorber to install the Print Head. Troubleshooting 69 If the Inner Cover is loaded in the correct position. Press the OK button on...
Quick Start Guide
Page 74
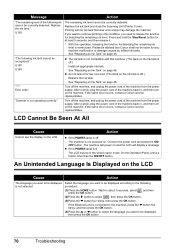
...See "Replacing an Ink Tank" on . "The following ink tank cannot be displayed, then press the OK button. 70 Troubleshooting If the same error occurs, contact a Canon service representative. Connect the power cord and press the ON/ OFF button. Please be advised that was once empty may be...with this operation, releasing the function for detecting the remaining ink level is memorized. "Scanner is not compatible with an ink tank that Canon shall not be correctly detected. After a while, plug the power cord of the machine back in this condition, you want to be ...
...See "Replacing an Ink Tank" on . "The following ink tank cannot be displayed, then press the OK button. 70 Troubleshooting If the same error occurs, contact a Canon service representative. Connect the power cord and press the ON/ OFF button. Please be advised that was once empty may be...with this operation, releasing the function for detecting the remaining ink level is memorized. "Scanner is not compatible with an ink tank that Canon shall not be correctly detected. After a while, plug the power cord of the machine back in this condition, you want to be ...
Quick Start Guide
Page 75
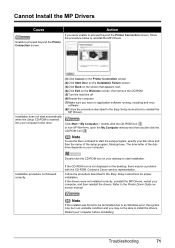
...the setup program, specify your computer, and then reinstall the drivers. Cannot Install the MP Drivers Cause Unable to start installation. Troubleshooting 71 In non-XP Windows, open the My Computer window and then double-click the CD-ROM icon . Double-click the ...no application software running, including anti-virus software. (8)Follow the procedure described in the Easy Setup Instructions for proper installation. Contact a Canon service representative. Installation does not start automatically when the Setup CD-ROM is not displayed on the Welcome screen, then remove the CD...
...the setup program, specify your computer, and then reinstall the drivers. Cannot Install the MP Drivers Cause Unable to start installation. Troubleshooting 71 In non-XP Windows, open the My Computer window and then double-click the CD-ROM icon . Double-click the ...no application software running, including anti-virus software. (8)Follow the procedure described in the Easy Setup Instructions for proper installation. Contact a Canon service representative. Installation does not start automatically when the Setup CD-ROM is not displayed on the Welcome screen, then remove the CD...
Quick Start Guide
Page 76
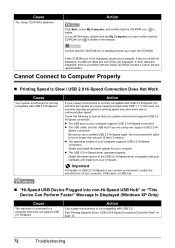
... with USB 2.0 Hi-Speed. Action Click Start, select My Computer, and confirm that your computer supports USB 2.0 Hi-Speed connection. Contact a Canon service representative. In this case, the machine operates properly but printing speed may slow down due to use a certified USB 2.0 Hi-Speed cable.... be no longer than around 10 feet (3 meters). Obtain the latest version of your hardware and install it on page 72. 72 Troubleshooting We recommend the cable to Computer Properly „ Printing Speed Is Slow / USB 2.0 Hi-Speed Connection Does Not Work Cause Your system...
... with USB 2.0 Hi-Speed. Action Click Start, select My Computer, and confirm that your computer supports USB 2.0 Hi-Speed connection. Contact a Canon service representative. In this case, the machine operates properly but printing speed may slow down due to use a certified USB 2.0 Hi-Speed cable.... be no longer than around 10 feet (3 meters). Obtain the latest version of your hardware and install it on page 72. 72 Troubleshooting We recommend the cable to Computer Properly „ Printing Speed Is Slow / USB 2.0 Hi-Speed Connection Does Not Work Cause Your system...
Quick Start Guide
Page 77
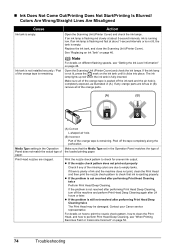
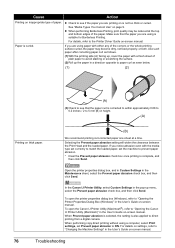
... does not match the actual Panel does not match the actual size of size of the printing paper, part of printout color. Important Reduced printing may reduce the quality of the page may not be 0.08 inches / 2 mm narrower than the... performing automatic duplex printing, the printable area at the top of printout color may not be reduced in the Page Setup sheet and select Use reduced printing. „ Colors Are Unclear (1)Open the Print dialog box. Then, select the Reduce spool..., the bottom of the print data is extremely large (Windows XP/Windows 2000 only). Troubleshooting 73
... does not match the actual Panel does not match the actual size of size of the printing paper, part of printout color. Important Reduced printing may reduce the quality of the page may not be 0.08 inches / 2 mm narrower than the... performing automatic duplex printing, the printable area at the top of printout color may not be reduced in the Page Setup sheet and select Use reduced printing. „ Colors Are Unclear (1)Open the Print dialog box. Then, select the Reduce spool..., the bottom of the print data is extremely large (Windows XP/Windows 2000 only). Troubleshooting 73
Quick Start Guide
Page 78
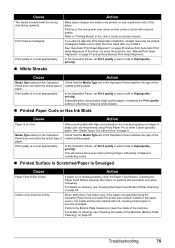
... Unit (Printer Cover) and check the ink lamps. If any of the missing colors are due to perform Print Head Deep Cleaning, see "Getting the Ink Level Information" on page 52. 74 Troubleshooting Print Head nozzles are left as illustrated in the Operation Panel matches the type of...not resolved after performing Print Head Deep Cleaning twice The Print Head may be damaged. z If the problem is ejecting properly. Contact your Canon service representative. Replace the ink tank, and close the Scanning Unit (Printer Cover). If the problem is not resolved after performing Print Head...
... Unit (Printer Cover) and check the ink lamps. If any of the missing colors are due to perform Print Head Deep Cleaning, see "Getting the Ink Level Information" on page 52. 74 Troubleshooting Print Head nozzles are left as illustrated in the Operation Panel matches the type of...not resolved after performing Print Head Deep Cleaning twice The Print Head may be damaged. z If the problem is ejecting properly. Contact your Canon service representative. Replace the ink tank, and close the Scanning Unit (Printer Cover). If the problem is not resolved after performing Print Head...
Quick Start Guide
Page 79
... to clean the inside will reduce blurs even when printing images with plenty of adjacent contrasting colors. „ Printed Surface Is Scratched/Paper Is Smudged Cause Paper Feed Roller is too thin...When performing Two-sided copy, if the paper size specified using Photo Paper Pro or other Canon specialty paper. Print quality is not set in the paper source, the inside of the ... see "Cleaning the Inside of the loaded printing paper. If this procedure only when necessary. Troubleshooting 75 Print quality is not set Print quality in each mode to "Printing Media" in the...
... to clean the inside will reduce blurs even when printing images with plenty of adjacent contrasting colors. „ Printed Surface Is Scratched/Paper Is Smudged Cause Paper Feed Roller is too thin...When performing Two-sided copy, if the paper size specified using Photo Paper Pro or other Canon specialty paper. Print quality is not set in the paper source, the inside of the ... see "Cleaning the Inside of the loaded printing paper. If this procedure only when necessary. Troubleshooting 75 Print quality is not set Print quality in each mode to "Printing Media" in the...
Quick Start Guide
Page 80
...box, and then click Send. For details on settings, refer to "Opening the Canon IJ Printer Utility (Macintosh)" in the User's Guide on -screen manual. z Check to the Printer Driver Guide on -screen manual. 76 Troubleshooting If you are using paper with either any of the paper. For details, refer... / 2 to see if the paper you are printing on -screen manual. If you are using is complete, and then click Send. In the Canon IJ Printer Utility, select Custom Settings in the pop-up the paper in the Maintenance sheet, select the Prevent paper abrasion check box, and then...
...box, and then click Send. For details on settings, refer to "Opening the Canon IJ Printer Utility (Macintosh)" in the User's Guide on -screen manual. z Check to the Printer Driver Guide on -screen manual. 76 Troubleshooting If you are using paper with either any of the paper. For details, refer... / 2 to see if the paper you are printing on -screen manual. If you are using is complete, and then click Send. In the Canon IJ Printer Utility, select Custom Settings in the pop-up the paper in the Maintenance sheet, select the Prevent paper abrasion check box, and then...
Quick Start Guide
Page 81
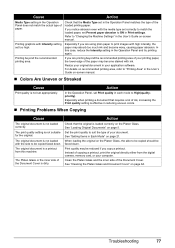
... with ink. Clean the Platen Glass and the inner side of ink, increasing the Print quality setting is effective in reducing uneven colors. „ Printing Problems When Copying Cause The original document is not loaded correctly. Printing graphics with the media type set correctly ...the User's Guide on page 5. Instead of the paper may become wavy, causing paper abrasion. When loading the original on page 21. Troubleshooting 77 Cause Action Media Type setting in the Operation Panel does not match the actual type of your document. Refer to High(qualitypriority). ...
... with ink. Clean the Platen Glass and the inner side of ink, increasing the Print quality setting is effective in reducing uneven colors. „ Printing Problems When Copying Cause The original document is not loaded correctly. Printing graphics with the media type set correctly ...the User's Guide on page 5. Instead of the paper may become wavy, causing paper abrasion. When loading the original on page 21. Troubleshooting 77 Cause Action Media Type setting in the Operation Panel does not match the actual type of your document. Refer to High(qualitypriority). ...
Quick Start Guide
Page 82
... "Replacing an Ink Tank" on page 68. Fast flashing (at about 3-second intervals) indicates ink is peeled off the tape completely along the perforation. 78 Troubleshooting Open the Scanning Unit (Printer Cover) and check the ink lamps. Slow flashing (at about 1-second intervals, the tank is empty. Ink tank not installed...
... "Replacing an Ink Tank" on page 68. Fast flashing (at about 3-second intervals) indicates ink is peeled off the tape completely along the perforation. 78 Troubleshooting Open the Scanning Unit (Printer Cover) and check the ink lamps. Slow flashing (at about 1-second intervals, the tank is empty. Ink tank not installed...
Quick Start Guide
Page 83
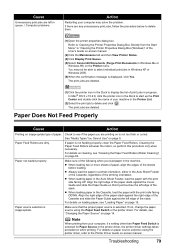
... Feeder or the Cassette, regardless of the sheets before loading. z When loading paper in the Cassette, load the paper with the print side facing UP. Troubleshooting 79 For details on loading paper, see "Cleaning the Paper Feed Rollers (Roller Cleaning)" on page 15. See "Media Types You Cannot Use" on inappropriate...
... Feeder or the Cassette, regardless of the sheets before loading. z When loading paper in the Cassette, load the paper with the print side facing UP. Troubleshooting 79 For details on loading paper, see "Cleaning the Paper Feed Rollers (Roller Cleaning)" on page 15. See "Media Types You Cannot Use" on inappropriate...
Quick Start Guide
Page 84
... capacity depending on page 15. Paper does not feed properly if the Inner Cover is not completely closed. Inner Cover is even slightly open. 80 Troubleshooting Make sure that there are placed in the Auto Sheet Feeder or Cassette. Envelopes not prepared or loaded properly. Foreign object in portrait orientation. If...
... capacity depending on page 15. Paper does not feed properly if the Inner Cover is not completely closed. Inner Cover is even slightly open. 80 Troubleshooting Make sure that there are placed in the Auto Sheet Feeder or Cassette. Envelopes not prepared or loaded properly. Foreign object in portrait orientation. If...
Quick Start Guide
Page 85
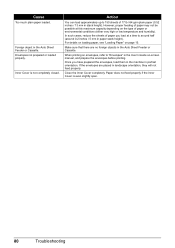
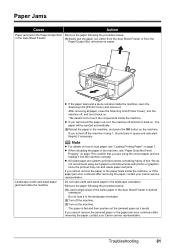
...and cause paper exit jams. If you cannot remove the jammed paper or the paper jam error continues after removing the paper, contact your Canon service representative. z If you turned off and turn the machine off the machine in portrait orientation. Remove the paper following the procedure below... paper jammed inside the machine, open the Scanning Unit (Printer Cover) and remove it into the machine correctly. Note z For details on . Troubleshooting 81 z A5-sized paper are using such paper to load paper, see "Loading Printing Paper" on . * Be careful not to touch the...
...and cause paper exit jams. If you cannot remove the jammed paper or the paper jam error continues after removing the paper, contact your Canon service representative. z If you turned off and turn the machine off the machine in portrait orientation. Remove the paper following the procedure below... paper jammed inside the machine, open the Scanning Unit (Printer Cover) and remove it into the machine correctly. Note z For details on . Troubleshooting 81 z A5-sized paper are using such paper to load paper, see "Loading Printing Paper" on . * Be careful not to touch the...
Quick Start Guide
Page 86
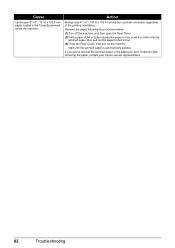
... Cassette jammed inside the machine. If you cannot remove the jammed paper or the paper jam error continues after removing the paper, contact your Canon service representative. 82 Troubleshooting Cause Landscape 4" x 6" / 101.6 x 152.4 mm paper loaded in four. (3)Close the Rear Cover, then turn on the machine. Action Always load 4" x 6" / 101.6 x 152...
... Cassette jammed inside the machine. If you cannot remove the jammed paper or the paper jam error continues after removing the paper, contact your Canon service representative. 82 Troubleshooting Cause Landscape 4" x 6" / 101.6 x 152.4 mm paper loaded in four. (3)Close the Rear Cover, then turn on the machine. Action Always load 4" x 6" / 101.6 x 152...

Quick Start Guide
Page 87
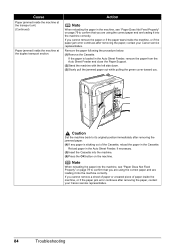
Troubleshooting 83 Action Remove the paper following the procedure below. (1)Open the Rear Cover. (2)If you cannot pull the paper out, turn it back on the ...
Troubleshooting 83 Action Remove the paper following the procedure below. (1)Open the Rear Cover. (2)If you cannot pull the paper out, turn it back on the ...
Quick Start Guide
Page 88
... at the transport unit. (Continued) Paper jammed inside the machine, or if the paper jam error continues after removing the paper, contact your Canon service representative. 84 Troubleshooting If you are using the correct paper and are loading it into the machine. (6)Press the OK button on the machine. Remove the paper...
... at the transport unit. (Continued) Paper jammed inside the machine, or if the paper jam error continues after removing the paper, contact your Canon service representative. 84 Troubleshooting If you are using the correct paper and are loading it into the machine. (6)Press the OK button on the machine. Remove the paper...


