
Quick Start Guide
Page 8
... tanks are installed. Important If the ALARM lamp lights up or flashes orange and an error message is removed from the wall outlet with the POWER lamp still lit or flashing green, the machine may become unable to a computer, confirm also the following . See "Keeping the Best Printing ...Results" on the machine, confirm the following . Note If preparatory operations above are using the machine connected to print. If the power plug is displayed on the LCD, see "Error Message Is Displayed on the LCD" on your computer (or a compatible device). You cannot change ...
... tanks are installed. Important If the ALARM lamp lights up or flashes orange and an error message is removed from the wall outlet with the POWER lamp still lit or flashing green, the machine may become unable to a computer, confirm also the following . See "Keeping the Best Printing ...Results" on the machine, confirm the following . Note If preparatory operations above are using the machine connected to print. If the power plug is displayed on the LCD, see "Error Message Is Displayed on the LCD" on your computer (or a compatible device). You cannot change ...
Quick Start Guide
Page 55
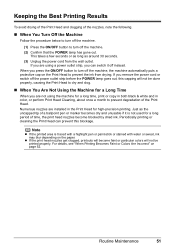
... ON/OFF button to turn off instead. Just as around 30 seconds. (3) Unplug the power cord from drying. z If the print head nozzles get clogged, printouts will become blocked by dried ink. When you are installed in color, or perform Print Head Cleaning, about once a month to prevent degradation of the Print... You Turn Off the Machine Follow the procedure below to turn off the machine. (1) Press the ON/OFF button to turn off the power outlet strip before the POWER lamp goes out, this capping will not be done properly, causing the Print Head to dry and clog. „ When You Are Not...
... ON/OFF button to turn off instead. Just as around 30 seconds. (3) Unplug the power cord from drying. z If the print head nozzles get clogged, printouts will become blocked by dried ink. When you are installed in color, or perform Print Head Cleaning, about once a month to prevent degradation of the Print... You Turn Off the Machine Follow the procedure below to turn off the machine. (1) Press the ON/OFF button to turn off the power outlet strip before the POWER lamp goes out, this capping will not be done properly, causing the Print Head to dry and clog. „ When You Are Not...
Quick Start Guide
Page 62
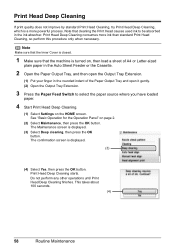
... a more ink than standard Print Head Cleaning, so perform this procedure only when necessary. Print Head Deep Cleaning starts. Print Head Deep Cleaning consumes more powerful process. Note that the machine is turned on page 2. (2) Select Maintenance, then press the OK button.
... a more ink than standard Print Head Cleaning, so perform this procedure only when necessary. Print Head Deep Cleaning starts. Print Head Deep Cleaning consumes more powerful process. Note that the machine is turned on page 2. (2) Select Maintenance, then press the OK button.

Quick Start Guide
Page 68
... sure that the Inner Cover is closed. 1 Make sure that is needed to clean. 64 Routine Maintenance Use a soft cloth to turn off the power and disconnect the power cord before cleaning the machine. Caution z Be sure to avoid scratching the components. these can damage the machine's components. „ Cleaning the Platen...
... sure that the Inner Cover is closed. 1 Make sure that is needed to clean. 64 Routine Maintenance Use a soft cloth to turn off the power and disconnect the power cord before cleaning the machine. Caution z Be sure to avoid scratching the components. these can damage the machine's components. „ Cleaning the Platen...
Quick Start Guide
Page 74
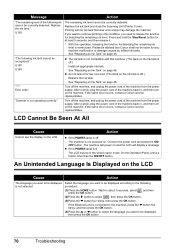
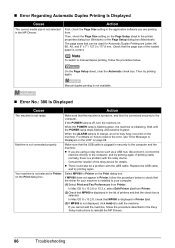
...An Ink tank error has occurred. (The lamp on the ink tank is not powered on the ink tank is not operating correctly." If the same error occurs, contact a Canon service representative. After a while, plug the power cord of the machine back in this machine. (The lamp on . Action z ...be recognized." "**** Error code" Turn off the machine, and unplug the power cord of the machine from the power supply. Connect the power cord and press the ON/ OFF button. If the same error occurs, contact a Canon service representative. An Unintended Language Is Displayed on the LCD. Wait for...
...An Ink tank error has occurred. (The lamp on the ink tank is not powered on the ink tank is not operating correctly." If the same error occurs, contact a Canon service representative. After a while, plug the power cord of the machine back in this machine. (The lamp on . Action z ...be recognized." "**** Error code" Turn off the machine, and unplug the power cord of the machine from the power supply. Connect the power cord and press the ON/ OFF button. If the same error occurs, contact a Canon service representative. An Unintended Language Is Displayed on the LCD. Wait for...
Quick Start Guide
Page 89
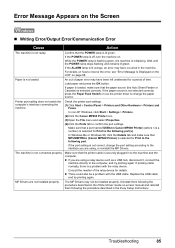
... to confirm the port settings. In Windows Me or Windows 98, click the Details tab and make sure that MPUSBPRNnn (Canon MP600 Printer) is initializing. Error Message Appears on . While the POWER lamp is flashing green, the machine is selected for Print to the following the procedure described in the Easy Setup Instructions...
... to confirm the port settings. In Windows Me or Windows 98, click the Details tab and make sure that MPUSBPRNnn (Canon MP600 Printer) is initializing. Error Message Appears on . While the POWER lamp is flashing green, the machine is selected for Print to the following the procedure described in the Easy Setup Instructions...
Quick Start Guide
Page 90
... the machine. Make sure that the check box is not ready. z There could also be used for details. If the POWER lamp is plugged in Printer on page 68. Select MP600 in securely to resolve the error, see "Error Message Is Displayed on the LCD" on the Print dialog box. Make sure...again. Then, check the Page Size setting on the Print dialog box. On the Page Setup sheet, clear the Automatic check box. If MP600 does not appear in the MP Drivers. While the POWER lamp is flashing green, the machine is not selected in Printer, follow the procedure below to the computer.
... the machine. Make sure that the check box is not ready. z There could also be used for details. If the POWER lamp is plugged in Printer on page 68. Select MP600 in securely to resolve the error, see "Error Message Is Displayed on the LCD" on the Print dialog box. Make sure...again. Then, check the Page Size setting on the Print dialog box. On the Page Setup sheet, clear the Automatic check box. If MP600 does not appear in the MP Drivers. While the POWER lamp is flashing green, the machine is not selected in Printer, follow the procedure below to the computer.
Quick Start Guide
Page 93
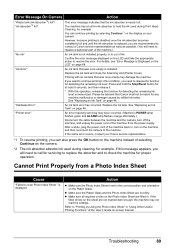
... Sheet are not marked dark enough, the machine may have occurred. (Machine's POWER lamp flashes green and ALARM lamp flashes orange alternately.) Disconnect the cable between the machine and the camera, turn on your Canon service representative. *1 To resume printing, you are filled in the correct position ... the Photo Index Sheet" in "Using Other Useful Printing Functions" of the machine back in, turn off the machine, and unplug the power cord of selecting Continue on the machine instead of the machine from a Photo Index Sheet Cause "Failed to check the machine for example....
... Sheet are not marked dark enough, the machine may have occurred. (Machine's POWER lamp flashes green and ALARM lamp flashes orange alternately.) Disconnect the cable between the machine and the camera, turn on your Canon service representative. *1 To resume printing, you are filled in the correct position ... the Photo Index Sheet" in "Using Other Useful Printing Functions" of the machine back in, turn off the machine, and unplug the power cord of selecting Continue on the machine instead of the machine from a Photo Index Sheet Cause "Failed to check the machine for example....
Quick Start Guide
Page 95
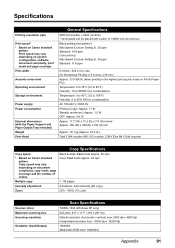
... 16bit/8bit) Appendix 91 Specifications Printing resolution (dpi) Print speed* * Based on Canon standard pattern. Black printing (text pattern) Max Speed (Custom Setting 5): 30 ppm Standard: 14.8 ppm Color printing Max Speed (Custom Setting 5): 24 ppm Standard: 11.6 ppm 8 inches /...mode, page coverage and the number of 1/9600 inch at minimum. Print width Acoustic noise level Operating environment Storage environment Power supply Power consumption External dimensions (with the Paper Support and Paper Output Tray retracted) Weight Print Head General Specifications 9600 (horizontal)*...
... 16bit/8bit) Appendix 91 Specifications Printing resolution (dpi) Print speed* * Based on Canon standard pattern. Black printing (text pattern) Max Speed (Custom Setting 5): 30 ppm Standard: 14.8 ppm Color printing Max Speed (Custom Setting 5): 24 ppm Standard: 11.6 ppm 8 inches /...mode, page coverage and the number of 1/9600 inch at minimum. Print width Acoustic noise level Operating environment Storage environment Power supply Power consumption External dimensions (with the Paper Support and Paper Output Tray retracted) Weight Print Head General Specifications 9600 (horizontal)*...

Quick Start Guide
Page 98
... the machine safely. Warning You may cause fire, electric shock, or damage to flammable solvents such as alcohol or thinners. Choosing a location Power supply Do not place the machine close to the machine, depending on the plug absorbs moisture and may cause insulation failure and fire. If you... ignore any dust or dirt collected on the power cord. Leaving the machine plugged in may cause an electric shock, fire, or damage the machine if you detect smoke, unusual smells or...
... the machine safely. Warning You may cause fire, electric shock, or damage to flammable solvents such as alcohol or thinners. Choosing a location Power supply Do not place the machine close to the machine, depending on the plug absorbs moisture and may cause insulation failure and fire. If you... ignore any dust or dirt collected on the power cord. Leaving the machine plugged in may cause an electric shock, fire, or damage the machine if you detect smoke, unusual smells or...

Quick Start Guide
Page 99
..., install the machine in this guide. Do not attempt to excessive vibration. Maintaining the machine Working around the machine Always unplug the machine from the power outlet before cleaning the machine. Never use highly flammable sprays near the machine. If flammable solvents come in contact with electrical components inside the machine...
..., install the machine in this guide. Do not attempt to excessive vibration. Maintaining the machine Working around the machine Always unplug the machine from the power outlet before cleaning the machine. Never use highly flammable sprays near the machine. If flammable solvents come in contact with electrical components inside the machine...

Quick Start Guide
Page 100
... touch the electrical contacts on the cord. Do not throw ink tanks into the machine, unplug the power cord and call for the machine in the machine while it is kept clear at all times so... the machine. Never remove the plug by pulling on a Print Head after printing. Do not use a power supply source other than the one rated for service. AC 100-240 V, 50/60 Hz Never put your... cause burns. When loading a thick book on the Platen Glass, do not press hard on the machine. Power supply Ensure that the area around the machine Print Heads and ink tanks Never use an extension lead/cord....
... touch the electrical contacts on the cord. Do not throw ink tanks into the machine, unplug the power cord and call for the machine in the machine while it is kept clear at all times so... the machine. Never remove the plug by pulling on a Print Head after printing. Do not use a power supply source other than the one rated for service. AC 100-240 V, 50/60 Hz Never put your... cause burns. When loading a thick book on the Platen Glass, do not press hard on the machine. Power supply Ensure that the area around the machine Print Heads and ink tanks Never use an extension lead/cord....
Easy Setup Instructions
Page 1
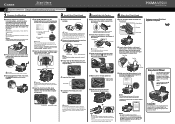
... the Paper Output Tray, put your product. appears, go to the center. Scanning Unit (Printer Cover) d Insert the Print Head. Refer to the color guide on the Operation Panel to "Basic Operation for the Operation Panel" in the User's Guide on print quality. Easy-Scroll Wheel Turn the Easy... the Back button to return to the wall outlet. Important Do not connect the USB cable until the machine stops making noise. b Plug the power cord in the rounded indent of the machine and connect the other end to the Language selection screen. e Open the Scanning Unit (Printer Cover)...
... the Paper Output Tray, put your product. appears, go to the center. Scanning Unit (Printer Cover) d Insert the Print Head. Refer to the color guide on the Operation Panel to "Basic Operation for the Operation Panel" in the User's Guide on print quality. Easy-Scroll Wheel Turn the Easy... the Back button to return to the wall outlet. Important Do not connect the USB cable until the machine stops making noise. b Plug the power cord in the rounded indent of the machine and connect the other end to the Language selection screen. e Open the Scanning Unit (Printer Cover)...
Easy Setup Instructions
Page 2
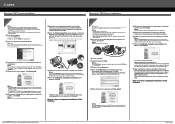
... trademarks or trademarks of the machine. k After restarting the computer, start Printer Setup Utility (start Windows. QT5-0683-V02 © 2006 Canon Inc. Macintosh and Mac are using Windows Me/98, Adobe RGB cannot be detected. Follow the on the front page. The software will ...need your product serial number, which is displayed, make sure that the POWER lamp stops flashing. Important If you would like to install. g When the list of each application. j When the Installation completed ...
... trademarks or trademarks of the machine. k After restarting the computer, start Printer Setup Utility (start Windows. QT5-0683-V02 © 2006 Canon Inc. Macintosh and Mac are using Windows Me/98, Adobe RGB cannot be detected. Follow the on the front page. The software will ...need your product serial number, which is displayed, make sure that the POWER lamp stops flashing. Important If you would like to install. g When the list of each application. j When the Installation completed ...


