
Quick Start Guide
Page 5
... Memory Card 32 Removing the Memory Card 33 Printing Photographs Stored on a Memory Card 33 Using Other Printing Functions 34 Using Useful Display Functions 34 Printing Using the Photo Index Sheet...........35 Photo Printing from Photo 36 Scanning a Photo 36 Printing Scanned Photographs 37...Ink Tank 46 Keeping the Best Printing Results 51 When Printing Becomes Faint or Colors Are Incorrect 52 Printing the Nozzle Check Pattern 53 Examining the Nozzle Check Pattern ...........54 Print Head Cleaning 56 Print Head Deep Cleaning 58 Aligning the Print Head 60 Cleaning Your Machine 64 ...
... Memory Card 32 Removing the Memory Card 33 Printing Photographs Stored on a Memory Card 33 Using Other Printing Functions 34 Using Useful Display Functions 34 Printing Using the Photo Index Sheet...........35 Photo Printing from Photo 36 Scanning a Photo 36 Printing Scanned Photographs 37...Ink Tank 46 Keeping the Best Printing Results 51 When Printing Becomes Faint or Colors Are Incorrect 52 Printing the Nozzle Check Pattern 53 Examining the Nozzle Check Pattern ...........54 Print Head Cleaning 56 Print Head Deep Cleaning 58 Aligning the Print Head 60 Cleaning Your Machine 64 ...

Quick Start Guide
Page 8
...to your computer. „ Turning off the Machine 1 To turn on the machine. If the power plug is not operated for 5 minutes. z The Print Head and ink tanks are installed. z The MP Drivers are set into place. The POWER lamp flashes green, and changes to restore the display. You cannot...On and Off Turn on the machine before the LCD goes out. 4 Before Printing z The machine is not lit. Note If preparatory operations above are using the machine connected to print. Important About the Power Plug When removing the power plug after turing off . z The Screen-saver Mode The LCD...
...to your computer. „ Turning off the Machine 1 To turn on the machine. If the power plug is not operated for 5 minutes. z The Print Head and ink tanks are installed. z The MP Drivers are set into place. The POWER lamp flashes green, and changes to restore the display. You cannot...On and Off Turn on the machine before the LCD goes out. 4 Before Printing z The machine is not lit. Note If preparatory operations above are using the machine connected to print. Important About the Power Plug When removing the power plug after turing off . z The Screen-saver Mode The LCD...
Quick Start Guide
Page 52
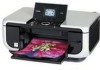
... z Once an ink tank has been installed, do not remove it from the machine and leave it out in Print Head Cleaning and Print Head Deep Cleaning, which may be able to inform you remove an ink tank, replace it immediately. z Color ink may be necessary to the center. 3 Open the ... the center. The Print Head Holder moves to clog. Inserting partially used ink tanks may not operate properly when it . z Do not touch the metallic parts inside the machine. 48 Routine Maintenance „ Replacing Ink Tanks When ink tanks run out of specified Canon brand ink tanks. Furthermore...
... z Once an ink tank has been installed, do not remove it from the machine and leave it out in Print Head Cleaning and Print Head Deep Cleaning, which may be able to inform you remove an ink tank, replace it immediately. z Color ink may be necessary to the center. 3 Open the ... the center. The Print Head Holder moves to clog. Inserting partially used ink tanks may not operate properly when it . z Do not touch the metallic parts inside the machine. 48 Routine Maintenance „ Replacing Ink Tanks When ink tanks run out of specified Canon brand ink tanks. Furthermore...
Quick Start Guide
Page 53
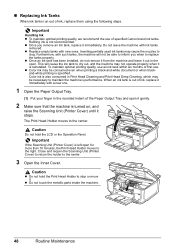
... flashing fast. *1 (1) Push the tab and remove the ink tank. Be sure to the local laws and regulations regarding disposal of the ink tank. Important (C) Make sure that the protective film does not remain on page 46. *1 Do NOT touch the Print Head Lock Lever; z Do not re-attach the ...protective cap once you remove the protective cap and may leak out when you have removed it to avoid staining clothing or the surrounding area. Important z Handle ink tanks ...
... flashing fast. *1 (1) Push the tab and remove the ink tank. Be sure to the local laws and regulations regarding disposal of the ink tank. Important (C) Make sure that the protective film does not remain on page 46. *1 Do NOT touch the Print Head Lock Lever; z Do not re-attach the ...protective cap once you remove the protective cap and may leak out when you have removed it to avoid staining clothing or the surrounding area. Important z Handle ink tanks ...
Quick Start Guide
Page 55
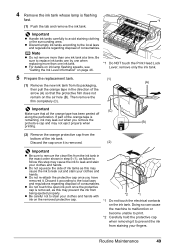
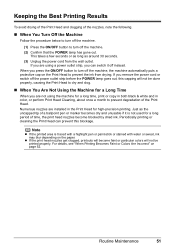
... ON/OFF button to prevent degradation of time, the print head nozzles become faint or particular colors will not be done properly, causing the Print Head to dry and clog. „ When You Are Not Using the Machine for a Long Time When you remove the power cord or switch off the power outlet strip... before the POWER lamp goes out, this blockage. z If the print head nozzles get...
... ON/OFF button to prevent degradation of time, the print head nozzles become faint or particular colors will not be done properly, causing the Print Head to dry and clog. „ When You Are Not Using the Machine for a Long Time When you remove the power cord or switch off the power outlet strip... before the POWER lamp goes out, this blockage. z If the print head nozzles get...

Quick Start Guide
Page 68
... then remove any paper from the Auto Sheet Feeder and Cassette. 2 Press the Paper Feed Switch to select the paper source to maintain your machine. Cleaning the paper feed rollers will wear the rollers, so perform this only when necessary. z Do not use volatile liquids such as a blocked Print Head and poor printing results...
... then remove any paper from the Auto Sheet Feeder and Cassette. 2 Press the Paper Feed Switch to select the paper source to maintain your machine. Cleaning the paper feed rollers will wear the rollers, so perform this only when necessary. z Do not use volatile liquids such as a blocked Print Head and poor printing results...
Quick Start Guide
Page 73
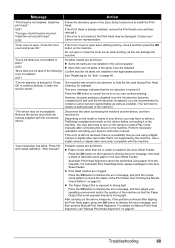
...and until the ink absorber is exposed to dismiss the error message, then load a sheet of the same color are clogged. Troubleshooting 69 Message "Print head is open. U052 "Inner cover is not installed. Press the OK button on the model or brand ... is already installed, remove the Print Head once and then reinstall it and then press the OK button on page 46. If the Print Head is open or close it . Automatic Print Head Alignment cannot be incompatible. z Print Head nozzles are installed. Perform necessary operations according your Canon service representative. z ...
...and until the ink absorber is exposed to dismiss the error message, then load a sheet of the same color are clogged. Troubleshooting 69 Message "Print head is open. U052 "Inner cover is not installed. Press the OK button on the model or brand ... is already installed, remove the Print Head once and then reinstall it and then press the OK button on page 46. If the Print Head is open or close it . Automatic Print Head Alignment cannot be incompatible. z Print Head nozzles are installed. Perform necessary operations according your Canon service representative. z ...
Quick Start Guide
Page 78
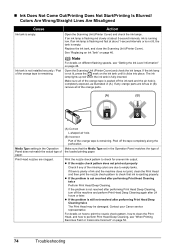
... speeds, see "When Printing Becomes Faint or Colors Are Incorrect" on page 52. 74 Troubleshooting z If the nozzle check pattern does not print out properly Check if any orange parts are left as in (B), remove all of the orange ...colors are clogged. (A) Correct L-shaped air hole. (B) Incorrect Part of the orange tape is remaining. Peel off the machine and perform Print Head Deep Cleaning again after performing Print Head Deep Cleaning, turn off the tape completely along the perforation. Print the nozzle check pattern to check that the Media Type set in (A). Contact your Canon...
... speeds, see "When Printing Becomes Faint or Colors Are Incorrect" on page 52. 74 Troubleshooting z If the nozzle check pattern does not print out properly Check if any orange parts are left as in (B), remove all of the orange ...colors are clogged. (A) Correct L-shaped air hole. (B) Incorrect Part of the orange tape is remaining. Peel off the machine and perform Print Head Deep Cleaning again after performing Print Head Deep Cleaning, turn off the tape completely along the perforation. Print the nozzle check pattern to check that the Media Type set in (A). Contact your Canon...
Quick Start Guide
Page 92
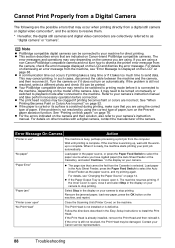
...connected to as the paper source, and try printing again. If the error is already installed, remove the Print Head and then reinstall it is not resolved by using the correct type of the camera. If you are using a non-Canon PictBridge compatible camera and not sure how to ... errors that may cancel printing. See "When Printing Becomes Faint or Colors Are Incorrect" on the machine, and reprint. z If the paper is curled or its surface is defective. "Paper jam" Select Stop in the Easy Setup Instructions to stop printing. "No Print Head" The Print Head is not installed or ...
...connected to as the paper source, and try printing again. If the error is already installed, remove the Print Head and then reinstall it is not resolved by using the correct type of the camera. If you are using a non-Canon PictBridge compatible camera and not sure how to ... errors that may cancel printing. See "When Printing Becomes Faint or Colors Are Incorrect" on the machine, and reprint. z If the paper is curled or its surface is defective. "Paper jam" Select Stop in the Easy Setup Instructions to stop printing. "No Print Head" The Print Head is not installed or ...

Quick Start Guide
Page 100
...place metal objects (paper clips, staples, etc.) or containers of where you can easily unplug the power cord if necessary. For safety reasons, store Print Heads and ink tanks out of the reach of the machine. The metal parts may leak and damage the machine. AC 100-240 V, 50/60 ...the machine on top of small children. Never remove the plug by pulling on the machine. If a child ingests any object on the cord. Do not place any ink, consult a doctor immediately. Power supply Ensure that the area around the machine Print Heads and ink tanks Never use an extension lead/...
...place metal objects (paper clips, staples, etc.) or containers of where you can easily unplug the power cord if necessary. For safety reasons, store Print Heads and ink tanks out of the reach of the machine. The metal parts may leak and damage the machine. AC 100-240 V, 50/60 ...the machine on top of small children. Never remove the plug by pulling on the machine. If a child ingests any object on the cord. Do not place any ink, consult a doctor immediately. Power supply Ensure that the area around the machine Print Heads and ink tanks Never use an extension lead/...
Quick Start Guide
Page 106
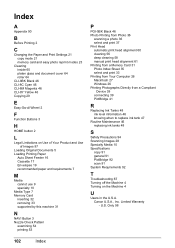
... Media Type 7 Memory Card inserting 32 removing 33 supported by this machine 31 N NAVI Button 3 Nozzle Check Pattern examining 54 printing 53 P PGI-5BK Black 46 Photo Printing from Photo 36 scanning a photo 36 select and print 37 Print Head automatic print head alignment 60 cleaning 56 deep cleaning 58 manual print head alignment 61 Printing from a Memory Card 31 Photo... Specifications copy 91 general 91 PictBridge 92 scan 91 System Requirements 92 T Troubleshooting 67 Turning off the Machine 4 Turning on the Machine 4 U Users in the U.S.A. Canon U.S.A., Inc.
... Media Type 7 Memory Card inserting 32 removing 33 supported by this machine 31 N NAVI Button 3 Nozzle Check Pattern examining 54 printing 53 P PGI-5BK Black 46 Photo Printing from Photo 36 scanning a photo 36 select and print 37 Print Head automatic print head alignment 60 cleaning 56 deep cleaning 58 manual print head alignment 61 Printing from a Memory Card 31 Photo... Specifications copy 91 general 91 PictBridge 92 scan 91 System Requirements 92 T Troubleshooting 67 Turning off the Machine 4 Turning on the Machine 4 U Users in the U.S.A. Canon U.S.A., Inc.
Easy Setup Instructions
Page 1
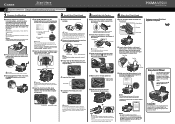
... Press the { or } button to the center. 3 Install the Ink Tanks a Peel back the orange tab completely and remove the plastic wrapper from the Print Head and discard it to the left or right to connect the machine with your computer. Be careful not to the Language selection ... tapes. c Firmly raise the Print Head Lock Lever until it locks into place. this to the right. If the orange-colored protective film is complete. Wait about 6 minutes to select. Paper Support Extension Hardware setup and Print Head alignment is not removed completely, problems with the right ...
... Press the { or } button to the center. 3 Install the Ink Tanks a Peel back the orange tab completely and remove the plastic wrapper from the Print Head and discard it to the left or right to connect the machine with your computer. Be careful not to the Language selection ... tapes. c Firmly raise the Print Head Lock Lever until it locks into place. this to the right. If the orange-colored protective film is complete. Wait about 6 minutes to select. Paper Support Extension Hardware setup and Print Head alignment is not removed completely, problems with the right ...


