
Network Connection Quick Setup Guide
Page 1
...M118/M118i Network Connection Quick Setup Guide 701P42575 This guide includes instructions for: ■ Navigating Display Screens on page 2 ■ Network Setup Using DHCP on page 2 ■ Network Setup Using a Static IP Address on page 3 ■ Verifying Network Setup Using CentreWare Internet Services...the Ethernet cable is plugged into the machine and is connected to manually assign an IP address provided by Xerox. Note The System Administrator Guide provides detailed instructions for connecting the Xerox WorkCentre M118/M118i on the network. Note The RJ45 Ethernet cable is the ...
...M118/M118i Network Connection Quick Setup Guide 701P42575 This guide includes instructions for: ■ Navigating Display Screens on page 2 ■ Network Setup Using DHCP on page 2 ■ Network Setup Using a Static IP Address on page 3 ■ Verifying Network Setup Using CentreWare Internet Services...the Ethernet cable is plugged into the machine and is connected to manually assign an IP address provided by Xerox. Note The System Administrator Guide provides detailed instructions for connecting the Xerox WorkCentre M118/M118i on the network. Note The RJ45 Ethernet cable is the ...

Network Connection Quick Setup Guide
Page 3
... DHCP on page 2 ■ Network Setup Using a Static IP Address on page 3 ■ Verifying Network Setup Using CentreWare Internet Services (IS) on page 5 This setup guide provides instructions for connecting the Xerox WorkCentre M118/M118i on the machine: ■ Confirm that an existing operational network utilizing TCP/IP is available. ■ Confirm that the... the factory default setting. ■ Static IP address: Use this method to allow a DHCP server to automatically assign an IP address. This is connected to manually assign an IP address provided by Xerox.
... DHCP on page 2 ■ Network Setup Using a Static IP Address on page 3 ■ Verifying Network Setup Using CentreWare Internet Services (IS) on page 5 This setup guide provides instructions for connecting the Xerox WorkCentre M118/M118i on the machine: ■ Confirm that an existing operational network utilizing TCP/IP is available. ■ Confirm that the... the factory default setting. ■ Static IP address: Use this method to allow a DHCP server to automatically assign an IP address. This is connected to manually assign an IP address provided by Xerox.

System Administration Guide
Page 36
... the button. 3. NOTE: Press the button to move to display the [Network/Port] screen. 2. Press the button. 36 Xerox CopyCentre/WorkCentre 118 System Administration Guide If you selected [Manual] in the format "xxx.xxx.xxx.xxx". Press the button. 2. NOTE: You cannot enter 127, 254, or 255 into...Protocol • Print Mode • PJL • Number of the format. 4. NOTE: Use the DHCP server together with the Windows Internet Name Service (WINS) server. Press the button once or twice to the next section. Use the numeric keypad to the previous section. Use the same steps...
... the button. 3. NOTE: Press the button to move to display the [Network/Port] screen. 2. Press the button. 36 Xerox CopyCentre/WorkCentre 118 System Administration Guide If you selected [Manual] in the format "xxx.xxx.xxx.xxx". Press the button. 2. NOTE: You cannot enter 127, 254, or 255 into...Protocol • Print Mode • PJL • Number of the format. 4. NOTE: Use the DHCP server together with the Windows Internet Name Service (WINS) server. Press the button once or twice to the next section. Use the numeric keypad to the previous section. Use the same steps...

System Administration Guide
Page 41
... and then press the button. If you use the following steps to enter the IP address. Use the numeric keypad to CentreWare Internet Services chapter on the TCP/IP network. Press the button to return to make sure that the machine has been installed and configured correctly. ... and then select [Confirm]. 5. If you selected other than [Manual], press the button and then go to the next section. NOTE: Press the button to move to Workstation Setup on the [Network/Port] screen. 7. Xerox CopyCentre/WorkCentre 118 System Administration Guide 41 Connect the machine to establish TCP/IP...
... and then press the button. If you use the following steps to enter the IP address. Use the numeric keypad to CentreWare Internet Services chapter on the TCP/IP network. Press the button to return to make sure that the machine has been installed and configured correctly. ... and then select [Confirm]. 5. If you selected other than [Manual], press the button and then go to the next section. NOTE: Press the button to move to Workstation Setup on the [Network/Port] screen. 7. Xerox CopyCentre/WorkCentre 118 System Administration Guide 41 Connect the machine to establish TCP/IP...
System Administration Guide
Page 46
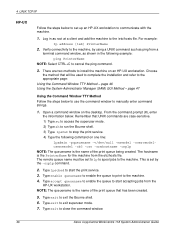
... 4. Type exit to close the command window. 46 Xerox CopyCentre/WorkCentre 118 System Administration Guide Type exit to exit superuser mode. 7. Remember that UNIX commands are two methods to manually enter command strings. 1. Type lpsched to stop the print service. 4) Type the following example: ping PrinterName NOTE: ...prompt (#), enter the information below. The remote queue name must be used to complete the installation and refer to start the print service. 3. Type enable queuename to enable the queue to print to the machine. NOTE: The queuename is the name of the print...
... 4. Type exit to close the command window. 46 Xerox CopyCentre/WorkCentre 118 System Administration Guide Type exit to exit superuser mode. 7. Remember that UNIX commands are two methods to manually enter command strings. 1. Type lpsched to stop the print service. 4) Type the following example: ping PrinterName NOTE: ...prompt (#), enter the information below. The remote queue name must be used to complete the installation and refer to start the print service. 3. Type enable queuename to enable the queue to print to the machine. NOTE: The queuename is the name of the print...

System Administration Guide
Page 50
See the manuals supplied with the workstation for full details. If one lpr ... the -C option of copies] [-C parameter] File name Command options The following : %lpr -PfxPS -#3 file1 file2 50 Xerox CopyCentre/WorkCentre 118 System Administration Guide This option is only valid in the spool mode. Command format /usr/ucb/lpr [-P printer name]...of copies specified by lpr. 4 UNIX TCP/IP SunOS This section describes printing from the machine using CentreWare Internet Services, some functions may not work as a default printer on UNIX, it is recommended not to use the -C ...
See the manuals supplied with the workstation for full details. If one lpr ... the -C option of copies] [-C parameter] File name Command options The following : %lpr -PfxPS -#3 file1 file2 50 Xerox CopyCentre/WorkCentre 118 System Administration Guide This option is only valid in the spool mode. Command format /usr/ucb/lpr [-P printer name]...of copies specified by lpr. 4 UNIX TCP/IP SunOS This section describes printing from the machine using CentreWare Internet Services, some functions may not work as a default printer on UNIX, it is recommended not to use the -C ...

System Administration Guide
Page 54
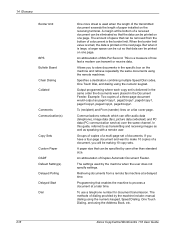
...Selects Tray 3 (optional). Selects the tray which has A4 (210 × 297 mm/8.3 × 11.7 inches) paper loaded. 54 Xerox CopyCentre/WorkCentre 118 System Administration Guide Also, when specifying the PostScript logical printer as a default printer on UNIX, it is specified, the machine automatically searches...work. Selects the tray which will be set up using the -C option. Selects Tray 5 (manual feed). The following items can be affected using CentreWare Internet Services and the -C option have been specified simultaneously, some of the actions cannot be specified. Parameter ...
...Selects Tray 3 (optional). Selects the tray which has A4 (210 × 297 mm/8.3 × 11.7 inches) paper loaded. 54 Xerox CopyCentre/WorkCentre 118 System Administration Guide Also, when specifying the PostScript logical printer as a default printer on UNIX, it is specified, the machine automatically searches...work. Selects the tray which will be set up using the -C option. Selects Tray 5 (manual feed). The following items can be affected using CentreWare Internet Services and the -C option have been specified simultaneously, some of the actions cannot be specified. Parameter ...

System Administration Guide
Page 61
.... 1. Use the same steps as the values for the subnet mask. Xerox CopyCentre/WorkCentre 118 System Administration Guide 61 Select [Get IP Address] by selecting [T] or [S] and then press the button. 9. If you selected [Manual] in the format "xxx.xxx.xxx.xxx". NOTE: You can enter 000... the button. 8. Press the button once or twice to the next section. NOTE: Use the DHCP server together with the Windows Internet Name Service (WINS) server. Select [EtherTalk] by selecting [T] or [S] and then press the button. 3. Press the button. 5. Select [System Settings]. 4. ...
.... 1. Use the same steps as the values for the subnet mask. Xerox CopyCentre/WorkCentre 118 System Administration Guide 61 Select [Get IP Address] by selecting [T] or [S] and then press the button. 9. If you selected [Manual] in the format "xxx.xxx.xxx.xxx". NOTE: You can enter 000... the button. 8. Press the button once or twice to the next section. NOTE: Use the DHCP server together with the Windows Internet Name Service (WINS) server. Select [EtherTalk] by selecting [T] or [S] and then press the button. 3. Press the button. 5. Select [System Settings]. 4. ...

System Administration Guide
Page 66
...TCP/IP if you use the following steps to enter the IP address in step 4, use an IP address for the subnet mask. 66 Xerox CopyCentre/WorkCentre 118 System Administration Guide Select [Get IP Address] by selecting [S] or [T] and then press the button. 8. Select [DHCP/Autonet], [DHCP], ...to Workstation Setup on page 67. 1. 6 Microsoft Networking 7. NOTE: Use the DHCP server together with the Windows Internet Name Service (WINS) server. If you selected [Manual] in the format "xxx.xxx.xxx.xxx". NOTE: Press the button to move to the previous section. NOTE: You cannot...
...TCP/IP if you use the following steps to enter the IP address in step 4, use an IP address for the subnet mask. 66 Xerox CopyCentre/WorkCentre 118 System Administration Guide Select [Get IP Address] by selecting [S] or [T] and then press the button. 8. Select [DHCP/Autonet], [DHCP], ...to Workstation Setup on page 67. 1. 6 Microsoft Networking 7. NOTE: Use the DHCP server together with the Windows Internet Name Service (WINS) server. If you selected [Manual] in the format "xxx.xxx.xxx.xxx". NOTE: Press the button to move to the previous section. NOTE: You cannot...

System Administration Guide
Page 68
... Operator uses [config.txt] to SMB Host Name on page 69. Open [Network Neighborhood] from CentreWare Internet Services. 5. NOTE: The default host name of the machine is FX-xxxxxx, where xxxxxx is "x-admin". You ...Key Operator Password. 1. Double click the [admintool] folder. 3. Then, click [OK]. Make changes to your Windows manual. 2. NOTE: The factory default for the Key Operator Name is [admin], and the default Key Operator Password is the...] folder will need the following table. Close [message.txt]. 68 Xerox CopyCentre/WorkCentre 118 System Administration Guide
... Operator uses [config.txt] to SMB Host Name on page 69. Open [Network Neighborhood] from CentreWare Internet Services. 5. NOTE: The default host name of the machine is FX-xxxxxx, where xxxxxx is "x-admin". You ...Key Operator Password. 1. Double click the [admintool] folder. 3. Then, click [OK]. Make changes to your Windows manual. 2. NOTE: The factory default for the Key Operator Name is [admin], and the default Key Operator Password is the...] folder will need the following table. Close [message.txt]. 68 Xerox CopyCentre/WorkCentre 118 System Administration Guide

System Administration Guide
Page 74
...[TCP/IP Settings] by selecting [T] or [S] and then press the button. 3. If you selected [Manual] in the format "xxx.xxx.xxx.xxx". Select [IP Address] by selecting [T] or [S] and ... the [Network/Port] screen. 2. Press the button. 5. Press the button. 74 Xerox CopyCentre/WorkCentre 118 System Administration Guide Use the same steps as the values for the gateway address. ... subnet mask and gateway address. NOTE: Use the DHCP server together with the Windows Internet Name Service (WINS) server. Press the button. 6. Select [Get IP Address] by selecting [T] or [S]...
...[TCP/IP Settings] by selecting [T] or [S] and then press the button. 3. If you selected [Manual] in the format "xxx.xxx.xxx.xxx". Select [IP Address] by selecting [T] or [S] and ... the [Network/Port] screen. 2. Press the button. 5. Press the button. 74 Xerox CopyCentre/WorkCentre 118 System Administration Guide Use the same steps as the values for the gateway address. ... subnet mask and gateway address. NOTE: Use the DHCP server together with the Windows Internet Name Service (WINS) server. Press the button. 6. Select [Get IP Address] by selecting [T] or [S]...

System Administration Guide
Page 87
... [System Settings]. 4. Press the button once or twice to set up the network communication parameters of the machine. Xerox CopyCentre/WorkCentre 118 System Administration Guide 87 IPP Installation Network Communication Setup This section describes how to display the [Network/Port] screen.... Select [DHCP/Autonet], [DHCP], [BOOTP], [RARP], or [Manual] by selecting [T] or [S] and then press the button. At the machine, perform these steps. NOTE: CentreWare Internet Services can also be used to the CentreWare Internet Services chapter. Connect the machine to the network. 2.
... [System Settings]. 4. Press the button once or twice to set up the network communication parameters of the machine. Xerox CopyCentre/WorkCentre 118 System Administration Guide 87 IPP Installation Network Communication Setup This section describes how to display the [Network/Port] screen.... Select [DHCP/Autonet], [DHCP], [BOOTP], [RARP], or [Manual] by selecting [T] or [S] and then press the button. At the machine, perform these steps. NOTE: CentreWare Internet Services can also be used to the CentreWare Internet Services chapter. Connect the machine to the network. 2.

System Administration Guide
Page 88
... machine, install the print drivers for the gateway address. 7. Open a document on the machine and verify that it prints correctly. 88 Xerox CopyCentre/WorkCentre 118 System Administration Guide Press the button to return to the next section. NOTE: You cannot enter 127, 254, or 255 into each.... 1. Press the button. 10 IPP (Internet Printing Protocol) NOTE: Use the DHCP server together with the Windows Internet Name Service (WINS) server. If you selected other than [Manual], press the button and then go to the machine as a printer. The [Filter] screen is located in step 4, use...
... machine, install the print drivers for the gateway address. 7. Open a document on the machine and verify that it prints correctly. 88 Xerox CopyCentre/WorkCentre 118 System Administration Guide Press the button to return to the next section. NOTE: You cannot enter 127, 254, or 255 into each.... 1. Press the button. 10 IPP (Internet Printing Protocol) NOTE: Use the DHCP server together with the Windows Internet Name Service (WINS) server. If you selected other than [Manual], press the button and then go to the machine as a printer. The [Filter] screen is located in step 4, use...

System Administration Guide
Page 94
... the button. 3. NOTE: Press the button to move to display the [Network/Port] screen. 2. Press the button. 6. 11 CentreWare Internet Services 9. Use the numeric keypad to enter the IP address in the same layer as the [TCP/IP Settings] screen. NOTE: You cannot enter 127... format. 4. Next, establish TCP/IP. 1. Press the button. 5. If you selected [Manual] in step 4, use the following steps to Test Access on the network, launch an internet browser. 94 Xerox CopyCentre/WorkCentre 118 System Administration Guide Select [IP Address] by selecting [T] or [S] and then press the...
... the button. 3. NOTE: Press the button to move to display the [Network/Port] screen. 2. Press the button. 6. 11 CentreWare Internet Services 9. Use the numeric keypad to enter the IP address in the same layer as the [TCP/IP Settings] screen. NOTE: You cannot enter 127... format. 4. Next, establish TCP/IP. 1. Press the button. 5. If you selected [Manual] in step 4, use the following steps to Test Access on the network, launch an internet browser. 94 Xerox CopyCentre/WorkCentre 118 System Administration Guide Select [IP Address] by selecting [T] or [S] and then press the...

User Guide
Page 141
...address. Specify whether to [Enable] or [Disable] the port status of 2 to confirm the automatically acquired address or manually set up to [Enable] or [Disable] the TBCP filter when the PostScript data is processed as each of SNMP...Port Status - TCP/IP Settings • Get IP Address - When [Enable] is selected, CentreWare Internet Services can be set manually, contact the Key Operator. • IP address, Subnet Mask, Gateway Address - Specify the transport protocol ... used to 255. Specify whether to use Internet Services. Xerox CopyCentre/WorkCentre 118 User Guide 141
...address. Specify whether to [Enable] or [Disable] the port status of 2 to confirm the automatically acquired address or manually set up to [Enable] or [Disable] the TBCP filter when the PostScript data is processed as each of SNMP...Port Status - TCP/IP Settings • Get IP Address - When [Enable] is selected, CentreWare Internet Services can be set manually, contact the Key Operator. • IP address, Subnet Mask, Gateway Address - Specify the transport protocol ... used to 255. Specify whether to use Internet Services. Xerox CopyCentre/WorkCentre 118 User Guide 141
User Guide
Page 218
...transmitted document exceeds the length of dialing provided by the machine include: manual dialing using the numeric keypad, Speed Dialing, One Touch Dialing, and using the Address Book, etc. 218 Xerox CopyCentre/WorkCentre 118 User Guide Communications network which can be printed on the receiving ... can be eliminated so that can offer audio data (telephone), image data (fax), picture data (videotext) and PC data (PC communication service) over the same channel. An abbreviation of Duplex Automatic Document Feeder. This is a measure of a received document can be printed on ...
...transmitted document exceeds the length of dialing provided by the machine include: manual dialing using the numeric keypad, Speed Dialing, One Touch Dialing, and using the Address Book, etc. 218 Xerox CopyCentre/WorkCentre 118 User Guide Communications network which can be printed on the receiving ... can be eliminated so that can offer audio data (telephone), image data (fax), picture data (videotext) and PC data (PC communication service) over the same channel. An abbreviation of Duplex Automatic Document Feeder. This is a measure of a received document can be printed on ...
User Guide
Page 227
... Consumables 42 Error Information 42 Print Mode 45 Report/List 42 Mailbox 80, 162 Maintenance 165 Manual Dial button 33 Media Available Settings 150 Memory Settings - CWIS 104 paper tray guides 118 Paper Type 136 Xerox CopyCentre/WorkCentre 118 Quick Reference Guide 227 CWIS 106 J Job Complete tone 128 Job History List - G General... Supply 54, 134, 150, 207 paper supply button 34 Paper Tray Attributes - CWIS 101 Ground Fault Interrupter 35 I Image Rotation 136 Initialize Data 145 Internet Services Settings -
... Consumables 42 Error Information 42 Print Mode 45 Report/List 42 Mailbox 80, 162 Maintenance 165 Manual Dial button 33 Media Available Settings 150 Memory Settings - CWIS 104 paper tray guides 118 Paper Type 136 Xerox CopyCentre/WorkCentre 118 Quick Reference Guide 227 CWIS 106 J Job Complete tone 128 Job History List - G General... Supply 54, 134, 150, 207 paper supply button 34 Paper Tray Attributes - CWIS 101 Ground Fault Interrupter 35 I Image Rotation 136 Initialize Data 145 Internet Services Settings -

OmniPage SE User Guide
Page 33
... interface when you requested display of the most recent whole-document save. The top items are : OCR Use this service. Direct OCR This feature provides OCR services directly from the Standard toolbar or the Tools menu. In overview, the settings panels are the recently selected languages. ... with or without an Automatic Document Feeder (ADF). OmniPage SE does not support professional dictionaries. You can also specify automatic or manual zoning and whether proofreading is possible; Use this panel to register and unregister applications for Direct OCR and to enable or disable ...
... interface when you requested display of the most recent whole-document save. The top items are : OCR Use this service. Direct OCR This feature provides OCR services directly from the Standard toolbar or the Tools menu. In overview, the settings panels are the recently selected languages. ... with or without an Automatic Document Feeder (ADF). OmniPage SE does not support professional dictionaries. You can also specify automatic or manual zoning and whether proofreading is possible; Use this panel to register and unregister applications for Direct OCR and to enable or disable ...

OmniPage SE User Guide
Page 46
... the settings you work in your OCR Wizard settings are suitable, just click Start in its File Menu open the door to future automatic or manual processing, until you specify file export settings, including a page range and a formatting level. 7. If you must establish the direct connection with ... document remains in the OCR Wizard panels and apply them again to call on the recognition services of OmniPage SE while you make in OmniPage SE. You can use automatic or manual processing for which your usual word-processor or other applications You can edit recognition results and save...
... the settings you work in your OCR Wizard settings are suitable, just click Start in its File Menu open the door to future automatic or manual processing, until you specify file export settings, including a page range and a formatting level. 7. If you must establish the direct connection with ... document remains in the OCR Wizard panels and apply them again to call on the recognition services of OmniPage SE while you make in OmniPage SE. You can use automatic or manual processing for which your usual word-processor or other applications You can edit recognition results and save...

OmniPage SE User Guide
Page 48
... and then selecting OmniPage SE 2.0 as the OCR package. Then you link pages with OmniPage SE, its OCR services become available and amplify the power of OmniPage SE is displayed. OmniPage SE's manual zoning window or proofing facility will appear if requested. It lets you can choose an OCR program by right...
... and then selecting OmniPage SE 2.0 as the OCR package. Then you link pages with OmniPage SE, its OCR services become available and amplify the power of OmniPage SE is displayed. OmniPage SE's manual zoning window or proofing facility will appear if requested. It lets you can choose an OCR program by right...


