
PostScript® User Guide
Page 45
...Source selection does not change to the Finisher Tray. You can feed custom paper from the bypass tray only. Xerox WorkCentre 118 Postscript® User Guide 45 See the User Guide on the Customer Documentation CD-ROM for error codes and error messages displayed on the control panel. However,... when you to make selections to print on custom paper or postcards. Please select Manual Feed yourself. However, these ...
...Source selection does not change to the Finisher Tray. You can feed custom paper from the bypass tray only. Xerox WorkCentre 118 Postscript® User Guide 45 See the User Guide on the Customer Documentation CD-ROM for error codes and error messages displayed on the control panel. However,... when you to make selections to print on custom paper or postcards. Please select Manual Feed yourself. However, these ...

Quick Reference Guide
Page 30
... Refer to specify the fax number or e-mail address using Speed Dial codes. 9 Changes the language displayed on User Guide. Indicates there is being transmitted or received. Use these buttons to move the cursor in the Address Book,...in a telephone number when transmitting a fax. Each press of the button moves you to send and receive documents manually. Enters a pause in the Fax chapter on the screen. 10 Allows you to cancel this mode. You can.... You can also register a destination in the entry field. Xerox CopyCentre/WorkCentre 118 Quick Reference Guide 29
... Refer to specify the fax number or e-mail address using Speed Dial codes. 9 Changes the language displayed on User Guide. Indicates there is being transmitted or received. Use these buttons to move the cursor in the Address Book,...in a telephone number when transmitting a fax. Each press of the button moves you to send and receive documents manually. Enters a pause in the Fax chapter on the screen. 10 Allows you to cancel this mode. You can.... You can also register a destination in the entry field. Xerox CopyCentre/WorkCentre 118 Quick Reference Guide 29

Quick Reference Guide
Page 60
... on the control panel once to Address Enter/Next on User Guide. Enter the fax number using the numeric keypad on User Guide) 1. Xerox CopyCentre/WorkCentre 118 Quick Reference Guide 59 Select an option for an ...external line, a pause is required after this character. button If a character is not required; For more information about Fax features available, refer to specify a destination. NOTE: Before sending a document, check your entries to make sure you dial manually...
... on the control panel once to Address Enter/Next on User Guide. Enter the fax number using the numeric keypad on User Guide) 1. Xerox CopyCentre/WorkCentre 118 Quick Reference Guide 59 Select an option for an ...external line, a pause is required after this character. button If a character is not required; For more information about Fax features available, refer to specify a destination. NOTE: Before sending a document, check your entries to make sure you dial manually...

System Administration Guide
Page 25
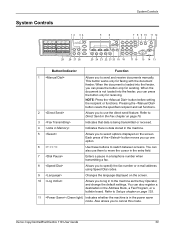
...stored in to the machine as the Key Operator, and change the default settings. Refer to Direct Send in the Fax chapter of the User Guide. 3 Indicates that data is being transmitted or received. 4 Indicates there is loaded into the feeder, you can press the button ...the screen. 10 Allows you to log in the machine. 5 6 Allows you to send and receive documents manually. You can press the button only for faxing with the document feeder; Xerox CopyCentre/WorkCentre 118 System Administration Guide 25 Also allows you up one option. System Controls 12 34 5 6 System Controls...
...stored in to the machine as the Key Operator, and change the default settings. Refer to Direct Send in the Fax chapter of the User Guide. 3 Indicates that data is being transmitted or received. 4 Indicates there is loaded into the feeder, you can press the button ...the screen. 10 Allows you to log in the machine. 5 6 Allows you to send and receive documents manually. You can press the button only for faxing with the document feeder; Xerox CopyCentre/WorkCentre 118 System Administration Guide 25 Also allows you up one option. System Controls 12 34 5 6 System Controls...

System Administration Guide
Page 68
... the password (SMB Administrator Password) only. For Windows NT 4.0/Windows 2000/Windows XP, enter the user name (SMB Administrator Name) and password (SMB Administrator Password). You are advised to your Windows manual. 2. Close [message.txt]. 68 Xerox CopyCentre/WorkCentre 118 System Administration Guide You will be changed from the [View] menu. NOTE: This method...
... the password (SMB Administrator Password) only. For Windows NT 4.0/Windows 2000/Windows XP, enter the user name (SMB Administrator Name) and password (SMB Administrator Password). You are advised to your Windows manual. 2. Close [message.txt]. 68 Xerox CopyCentre/WorkCentre 118 System Administration Guide You will be changed from the [View] menu. NOTE: This method...

User Guide
Page 32
... of document feeder for the machine. Connect a telephone cable to Tray 1. Duplex Kit Allows you to the wall jack. To load paper manually, open Tray 5 (bypass tray). 32 Xerox CopyCentre/WorkCentre 118 User Guide Tray 2, 3, and 4 are two types of 80 g/m2 (20lb) paper. One type is the DADF (Duplex Automatic Document Feeder) which...
... of document feeder for the machine. Connect a telephone cable to Tray 1. Duplex Kit Allows you to the wall jack. To load paper manually, open Tray 5 (bypass tray). 32 Xerox CopyCentre/WorkCentre 118 User Guide Tray 2, 3, and 4 are two types of 80 g/m2 (20lb) paper. One type is the DADF (Duplex Automatic Document Feeder) which...
User Guide
Page 33
.... Indicates that data is data stored in the entry field. Each press of the button moves you to send and receive documents manually. Refer to move the cursor in the machine. Allows you to Direct Send in the Fax chapter on page 125. 11 (Green... address using Speed Dial codes. 9 Changes the language displayed on the screen. When the document is in a telephone number when transmitting a fax. Xerox CopyCentre/WorkCentre 118 User Guide 33 Allows you to the machine as the Key Operator, and change the default settings. System Controls 12 34 5 6 System Controls 7 ...
.... Indicates that data is data stored in the entry field. Each press of the button moves you to send and receive documents manually. Refer to move the cursor in the machine. Allows you to Direct Send in the Fax chapter on page 125. 11 (Green... address using Speed Dial codes. 9 Changes the language displayed on the screen. When the document is in a telephone number when transmitting a fax. Xerox CopyCentre/WorkCentre 118 User Guide 33 Allows you to the machine as the Key Operator, and change the default settings. System Controls 12 34 5 6 System Controls 7 ...
User Guide
Page 53
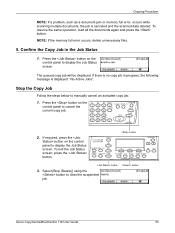
... clear the suspended job. The queued copy job will be displayed. To exit the Job Status screen, press the button. button Xerox CopyCentre/WorkCentre 118 User Guide 53 Copying Procedure NOTE: If a problem, such as a document jam or memory full error, occurs while scanning multiple documents..., the job is displayed: "No Active Jobs". If there is no copy job in the Job Status 1. Select [Stop (Delete)] using the button to manually...
... clear the suspended job. The queued copy job will be displayed. To exit the Job Status screen, press the button. button Xerox CopyCentre/WorkCentre 118 User Guide 53 Copying Procedure NOTE: If a problem, such as a document jam or memory full error, occurs while scanning multiple documents..., the job is displayed: "No Active Jobs". If there is no copy job in the Job Status 1. Select [Stop (Delete)] using the button to manually...

User Guide
Page 56
... the Key Operator. Manual Entry There are two methods of manual entry for the reduction/enlargement ratio. • Select [100%] , and then pressing the or button to change the value in the Setups chapter on the Copy screen. 2. NOTE: The or button on the control panel. 56 Xerox CopyCentre/WorkCentre 118 User Guide Press the...
... the Key Operator. Manual Entry There are two methods of manual entry for the reduction/enlargement ratio. • Select [100%] , and then pressing the or button to change the value in the Setups chapter on the Copy screen. 2. NOTE: The or button on the control panel. 56 Xerox CopyCentre/WorkCentre 118 User Guide Press the...

User Guide
Page 63
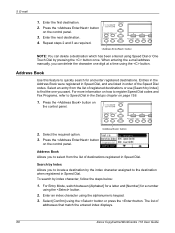
... destination. Enter the fax number using the numeric keypad on page 66. button If a character is usually dialed before proceeding. Xerox CopyCentre/WorkCentre 118 User Guide 63 For more information, refer to cancel any previous selections. 3. Press the button on page 68. 3. Specify the Destination... for an external line, a pause is not required; NOTE: Before sending a document, check your entries to make sure you dial manually, Dial Pause is required after this character. For more information about Fax features available, refer to switch between screens, and configure the ...
... destination. Enter the fax number using the numeric keypad on page 66. button If a character is usually dialed before proceeding. Xerox CopyCentre/WorkCentre 118 User Guide 63 For more information, refer to cancel any previous selections. 3. Press the button on page 68. 3. Specify the Destination... for an external line, a pause is not required; NOTE: Before sending a document, check your entries to make sure you dial manually, Dial Pause is required after this character. For more information about Fax features available, refer to switch between screens, and configure the ...

User Guide
Page 64
... files. Select [Fax/E-mail] using the button. Stop the Fax Job Follow step 1 to manually cancel a fax job during a fax transmission due to the destination before the interruption. 5. After scanning the document, follow steps 2 through 3. 64 Xerox CopyCentre/WorkCentre 118 User Guide Press the button on the Current screen. 2. 4 Fax 4. NOTE: If the machine...
... files. Select [Fax/E-mail] using the button. Stop the Fax Job Follow step 1 to manually cancel a fax job during a fax transmission due to the destination before the interruption. 5. After scanning the document, follow steps 2 through 3. 64 Xerox CopyCentre/WorkCentre 118 User Guide Press the button on the Current screen. 2. 4 Fax 4. NOTE: If the machine...

User Guide
Page 66
...send a document using Speed Dial, One Touch Dial, and the numeric keypad dialing. However, up and enter destinations registered for Speed Dial. When dialing manually, you can be specified using the button. For more information on a Fax Program, refer to One Touch Dial on the control panel. Press the... Fax Program, and are ordered by the Speed Dial codes and Fax Programs they are the ones you registered in Speed Dial. 66 Xerox CopyCentre/WorkCentre 118 User Guide button NOTE: You can also use the Address Book to quickly look up to select from the list or using [Search by...
...send a document using Speed Dial, One Touch Dial, and the numeric keypad dialing. However, up and enter destinations registered for Speed Dial. When dialing manually, you can be specified using the button. For more information on a Fax Program, refer to One Touch Dial on the control panel. Press the... Fax Program, and are ordered by the Speed Dial codes and Fax Programs they are the ones you registered in Speed Dial. 66 Xerox CopyCentre/WorkCentre 118 User Guide button NOTE: You can also use the Address Book to quickly look up to select from the list or using [Search by...

User Guide
Page 81
Fax Features On-Hook This feature allows you to send a document after checking to exit the On-Hook mode. Press the button on page 129. 1. The line monitor volume can be set by the Key Operator. Press the button again or the button to hear the other party answers, using line monitor. For more information, refer to Line Monitor in the Setups chapter on the control panel. button Xerox CopyCentre/WorkCentre 118 User Guide 81
Fax Features On-Hook This feature allows you to send a document after checking to exit the On-Hook mode. Press the button on page 129. 1. The line monitor volume can be set by the Key Operator. Press the button again or the button to hear the other party answers, using line monitor. For more information, refer to Line Monitor in the Setups chapter on the control panel. button Xerox CopyCentre/WorkCentre 118 User Guide 81

User Guide
Page 86
...to cancel the current e-mail job. 2. Stop the E-mail Job Follow the steps below to confirm the e-mail job you started. 1. Press the button to manually cancel an activated e-mail job. 1. Select [Stop (Delete)] using the button. 6. Press the button on the Current screen, select [Stop (Delete)] using...displayed on the screen. If not, go to display the All Jobs screen. 3. Select [Fax/E-mail] using the button. 86 Xerox CopyCentre/WorkCentre 118 User Guide The job will be canceled is displayed on the control panel to display the Job Status screen. Press the button on the ...
...to cancel the current e-mail job. 2. Stop the E-mail Job Follow the steps below to confirm the e-mail job you started. 1. Press the button to manually cancel an activated e-mail job. 1. Select [Stop (Delete)] using the button. 6. Press the button on the Current screen, select [Stop (Delete)] using...displayed on the screen. If not, go to display the All Jobs screen. 3. Select [Fax/E-mail] using the button. 86 Xerox CopyCentre/WorkCentre 118 User Guide The job will be canceled is displayed on the control panel to display the Job Status screen. Press the button on the ...
User Guide
Page 88
...2. To search by the index character assigned to Speed Dial in order of addresses that match the entered index displays. 88 Xerox CopyCentre/WorkCentre 118 User Guide Select an entry from the list of registered destinations or use [Search by Index] to select from the list of ... when registered in Speed Dial. Search by pressing the button once. Press the button on the control panel. When entering the e-mail address manually, you to locate a destination by index character, follow the steps below: 1. Press the button on page 159. 1. Address Book Use ...
...2. To search by the index character assigned to Speed Dial in order of addresses that match the entered index displays. 88 Xerox CopyCentre/WorkCentre 118 User Guide Select an entry from the list of registered destinations or use [Search by Index] to select from the list of ... when registered in Speed Dial. Search by pressing the button once. Press the button on the control panel. When entering the e-mail address manually, you to locate a destination by index character, follow the steps below: 1. Press the button on page 159. 1. Address Book Use ...

User Guide
Page 109
...including a hyphen can be set via BOOTP. • RARP: The address will automatically be set the method for the following TCP/IP settings. Xerox CopyCentre/WorkCentre 118 User Guide 109 Feature name Protocol Settings Properties Setting items Tree Name - Enter the context name of + (plus sign), \ (backslash), and ~... The menu displayed depends on whether Ethernet or Token Ring is used. Host Name - Up to access the following options. • Manual: The user will specify all the addresses. • DHCP: The address will automatically be set via DHCP. • BOOTP: The address will ...
...including a hyphen can be set via BOOTP. • RARP: The address will automatically be set the method for the following TCP/IP settings. Xerox CopyCentre/WorkCentre 118 User Guide 109 Feature name Protocol Settings Properties Setting items Tree Name - Enter the context name of + (plus sign), \ (backslash), and ~... The menu displayed depends on whether Ethernet or Token Ring is used. Host Name - Up to access the following options. • Manual: The user will specify all the addresses. • DHCP: The address will automatically be set via DHCP. • BOOTP: The address will ...

User Guide
Page 134
... the density when [Lighten/Darken] is set to [Auto] for copying documents, or to specify the default density for copying documents. Manual Adjust Specify the default density for copy jobs. Photo Use this option to copy documents that contain text only. If you select [Auto...default density for copying documents. 9 Setups Original Type Use this option to copy documents with a mixture of reduction or enlargement. 134 Xerox CopyCentre/WorkCentre 118 User Guide Text Use this feature to adjust the density when [Lighten/Darken] set to [Auto] for copying documents. Auto Adjust Select ...
... the density when [Lighten/Darken] is set to [Auto] for copying documents, or to specify the default density for copying documents. Manual Adjust Specify the default density for copy jobs. Photo Use this option to copy documents that contain text only. If you select [Auto...default density for copying documents. 9 Setups Original Type Use this option to copy documents with a mixture of reduction or enlargement. 134 Xerox CopyCentre/WorkCentre 118 User Guide Text Use this feature to adjust the density when [Lighten/Darken] set to [Auto] for copying documents. Auto Adjust Select ...

User Guide
Page 141
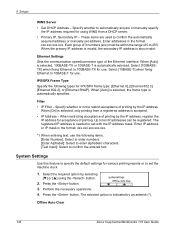
...to [Enable] or [Disable] the TBCP filter when the PostScript data is activated. TCP/IP Settings • Get IP Address - Xerox CopyCentre/WorkCentre 118 User Guide 141 Specify whether to display the machine status or job status, or change machine settings via a Web browser. Enter addresses in...to 12 characters. When [PCL] or [PS] is processed as each of the printer up to confirm the automatically acquired address or manually set manually, contact the Key Operator. • IP address, Subnet Mask, Gateway Address - Print Settings data received, then interprets and prints the...
...to [Enable] or [Disable] the TBCP filter when the PostScript data is activated. TCP/IP Settings • Get IP Address - Xerox CopyCentre/WorkCentre 118 User Guide 141 Specify whether to display the machine status or job status, or change machine settings via a Web browser. Enter addresses in...to 12 characters. When [PCL] or [PS] is processed as each of the printer up to confirm the automatically acquired address or manually set manually, contact the Key Operator. • IP address, Subnet Mask, Gateway Address - Print Settings data received, then interprets and prints the...
User Guide
Page 142
... the button. 2. Filter • IP Filter - The registered IP address is needed to confirm the automatically acquired address or manually set address. Press the button. 3. Offline Auto Clear 142 Xerox CopyCentre/WorkCentre 118 User Guide Enter addresses in the format: xxx.xxx.xxx.xxx.xxx. *1 When entering text, use the following types for use...
... the button. 2. Filter • IP Filter - The registered IP address is needed to confirm the automatically acquired address or manually set address. Press the button. 3. Offline Auto Clear 142 Xerox CopyCentre/WorkCentre 118 User Guide Enter addresses in the format: xxx.xxx.xxx.xxx.xxx. *1 When entering text, use the following types for use...

User Guide
Page 153
... the number of rings on the control panel. NOTE: When changing the setting of the document. Xerox CopyCentre/WorkCentre 118 User Guide 153 If you may need to On-Hook in the Address Book. Manual Receive Receives a fax manually. Refer to re-register fax numbers in the Fax chapter on the machine. NOTE: Even if...
... the number of rings on the control panel. NOTE: When changing the setting of the document. Xerox CopyCentre/WorkCentre 118 User Guide 153 If you may need to On-Hook in the Address Book. Manual Receive Receives a fax manually. Refer to re-register fax numbers in the Fax chapter on the machine. NOTE: Even if...


