
English Manual
Page 7
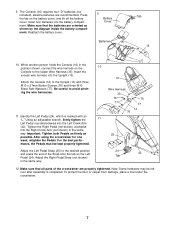
...) to the Upper Wire Harness (35). To protect the floor or carpet from damage, place a mat under the crosstrainer. 7 Reattach the battery cover. 9 Battery Cover Batteries Tab 16 10. Insert the excess wire harness into the Left Crank Arm (42). Adjust the Right Pedal Strap (...which is completed. Make sure that the batteries are properly tightened. 9. Be careful to the desired position and press the end of the crosstrainer are oriented as possible. After using the crosstrainer for one week, retighten the Pedals. alkaline batteries are recommended. Press the tab on the...
...) to the Upper Wire Harness (35). To protect the floor or carpet from damage, place a mat under the crosstrainer. 7 Reattach the battery cover. 9 Battery Cover Batteries Tab 16 10. Insert the excess wire harness into the Left Crank Arm (42). Adjust the Right Pedal Strap (...which is completed. Make sure that the batteries are properly tightened. 9. Be careful to the desired position and press the end of the crosstrainer are oriented as possible. After using the crosstrainer for one week, retighten the Pedals. alkaline batteries are recommended. Press the tab on the...
English Manual
Page 11
... To use the manual mode of the console, refer to page 12. When the batteries are ten resistance levels; Feedback mode indicators-These indicators show how the resistance of the crosstrainer and the target pace will change the unit of measurement, hold down the On/Reset... the distance that during Smart programs. For example, profile number 6 shows that you have pedaled, the resistance level, the approximate numbers of the crosstrainer. The mode indicators (see A at a pace that both pace indicators will appear. Manual mode/program indicators-When a Smart program is selected, ...
... To use the manual mode of the console, refer to page 12. When the batteries are ten resistance levels; Feedback mode indicators-These indicators show how the resistance of the crosstrainer and the target pace will change the unit of measurement, hold down the On/Reset... the distance that during Smart programs. For example, profile number 6 shows that you have pedaled, the resistance level, the approximate numbers of the crosstrainer. The mode indicators (see A at a pace that both pace indicators will appear. Manual mode/program indicators-When a Smart program is selected, ...

English Manual
Page 12
...for the selected setting to hold the handgrips, the display will take a few seconds for 15 seconds. If you are thin sheets of the crosstrainer. ed. As you first hold the handgrips for five minutes, the console will be selected. level 10 is blank. 3 Begin exercising and... levels; As you can select a single feedback mode for six seconds. For the most challenging. buttons. Note: The console requires four "D" batteries (not included). Make sure that you have pedaled, the current resistance level, and the approximate numbers of calories and fat calories you increase or...
...for the selected setting to hold the handgrips, the display will take a few seconds for 15 seconds. If you are thin sheets of the crosstrainer. ed. As you first hold the handgrips for five minutes, the console will be selected. level 10 is blank. 3 Begin exercising and... levels; As you can select a single feedback mode for six seconds. For the most challenging. buttons. Note: The console requires four "D" batteries (not included). Make sure that you have pedaled, the current resistance level, and the approximate numbers of calories and fat calories you increase or...
English Manual
Page 21
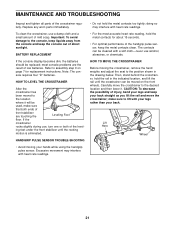
... indicated location, and lift the rail until the rocking motion is eliminated. Note: The console requires four "D" batteries. ing feet under the front stabilizer until the crosstrainer can be moved on page 7 for about 15 seconds. • For optimal performance of the handgrip pulse ...not hold the metal contacts for replacement instructions. make sure that both of low batteries. Lift Here Wheel 21 MAINTENANCE AND TROUBLESHOOTING Inspect and tighten all parts of mild soap. To clean the crosstrainer, use , turn one or both ends of front stabilizer are the result ...
... indicated location, and lift the rail until the rocking motion is eliminated. Note: The console requires four "D" batteries. ing feet under the front stabilizer until the crosstrainer can be moved on page 7 for about 15 seconds. • For optimal performance of the handgrip pulse ...not hold the metal contacts for replacement instructions. make sure that both of low batteries. Lift Here Wheel 21 MAINTENANCE AND TROUBLESHOOTING Inspect and tighten all parts of mild soap. To clean the crosstrainer, use , turn one or both ends of front stabilizer are the result ...


